- How to Zoom In and Out while Screen Recording
- Use Magnifier on Windows for zooming in and out
- Full Screen Recording + Windows Magnifier
- FAQs and Related Essential Tips
- 1. There are two mouse cursors in a recorded video.
- 2. Use the drawing tool while zooming in/out.
- 3. Record the PowerPoint while zooming in/out the screen.
- 4. How to enlarge a specific part in Rectangle on a screen mode.
- How to Zoom in or out on Windows or a Mac
- Make your screen the right size for your eyes
- Zooming in and out on a Mac
- Increase Size in Apps
- Increase Size in Finder
- Configuring Mac Zoom Accessibility Settings
- Configuring Zoom Accessibility Magnifier for Windows
- Better Web Browsing
- No More Squinting!
- windows randomly zoom in and out
- Replies (13)
- Screen zooms in and out on windows 10
- Replies (9)
How to Zoom In and Out while Screen Recording
Use Magnifier on Windows for zooming in and out
Magnifier enlarges part of or all of your screen, making words and images easier to see.
By default, it opens in full screen and will follow your mouse pointer, keyboard entry, text cursor, and narrator cursor. To use Magnifier, press the Windows Logo Key + Plus (+).
If you use Bandicam and the Window Magnifier together, you can easily record while zooming in or out of your computer screen in real time.
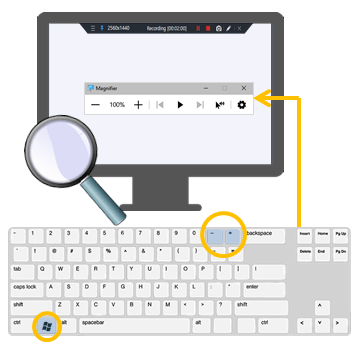
The keyboard shortcuts for Magnifier in Windows
- To turn on : Windows logo key + Plus (+)
- To zoom in or out : Windows logo key + Plus (+), Minus(-)
- To turn off: Windows logo key + Esc
Full Screen Recording + Windows Magnifier
After selecting “Around mouse» or » Fullscreen» mode in Bandicam, you can zoom in and out by using the Windows Magnifier together with Bandicam.
- Download/install Bandicam and choose the Screen Recording Mode.
Select the «Fullscreen» or «Around Mouse: Fullscreen» recording mode in Bandicam.
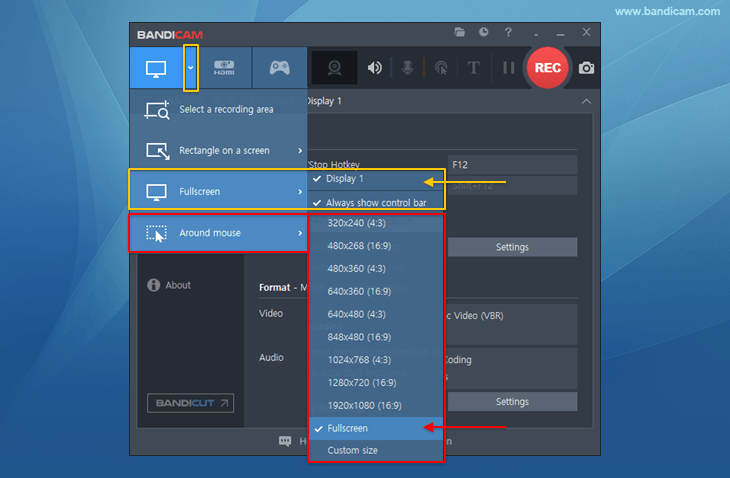
Tips) Advantages of each recording mode
- If you select «Fullscreen — Display 1«, you can use the real-time drawing tool
 .
. - If you select «Around mouse — fullscreen«, you can record the full screen while hiding the recording status bar.
- If you add the Bandicam icon to the taskbar , you can check the recording status while using the full screen recording mode.
 .
.
- Run Window Magnifier and minimize, then press the shortcut key to zoom in or out.
- By using the Windows key and the plus (+) and minus (-) keys, you can enlarge or reduce the computer screen.
- Press the recording start/stop shortcut key (F12) or click the ‘● REC‘ button. ( Shortcut can be changed to other shortcut. )
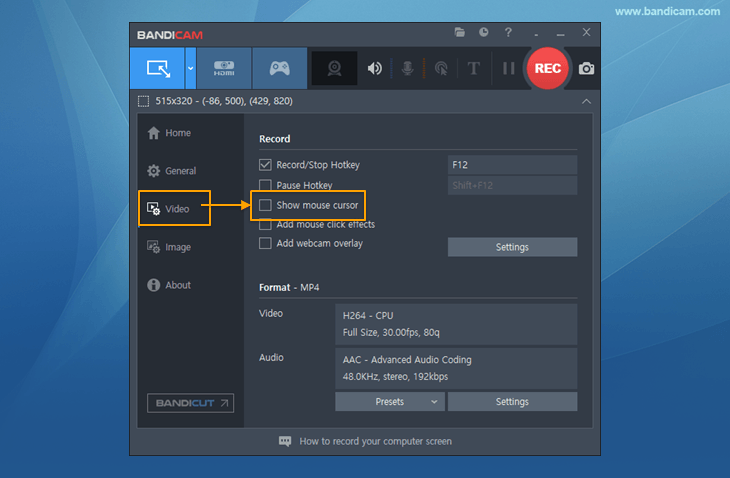
- When using the Windows Magnifier, the ‘Show mouse cursor ‘ option must be unchecked in Bandicam.
FAQs and Related Essential Tips
1. There are two mouse cursors in a recorded video.
If you use the Windows magnifier and the mouse cursor option is checked in Bandicam, you will see two mouse cursors.
Please uncheck the Mouse Cursor option in the Video tab of Bandicam to record with a single mouse cursor.
2. Use the drawing tool while zooming in/out.
If you select the ‘Fullscreen’ recording mode, you can zoom and draw using the magnifier and drawing tools. » See more

3. Record the PowerPoint while zooming in/out the screen.
When recording PowerPoint in full screen recording mode , you can zoom in or out. » See more
4. How to enlarge a specific part in Rectangle on a screen mode.
- You can enlarge a specific part by adjusting the size of the Rectangle window.
- To use this feature, you need to turn off the ‘Use enhanced capture method’ option in Bandicam.

Last Updated on April 16, 2021, 19:00:00 PM
How to Zoom in or out on Windows or a Mac
Make your screen the right size for your eyes
:max_bytes(150000):strip_icc()/susiej20131-5ab94d9e18ba0100378d30cb.jpg)
Sometimes it’s too hard to read the fine print on your computer screen. Whether you’re using a MacBook or a Windows 10 PC, there are some quick and easy ways to zoom in on a portion of your screen, or to enlarge your entire screen.
Whether you’re looking for a way to zoom in on a specific area, or would like your entire screen content to be enlarged, read on to learn how these features work.
Zooming in and out on a Mac
:max_bytes(150000):strip_icc()/zoom-text-mac-5b119bab30371300365e6b12.jpg)
Increase Size in Apps
Increasing text size in many Mac apps can be done from the View menu (found along the top of the screen in the Menu Bar). Typically the feature will be called Zoom In along with a corresponding feature called Zoom Out. This will increase the size of everything within that window. You’ll also notice, next to the menu commands, symbols that show you how to do right from the keyboard. In most apps, you’ll use command++ and command+— to increase or decrease the text size respectively.
Increase Size in Finder
Technically an app like any other app, the Finder works a little differently when it comes to making text and icons bigger.
Open Finder, and Click View from the Menu Bar. At the bottom of the menu, select Show View Options. This will open a pop-up menu with an option to increase text size. Increase the number next to text size. The default is 12 and you can increase up to 16 points. There are other options you can increase, such as the size of the icons.
Configuring Mac Zoom Accessibility Settings
:max_bytes(150000):strip_icc()/ScreenShot2018-04-15at8.32.58PM-5ad7b448c5542e00365956ee.png)
If you need more assistance than just the text being a little bigger, you might need to delve into the Mac’s accessibility settings. This enables you to increase the contents of the screen to a bigger scale as if a magnifying glass was placed over the screen.
You can find Apple’s Zoom Accessibility functions by clicking Apple menu > System Preferences > Accessibility > Zoom.
To zoom the entire screen, rather than a section, select, Zoom Style > Fullscreen.
Or select Zoom Style > Picture in Picture. When using the Picture-in-Picture zoom, a magnifier lens is used, which you can customize within Zoom Settings under Options > Zoom Style.
Enable shortcuts for the Picture-in-Picture Zoom style by pressing Option+Command+8 to bring up a magnifying glass on the page.
Configuring Zoom Accessibility Magnifier for Windows
:max_bytes(150000):strip_icc()/4-5ad7d64c119fa8003670bfea.png)
Windows 10 also has accessibility features for Zoom with a magnifier, which can be found by clicking Start > Settings > Ease of Access > Magnifier and use the toggle under Magnifier.
From here, you can select options:
- Fullscreen.
- Lens View zooms a portion of the screen.
- Docked which leaves the Magnifier anchored to your screen, with portions of the screen magnified in the docking area, while the main part of the screen is unchanged.
If you want instant access to your magnifier when working on your PC, choose from these options to ensure the zoom feature is instantly accessible:
- Start Magnifier automatically after you sign in to your PC.
- Turn on Magnifier for everyone before they sign in to your PC.
- Change tracking options. Choose whether the Magnifier lens follows the mouse pointer, keyboard, the text insertion point, or the Narrator cursor.
You can also customize more zoom setting on your PC, including:
- Zoom level
- Zoom level increment
- Invert colors
- Collapse to magnifying glass icon
- Change the size of the lens.
Additionally, depending on your computer setup, you may also have a Display option to the left, a few options above Magnifier. Here you can set the size of apps and text, which can be very helpful if you’re connecting a laptop to a second monitor.
Better Web Browsing
:max_bytes(150000):strip_icc()/ScreenShot2018-05-25at7.33.13AM-5b07f7491d64040037a88828.png)
You also have the ability to quickly Zoom your web pages while surfing the internet. Chrome, Firefox, Internet Explorer, and Edge have built-in zoom features that let you enlarge the page.
To find this feature in Chrome and Firefox, click the Three Dots, or the Three Bars at the top right of the browser to find the pull-down menu and click the + to increase the zoom.
You’ll find Internet Explorer’s Zoom features by clicking the Gear Icon in the upper right of the screen and click Zoom In
For Microsoft Edge, Click Ctrl++ to zoom in and Ctrl+— to zoom out. This quick trick works for Chrome as well.
No More Squinting!
Instead of trying to pull your monitor as close to you as possible, put these shortcut tips into actions to increase your zoom so you can see what’s on the page.
windows randomly zoom in and out
Replies (13)
* Please try a lower page number.
* Please enter only numbers.
* Please try a lower page number.
* Please enter only numbers.
![]()
Thank you for posting your query in Microsoft Community.
As per your issue, would suggest you to update all your drivers from the manufacturer’s website and check if the issue persists or not.
Method 1: Run the Hardware and Devices troubleshooter.
Hardware and Devices troubleshooter checks for common problems and makes sure that any new device or hardware connected to your PC is installed correctly.
a. Press “ Windows key + W ”.
b. Type “ Troubleshooting ” and hit Enter .
c. Select “ Hardware and Sound ” from the Troubleshooter Window .
d. Select “ Hardware and Devices ” under Devices option .
e. Follow the On Screen instructions.
Method 2: Uninstall and re-install the drivers.
Step 1: I suggest you to uninstall the Touchpad drivers and then install them.
Follow these steps to uninstall the touchpad drivers.
- Press Windows key + X and select Device Manager .
- Search for Human Interface Device and expand it.
- Right click on the driver and select Uninstall.
If the issue still persists, I would suggest you to contact your manufacture regarding this issue.
Please post us if you need any further assistance with Windows.
Screen zooms in and out on windows 10
Replies (9)
![]()
Thank you for posting your query on Microsoft Community.
I understand how frustrating it could be for you, when the monitor screen zoom in and out after upgrading to Windows 10. We will assist you to resolve this issue.
Before we proceed, we require more information to assist you better.
- When exactly this happens?
- Do the screen zoom in and out automatically?
- What did you do to resolve this issue earlier?
I suggest you to run the Windows Defender on your computer and check.
Method 1: Run Windows Defender.
I suggest you to run Windows Defender on your computer and check if it helps. Follow the instruction provided in the Microsoft link.
Protect your PC
If the issue still persist, boot your computer in safe mode environment and check if the issue is resolved.
Method 2:
Step 1: Safe Mode with Networking
I suggest you to Start Windows in Safe Mode with Networking and check if it helps.
Safe Mode is a troubleshooting option for Windows that starts your computer in a limited state. Only the basic files and drivers necessary to run Windows are started.
Follow the instruction provided below.
- Press the ‘Windows + I’ key on the keyboard.
- Click on Update and Security.
- Click on Recovery option.
- Under Advanced Startup, click Restart now.
- Click on Tr oubleshoot , Advanced options, Startup Settings.
- Click Restart, select Safe Mode with Networking and then press Enter.
Note: Restart the computer to start in normal mode.
If the issue is doesn’t occur in Safe mode with networking then place the computer in a Clean Boot and check.
Step 2: Clean boot
A Clean boot is troubleshooting option for Windows in which all the third party services are disabled and checked, if this services are causing the problem.
Follow the Microsoft help article to perform clean boot.
Note : Please go through the section: How to reset the computer to start as usual after troubleshooting with Clean Boot of the Kb article to boot the computer in normal startup after fixing the issue.
Note: The steps for Windows 8/8.1 applies to Windows 10.
Hope it helps. Do let us know if your issue is resolved. For any further query, feel free to contact us.


