How I hacked my Xiaomi MiBand 2 fitness tracker — a step-by-step Linux guide


This is a step by step guide into how I hacked my Bluetooth Low Energy (BLE) fitness tracker so I could control it from Linux.
This story started from a Facebook post I made talking about a problem of the absence of an API for fitness trackers, and why that’s not helping data scientists make cool stuff for them.
The post generated quite a lot of discussion and after caught the attention of my friend Volodymyr Shymanskyy who tried to help me and found some code on Github from Leo Soares for my fitness tracker MiBand 2. He tried to run it, but there were some problems with the connection. He fixed the problem in a few hours, commited the code and sent me a link.
That got me off to a head start. The code I had allowed me to connect to the MiBand 2 device, run notifications, and get a heart measurement. But that was not enough for what I wanted to do. I needed to get real-time raw data from the sensors to use it in my data science experiments. I wanted to make a gym exercise predictor.
So I decided to hack the hell out of my fitness tracker.
I didn’t have any experience on working with BLE devices, so first I tried to understand how the technology worked and how the different pieces fitted together. As it turned out, it was pretty simple and here is a summary.
- Each BLE device has a few services
- Each service has some characteristics
- Some of the characteristics have descriptors (if the characteristic has more then one parameter or is of type read or notification).
- Some of the characteristics have only read/write access (For example, current time, battery status or revision info)
- Some of the characteristics are more complicated and work using a request/notification loop (For example real-time heart rate monitor or authorization)
This is basically all you need to know to start working with the fitness tracker.
You’ll also need two apps that will help you debug the BLE device — Wireshark protocol analyzer and BLE debugger. And you will need to get access to your Android phone developer options (Sorry iOS folks but you’ll have to find the equivalent options for the iOS platform).
To start, you will need to unpair your MiBand2 device from the phone app.
So let’s see now what services and characteristics our band has. Open BLE debugger and run a scan. You’ll see something like this.

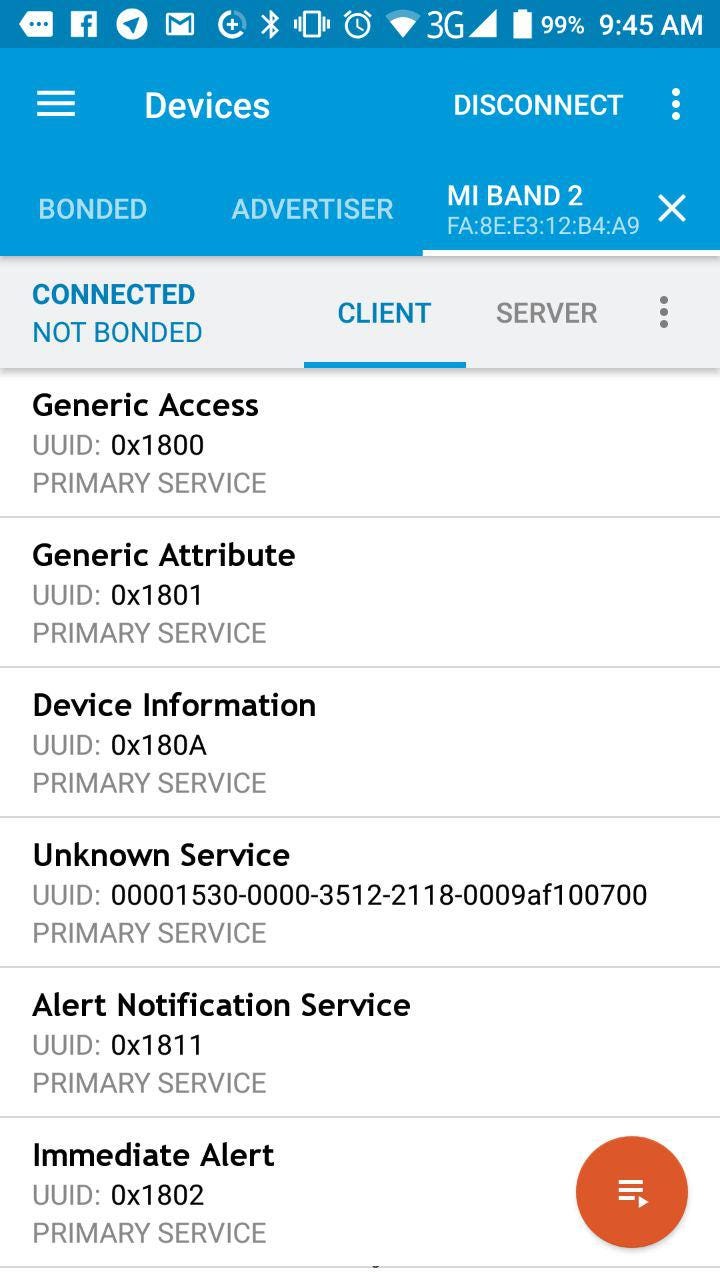
Save your device MAC address somewhere, we will need it later. Now let’s connect to it and see what services and characteristics does it have.
From these two simple operations we’ve already got some useful information about our device. Another way of doing this is to use command line tools such as hcitool and gatttool .
To run a BLE scan from the command line:
Connecting to your BLE device’s Mac address and retrieving services and descriptors:
In some cases BLE stack can glitch and you can turn your bluetooth device On/Off or run this command:
Preparing to sniff data
To sniff data from our phone when it is communicating with the BLE device, we’ll need to enable Bluetooth logs in dev settings. To do this you need to turn on developer settings on your Android device first. To do that follow the steps below.
On Android 4.1 and lower, the Developer options screen is available by default. On Android 4.2 and higher, you must enable this screen as follows:
- Open the Settings app on the Android device.
- Select System. (This only needs to be done on Android 8.0 devices or higher)
- Scroll to the bottom and select About phone.
- Scroll to the bottom and tap Build number 7 times.
- Return to the previous screen to find Developer options near the bottom.
Now open dev settings and find “ Enable Bleutooth HCI snoop log” and enable it. After this all Bluetooth communication from the device with any external Bluetooth device will be logged. The logs can be viewed by accessing a file called btsnoop_hci.log (in the case of my Android 7.0 device, they’re located at /mtklog/btlog/btsnoop_hci.log).
Authentication
So now we will need to perform the following steps to get some info about how authentication (pairing) works.
- Turn on Bluetooth and HCI log.
- Pair your device to the Xiaomi Android App.
- Turn off Bluetooth.
- Download your btsnoop_hci.log to your PC.
- Open it with Wireshark.
- Find the first ATT protocol request that go to the handle 0x0055 (which represents Anhui Huami Information Technology Co, the company that makes wearable devices and owns the Xiaomi brand)
You’ll see something like this:

As can be seen from the figure above, the handle UUID values are:
- Pairing device
Main service UUID
0000fee1-0000–1000–8000–00805f9b34fb - Auth Characteristic (Char) UUID
00000009–0000–3512–2118–0009af100700 - Notification descriptor (Des) handle
0x2902(it same for all stuff)
And here are the Authentication steps:
- Setting on auth notifications (to get a response) by sending 2 bytes request \x01\x00 to the Des.
- Send 16 bytes encryption key to the Char with a command and appending to it 2 bytes \x01\x00 + KEY.
- Requesting random key from the device with a command by sending 2 bytes \x02\x00to the Char.
- Getting random key from the device response ( last 16 bytes).
- Encrypting this random number with our 16 bytes key using the AES/ECB/NoPadding encryption algorithm (from Crypto.Cipher import AES) and send it back to the Char ( \x03\x00 + encoded data)
Real Time Data
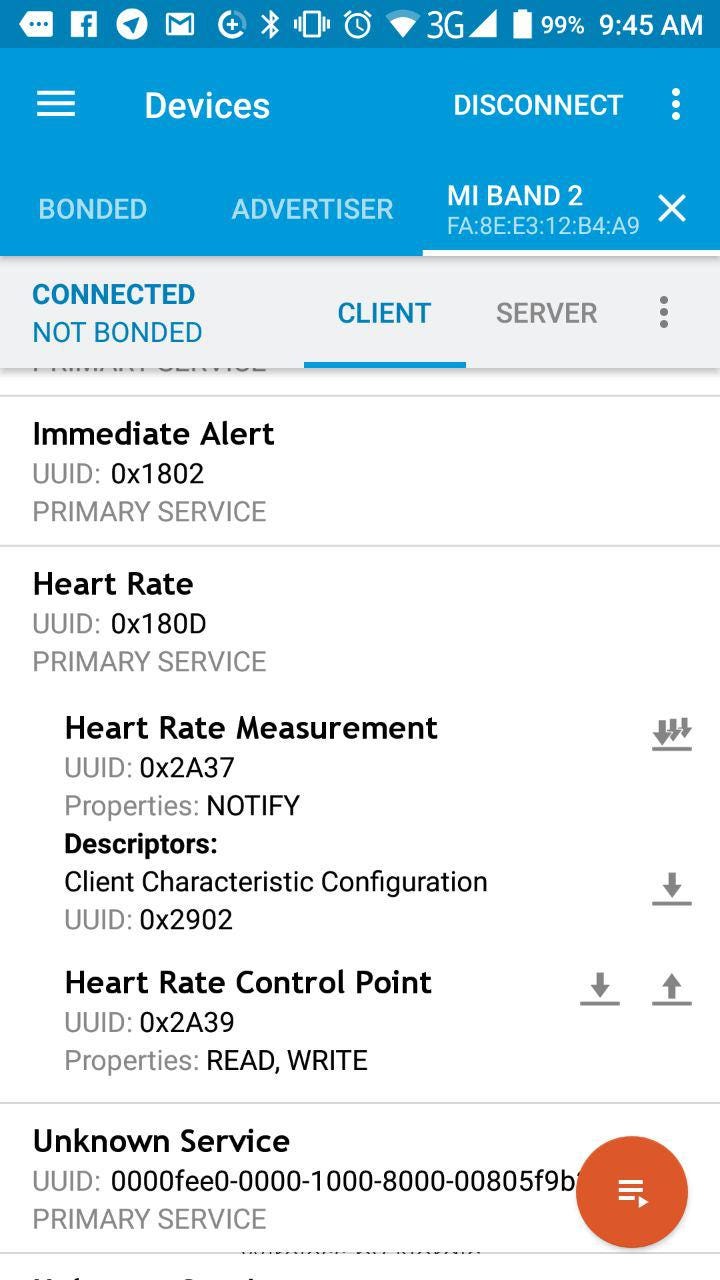
The Auth process was a little complicated and to add to the problems, the heart rate monitor was turning off after 15 sec. Here are the UUID values that were obtained from the device:
- Hardware service (HRDW) UUID
0000fee0–0000–1000–8000–00805f9b34fb - Heart Monitor Service (HMS) UUID
0000180d-0000–1000–8000–00805f9b34fb - Heart Rate Measure Characteristic (HRM) UUID
00002a37–0000–1000–8000–00805f9b34fb - Heart Monitor Control Characteristic (HMC) UUID
00002a39–0000–1000–8000–00805f9b34fb - Sensor Characteristic (SENS) UUID
00000001–0000–3512–2118–0009af100700 - Notification descriptor (DES) handle
0x2902(it’s the same always)
And here is how a few common actions are carried out:
- To turn off the current hear monitor measurement.
Send a request to HMC \x15\x02\x00for one-shot measurements.
Send a request to HMC \x15\x01\x00for continous measurements. - Enabling Gyroscope and Heart raw data by sending a command to SENS \x01\x03\x19
- Enabling notification for HRM by writing a request to DES \x01\x00
- Start continuous heart measurements by sending a request to HMC \x15\x01\x01
- Sending command to SENS \x02 (don’t know why this is need)
- Then while getting notifications, every 12 seconds we need to send a ping with the value \x16 to the HCM
Parsing data
Understanding how data is parsed was not very interesting , as you needed to find out how to unpack data that comes from the device.
Some part of it can be parsed from logs, and some cannot.

Finding the right packets and encoding can take some time. In my case I tried to find similar byte occurrences in packets next to each other, some repeating within a packet.
He we can see a clear pattern with the string 368c 328c 2e8c 3c8c 338c 308c 3f8c repeating and the packet being 16 bytes in length. If we unpack this with 2 bytes unsigned short then we get 7 raw measurements of the heart sensor.
Also we see that second byte just iterating, and I think it’s just time difference between measurements (responses)
As for the Gyroscope, it was a bit harder. But my thoughts were that it should be packed in a similar way as the heart data, but in this case we have 3 measurements for each gyro axis which should be signed and the packet length is 20 bytes. So 12 x,y,z measurements will not cover all packages, but 3 will, leaving the first 2 bytes (the same as in the previous packet). So i tried this and it worked. 😃
The code
You can find the code on Github as always, with an example of usage provided. It’s pretty simple, so I don’t need to elaborate on it further in this article.
Источник
Пошаговое руководство взлома фитнес-браслета Xiaomi MiBand 2 в Linux
В этой статье будет приведено пошаговое руководство взлома фитнес-трекера xiaomi mi band 2

Автор: Andrey Nikishaev
В этой статье будет приведено пошаговое руководство взлома фитнес-трекера с поддержкой Bluetooth и низким энергопотреблением средствами ОС Linux.
Эта история началась с моего поста в Facebook, посвященного проблеме отсутствия API для фитнес-трекеров, и почему сей факт мешает исследователям данных создавать что-то полезное и крутое для этих девайсов.
Тот пост спровоцировал жаркую дискуссию и привлек внимание моего друга Володимира Шиманского, пытавшегося помочь мне с кодом Лео Соареса для моего фитнес-трекера MiBand 2. Володимир пытался запустить этот код, но были проблемы с соединением. Проблема была решена в течение нескольких часов, и код обновлен.
Эта ситуация подтолкнула меня к активным действия. Используя вышеуказанный код, я смог подключиться к MiBand 2, поработать с уведомлениями и измерить ритм сердца. Однако этот функционал меня не устраивал. Я хотел получать данные с сенсоров в режиме реального времени и поэкспериментировать с полученной информацией. Мне хотелось создать советника по физическим упражнениям.
В итоге было решено хакнуть фитнес-трекер.
У меня не было никакого опыта работы с BLE-девайсами (Bluetooth Low Energy), и я решил начать с изучения этой технологии. Выяснилось, что никаких особых сложностей нет:
У каждого BLE-устройства есть несколько служб.
У каждой службы есть некоторые характеристики.
У некоторых характеристик есть дескрипторы (если у характеристики больше чем один параметр или тип соответствует чтению или уведомлению).
У некоторых характеристик есть доступ только на чтение/запись (например, текущее время, статус батареи или информация о последней ревизии).
Некоторые характеристики более сложны и работают, используя запросы/цикл уведомлений (например, монитор частоты сердцебиения в режиме реального времени или авторизация).
Вышеуказанного списка вполне достаточно для начала работы с фитнес-трекером.
Также вам понадобятся два приложения для отладки BLE-устройства: анализаторпротоколов Wireshark и BLE отладчик. Кроме того, нужно активировать опции разработчика в устройстве на базе Android (для любителей iOS придется поискать эквивалент в этой платформе).
Для начала нужно отключить MiBand2 от приложения телефона.
Посмотрим, какие службы и характеристики есть у нашего устройства. Открываем отладчик для BLE и запускаем сканирование. Должно появиться примерно следующее:
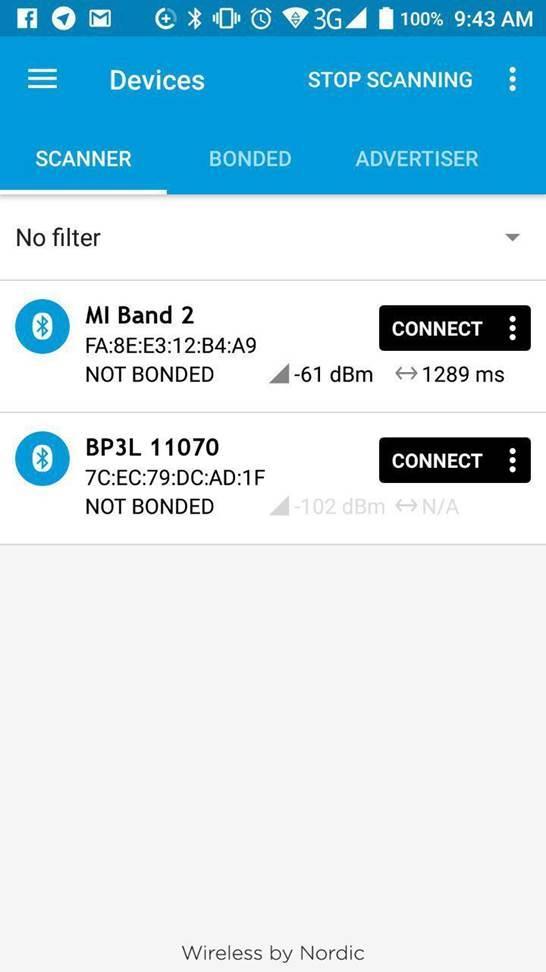
Рисунок 1: Перечень устройств доступных для подключения
MAC адрес устройства нам понадобится позже, поэтому лучше эту информацию где-то сохранить или записать. Подключаемся и смотрим перечень служб и характеристик.
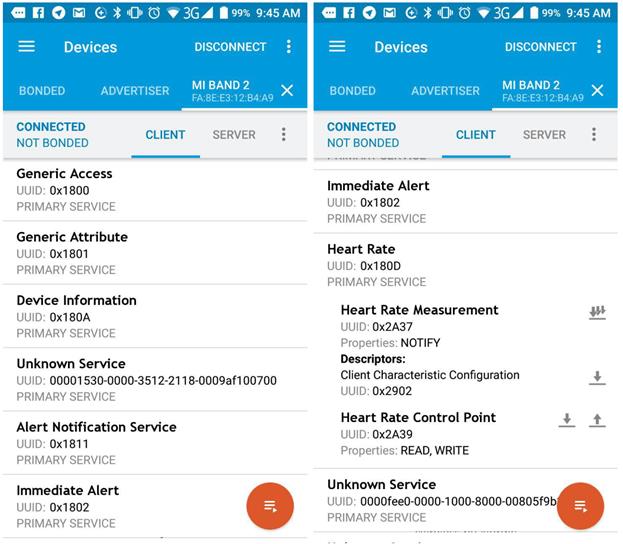
Рисунок 2: Перечень служб устройства
Выполнив две простые операции, мы уже получили полезную информацию о нашем устройстве. Схожая функция доступна через командную строку при помощи утилит hcitool и gatttool.
Запуск сканирования из командной строки:
sudo hcitool lescan
Подключение к BLE устройство через Mac адрес и получение списка служб и дескрипторов:
sudo gatttool -b YOUR_MAC -I -t random
В некоторых случаях могут возникнуть проблемы. В том случае можно перезагрузить устройство или запустить следующую команду:
sudo hciconfig hci0 reset
Подготовка к сниффингу данных
Для сниффинга данных во время коммуникации телефона и BLE-устройства нужно включить Bluetooth-логи в настройках разработчика. Вначале необходимо включить настройки на Android-устройстве. Следуйте по шагам, описанным далее.
До Android 4.1 опции разработчика доступны по умолчанию. Начиная с версии 4.2, нужно сделать следующее:
1. Откройте раздел Settings на Android-устройстве.
2. Выберите раздел System (только на устройствах с Android 8.0 и выше).
3. Прокрутите вниз и выберите About phone.
4. Прокрутите вниз и тапните 7 раз на Build number.
5. Возвратитесь к предыдущему разделу. Почти в самом низу должен появиться раздел Developer options.
Откройте настройки разработчика и включите опцию «Enable Bleutooth HCI snoop log». Теперь все коммуникации между телефоном и любым внешним Bluetooth-устройством должны отражаться в файле btsnoop_hci.log. (на моем телефоне с Android 7.0 логи находятся в /mtklog/btlog/btsnoop_hci.log).
Теперь нужно выполнить следующие шаги для получения информации о том, как работает аутентификация (сопряжение).
1. Включите Bluetooth и HCI логи.
2. Выполните сопряжение устройства с приложением Xiaomi Android App.
3. Отключите Bluetooth.
4. Загрузите btsnoop_hci.log на компьютер.
5. Откройте файл в Wireshark.
6. Найдите первый запрос, имеющий отношение к протоколу ATT, с параметром Handle: 0x0055 (который связан с компанией Anhui Huami Information Technology Co, выпускающей переносные устройства и владеющей брендом Xiaomi).
Должно получиться примерно следующее:
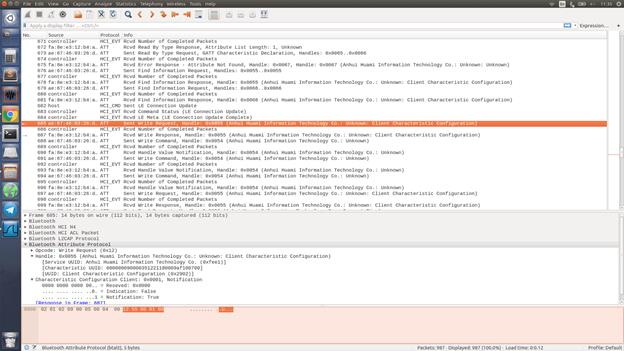
Рисунок 3: Содержимое логов с Android-устройства
Выделенный запрос – первый этап аутентификации.
Как видно из рисунка выше, обрабатываются следующие значения UUID:
Pairing device
Main service UUID
0000fee1-0000–1000–8000–00805f9b34fb
Auth Characteristic (Char) UUID
00000009–0000–3512–2118–0009af100700
Notification descriptor (Des) handle
0x2902 (всегда неизменный)
Аутентификация состоит из следующих шагов:
Настройка auth-уведомлений (для получения ответа) посредством отправки двухбайтового запроса \x01\x00 в Des.
Отправка 16-байтового ключа шифрования в Char с командой и добавление двух байт \x01\x00 + KEY.
Получение случайного ключа от устройства (последние 16 байт).
Шифрование этого случайного номера при помощи 16-байтового ключа, используя алгоритм шифрования AES/ECB/NoPadding (из Crypto.Cipher import AES) и обратная отправка в Char (\x03\x00 + закодированная информация).
Данные в режиме реального времени
Процесс аутентификации Auth оказался чуть сложнее, и появились некоторые проблемы. Мониторинг частоты сердцебиений отключался через 15 секунд. Ниже показан перечень полученных значений UUID:
- Hardware service (HRDW) UUID
0000fee0–0000–1000–8000–00805f9b34fb - Heart Monitor Service (HMS) UUID
0000180d-0000–1000–8000–00805f9b34fb - Heart Rate Measure Characteristic (HRM) UUID
00002a37–0000–1000–8000–00805f9b34fb - Heart Monitor Control Characteristic (HMC) UUID
00002a39–0000–1000–8000–00805f9b34fb - Sensor Characteristic (SENS) UUID
00000001–0000–3512–2118–0009af100700 - Notification descriptor (DES) handle
0x2902(всегда неизменный)
Выполняются несколько стандартных операций:
Отправка команды \x02 к SENS (не очень понятно, зачем нужна эта команда)
Затем в процессе получения уведомлений каждый 12 секунд нам нужно отсылать пинг со значением \x16 к HCM
Далее нужно было разобраться, как распаковать информацию, приходящую с устройства, для последующего парсинга.
Некоторую часть данных можно распарсить из логов, некоторую — нельзя.
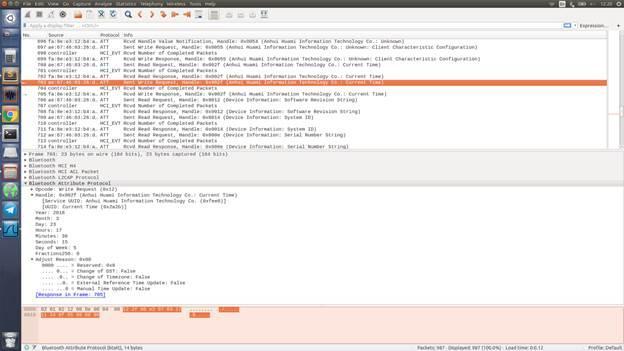
Рисунок 4: Ответ от устройства с текущим временем
Поиск правильных пакетов и изучение системы кодирования может отнять некоторое время. В моем случае я попытался найти похожие байты в пакетах рядом с друг с другом. Некоторые байты повторяются внутри пакета.
Здесь можно заметить четкий повторяющийся шаблон 368c 328c 2e8c 3c8c 338c 308c 3f8c в пакете размером 16 байт. Если мы распакуем с учетом, что каждое измерение представляет собой беззнаковый короткий тип размером 2 байта, то получим 7 непосредственных измерений от сенсора сердца.
Также видно, что второй байт просто увеличивается и связан, как я думаю, с временной разницей между измерениями (ответами).
Raw gyro: 01de49ffd9ff3c004cffd8ff3b004dffdcff4400
Raw gyro: 01df4cffd6ff44004dffd8ff40004cffd1ff4700
Raw gyro: 02e1103231323d3274328e329632af32c732cf32
Raw gyro: 01e34fffd7ff56004bffc7ff590049ffccff4c00
Raw gyro: 01e443ffccff43004effcdff40005bffd4ff4c00
Raw gyro: 01e558ffc9ff5f005effbfff66005fffb0ff5900
Raw gyro: 01e64cffacff60005cffa7ff410066ffc9ff4600
Raw gyro: 01e760ffdcff4b0051ffe4ff4f0034ffdeff5300
Raw gyro: 02e903365c36813663361036543688374139fe3a
Raw gyro: 01eb4bffc3ff50004fffc1ff430047ffbbff4100
Raw gyro: 01ec3effb2ff3c0050ffbfff560047ffccff7300
Raw gyro: 01ed4fffe0ff78005cffebff8e0056fff6ff8300
Raw gyro: 01ee7efffbffa1008bff0f00bc00b1ff1900b800
Raw gyro: 01ef9bff0c00d10095fff3ffd600b7ff0800df00
Raw gyro: 02f12445314600479e473348aa481c499749244a
Raw gyro: 01f3c3ff1600fe00beff1800f200a6ff0800e700
Raw gyro: 01f4a9fff8ffd300a7fff3ffd700a9fff1ffdf00
Raw gyro: 01f5b1fff8ffe800b4fff1fff700acfffcffef00
Raw gyro: 01f67ffff7ffc0006bfff4ffb00078ffe9ffb600
Raw gyro: 01f786ffecffc0006ffff0ffbc0060fff1ffc000
Raw gyro: 02f9ca4cbb4c784c964ca84c784c854c444c1b4c
Raw gyro: 01fb7cff0f00bb007eff2700ae0083ff30009800
Raw gyro: 01fc79ff1800b00076ff0f00bc0068ff0900d900
Raw gyro: 01fd78ff07000c01f6fffbff19011c000b00f600
Raw gyro: 01fe4b001100d30054000700c3004300efffeb00
Raw gyro: 01ff1f00d0ff1701fbffe8ff1b01e3ffffff1101
Raw gyro: 0201214b014bec4ad04aba4acb4abe4aba4abd4a
Raw gyro: 0103efffecfffc00e3fff3fff300defff3fffc00
Raw gyro: 0104e3fff0fff400e6ffefff0301dbffe9ff0c01
Raw gyro: 0105e3fff0ff0301e6ffe6fffc00dcffecfffc00
Raw gyro: 0106dffff0fff700dbffeefff600d6fff0fff400
Raw gyro: 0107dfffecffff00e1fff0ff0301defff3fffc00
В случае с гироскопом ситуация оказалась чуть сложнее. Но я думаю, что упаковка должна выполняться схожим образом, как и для данных о частоте сердцебиения. Однако здесь у нас 3 измерения знакового типа для каждой оси гироскопа, а сам пакет размером 20 байт. Таким образом, данные от всех сенсоров укладываются не в 12, а в 3 измерения по осям x, y, z. Первые 2 байта играют ту же роль, что и в предыдущем случае. В итоге моя гипотеза оказалась верной.
Код, как обычно, можно найти на Github с примером использования. Ничего сложного нет, и я решил подробно не рассматривать этот момент в статье.
Источник


