- How to Connect an Xbox 360 Controller to a Windows PC in 2021 [Partition Magic]
- Summary :
- Quick Navigation :
- Connect a Wired Xbox 360 Controller to a Windows PC
- Connect a Wireless Xbox 360 Controller to a Windows PC
- Bottom Line
- Xbox 360 controller not working [How to fix it]
- How do I fix Xbox 360 controller driver issues on Windows 10?
- 1. Install the driver manually
- 2. Uninstall the driver
- How to connect an Xbox 360 controller to your PC – 4 simple steps
- Step 1: Connect your Xbox 360 controller to your computer
- Step 2: Install the controller driver
- Step 3 (for wireless controller only): Connect your controller to the wireless receiver
- Step 4: Test your controller
How to Connect an Xbox 360 Controller to a Windows PC in 2021 [Partition Magic]
By Irene | Follow | Last Updated January 05, 2021
Summary :
How to connect Xbox 360 controller to PC? This article from MiniTool will show you how to connect a wired or wireless Xbox 360 controller to a Windows PC especially for Windows 10 users. If you want to use your Xbox 360 controller on a Windows PC, check out this post now.
Quick Navigation :
The first part will show you how to connect an Xbox 360 wired controller to a Windows PC with detailed steps. If you use a wireless Xbox 360 controller, you can skip straight to the second part to connect the Xbox 360 controller to a Windows PC wirelessly.
Connect a Wired Xbox 360 Controller to a Windows PC
If you are using a Xbox 360 wired controller, you can follow these steps to install your Xbox 360 wired controller on Windows 10.
Step 1. Plug the USB connector of your Xbox 360 controller into any USB 2.0 or 3.0 port on your Windows PC.
Step 2. Then Windows 10 will automatically install drivers for the Xbox 360 controller. Just wait patiently and Windows will download or install the related driver software very quickly.
Step 3. When you see the pop-up notification that shows the drivers have been installed, you can use your controller immediately.
Step 4. Open a game that support your controller and then press a button, pull a trigger, or move a stick on the controller to test if your controller works properly.
Connect a Wireless Xbox 360 Controller to a Windows PC
If you own a wireless Xbox 360 controller, you can connect the Xbox 360 wireless controller to a Windows PC with an Xbox 360 Wireless Gaming Receiver. Then you can follow the steps below to setup a wireless Xbox 360 controller on a Windows PC and to play games with it.
Step 1. Prepare an Xbox 360 wireless gaming receiver. If you don’t have one, you can purchase a wireless receiver on Amazon, which may cost you about $10 to $20.
Step 2. Insert the gaming receiver’s USB connector into an USB 2.0 port on your Windows computer.
Step 3. Once it is plugged in, you will see a green light appeared on the receiver, which indicates that the unit is working properly.
Step 4. Install software to make sure the gaming receiver and the wireless Xbox 360 controller to properly sync with one another.
- If the Add New Hardware Wizard automatically appears on your PC, select Install the software automatically (Recommended), and then select Next. Then follow the prompts to install the software driver.
- If the wizard fails to install the software, use the installation disc that came with your Xbox 360 Wireless Gaming Receiver to install the software from the disc. Insert it into your Windows PC’s main optical drive and follow the on-screen instruction to finish the installation.
- If you don’t have the disc, you can install the software by downloading it from the Xbox 360 Wireless Controller for Windows link. The Windows 7 drivers will also work for Windows 8 and Windows 10. Just select the proper operating system and language, and click the Download button.
Step 5. Then you need to turn on the Xbox 360 wireless controller. Press and hold the Xbox Guide button to turn on it.
Step 6. On the gaming receiver, press the Connect button. It is a small circular button located near the middle of the receiver.
Step 7. The lights on the controller and on the receiver will flash green, which indicate that the device is trying to establish a connection. When the lights stop flashing and one of the lights around the Guide button remains lit, this means that the controller is connected.
You can press the controller’s buttons, pull the triggers and move the stick to ensure the controller is functioning properly. After that, you can enjoy the games on your Windows PC.
This article will show you top 3 Xbox 360 emulators that can be used on Windows PC. With Xbox 360 emulators, you can play Xbox games on your Windows PC directly.
Bottom Line
The above is all you need to do if you want to connect an Xbox 360 controller to a Windows PC. And depending on what Xbox 360 controller you use, the steps can be rather simple. Now open a game that supports the Xbox 360 controller and whether if your controller works properly.
If you are using Xbox One controller and want to know how to connect Xbox One controller to a Windows PC, you may check out this post listed below.
This post will show you how to connect Xbox One controller to PC with 3 different methods. If you want to use Xbox One controller on PC, check out the post now.
Xbox 360 controller not working [How to fix it]

- One of the best things about PC gaming is that you can use a multitude of controllers instead of the traditional keyboard/mouse combo.
- This way, you can still use your old Xbox 360 controller for what it was meant to do. This guide will help you if you should encounter any issues.
- Whenever your gadgets are acting up, remember that you have an invaluable resource available: our Device Troubleshooting Page.
- To unlock your full gaming potential, keep a close eye on our extensive Xbox Hub. We regularly post easy to digest guides and fixes.
Many gamers like to use their Xbox 360 Controller with Windows 10 while playing their favourite games.
This is great if you don’t want to spend money on an additional controller, but there have been reports that Xbox 360 Controller is not working with Windows 10, and today we’ll try to fix that.
There are many things that could go wrong, and we will try to focus on all of them:
How do I fix Xbox 360 controller driver issues on Windows 10?
1. Install the driver manually
If you’re using wireless Xbox 360 Controller, you need to use a wireless receiver in order to connect it to your computer.
Sometimes, drivers for wireless receiver have to be updated, or your Xbox 360 Controller might not work on Windows 10.
To update the drivers for your receiver, follow these steps:
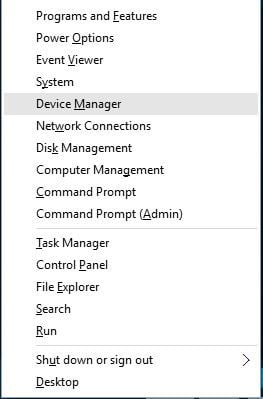
- Open Device Manager. You can access Device Manager by pressing Windows Key + X and choosing Device Manager from the list.

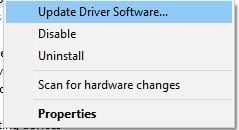
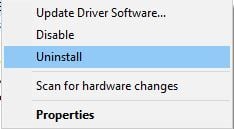
- When Device Manager opens, make sure that your receiver is connected to your PC. Navigate to Other Devices section and expand it. Right-click the Unknown device and choose Update Driver Software from the menu.
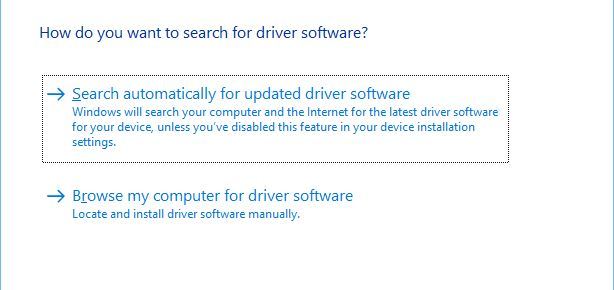
- Click Browse my computer for driver software.
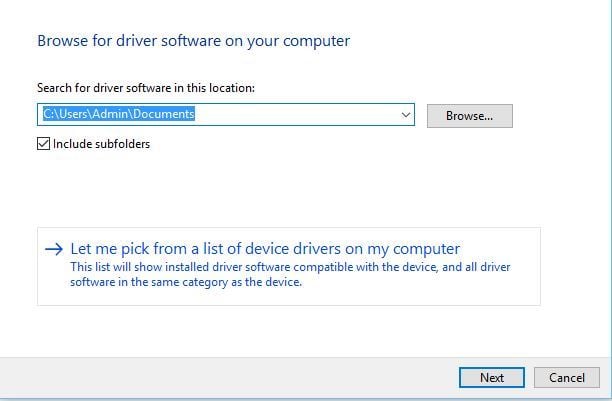
- Now click on Let me pick from a list of device drivers on my computer.
- You should see a list of device drivers. Select Xbox 360 peripherals and click Next.
- Choose the latest Receiver driver that’s on the list and click Next. If you get a warning message, just click OK and wait for the driver to install.
- Now you just need to hold the pairing button on your Bluetooth receiver and on your Xbox 360 Controller for about 3 seconds. After doing that, your computer should recognize your controller.
After the driver has been installed, your Xbox 360 Controller should start working on Windows 10 without any problems.
It has been reported that this solution works with third-party receivers as well, so even if you don’t use Microsoft receiver, it should work without any problems as long as you install Microsoft’s drivers.
2. Uninstall the driver
Sometimes Xbox 360 Controller might not work on Windows 10 due to bad driver, and if that’s the case, the best solution is to uninstall that driver and allow Windows to install it again.
To uninstall the driver, follow these steps:
- Start Device Manager.
- In Device Manager locate Xbox 360 Wireless Receiver for Windows and right-click it.
- Choose Uninstall from the menu.
- After the driver has been uninstalled, restart your computer. When your computer restarts, Windows 10 will automatically install the missing driver.
How to connect an Xbox 360 controller to your PC – 4 simple steps
Last Updated: 2 years ago
Xbox 360 is a video game console developed by Microsoft. They have also built perfect support for Xbox 360 controller in their Windows operating systems. There are many Windows PC games that let you play with an Xbox controller. Lots of Windows computer users are using an Xbox 360 controller for a more enjoyable gaming experience. You would also want to try installing your controller on your own computer.
The following are the steps that help you connect your Xbox 360 controller to a Windows PC. Follow them through and you will complete your controller installation very easily.
Step 1: Connect your Xbox 360 controller to your computer
If you are using a wired Xbox 360 controller, plug the USB connector of your Xbox 360 controller into a USB port on your computer.
If you are using a wireless controller, insert the USB connector of your Xbox 360 Wireless Gaming Receiver into a USB port on your computer. A green light will be on if your wireless receiver is working.
Step 2: Install the controller driver
To make sure your controller or wireless receiver works on your computer, you need to install the latest driver for the device. One easy and reliable way to install drivers is to use Driver Easy.
Driver Easy will automatically recognize your system and find the correct drivers for it. You don’t need to know exactly what system your computer is running, you don’t need to risk downloading and installing the wrong driver, and you don’t need to worry about making a mistake when installing.
You can download and install your drivers by using either Free or Pro version of Driver Easy. But with the Pro version it takes only 2 clicks (and you get full support and a 30-day money back guarantee):
1. Download and Install Driver Easy.
2. Run Driver Easy and hit the Scan Now button. Driver Easy will then scan your computer and detect any problem drivers.
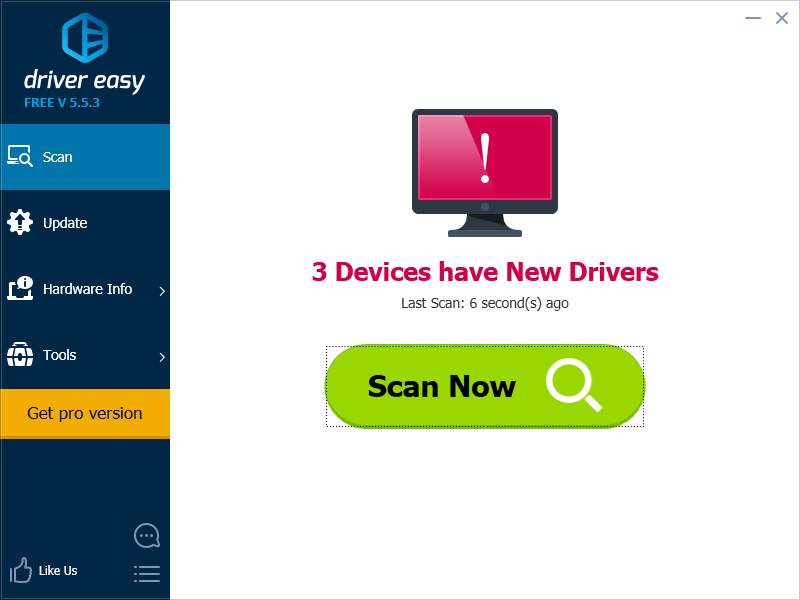
3. Click on the Update button next to the controller or receiver to download the latest and correct driver for it. You can also hit the Update All button at the bottom right to automatically update all outdated or missing drivers on your computer (this requires the Pro version — you will be prompted to upgrade when you click on Update All).

After installing the driver, restart your computer.
Step 3 (for wireless controller only): Connect your controller to the wireless receiver
1. Insert a pair of AA batteries or a battery pack into your controller.
2. Press and hold the Guide button (the button with a Xbox logo) to turn on the controller.

3. Press the connect button (a circular button near the middle) on the wireless receiver. The light will flash green.
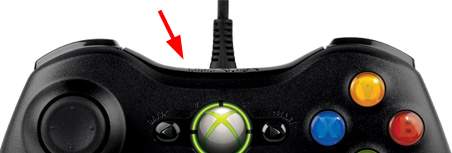
4. Press the connect button on the front edge of the controller.
5. There will be green lights flashing on both the controller and the receiver. This means they are establishing a connection. When they are connected, there will be a green light around the Guide button remaining lit, indicating the connection has been established.
Step 4: Test your controller
Open a game that supports the Xbox 360 controller. Test your controller by pressing the buttons or pulling the triggers on it.
If your Windows computer cannot detect your controller, try connecting your controller to another USB port. But if you have tried all the ports and the problem persists, or there are some issues with buttons on your controller, you may need to get it repaired or replaced. In this case, you can contact Microsoft support for further assistance.


