- Module 1. Your First Windows Program
- _write _write
- Синтаксис Syntax
- Параметры Parameters
- Возвращаемое значение Return Value
- Комментарии Remarks
- Требования Requirements
- Create, write, and read a file
- Prerequisites
- Creating a file
- Writing to a file
- Reading from a file
- Walkthrough: Create a traditional Windows Desktop application (C++)
- Prerequisites
- Create a Windows desktop project
- To create a Windows desktop project in Visual Studio 2019
- To create a Windows desktop project in Visual Studio 2017
- To create a Windows desktop project in Visual Studio 2015
- Create the code
- To start a Windows desktop application
- To add functionality to the WinMain function
- To add functionality to the WndProc function
- Build the code
- To build this example
Module 1. Your First Windows Program
In this module, we will write a minimal Windows desktop program. All it does is create and show a blank window. This first program contains about 50 lines of code, not counting blank lines and comments. It will be our starting point; later we’ll add graphics, text, user input, and other features.
If you are looking for more details on how to create a traditional Windows desktop application in Visual Studio, check out Walkthrough: Create a traditional Windows Desktop application (C++).

Here is the complete code for the program:
You can download the complete Visual Studio project from Windows Hello World Sample.
It may be useful to give a brief outline of what this code does. Later topics will examine the code in detail.
- wWinMain is the program entry point. When the program starts, it registers some information about the behavior of the application window. One of the most important items is the address of a function, named WindowProc in this example. This function defines the behavior of the window—its appearance, how it interacts with the user, and so forth.
- Next, the program creates the window and receives a handle that uniquely identifies the window.
- If the window is created successfully, the program enters a while loop. The program remains in this loop until the user closes the window and exits the application.
Notice that the program does not explicitly call the WindowProc function, even though we said this is where most of the application logic is defined. Windows communicates with your program by passing it a series of messages. The code inside the while loop drives this process. Each time the program calls the DispatchMessage function, it indirectly causes Windows to invoke the WindowProc function, once for each message.
_write _write
Записывает данные в файл. Writes data to a file.
Синтаксис Syntax
Параметры Parameters
демо fd
Дескриптор файла, в который записываются данные. File descriptor of file into which data is written.
двойной buffer
Записываемые данные. Data to be written.
count count
Число байтов. Number of bytes.
Возвращаемое значение Return Value
В случае успеха _write возвращает число записанных байтов. If successful, _write returns the number of bytes written. Если фактическое пространство на диске меньше, чем размер буфера, который функция пытается записать на диск, _write завершается сбоем и не сбрасывает содержимое буфера на диск. If the actual space remaining on the disk is less than the size of the buffer the function is trying to write to the disk, _write fails and does not flush any of the buffer’s contents to the disk. Возвращаемое значение, равное-1, указывает на ошибку. A return value of -1 indicates an error. Если передается недопустимый параметр, эта функция вызывает обработчик недопустимых параметров, как описано в разделе Проверка параметров. If invalid parameters are passed, this function invokes the invalid parameter handler, as described in Parameter Validation. Если выполнение может быть продолжено, функция возвращает значение-1 , а параметру возврата — одно из трех значений: значение EBADF, что означает, что дескриптор файла недействителен или файл не открыт для записи. Еноспк. Это означает, что на устройстве недостаточно свободного места для операции; или еинвал, что означает, что буфер был пустым указателем или что в файл в режиме Юникода было передано нечетное число байтов. If execution is allowed to continue, the function returns -1 and errno is set to one of three values: EBADF, which means the file descriptor is invalid or the file is not opened for writing; ENOSPC, which means there is not enough space left on the device for the operation; or EINVAL, which means that buffer was a null pointer or that an odd count of bytes was passed to be written to a file in Unicode mode.
Дополнительные сведения об этих и других кодах возврата см. в разделе переввод , _doserrno, _sys_errlist и _sys_nerr. For more information about these and other return codes, see errno, _doserrno, _sys_errlist, and _sys_nerr.
Если файл открыт в текстовом режиме, каждый символ перевода строки заменяется парой символов возврата каретки и перевода строки в выходных данных. If the file is opened in text mode, each line feed character is replaced with a carriage return-line feed pair in the output. Замена не влияет на возвращаемое значение. The replacement doesn’t affect the return value.
Когда файл открывается в режиме преобразования Юникода (например, если демон открывается с помощью _open или _sopen и параметр mode, включающий _O_WTEXT, _O_U16TEXT или _O_U8TEXT или, если он открыт с помощью FOPEN и параметр mode, включающий CCS = Unicode, CCS = UTF-16LE или CCS = UTF-8, или, если режим был изменен на режим преобразования Юникода с помощью _setmode—buffer интерпретируется как указатель на массив wchar_t , содержащий данные UTF-16 . When the file is opened in Unicode translation mode—for example, if fd is opened by using _open or _sopen and a mode parameter that includes _O_WTEXT, _O_U16TEXT, or _O_U8TEXT, or if it’s opened by using fopen and a mode parameter that includes ccs=UNICODE, ccs=UTF-16LE, or ccs=UTF-8, or if the mode is changed to a Unicode translation mode by using _setmode—buffer is interpreted as a pointer to an array of wchar_t that contains UTF-16 data. Попытка записи нечетного числа байт в этом режиме приводит к возникновению ошибки проверки параметра. An attempt to write an odd number of bytes in this mode causes a parameter validation error.
Комментарии Remarks
Функция _write записывает байты счетчика из буфера в файл, связанный с демоном к памяти. The _write function writes count bytes from buffer into the file associated with fd. Операция записи начинается с текущего положения указателя файла (при наличии), связанного с данным файлом. The write operation begins at the current position of the file pointer (if any) associated with the given file. Если файл открыт для добавления, операция начинается с текущего конца файла. If the file is open for appending, the operation begins at the current end of the file. После операции записи указатель файла увеличивается на число записанных байтов. After the write operation, the file pointer is increased by the number of bytes written.
При записи в файлы, открытые в текстовом режиме, _write ОБРАБАТЫВАЕТ символ CTRL + Z в качестве логического конца файла. When writing to files opened in text mode, _write treats a CTRL+Z character as the logical end of file. При записи на устройство _write ОБРАБАТЫВАЕТ символ CTRL + Z в буфере как признак конца выходных данных. When writing to a device, _write treats a CTRL+Z character in the buffer as an output terminator.
По умолчанию глобальное состояние этой функции ограничивается приложением. By default, this function’s global state is scoped to the application. Чтобы изменить это, см. раздел глобальное состояние в CRT. To change this, see Global state in the CRT.
Требования Requirements
| Подпрограмма Routine | Обязательный заголовок Required header |
|---|---|
| _write _write |
Дополнительные сведения о совместимости см. в статье Compatibility. For additional compatibility information, see Compatibility.
Create, write, and read a file
Important APIs
Read and write a file using a StorageFile object.
В For a complete sample, see the File access sample.
Prerequisites
Understand async programming for Universal Windows Platform (UWP) apps
You can learn how to write asynchronous apps in C# or Visual Basic, see Call asynchronous APIs in C# or Visual Basic. To learn how to write asynchronous apps in C++/WinRT, see Concurrency and asynchronous operations with C++/WinRT. To learn how to write asynchronous apps in C++/CX, see Asynchronous programming in C++/CX.
Know how to get the file that you want to read from, write to, or both
You can learn how to get a file by using a file picker in Open files and folders with a picker.
Creating a file
Here’s how to create a file in the app’s local folder. If it already exists, we replace it.
Writing to a file
Here’s how to write to a writable file on disk using the StorageFile class. The common first step for each of the ways of writing to a file (unless you’re writing to the file immediately after creating it) is to get the file with StorageFolder.GetFileAsync.
Writing text to a file
Write text to your file by calling the FileIO.WriteTextAsync method.
Writing bytes to a file by using a buffer (2 steps)
First, call CryptographicBuffer.ConvertStringToBinary to get a buffer of the bytes (based on a string) that you want to write to your file.
Then write the bytes from your buffer to your file by calling the FileIO.WriteBufferAsync method.
Writing text to a file by using a stream (4 steps)
First, open the file by calling the StorageFile.OpenAsync method. It returns a stream of the file’s content when the open operation completes.
Next, get an output stream by calling the IRandomAccessStream.GetOutputStreamAt method from the stream . If you’re using C#, then enclose this in a using statement to manage the output stream’s lifetime. If you’re using C++/WinRT, then you can control its lifetime by enclosing it in a block, or setting it to nullptr when you’re done with it.
Now add this code (if you’re using C#, within the existing using statement) to write to the output stream by creating a new DataWriter object and calling the DataWriter.WriteString method.
Lastly, add this code (if you’re using C#, within the inner using statement) to save the text to your file with DataWriter.StoreAsync and close the stream with IOutputStream.FlushAsync.
Best practices for writing to a file
For additional details and best practice guidance, see Best practices for writing to files.
Reading from a file
Here’s how to read from a file on disk using the StorageFile class. The common first step for each of the ways of reading from a file is to get the file with StorageFolder.GetFileAsync.
Reading text from a file
Read text from your file by calling the FileIO.ReadTextAsync method.
Reading text from a file by using a buffer (2 steps)
Then use a DataReader object to read first the length of the buffer and then its contents.
Reading text from a file by using a stream (4 steps)
Walkthrough: Create a traditional Windows Desktop application (C++)
This walkthrough shows how to create a traditional Windows desktop application in Visual Studio. The example application you’ll create uses the Windows API to display «Hello, Windows desktop!» in a window. You can use the code that you develop in this walkthrough as a pattern to create other Windows desktop applications.
The Windows API (also known as the Win32 API, Windows Desktop API, and Windows Classic API) is a C-language-based framework for creating Windows applications. It has been in existence since the 1980s and has been used to create Windows applications for decades. More advanced and easier-to-program frameworks have been built on top of the Windows API. For example, MFC, ATL, the .NET frameworks. Even the most modern Windows Runtime code for UWP and Store apps written in C++/WinRT uses the Windows API underneath. For more information about the Windows API, see Windows API Index. There are many ways to create Windows applications, but the process above was the first.
For the sake of brevity, some code statements are omitted in the text. The Build the code section at the end of this document shows the complete code.
Prerequisites
A computer that runs Microsoft Windows 7 or later versions. We recommend Windows 10 for the best development experience.
A copy of Visual Studio. For information on how to download and install Visual Studio, see Install Visual Studio. When you run the installer, make sure that the Desktop development with C++ workload is checked. Don’t worry if you didn’t install this workload when you installed Visual Studio. You can run the installer again and install it now.

An understanding of the basics of using the Visual Studio IDE. If you’ve used Windows desktop apps before, you can probably keep up. For an introduction, see Visual Studio IDE feature tour.
An understanding of enough of the fundamentals of the C++ language to follow along. Don’t worry, we don’t do anything too complicated.
Create a Windows desktop project
Follow these steps to create your first Windows desktop project. As you go, you’ll enter the code for a working Windows desktop application. To see the documentation for your preferred version of Visual Studio, use the Version selector control. It’s found at the top of the table of contents on this page.
To create a Windows desktop project in Visual Studio 2019
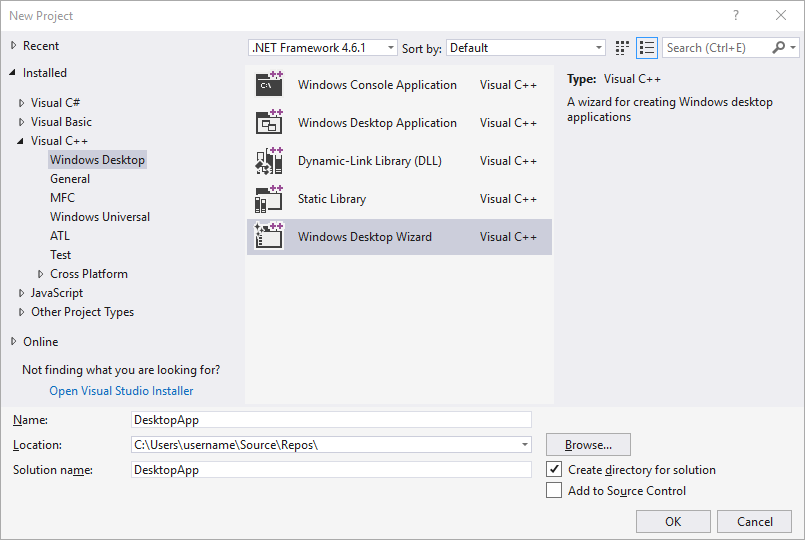
From the main menu, choose File > New > Project to open the Create a New Project dialog box.
At the top of the dialog, set Language to C++, set Platform to Windows, and set Project type to Desktop.
From the filtered list of project types, choose Windows Desktop Wizard then choose Next. In the next page, enter a name for the project, for example, DesktopApp.
Choose the Create button to create the project.
The Windows Desktop Project dialog now appears. Under Application type, select Desktop application (.exe). Under Additional options, select Empty project. Choose OK to create the project.
In Solution Explorer, right-click the DesktopApp project, choose Add, and then choose New Item.

In the Add New Item dialog box, select C++ File (.cpp). In the Name box, type a name for the file, for example, HelloWindowsDesktop.cpp. Choose Add.
 Visual C plus plus selected and the C plus plus File option highlighted.» title=»Add .cpp file to DesktopApp Project» data-linktype=»relative-path»>
Your project is now created and your source file is opened in the editor. To continue, skip ahead to Create the code.
To create a Windows desktop project in Visual Studio 2017
On the File menu, choose New and then choose Project.
In the New Project dialog box, in the left pane, expand Installed > Visual C++, then select Windows Desktop. In the middle pane, select Windows Desktop Wizard.
In the Name box, type a name for the project, for example, DesktopApp. Choose OK.
 Visual C plus plus > Windows Desktop selected, the Windows Desktop Wizard option highlighted, and DesktopApp typed in the Name text box.» title=»Name the DesktopApp project» data-linktype=»relative-path»>
In the Windows Desktop Project dialog, under Application type, select Windows application (.exe). Under Additional options, select Empty project. Make sure Precompiled Header isn’t selected. Choose OK to create the project.
In Solution Explorer, right-click the DesktopApp project, choose Add, and then choose New Item.
In the Add New Item dialog box, select C++ File (.cpp). In the Name box, type a name for the file, for example, HelloWindowsDesktop.cpp. Choose Add.
Visual C plus plus selected and the C plus plus File option highlighted.» title=»Add .cpp file to DesktopApp Project» data-linktype=»relative-path»>
Your project is now created and your source file is opened in the editor. To continue, skip ahead to Create the code.
To create a Windows desktop project in Visual Studio 2015
On the File menu, choose New and then choose Project.
In the New Project dialog box, in the left pane, expand Installed > Templates > Visual C++, and then select Win32. In the middle pane, select Win32 Project.
In the Name box, type a name for the project, for example, DesktopApp. Choose OK.
 Templates > Visual C plus plus > Win32 selected, the Win32 Project option highlighted, and DesktopApp typed in the Name text box.» title=»Name the DesktopApp project» data-linktype=»relative-path»>
On the Overview page of the Win32 Application Wizard, choose Next.

On the Application Settings page, under Application type, select Windows application. Under Additional options, uncheck Precompiled header, then select Empty project. Choose Finish to create the project.
In Solution Explorer, right-click the DesktopApp project, choose Add, and then choose New Item.

In the Add New Item dialog box, select C++ File (.cpp). In the Name box, type a name for the file, for example, HelloWindowsDesktop.cpp. Choose Add.
 Visual C plus plus selected and the C plus plus File option highlighted.» title=»Add .cpp file to DesktopApp Project» data-linktype=»relative-path»>
Your project is now created and your source file is opened in the editor.
Create the code
Next, you’ll learn how to create the code for a Windows desktop application in Visual Studio.
To start a Windows desktop application
Just as every C application and C++ application must have a main function as its starting point, every Windows desktop application must have a WinMain function. WinMain has the following syntax.
For information about the parameters and return value of this function, see WinMain entry point.
What are all those extra words, such as CALLBACK , or HINSTANCE , or _In_ ? The traditional Windows API uses typedefs and preprocessor macros extensively to abstract away some of the details of types and platform-specific code, such as calling conventions, __declspec declarations, and compiler pragmas. In Visual Studio, you can use the IntelliSense Quick Info feature to see what these typedefs and macros define. Hover your mouse over the word of interest, or select it and press Ctrl+K, Ctrl+I for a small pop-up window that contains the definition. For more information, see Using IntelliSense. Parameters and return types often use SAL Annotations to help you catch programming errors. For more information, see Using SAL Annotations to Reduce C/C++ Code Defects.
Windows desktop programs require . defines the TCHAR macro, which resolves ultimately to wchar_t if the UNICODE symbol is defined in your project, otherwise it resolves to char . If you always build with UNICODE enabled, you don’t need TCHAR and can just use wchar_t directly.
Along with the WinMain function, every Windows desktop application must also have a window-procedure function. This function is typically named WndProc , but you can name it whatever you like. WndProc has the following syntax.
In this function, you write code to handle messages that the application receives from Windows when events occur. For example, if a user chooses an OK button in your application, Windows will send a message to you and you can write code inside your WndProc function that does whatever work is appropriate. It’s called handling an event. You only handle the events that are relevant for your application.
For more information, see Window Procedures.
To add functionality to the WinMain function
In the WinMain function, you populate a structure of type WNDCLASSEX. The structure contains information about the window: the application icon, the background color of the window, the name to display in the title bar, among other things. Importantly, it contains a function pointer to your window procedure. The following example shows a typical WNDCLASSEX structure.
For information about the fields of the structure above, see WNDCLASSEX.
Register the WNDCLASSEX with Windows so that it knows about your window and how to send messages to it. Use the RegisterClassEx function and pass the window class structure as an argument. The _T macro is used because we use the TCHAR type.
Now you can create a window. Use the CreateWindow function.
This function returns an HWND , which is a handle to a window. A handle is somewhat like a pointer that Windows uses to keep track of open windows. For more information, see Windows Data Types.
At this point, the window has been created, but we still need to tell Windows to make it visible. That’s what this code does:
The displayed window doesn’t have much content because you haven’t yet implemented the WndProc function. In other words, the application isn’t yet handling the messages that Windows is now sending to it.
To handle the messages, we first add a message loop to listen for the messages that Windows sends. When the application receives a message, this loop dispatches it to your WndProc function to be handled. The message loop resembles the following code.
For more information about the structures and functions in the message loop, see MSG, GetMessage, TranslateMessage, and DispatchMessage.
At this point, the WinMain function should resemble the following code.
To add functionality to the WndProc function
To enable the WndProc function to handle the messages that the application receives, implement a switch statement.
One important message to handle is the WM_PAINT message. The application receives the WM_PAINT message when part of its displayed window must be updated. The event can occur when a user moves a window in front of your window, then moves it away again. Your application doesn’t know when these events occur. Only Windows knows, so it notifies your app with a WM_PAINT message. When the window is first displayed, all of it must be updated.
To handle a WM_PAINT message, first call BeginPaint, then handle all the logic to lay out the text, buttons, and other controls in the window, and then call EndPaint. For the application, the logic between the beginning call and the ending call displays the string «Hello, Windows desktop!» in the window. In the following code, the TextOut function is used to display the string.
HDC in the code is a handle to a device context, which is used to draw in the window’s client area. Use the BeginPaint and EndPaint functions to prepare for and complete the drawing in the client area. BeginPaint returns a handle to the display device context used for drawing in the client area; EndPaint ends the paint request and releases the device context.
An application typically handles many other messages. For example, WM_CREATE when a window is first created, and WM_DESTROY when the window is closed. The following code shows a basic but complete WndProc function.
Build the code
As promised, here’s the complete code for the working application.
To build this example
Delete any code you’ve entered in HelloWindowsDesktop.cpp in the editor. Copy this example code and then paste it into HelloWindowsDesktop.cpp:
On the Build menu, choose Build Solution. The results of the compilation should appear in the Output window in Visual Studio.

To run the application, press F5. A window that contains the text «Hello, Windows desktop!» should appear in the upper-left corner of the display.

Congratulations! You’ve completed this walkthrough and built a traditional Windows desktop application.


