- How To Configure Linux Wireless From Command Line with wpa_supplicant
- Install wpa_supplicant Package
- Fedora, RHEL, CentOS
- Ubuntu, Debian, Mint, Kali
- Help wpa_supplicant
- Specify Interface and Configuration File
- Run Daemon In Background
- Sample Wireless Configuration
- Настройка строгой аутентификации (802.1X) Wi-Fi в Linux, часть 2
- Настройка wpa_supplicant с использованием конфигурационного файла
- Запускаем wpa_supplicant
- Использование приложения wpa_gui
- Получение дополнительной помощи
- wpa_supplicant
- Contents
- Installation
- Overview
- Connecting with wpa_cli
- Connecting with wpa_passphrase
- Advanced usage
- Configuration
- Connection
- Manual
- At boot (systemd)
- wpa_cli action script
- Roaming
- Troubleshooting
- nl80211 driver not supported on some hardware
- Problem with mounted network shares (cifs) and shutdown
- Password-related problems
- Problems with eduroam and other MSCHAPv2 connections
- Connections to pure WPA3-SAE access points
- Connections to mixed WPA2-PSK/WPA3-SAE access points
How To Configure Linux Wireless From Command Line with wpa_supplicant
wpa_supplicant is used to connect wireless networks. wpa_supplicant.conf file is used to store related configuration file about the wireless network. Also wireless security policy is configured with this file.
Install wpa_supplicant Package
In most of cases the wpa_supplicant package is installed by default but we can use following commands in order to install this package.
Fedora, RHEL, CentOS
Ubuntu, Debian, Mint, Kali
Help wpa_supplicant
More detailed help information can be show with -h option like below.
 Help wpa_supplicant
Specify Interface and Configuration File
The most basic and used way to run wpa_supplicant is providing the interface name and the configuration file. We can use -i to specify interface and -c for configuration file like below.
Run Daemon In Background
The deafult behaivour of wpa_supplicant is running on foregound which will take terminal busy. This will also create the stability problems where closing terminal will kill network connection too. We can use -B option for background connection.
Sample Wireless Configuration
Here is a sample configuration which has SSID name poftut and key management is specified as WPA_PSK .
Источник
Настройка строгой аутентификации (802.1X) Wi-Fi в Linux, часть 2
В прошлом месяце мы начали разговор о технологии аутентификации 802.1X. Рассмотрели, каким образом она использует шифрование для защиты беспроводных сетей. Выяснили, что стандарт WEP давно мертв, WPA вполне пригоден для работы, ну а WPA2 — лучший вариант. Также были описаны два различных режима функционирования WPA (обеих версий): легко настраиваемый PSK (Персональный) и более мощный Корпоративный, предназначенный для защиты сетей в организациях.
Помимо вышеперечисленного, в предыдущей части были рассмотрены основные саппликанты (клиенты) 802.1X: Xsupplicant и wpa_supplicant . Мы использовали wpa_supplicant, настраивая его через графический интерфейс сетевых настроек Ubuntu. В этот раз займемся ручной настройкой wpa_supplicant через соответствующий конфигурационный файл. Это пригодится в случае, если ваш дистрибутив Linux не поддерживает настройку данного саппликанта через графический интерфейс.
Настройка wpa_supplicant с использованием конфигурационного файла
В случае, если вы установили wpa_supplicant отдельно, его следует настроить через конфигурационный файл. В случае, если саппликант предустановлен в вашем дистрибутиве Linux, вы все равно можете использовать конфигурационный файл для более тонкой и точной настройки параметров аутентификации и шифрования.
Вот пара основных параметров, требующих настройки в первую очередь (они применяются ко всем сетям, к которым вы подключаетесь):
- eapol_version: может принимать значения 1 и 2. По умолчанию wpa_supplicant использует EAPOL версии 2, как указано в стандарте IEEE 802.1X-2004. Однако, некоторые точки доступа все еще поддерживают только первую версию.
- fast_reauth: значение 1 включает быструю повторную аутентификацию для всех поддерживаемых методов EAP, 2 — выключает.
Подробные настройки сетей, к которым вы хотите подключиться, указываются в блоках, заключенных в фигурные скобки. Саппликант будет пытаться подключиться к перечисленным сетям в том порядке, в каком они указаны. Прежде чем тратить время на настройку всех параметров, стоит проверить, нормально ли саппликант работает с вашим беспроводным драйвером. Для этого нужно подключиться к незашифрованной точке доступа, используя следующий блок:
Перед конфигурацией других блоков настройки сети, давайте проведем обзор некоторых параметров (полей), которые можно в них использовать для настройки параметров сети:
- ssid: Имя сети. Обязательное поле.
- scan_ssid: При установке параметра в 1 во фреймах probe request указывается конкретный SSID сети. Это используется при подключении к скрытой сети или к точке доступа, имеющей несколько идентификаторов SSID.
- key_mgmt: Допустимы такие варианты, как WPA-PSK (при использовании этого значения обязательно также поле psk), WPA-EAP, IEEE8021X (аутентификация как с использованием динамически генерируемых ключей WEP, так и без) и NONE (для сетей открытых или использующих статические ключи WEP).
- pairwise: Если используется один из стандартов WPA, укажите либо CCMP (в случае WPA2), либо TKIP (в случае WPA).
- eap: Разделенный пробелами список поддерживаемых методов EAP: MD5, MSCHAPV2, OTP, GTC, TLS, PEAP, или TTLS.
- identity: Строка, используемая для идентификации EAP, например имя пользователя.
- password: Строка, используемая в качестве пароля EAP.
- ca_cert: Полный путь к CA-сертификату в формате PEM или DER, необходим для возможности подтверждения сертификата сервера.
- ca_path: Полный путь к директории, где хранятся файлы CA-сертификатов (в формате PEM), которые вы хотите добавить в список доверенных. Необходим для возможности подтверждения сертификата сервера.
- client_cert: Полный путь к файлу сертификата клиента в формате PEM или DER format, необходим для возможности использования методов EAP, например TLS.
Теперь продемонстрируем использование некоторых из этих полей на примерах.
Вот пример блока, настроенного для подключения к сети в режиме WPA-Enterprise с аутентификацией 802.1X (используется протокол PEAP, требующий от пользователя ввода данных учетной записи):
Далее приведем пример блока, настроенного на подключение к сети WPA2-Enterprise с аутентификацией 802.1X (используется EAP-TLS, требующий сертификаты клиента и сервера):
Запускаем wpa_supplicant
Сохранив в файле wpa_supplicant.conf необходимые параметры и блоки настройки сети, можно попробовать его в деле. Вот пример того, как произвести запуск из командной строки:
Данная команда запускает демона в фоновом режиме, использует сетевой интерфейс wlan0 и считывает конфигурационные файлы из директории etc. Для получения дополнительной помощи, используйте man wpa_supplicant , чтобы прочесть руководство. Если возникают какие-то проблемы, попробуйте запустить следующую команду для вывода информации отладки:
Дабы не вводить все эти команды после каждой загрузки, в файле по адресу /etc/network/interfaces следует сохранить следующее:
Использование приложения wpa_gui
Если с командной строкой какие-то проблемы, попробуйте wpa_gui . Это графическая утилита, которую можно использовать для настройки большинства параметров wpa_supplicant. В зависимости от вашего дистрибутива Linux, утилита может быть установлена вместе с пакетом wpa_supplicant, либо из отдельного пакета wpa_gui.
На рисунке 1 показано, как выглядит утилита в Ubuntu. По сути, это графическая оболочка для работы с конфигурационным файлом и командной строкой. Позволяет искать беспроводные сети и сохранять для них профили, есть возможность просмотра состояния сети и истории событий, также можно настроить параметры WPS.
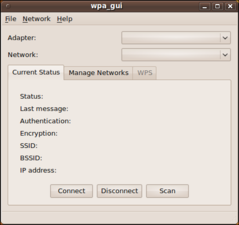
Рисунок 1
Получение дополнительной помощи
Мы рассмотрели лишь некоторые аспекты работы с wpa_supplicant. В Интернете можно найти гораздо больше примеров по настройке конфигурационного файла, а также воспользоваться соответствующим списком рассылки для поиска информации или связи с другими пользователями.
Eric Geier — основатель и генеральный директор NoWiresSecurity , предлагающей аутсорсинговый сервис AuthenticateMyWiFi с целью помочь организациям защитить свои Wi-Fi сети. Также он является автором многих книг, посвященных сетевым и компьютерным технологиям, из серий Cisco Press и For Dummies.
Источник
wpa_supplicant
wpa_supplicant is a cross-platform supplicant with support for WEP, WPA, WPA2 and WPA3 (IEEE 802.11i). It is suitable for desktops, laptops and embedded systems. It is the IEEE 802.1X/WPA component that is used in the client stations. It implements key negotiation with a WPA authenticator and it controls the roaming and IEEE 802.11 authentication/association of the wireless driver.
Contents
Installation
Install the wpa_supplicant package, which includes the main program wpa_supplicant, the passphrase tool wpa_passphrase, and the text front-end wpa_cli.
Optionally, also install the official wpa_supplicant_gui AUR which provides wpa_gui, a graphical front-end for wpa_supplicant, or wpa-cute AUR which is a fork from an earlier version of wpa_gui with a couple of fixes and improvements.
Overview
The first step to connect to an encrypted wireless network is having wpa_supplicant obtain authentication from a WPA authenticator. In order to do this, wpa_supplicant must be configured so that it will be able to submit the correct credentials to the authenticator.
Once you are authenticated you need to assign an IP address, see Network configuration#IP addresses.
Connecting with wpa_cli
This connection method allows scanning for available networks, making use of wpa_cli, a command line tool which can be used to configure wpa_supplicant. See wpa_cli(8) for details.
In order to use wpa_cli, a control interface must be specified for wpa_supplicant, and it must be given the rights to update the configuration. Do this by creating a minimal configuration file:
Now start wpa_supplicant with:
At this point run:
This will present an interactive prompt ( > ), which has tab completion and descriptions of completed commands.
Use the scan and scan_results commands to see the available networks:
To associate with MYSSID , add the network, set the credentials and enable it:
If the SSID does not have password authentication, you must explicitly configure the network as keyless by replacing the command set_network 0 psk «passphrase» with set_network 0 key_mgmt NONE .
Finally save this network in the configuration file and quit wpa_cli:
Once association is complete, you must obtain an IP address, for example, using dhcpcd.
Connecting with wpa_passphrase
This connection method allows quickly connecting to a network whose SSID is already known, making use of wpa_passphrase, a command line tool which generates the minimal configuration needed by wpa_supplicant. For example:
This means that wpa_supplicant can be associated with wpa_passphrase and started with:
Finally, you should obtain an IP address, see Network configuration#IP addresses.
Advanced usage
For networks of varying complexity, possibly employing extensive use of EAP, it will be useful to maintain a customised configuration file. For an overview of the configuration with examples, refer to wpa_supplicant.conf(5) ; for details on all the supported configuration parameters, refer to the example file /usr/share/doc/wpa_supplicant/wpa_supplicant.conf .[1]
Configuration
As explained in #Connecting with wpa_passphrase, a basic configuration file can be generated with:
This will only create a network section. A configuration file with also the ability of #Connecting with wpa_cli and some other common options may look like:
If security is not a concern, the passphrase can also be defined in clear text in the network section by enclosing it in quotes:
If the network does not have a passphrase, e.g. a public Wi-Fi:
To connect to a WPA-Enterprise network, see #802.1x/radius.
Further network blocks may be added manually, or using wpa_cli as illustrated in #Connecting with wpa_cli. In order to use wpa_cli, a control interface must be set with the ctrl_interface option. Setting ctrl_interface_group=wheel allows users belonging to such group to execute wpa_cli. This setting can be used to enable users without root access (or equivalent via sudo etc) to connect to wireless networks. Also add update_config=1 so that changes made with wpa_cli to example.conf can be saved. Note that any user that is a member of the ctrl_interface_group group will be able to make changes to the file if this is turned on.
fast_reauth=1 and ap_scan=1 are the wpa_supplicant options active globally at the time of writing. Whether you need them, or other global options too for that matter, depends on the type of network to connect to. If you need other global options, simply copy them over to the file from /usr/share/doc/wpa_supplicant/wpa_supplicant.conf .
Alternatively, wpa_cli set can be used to see options’ status or set new ones. Multiple network blocks may be appended to this configuration: the supplicant will handle association to and roaming between all of them. The strongest signal defined with a network block usually is connected to by default, one may define priority= to influence behaviour. For example to auto-connect to any unsecured network as a fallback with the lowest priority:
Once you have finished the configuration file, you can optionally use it as a system-wide or per-interface default configuration by naming it according to the paths listed in #At boot (systemd). This also applies if you use additional network manager tools, which may rely on the paths (for example Dhcpcd#10-wpa_supplicant).
Connection
Manual
First start wpa_supplicant command, whose most commonly used arguments are:
- -B — Fork into background.
- -c filename — Path to configuration file.
- -i interface — Interface to listen on.
- -D driver — Optionally specify the driver to be used. For a list of supported drivers see the output of wpa_supplicant -h .
- nl80211 is the current standard, but not all wireless chip’s modules support it.
- wext is currently deprecated, but still widely supported.
See wpa_supplicant(8) for the full argument list. For example:
followed by a method to obtain an ip address manually as indicated in the #Overview, for example:
At boot (systemd)
The wpa_supplicant package provides multiple systemd service files:
- wpa_supplicant.service — uses D-Bus, recommended for NetworkManager users.
- wpa_supplicant@interface.service — accepts the interface name as an argument and starts the wpa_supplicant daemon for this interface. It reads a /etc/wpa_supplicant/wpa_supplicant-interface.conf configuration file. Useful when using systemd-networkd.
- wpa_supplicant-nl80211@interface.service — also interface specific, but explicitly forces the nl80211 driver (see below). The configuration file path is /etc/wpa_supplicant/wpa_supplicant-nl80211-interface.conf .
- wpa_supplicant-wired@interface.service — also interface specific, uses the wired driver. The configuration file path is /etc/wpa_supplicant/wpa_supplicant-wired-interface.conf .
To enable wireless at boot, enable an instance of one of the above services on a particular wireless interface. For example, enable the wpa_supplicant@interface systemd unit.
Now choose and enable an instance of a service to obtain an ip address for the particular interface as indicated in the #Overview. For example, enable the dhcpcd@interface systemd unit.
802.1x/radius
To connect a wired adapter using 802.1x/radius you will need to specify some configurations and enable the necessary service for the adapter. This is useful for headless servers using networkd.
Replace adapter with the wired adapter you wish to connect, and adapt the settings to match your 802.1x/radius requirements.
Since this file is storing a plaintext password, chown it to root:root and chmod it to 600 .
To use the hash instead of the plaintext password, you can use the hash keyword:
To hash your password:
After invoking the command above, provide your plain password and then press Ctrl+d .
Before running the wpa_supplicant-wired@adapter.service service, make sure to set the device down:
wpa_cli action script
wpa_cli can run in daemon mode and execute a specified script based on events from wpa_supplicant. Two events are supported: CONNECTED and DISCONNECTED . Some environment variables are available to the script, see wpa_cli(8) for details.
The following example will use desktop notifications to notify the user about the events:
Remember to make the script executable, then use the -a flag to pass the script path to wpa_cli:
Roaming
When connected to a wireless network with multiple access points, wpa_supplicant is typically responsible for roaming between access points. Choosing a new access point requires wpa_supplicant to perform a scan of available networks, which causes a brief interruption in connectivity to the current access point while the wireless radio scans other frequencies. After a scan, if wpa_supplicant detects a closer access point (BSSID) in the current network (SSID), in terms of signal strength (RSSI), it will re-associate to the closer access point.
The default configuration of wpa_supplicant has relatively timid roaming: it will rescan only when the association to the current access point is lost. This means that, if a client moves far away from its current access point, but not far enough to completely lose signal, the client will keep using the weak signal instead of roaming to a closer access point.
To make wpa_supplicant more aggressive about roaming, set the bgscan parameter in the configuration file, such as:
The above example will cause wpa_supplicant to scan every 30 seconds when the signal is weak (below -70), and every 3600 seconds otherwise. bgscan can be specified either in specific network blocks or globally for all networks.
Troubleshooting
nl80211 driver not supported on some hardware
On some (especially old) hardware, wpa_supplicant may fail with the following error:
This indicates that the standard nl80211 driver does not support the given hardware. The deprecated wext driver might still support the device:
If the command works to connect, and the user wishes to use systemd to manage the wireless connection, it is necessary to edit the wpa_supplicant@.service unit provided by the package and modify the ExecStart line accordingly:
Problem with mounted network shares (cifs) and shutdown
When you use wireless to connect to network shares you might have the problem that the shutdown takes a very long time. That is because systemd runs against a 3 minute timeout. The reason is that WPA supplicant is shut down too early, i.e. before systemd tries to unmount the share(s). A bug report suggests a work-around by editing the wpa_supplicant@.service as follows:
Password-related problems
wpa_supplicant may not work properly if directly passed via stdin particularly long or complex passphrases which include special characters. This may lead to errors such as failed 4-way WPA handshake, PSK may be wrong when launching wpa_supplicant .
In order to solve this try using here strings wpa_passphrase or passing a file to the -c flag instead:
In some instances it was found that storing the passphrase cleartext in the psk key of the wpa_supplicant.conf network block gave positive results (see [2]). However, this approach is rather insecure. Using wpa_cli to create this file instead of manually writing it gives the best results most of the time and therefore is the recommended way to proceed.
Problems with eduroam and other MSCHAPv2 connections
Ensure that your config uses
with a capital «v» (see FS#51358). You could even omit this setting entirely, since MSCHAPV2 is the default.
Connections to pure WPA3-SAE access points
Make sure to define the following within the network block of the config to enable connections to pure WPA3 access points:
Connections to mixed WPA2-PSK/WPA3-SAE access points
Mixed WPA2-PSK/WPA3-SAE access points will require an alternative setting for key_mgmt as shown below:
Источник


