- DLL DOWNLOADER
- Download Winprint.dll for Windows 10, 8.1, 8, 7, Vista and XP (32 Bit and 64 Bit)
- What is Winprint.dll? link
- Table of Contents
- Operating Systems That Can Use the Winprint.dll File link
- All Versions of the Winprint.dll File link
- Steps to Download the Winprint.dll File link
- How to Fix Winprint.dll Errors? link
- Method 1: Solving the DLL Error by Copying the Winprint.dll File to the Windows System Folder link
- Method 2: Copying The Winprint.dll File Into The Software File Folder link
- Method 3: Uninstalling and Reinstalling the Software That Is Giving the Winprint.dll Error link
- Method 4: Solving the Winprint.dll Error using the Windows System File Checker (sfc /scannow) link
- Method 5: Getting Rid of Winprint.dll Errors by Updating the Windows Operating System link
- Подсистема печати недоступна! Не существует обработчик печати
- Причина появления ошибки — подсистема печати недоступна
DLL DOWNLOADER
Download DLL and other System-Files for Windows

Download Winprint.dll for Windows 10, 8.1, 8, 7, Vista and XP (32 Bit and 64 Bit)
What is Winprint.dll? link
The size of this dll file is 0.03 MB for 32 Bit and 0.04 MB for 64 Bit and its download links are healthy. It has been downloaded 3145 times already.
Table of Contents
Operating Systems That Can Use the Winprint.dll File link
All Versions of the Winprint.dll File link
The last version of the Winprint.dll file is the 6.3.9600.16384 version for 32 Bit and the 6.1.7601.17514 version for 64 Bit. Before this version, there were 4 versions released. Downloadable Winprint.dll file versions have been listed below from newest to oldest.
Steps to Download the Winprint.dll File link
- Click on the green-colored «Download» button (The button marked in the picture below).
 Step 1:Starting the download process for Winprint.dll
 - After clicking the «Download» button at the top of the page, the «Downloading» page will open up and the download process will begin. Definitely do not close this page until the download begins. Our site will connect you to the closest DLL Downloader.com download server in order to offer you the fastest downloading performance. Connecting you to the server can take a few seconds.
 Step 1:Starting the download process for Winprint.dll
How to Fix Winprint.dll Errors? link
ATTENTION! In order to install the Winprint.dll file, you must first download it. If you haven’t downloaded it, before continuing on with the installation, download the file. If you don’t know how to download it, all you need to do is look at the dll download guide found on the top line.
Method 1: Solving the DLL Error by Copying the Winprint.dll File to the Windows System Folder link
- The file you will download is a compressed file with the «.zip» extension. You cannot directly install the «.zip» file. Because of this, first, double-click this file and open the file. You will see the file named «Winprint.dll» in the window that opens. Drag this file to the desktop with the left mouse button. This is the file you need. Step 1:Extracting the Winprint.dll file from the .zip file
- Copy the «Winprint.dll» file file you extracted.
- Paste the dll file you copied into the «C:\Windows\System32» folder. Step 3:Pasting the Winprint.dll file into the Windows/System32 folder
- If you are using a 64 Bit operating system, copy the «Winprint.dll» file and paste it into the «C:\Windows\sysWOW64» as well.
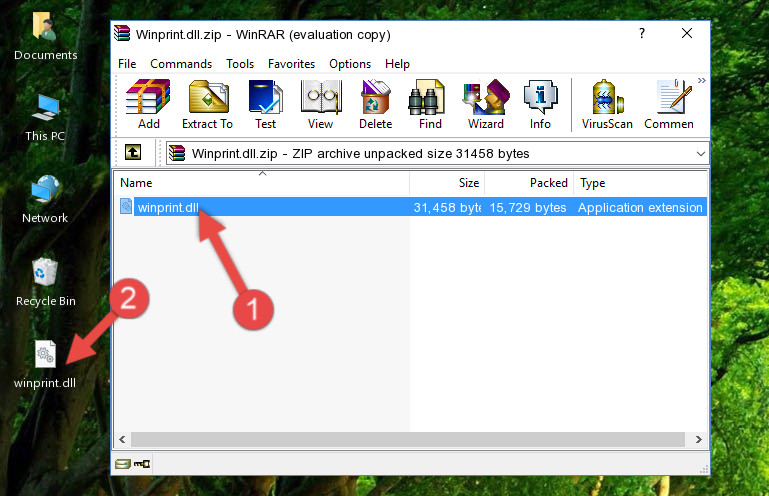 Step 1:Extracting the Winprint.dll file from the .zip file
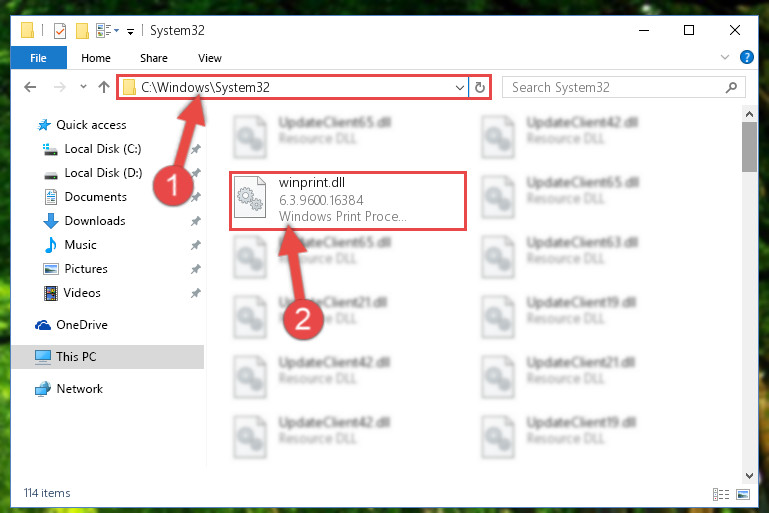 Step 3:Pasting the Winprint.dll file into the Windows/System32 folder
NOTE! On Windows operating systems with 64 Bit architecture, the dll file must be in both the «sysWOW64» folder as well as the «System32» folder. In other words, you must copy the «Winprint.dll» file into both folders.
NOTE! In this explanation, we ran the Command Line on Windows 10. If you are using one of the Windows 8.1, Windows 8, Windows 7, Windows Vista or Windows XP operating systems, you can use the same methods to run the Command Line as an administrator. Even though the pictures are taken from Windows 10, the processes are similar.
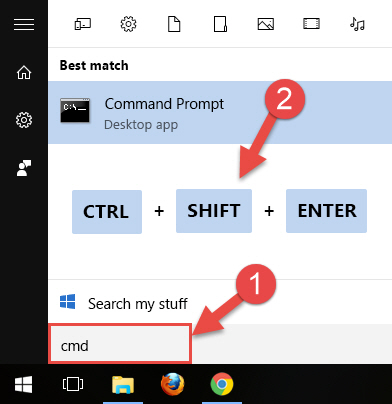
- First, open the Start Menu and before clicking anywhere, type «cmd» but do not press Enter.
- When you see the «Command Line» option among the search results, hit the «CTRL» + «SHIFT» + «ENTER» keys on your keyboard.
- A window will pop up asking, «Do you want to run this process?«. Confirm it by clicking to «Yes» button.
 Step 5:Running the Command Line as an administrator
%windir%\System32\regsvr32.exe /u Winprint.dll
%windir%\System32\regsvr32.exe /i Winprint.dll
%windir%\SysWoW64\regsvr32.exe /i Winprint.dll
Method 2: Copying The Winprint.dll File Into The Software File Folder link
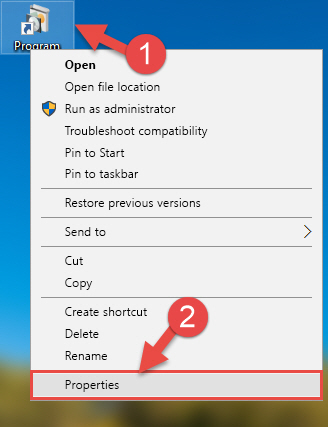
- First, you need to find the file folder for the software you are receiving the «Winprint.dll not found«, «Winprint.dll is missing» or other similar dll errors. In order to do this, right-click on the shortcut for the software and click the Properties option from the options that come up. Step 1:Opening software properties
- Open the software’s file folder by clicking on the Open File Location button in the Properties window that comes up. Step 2:Opening the software’s file folder
- Copy the Winprint.dll file into the folder we opened up. Step 3:Copying the Winprint.dll file into the software’s file folder
- That’s all there is to the installation process. Run the software giving the dll error again. If the dll error is still continuing, completing the 3rd Method may help solve your problem.
 Step 1:Opening software properties
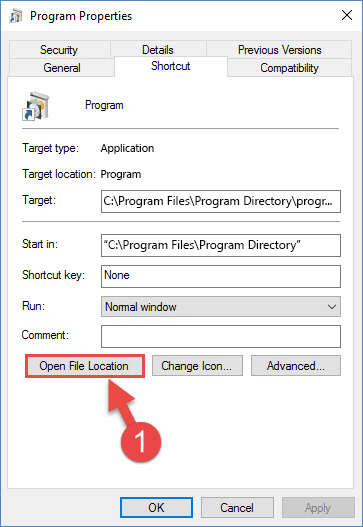 Step 2:Opening the software’s file folder
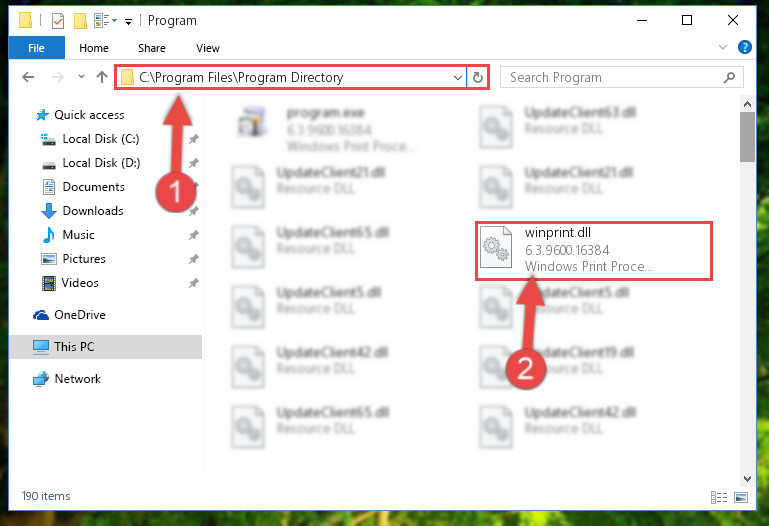 Step 3:Copying the Winprint.dll file into the software’s file folder
Method 3: Uninstalling and Reinstalling the Software That Is Giving the Winprint.dll Error link
- Open the Run window by pressing the «Windows» + «R» keys on your keyboard at the same time. Type in the command below into the Run window and push Enter to run it. This command will open the «Programs and Features» window.
Method 4: Solving the Winprint.dll Error using the Windows System File Checker (sfc /scannow) link
- In order to run the Command Line as an administrator, complete the following steps.
NOTE! In this explanation, we ran the Command Line on Windows 10. If you are using one of the Windows 8.1, Windows 8, Windows 7, Windows Vista or Windows XP operating systems, you can use the same methods to run the Command Line as an administrator. Even though the pictures are taken from Windows 10, the processes are similar.
- First, open the Start Menu and before clicking anywhere, type «cmd» but do not press Enter.
- When you see the «Command Line» option among the search results, hit the «CTRL» + «SHIFT» + «ENTER» keys on your keyboard.
- A window will pop up asking, «Do you want to run this process?«. Confirm it by clicking to «Yes» button.
Step 1:Running the Command Line as an administrator
Method 5: Getting Rid of Winprint.dll Errors by Updating the Windows Operating System link
Most of the time, softwares have been programmed to use the most recent dll files. If your operating system is not updated, these files cannot be provided and dll errors appear. So, we will try to solve the dll errors by updating the operating system.
Since the methods to update Windows versions are different from each other, we found it appropriate to prepare a separate article for each Windows version. You can get our update article that relates to your operating system version by using the links below.
Подсистема печати недоступна! Не существует обработчик печати
В этом материале я расскажу, как избавиться от ошибки:
— Для версий Windows XP
— Для версий Windows 7-8
— Для версий Windows 10
В десятке тоже можно столкнуться с проблемами при подключении нового оборудования, но там ошибка обозначается другим сообщением, да и решение состоит из других действий. Появиться уведомление может не только при подключении нового принтера, но и при попытке напечатать документ на устройстве, которое до этого работало без сбоев. Опытные пользователи в первую очередь выполняют переустановку драйверов. Иногда такое действие помогает, а иногда – нет.
Причина появления ошибки — подсистема печати недоступна
Программное уведомление выскакивает из-за пропажи или случайного удаления файла «winprint.dll». Я тоже столкнулся с этой ошибкой после глубокой очистки компьютера от ненужных файлов при помощи одного приложения. Легко догадаться, что подобные утилиты могут перепутать ненужный файл с важным элементом. Перед любой очисткой реестра и жестких дисков рекомендую делать резервную копию.
Избавляемся от ошибки в Windows XP — Windows 7-8
Подсистема печати недоступна или не существует обработчик печати, о котором говориться в сообщении, является одним из главных компонентов, участвующих в печати Windows. За работу обработчика печати отвечает файл «winprint.dll». Остальные элементы, за счет которых происходит печать, находятся в системной директории «Spool». Найти ее можно через поиск Windows, только не забудьте поставить в настройке папок галочки напротив пункта «Сделать видимыми системные файлы и папки». Зайдите в эту директорию. Там вы увидите следующие папки:
Tools – здесь хранятся утилиты для изменения параметров работы принтера;
Drivers – в этой папке находится программное обеспечение для устройства, установленное на компьютер;
Servers – указывает, есть в сети доступные устройства для печати;
Printers – директория отвечает за сохранение элементов печати;
Prtprocs – здесь находится обработчик печати.
На этом скриншоте показан путь и сами папки:

Ошибка связана с обработчиком, поэтому мы будем работать с каталогом Prtprocs, так как в нем лежат файлы, отвечающие за работу устройства. Заходим в папку, здесь нам нужно найти каталог под названием W32X86(если у вас установлен Windowsx32) или x64 (если Windowsx64). У меня стоит 64-разрядная система:

Заходим в папку, нам нужен файл «winprint.dll». Его нет? Скопируйте его с другого компьютера с такой же операционной системы. Если такая возможность отсутствует, то просто скачиваем его из интернета:
После скачивания вам необходимо будет переместить файл в нужную директорию.
Готово, после восстановление или замены этого файла ошибка должна исчезнуть. Теперь вы можете установить драйверы и полноценно работать с принтером. После решения этого программного сбоя рекомендуется перезагрузить принтер и компьютер.
Если выше названный файл «winprint.dll» вы не смогли найти в интернете или вовсе не знаете где его искать, тогда вы можете скачать его по моей ссылке, которые находятся ниже.
Решение проблемы подсистема печати недоступна в Windows 10
Если вы обновились до десятой версии, а принтер перестал отображаться, то стоит попробовать добавить его вручную. Не исключено, что при попытке печати будет выскакивать ошибка с аналогичным содержанием, о которой я рассказывал выше. Итак, автоматическая диагностика результатов не принесла. Стоит выбрать ручной поиск.
Кликаем левой кнопкой мыши по значку уведомлений, здесь необходимо выбрать пункт под названием «Все параметры». В это меню также можно попасть при помощи комбинации клавиш «Win+I». Переходим в раздел «Устройства» – «Принтеры и сканеры». Нажмите на кнопку «Добавить сканер или принтер». Подождите пару минут. Есть вероятность, что операционная система самостоятельно найдет устройства и автоматически загрузит нужное программное обеспечение для принтера.
Более подробно про правильную установку принтера на свой персональный компьютер вы можете узнать из этой статьи:
ВАЖНО! Во время этих операций у вас должен быть активное соединение с интернетом.

Если Windows 10 не смог найти устройство, то нажимаем на кнопку «Необходимый принтер отсутствует в списке» – она появится после неудачного поиска. Теперь вы можете установить новое оборудование по другим системным параметрам: добавить беспроводное устройство, вписать адрес принтера или указать, что устройство уже устарело (после этого поиск будет выполняться с другими настройками.

Итак, подводя итого сегодняшней темы, в которой мы с вами рассмотрели основные и наиболее часто возникающие ошибки, такие как — «Не удалось установить принтер». «Не существует обработчик печати». «Подсистема печати недоступна», по своей практике могу сказать, что чаще возникновение ошибки связано именно из-за программного сбоя, по крайней мере мне пока еще не доводилось обнаруживать неисправность принтера из-за таких ошибок.
Если же Вы не нашли решение своей проблемы из всего выше написанного, то я вам рекомендую ознакомиться со следующими статьями, в которых приводятся дополнительные перечни для устранения неполадок при подключений принтера к компьютеру:
Однако если эти инструкции вам вдруг не помогли, то тогда вам стоит убедиться в том, что ваше печатающее устройство работает исправно на других компьютерах.


