Working Set
The working set of a process is the set of pages in the virtual address space of the process that are currently resident in physical memory. The working set contains only pageable memory allocations; nonpageable memory allocations such as Address Windowing Extensions (AWE) or large page allocations are not included in the working set.
When a process references pageable memory that is not currently in its working set, a page fault occurs. The system page fault handler attempts to resolve the page fault and, if it succeeds, the page is added to the working set. (Accessing AWE or large page allocations never causes a page fault, because these allocations are not pageable .)
A hard page fault must be resolved by reading page contents from the page’s backing store, which is either the system paging file or a memory-mapped file created by the process. A soft page fault can be resolved without accessing the backing store. A soft page fault occurs when:
- The page is in the working set of some other process, so it is already resident in memory.
- The page is in transition, because it either has been removed from the working sets of all processes that were using the page and has not yet been repurposed, or it is already resident as a result of a memory manager prefetch operation.
- A process references an allocated virtual page for the first time (sometimes called a demand-zero fault).
Pages can be removed from a process working set as a result of the following actions:
- The process reduces or empties the working set by calling the SetProcessWorkingSetSize, SetProcessWorkingSetSizeEx or EmptyWorkingSet function.
- The process calls the VirtualUnlock function on a memory range that is not locked.
- The process unmaps a mapped view of a file using the UnmapViewOfFile function.
- The memory manager trims pages from the working set to create more available memory.
- The memory manager must remove a page from the working set to make room for a new page (for example, because the working set is at its maximum size).
If several processes share a page, removing the page from the working set of one process does not affect other processes. After a page is removed from the working sets of all processes that were using it, the page becomes a transition page. Transition pages remain cached in RAM until the page is either referenced again by some process or repurposed (for example, filled with zeros and given to another process). If a transition page has been modified since it was last written to disk (that is, if the page is «dirty»), then the page must be written to its backing store before it can be repurposed. The system may start writing dirty transition pages to their backing store as soon as such pages become available.
Each process has a minimum and maximum working set size that affect the virtual memory paging behavior of the process. To obtain the current size of the working set of a specified process, use the GetProcessMemoryInfo function. To obtain or change the minimum and maximum working set sizes, use the GetProcessWorkingSetSizeEx and SetProcessWorkingSetSizeEx functions.
The process status application programming interface (PSAPI) provides a number of functions that return detailed information about the working set of a process. For details, see Working Set Information.
Частные байты и рабочий набор в Process Explorer
Я знаю, что рабочий набор-это фактический объем памяти, используемый процессом, а также, что частные байты-это сумма, отложенная на всякий случай, если ей нужно больше.
Так я бы добавил два, чтобы выяснить, сколько памяти на самом деле отнимается от других процессов в системе?
1 ответов
Я боюсь, что это не так просто. В частности, Private bytes не очень полезен для ответа на поставленный Вами вопрос.
Первое, что нужно иметь в виду, что страница памяти может существовать в основной памяти или во внешнем хранилище (в наши дни «дисковая подкачка» или «подкачка»). Во-вторых, процесс будет иметь частные страницы памяти в своем контуре, но также будет использовать объекты в общих страницах, которые другие процессы используют в то же время.
рабочий set — размер страниц, принадлежащих процессу, которые в данный момент хранятся в основной памяти. При перемещении страницы памяти, используемой процессом, в файл подкачки она удаляется из метрики рабочего набора, а при ее вызове обратно в основную память-снова добавляется.
рабочий набор не только обратиться к памяти, однако владеет. процессы используют много объектов общей памяти, и размер этих объектов отражается в статистике. к сожалению, когда два процессы совместно используют объект 1 МБ, оба их процесса показывают выделение 1 МБ в рабочем наборе, поэтому, если вы добавили все рабочие наборы, объект 1 МБ будет записан дважды, поэтому накопление всех ваших размеров рабочего набора может в крайних случаях превысить размер доступной оперативной памяти. подробнее можно посмотреть здесь: http://cybernetnews.com/cybernotes-windows-memory-usage-explained/
Байт ссылается на размере файла подкачки, что выделяется процессу (не обязательно используется)в том случае, если частная память процесса полностью выгружается для подкачки. большую часть времени процесс не является полностью (или вообще) резидентом файла подкачки, поэтому частные байты, по-видимому, имеют «комнату» для дальнейшего выделения. Однако это не так.
Private bytes однако относится только к частной памяти процессов, поэтому это значение может не отражать общие ресурсы (даже если общий ресурс используется только этот процесс в настоящее время).
«рабочий набор Private» («WS Private bytes» или «Private WS» в Process explorer в зависимости от версии), вероятно, является лучшей метрикой для вашего использования. он не имеет отношения к файлу подкачки, поэтому вы получаете точное представление о влиянии процессов на ваш физический ОЗУ, и это не вдвойне-подсчет общих объектов. общие объекты подсчитываются один раз (только для процесса, который их создал), но это также означает, что с точки зрения одного процесса вы не записывая, что процесс использует общие объекты, созданные другим процессом, процесс может использовать больше оперативной памяти на другом компьютере или в ситуации, когда требуется создать сам общий объект вместо использования другого экземпляра процесса. Диспетчер задач Windows использует working set private в качестве метрики использования памяти.
Change from Public to Private Network in Windows 7, 8 and 10
Make some tweaks to ensure you are not sharing too much (or too little)
In Windows, when you connect to a wireless network, it will either register it as a Public network or a Private network. Private networks are basically home and work whereas public networks are anywhere else, which you don’t trust.
Sometimes Windows detects a private network as a public one and vice versa. You can manually make some changes to ensure that you are not accidentally sharing either too much on a public network or blocking all sharing on a private network.
In this article, I walk you through the steps for Windows 10, Windows 8.1, Windows 8 and Windows 7.
Windows 10
In Windows 10, go ahead and click on the Ethernet or wireless icon in the system tray of your taskbar. The Ethernet icon is like a little computer and the wireless icon is, well, pretty well-known. Once you do that, click on the Network & Internet Settings link.

This will bring you to the PC settings dialog with the Status tab selected. If you are connected to a WiFi network, click on WiFi in the left-hand pane, otherwise click on Ethernet.
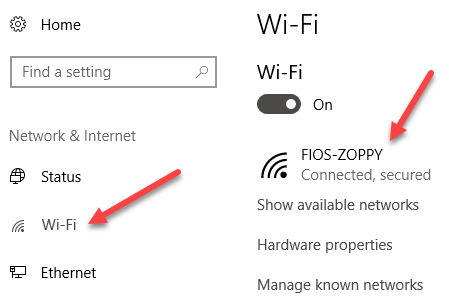

Go ahead and click on the name of the WiFi network or Ethernet network that has the Connected status. When you click on the network, you will now be able to select Public or Private.

For WiFi networks, you’ll also have the option to connect automatically when in range of the WiFi network.
Windows 8.1
In Windows 8.1, to change the network profile, we have to go into the PC Settings screen. To do that, open the Charms bar and click on Change PC Settings at the bottom.

Now click on Network and you’ll see the list of connections, i.e Ethernet, Wireless, etc.

Now all you have to do is turn on the Find devices and content option. It’s automatically turned off for public networks, so when you turn it on, it changes the network to a private network.

Windows 8
For Windows 8, follow the following procedure. First, right-click on the network icon in the Windows 8 system tray and click on Open Network and Sharing Center.

Here you will see the network you are connected to and what type of network Windows 8 has identified it as.
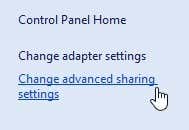
As you can see above, my network is considered a Private network, which is correct since I’m at home and connected via Ethernet. If this is incorrect, there are a couple of things you can do. First, you can click on Change advanced sharing settings in the left-hand pane.
Click on Private and then make sure you have these options enabled:
– Turn on network discovery
– Turn on file and printer sharing
– Allow Windows to manage homegroup connections
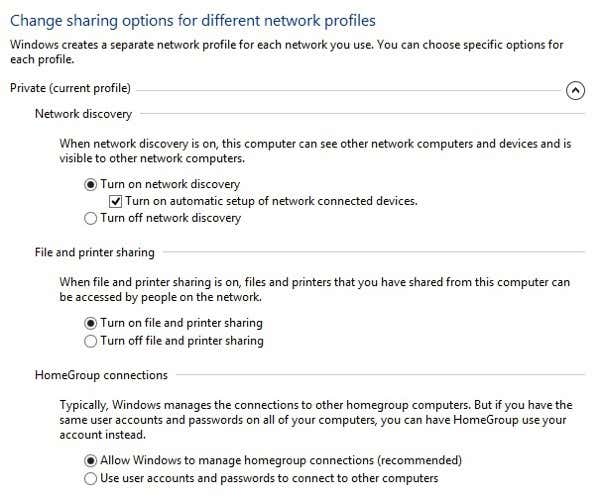
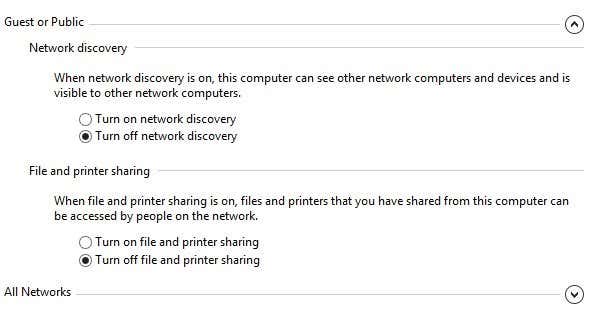
Then collapse Private and expand Guest or Public and make sure you have these options set:
– Turn off network discovery
– Turn off file and printer sharing
Once you have done this, you then need to go to the Windows 8 desktop and open the Charms bar. Click on Settings and then click on the Network icon.
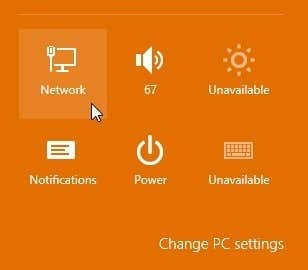
You’ll see Network and then Connected. Go ahead and right-click on that and choose Turn sharing on or off.

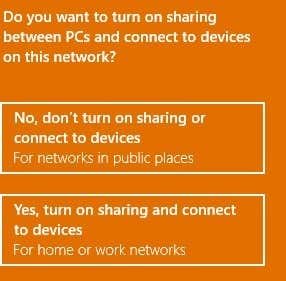
Now choose Yes if you want your network to be treated like a private network and No if you want it to be treated like a public network. Note that the label Private or Public may remain the same in Network and Sharing Center, but once you choose the sharing settings manually, the network will have the appropriate settings applied.
Windows 7
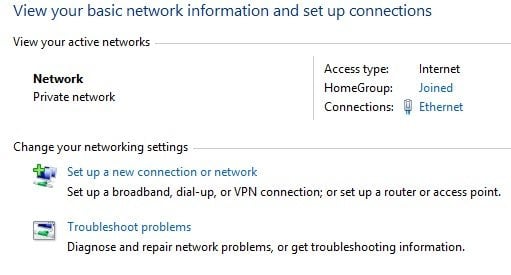
In Windows 7, the process is a bit different. You still have to click on the network icon in your taskbar, but this time click on the Open Network & Sharing Center link.
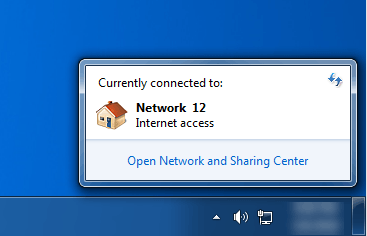
Here, you will see an overview of your network connection. Under View your active networks, you’ll see the name of the Ethernet or WiFi network and it should have a link underneath called Home network, Work network or Public network.
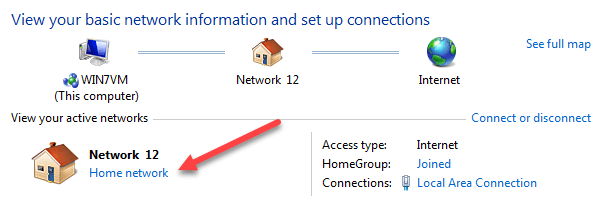
Click on that link and you’ll be able to change between the three different network types.
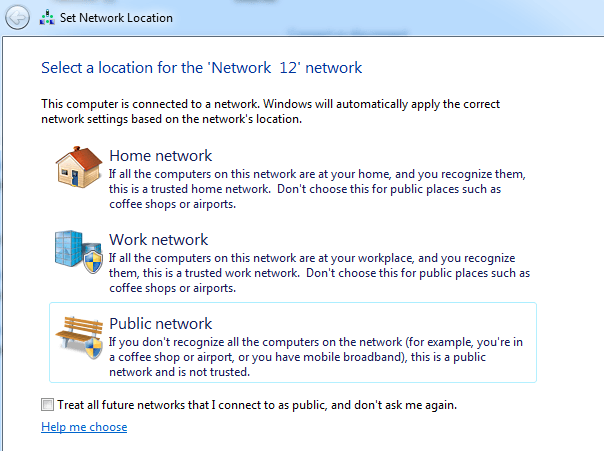
There is also an option in Windows 7 to treat all future networks as public networks automatically, though I don’t think most people would find that useful.
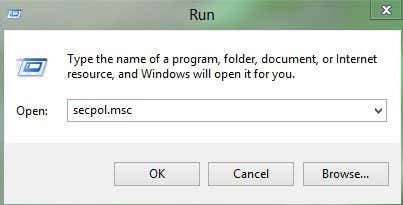
Manually Force a Network Location
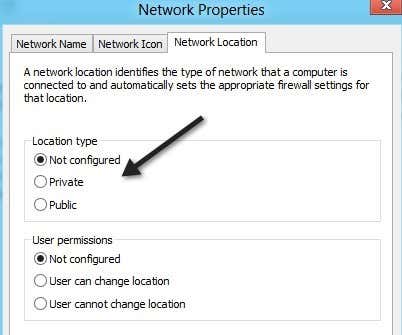
As a last resort, if you can’t change the network location using the methods above, you can manually change the network location using a tool called secpol.msc. This will not work on the Home, Student or Starter editions of Windows. In Windows, press the Windows Key + R, which will bring up the Run dialog box. Type in secpol.msc into the run dialog box.
Then click on Network List Manager Policies at the left and on the right-hand side you should see a couple of items with descriptions and then something called Network, which is the current network you are connected to. It may also be called something else, but it doesn’t have a description. If you are connected to a WiFi network, it will be the name of your WiFi network.
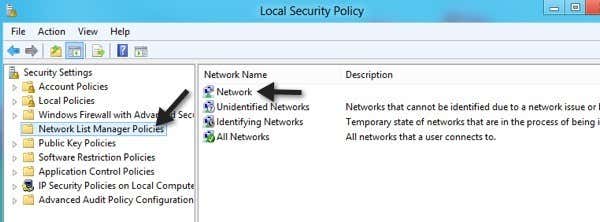
Double-click on it and click on the Network Location tab. Here you can manually change the network location from Private to Public and vice versa.
That’s about it! Not the easiest thing in the world, but it’s Microsoft! If you are having problems with changing network locations in Windows, post a comment here and we’ll help. Enjoy!
Founder of Online Tech Tips and managing editor. He began blogging in 2007 and quit his job in 2010 to blog full-time. He has over 15 years of industry experience in IT and holds several technical certifications. Read Aseem’s Full Bio


