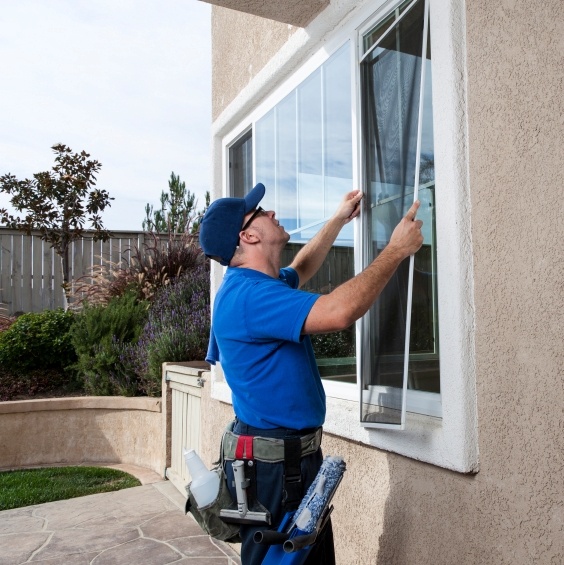
- How To Remove Window Screens – From The Outside
- How To Remove Window Screens?
- Tools To Remove Screen From Window:
- Materials
- Here Is A Step By Step Instruction On How To Remove Window Screens
- How to remove a Pull Tab Screen?
- R eplacement of Window Screens
- Large Window Screen Replacement
- A Few Final Thoughts And Words
- Windows: Bring Off-Screen Window Back Onto Screen
- Fix 1 – Resolution Trick
- Windows 10 & 8
- Windows 7
- Fix 2 – Show Desktop Toggle
- Fix 3 – Move Option 1
- Fix 4 – Move Option 2
- Fix 5 – Cascade Windows
- Fix 6 – Maximize
- Single pane windows with outside screens
- 2 Answers 2
- Not the answer you’re looking for? Browse other questions tagged windows or ask your own question.
- Linked
- Related
- Hot Network Questions
- Subscribe to RSS
- In win32 programming, how do I draw a rectangle anywhere on the screen (outside my program)?
- 3 Answers 3
How To Remove Window Screens – From The Outside
Window screens are used to cover opening of windows and a lot of us use one but they, like other things in our life, need changing and that task can be quite tricky. Even though we are asked to remove our window screens in advance, we never do so till it is too late.
The important thing to keep in mind is how to remove a window screen without doing any damage to the window itself.
How To Remove Window Screens?
Tools To Remove Screen From Window:

Craftsman 9-47137 Slotted Screwdriver Set, 5 Piece

Materials
In order to remove screen from window , use
- A putty knife or a flat screwdriver to remove the old screen splint from the frame. If there is any debris or dirt in the channel, clear it out well before continuing to work.
- Make sure that the screen material is at least 2-inches wider than the frame itself. Use a utility knife to trim the length, again leaving 2 inches excess at each end of the frame.
- Now roll the screen all the way over the frame and pull the screen tightly over it.
- The screen roller will have two wheels at each end: a concave wheel that has an inward groove on the edge, and a convex one that has a rounded edge.
With the help of the convex wheel, roll the tool over the screen so that it gets pushed into the channel of the frame. - Take the new screen splint and use the concave wheel on the screen roller to push the splint into the channel of the frame, fitting over the screen.
- Make sure the splint is pushed in all the way so that the screen does not pop off. Once the screen and splint are placed, trim off the excess screen material and you are all set to go.
The thing that you should note here is that the actual way of removing window screens is from the inside; that is the method recommended by most manufactures.
Pull tabs are provided for window screens to be removed from the inside. The method of window screen removal that I am referring to here should only be used as a last resort.
Here Is A Step By Step Instruction On How To Remove Window Screens
- Your right thumb should be pressed on the lower right hand side of the screen frame and then you can gently push the screen into the recess of the frame. This process will help you to lower the hidden half moon shaped tension springs of the screen.
- A gap will thus be created on the left side of the screen. You need to put the fingers of your left hand in this gap created on the left hand side of the screen.
Be careful about how much pressure you are applying to the screens while inserting fingers, if you are not too sure about putting your finger in, you can also do the same with screwdrivers, or other cylindrical
In cases where you do not get enough space, my advice would be to not push things any further as it might damage the window itself.
Sometimes screens also come with finger tabs in the upper left and lower left corners of the of the screen guard. In that case my advice would be that you put your fingers into the screen tab and pull out the lower left corner.
How to remove a Pull Tab Screen?
How-To Remove a Pull Tab Screen via JELD-WEN Windows and Doors
R eplacement of Window Screens
How to remove a window screen without lift tabs via Ben Donahower
- Next, the glass needs to be cleaned with care. Remember it is glass so be careful about the cleaning formula and how you are handling it. After it has been cleaned well, place it back into the window frame.
There is a probability that there will be water in the track of the bottom of the window from cleaning it. You would not want dirty water to splash back on to the clean glass again.
Now it is time for the glass to be put back into the window frame:
- First you need to lift the screen back up to the glass with the half moon shaped tension springs facing your right and use the pull tabs on the left side.
- Be careful about to pull the tabs that are facing the glass or else the screen will be inserted inside out. If you do that, you would not be able to remove it next time.
- Place right side of screen in frame and apply just enough pressure to the right side to lower the tension springs. This will allow the space needed to insert screen’s left side into the framework.
Due to the excess water formed in bottom window track, you should insert top left screen first and follow it by gently placing the lower left side into the frame without splashing any of the water back on to the clean glass.
Large Window Screen Replacement
Window screen replacement: do it yourself via iScaper1
And there you go! Your window screen frame replacement is done!
The splash back problem can easily be solved by wicking up excess water in track with any good sponge before placing the screen back into the frame.
A Few Final Thoughts And Words
This is a really easy work if you are a little precautious and take a little care. Because you will be using sharp objects, keep children away when you are doing this work.
You will obviously get a lot of professionals to do this work for you but if you are attempting to do this on your own, this instruction should be of good help. Always try to do it from the inside but if things can’t be done that way then take the last resort.
Windows: Bring Off-Screen Window Back Onto Screen
By Mitch Bartlett 115 Comments
While using Microsoft Windows, I had a window that had somehow fallen completely off of my screen. Right-clicking the window in the Taskbar and selecting Maximize brought it back, but there was no way I could get the window restored to where I could move it around my screen with my mouse.
Luckily, there are a couple of ways to bring off-screen windows back to the desktop screen.
Fix 1 – Resolution Trick
Windows 10 & 8
- Start the problematic application.
- Right-click a blank area of the Desktop, then choose “Display settings“.
- Select “Advanced display settings” at the bottom of the window.
- Temporarily change the “Resolution” to another value, then choose “Apply“.
- See if you can see the window on your screen now.
- Change the resolution back to the previous value, then select “OK“.
Windows 7
- Start the problematic application.
- Right-click a blank area of the Desktop, then choose “Screen Resolution“.
- Temporarily change the “Resolution” to another value, then choose “Apply“.
- See if you can see the window on your screen now.
- Change the resolution back to the previous value, then select “OK“.
Fix 2 – Show Desktop Toggle
- Hold down the Windows Key, then press “D“. Repeat these steps to see if it makes the window you are looking for reappear.
- Alternately, you can right-click a blank area of the taskbar, then choose “Show the desktop“, then repeat.
Fix 3 – Move Option 1
- Select the program in the task bar.
- Hold the Windows Key while pressing Left Arrow or Right Arrow repeatedly to move the window back into view.
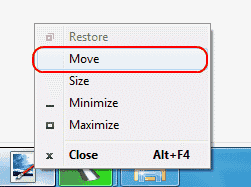
Fix 4 – Move Option 2
- In Windows 10, 8, 7, and Vista, hold down the “Shift” key while right-clicking the program in the taskbar, then select “Move“. In Windows XP, right-click the item in the task-bar and select “Move“. In some instances, you may have to select “Restore“, then go back and select “Move“.

- Use your mouse or the arrow keys on your keyboard to move the window back onto the screen.
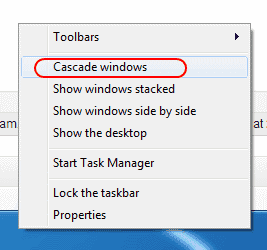
Fix 5 – Cascade Windows
- Right-click a blank area of the task-bar, then select “Cascade windows“.
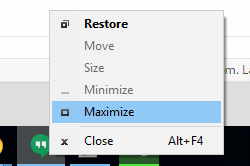
Fix 6 – Maximize
Sometimes a single app will get stuck in a state where it cannot redraw onto the Window. You can usually alleviate this by doing the following.
- Hold “Shift” and right-click on the program icon in the taskbar, then choose “Maximize“.
How do I prevent my application from starting off the screen every time I launch it?
Most applications will stop doing this if you properly exit out of the application while it is on the screen. If you have already properly exited the application, you might need to uninstall and reinstall it.
Otherwise, you can try right-clicking the icon for the application, then choosing “Properties“. Under the “Shortcut” tab, change the “Run” setting to “Maximized“, then select “OK“. 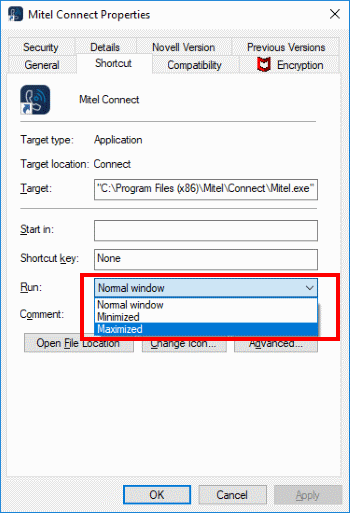
Single pane windows with outside screens
My house use to have old windows with storms I had to install outside each winter. Through a grant, I had new windows installed. They are double hung, single pane, with screens to the outside. Do I leave the screens on during the winter? How do I keep the cold out with single panes?
2 Answers 2
Well, that wasn’t much of an upgrade. I’m afraid you’re stuck with having to use that plastic stuff or installing extra storm windows.

Install insulating shutters.
Solid shutters will decrease both heat loss and summer heat gain. Insulating shutters consist of wood panels, a vapor barrier, and sometimes a decorative covering. If you fit them tightly against a window frame, they’ll provide an insulating air space between the shutter and the window.
Too bad. I would have thought any grant would specify modern efficient windows.

Not the answer you’re looking for? Browse other questions tagged windows or ask your own question.
Linked
Related
Hot Network Questions
Subscribe to RSS
To subscribe to this RSS feed, copy and paste this URL into your RSS reader.
site design / logo © 2021 Stack Exchange Inc; user contributions licensed under cc by-sa. rev 2021.4.16.39093
By clicking “Accept all cookies”, you agree Stack Exchange can store cookies on your device and disclose information in accordance with our Cookie Policy.
In win32 programming, how do I draw a rectangle anywhere on the screen (outside my program)?
I work in application testing team. I’ve been assigned a task to write a win32 application that takes screenshots of rectangular sections of the screen. This involves selecting the part of the screen to take screenshot of.
What I can’t figure out is how do I draw a rectangle anywhere on the screen, which would be the rectangular area to take screenshot of. I’ve seen other applications do it but I can’t find tutorials on how to do this exactly.
I know how to draw rectangles in my own application ( BeginPaint and Rectangle win32 functions), but how do I draw a rectangle anywhere on the screen?
3 Answers 3
- Create a top-level window the same size as the size of the screen, and set the WS_EX_LAYERED style
- Call SetLayeredWindowAttributes and set the transparent color to RGB(255,0,255) .
- Completely fill your window with the transparent color
- Draw your rectangle in another color over the top of it
EDIT:
This function uses UpdateLayeredWindow to achieve the same result. I haven’t actually tested it but it compiles ok 🙂
As modern OSes use composited window systems it is not easy to just «draw on the desktop» or the front buffer as it used to be called. The transparent overlap is probably the easiest way of achieving the result you need.
I am fairly confident there is a way to get a pointer to the composited surface, but of course, all the functions you will need to do this will be largely undocumented. The best places to start will be dwmapi.dll , gdi32.dll and opengl32.dll
Firstly dwmapi.dll has some un-tagged exports but you can get name hints for them
When OpenGL applications want to update the window, the SwapBuffers calls end up going through these two functions. There is a handle to the allocation that contains the composited surface somewhere in all of this as this handle is given to the OpenGL driver so that OpenGL application can then send a request to have its framebuffer blitted into the composited surface.
If you can open that handle (you can probably do this with D3DKMTLock you should be able to write to the composited surface prior to it being presented to the screen.
It’s been a while since I messed around with this kind of thing, but I hope this may point you in the right direction.
I’m interested in hearing if there is a way to do this without cheating. Because as far as I know all of the snipping programs make a copy of your current desktop before it lets you select an area to copy.
Check out the snipping tool that comes with Windows. %windir%\system32\SnippingTool.exe It captures the current desktops to a bitmap, displays them full screen over your current desktops, and then lets you select a portion of the screen to copy.
Other programs use similar techniques with fancier code. For example some snipping tools create a full screen transparent window over all of your desktops and then lets you draw the square area on the transparent form; however, the actual image capture is done by removing the transparent window and mapping the form to screen coordinates to capture the portion of the desktop.
There’s two reasons for the trickery. First is you need to capture mouse input and prevent the underlying desktop / application from using the mouse info. Second is a canvas is required for drawing and windows doesn’t expose a single canvas that encompasses all desktops.
Been years since I’ve done anything like this, so maybe things have changed?


