- How to identify Com Ports in Windows10
- Replies (5)
- How do I determine which process is using a serial port?
- 3 Answers 3
- COM port in Windows 10: fix any COM port-related issues in 2 easy ways
- The Problem: Windows 10 COM ports missing
- Add COM port Windows 10 with Virtual COM Port Driver
- Virtual COM Port Driver
- Virtual Serial Port Driver
- Native method to mount virtual COM ports in Windows 10
- How to change COM port settings in Windows 10
- Just follow these simple steps on a Windows 10 machine to change the default COM port number.
- Tip: Here is what you can try if COM ports are not showing in Device Manager:
- How to assign a COM port to a USB device Windows 10?
- How to Check for Ports in Use in Windows 10
- Use Nirsoft CurrPorts
- Command Prompt Method
- TCPView
How to identify Com Ports in Windows10
The new device manager in windows 10 is not showing the «com port» numbers. Such as COM1 COM2 and so on. If I open the serial bus controller line in device manager it does not provide the port information.
What I am trying do is connect to my network switch with a terminal emulation program via an Ethernet cable out of the back of the switch. I know it works since I used it on an old win7 computer. But that computer is long gone. 9600, 8, none, 1. COM1, COM2, or whichever port I happened to be plugged into. But I can’t verify what COM PORT I am using.
If someone can point me in a direction, it would be a big help. I have done all the net searches I can think of.
Thanks in advance.
***Modified Title from: Identify Com Ports in windows10***
Replies (5)
Thank you for writing to Microsoft Community Forums.
We understand your concern. However, serial bus controller in Device Manager contains USB devices and USB port numbers and it seems COM Ports devices might be hidden, so please follow the steps mentioned below and check if you can see the Com Ports.
Open Device Manager.
Click on View in the menu bar and select Show hidden devices.
Locate Ports (COM & LPT) in the list.
Check for the com ports by expanding the same.
62 people found this reply helpful
Was this reply helpful?
Sorry this didn’t help.
Great! Thanks for your feedback.
How satisfied are you with this reply?
Thanks for your feedback, it helps us improve the site.
How satisfied are you with this reply?
Thanks for your feedback.
below is version number of the device manager I have on my machine.
There is no com or lpt port line on this version. It did show as described on my win7 machine but not on this version of device manager. I had «shown hidden devices» before, but to no avail, and I just double checked it again after reading your response. And thank you for the response. But so far I can still find nothing that associates usb devices to com ports on this machine. I had expanded the serial bus controller tree and checked properties of the three usb devices (generic usb hub, usb host controller and usb root hub) connected Still no com port information.
If you can give me another idea it will be a big help. After a couple of days of chasing information down on the net, and so far with no luck, it has been frustrating. You wouldn’t think Microsoft would make information that is needed so often so hard to dig out. BTW I also went thru properties on all the items under HID as well. Still nothing that showed com ports.
How do I determine which process is using a serial port?
The company I work for makes hardware that communicates to the computer though a serial port. Third party companies write software that communicates with our hardware.
There are times when I need to diagnose our hardware. However, a third party software app connects to the serial port when Windows starts up, blocking any other connection. I don’t know the name of this application/service and it’s not always the same one.
Is there any way to either:
- Find the name/pid of the app/service that is currently using a given serial port or
- Steal the serial port connection from another app.
vb.net preferably, but I’ll take a language agnostic answer as well.
3 Answers 3
You can use the process explorer tool also from SysInternals to search for open handles. In this case you would want to search for ‘Serial’ since it uses device names that may not map to com port numbers. (e.g. COM1 is \Device\Serial0 on my system).
If you want to take control of the serial port from another app I think you would need co-operation of the driver.
As Rob Walker said, you can find who’s using a serial port using Process Explorer. Most of the time, typing Ctrl + F and searching for «serial» will show you who has a serial port open, but I just ran into a situation where my «COM3» serial port’s handle appeared as «\Device\VCP0». It may be strange because it was running under VirtualBox with a USB-to-serial connector.
If searching for «serial» and «device\vcp» don’t get you any results, you may be able to figure out how serial port handles are named by opening one with a known program. In Process Explorer, display the lower pane with each process’s open handles by typing Ctrl + L . Click on the process that you used to open the serial port and look through the lower pane to see which handles look like they might be a serial port. You can open and close the port while you’re looking, and the file handle should appear and disappear, as well as being highlighted in green or red. Of course, this is only possible if you have more than one serial port or the serial port you’re trying to diagnose isn’t always locked by some mystery process.
Sysinternals has a slew of utilities I find very useful and educational for tracking down what processes are doing to the system.
They have a utility that does exactly what you need called Portmon, and give some information on how it works near the bottom of the page. That info and a few well-asked questions will probably give you everything you need to implement it yourself if the utility isn’t enough.
COM port in Windows 10: fix any COM port-related issues in 2 easy ways
In this article, we are going to discuss two ways to resolve the problem of the lack of COM ports on computers running the Windows 10 operating system. Windows 10 COM port issues plague many users whose computers have been designed without the inclusion of any serial interfaces. The absence of physical COM ports can hinder a user’s ability to make use of computing peripherals that transmit their data serially.
The way to resolve this issue is through the use of Windows virtual serial ports. It can be very frustrating to query your Device Manager with the expectation of finding COM ports only to find that they are not present. We are going to show you two different methods you can use to add COM ports to Windows 10. One is a procedure that employs the native functionality built into the operating system and the other uses third-party software.
The Problem: Windows 10 COM ports missing
Locating virtual COM port in Windows 10 can be a problem for users. You navigate to your Device Manager with the expectation to see the virtual COM port drivers that were previously loaded on your machine and find they are not there. The serial port option might not be available due to the installation of a Windows 10 update. The update may have impacted the ability of the virtual serial port drivers for certain devices to load by default. This poses a significant issue when you are trying to use these devices.
First, we will investigate the use of Eltima Software’s Virtual Serial Port Driver to add Windows 10 virtual serial ports. We provide a step-by-step procedure which can help you eliminate issues related to COM ports on Windows 10 in as little as three clicks. Read on to learn more about how to use this efficient virtual COM port driver for Windows 10.
Add COM port Windows 10 with Virtual COM Port Driver
When the COM and LPT ports do not appear in your Windows 10 Device Manager your ability to perform your work is negatively impacted. There is a way to resolve this annoying problem in a manner that will prevent it from recurring. The solution is to install the aforementioned Virtual COM Port Driver from Eltima. This application allows the creation of an unlimited number of virtual serial port pairs. The virtual COM port pairs employ a virtual null-modem connection to enable communication with each other.
Virtual COM Port Driver

Virtual Serial Port Driver
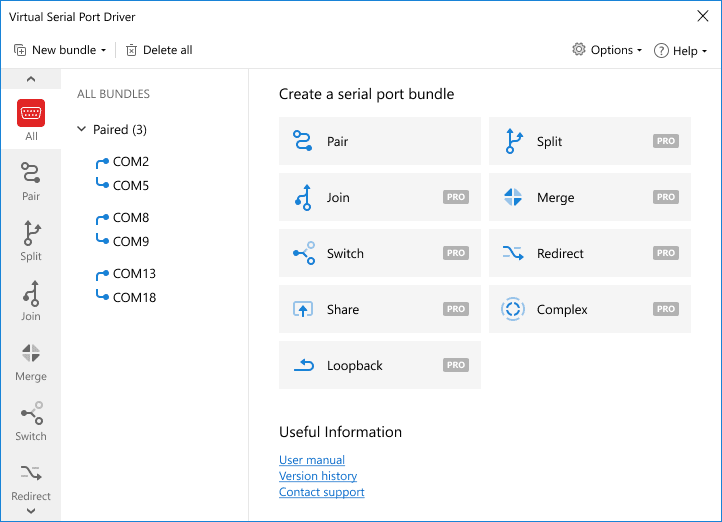
Users engaged in the practice of developing and testing serial applications and hardware will benefit from the configuration options that are possible through the use of Virtual Serial Port Driver. One example is the ability to allow two applications to share data via virtual serial ports. Connecting the apps with a pair of virtual COM ports lets the data written by one program be immediately made available to the other program. This can save significant time and effort when debugging and testing serial apps and devices.
Step-by-step guide to add virtual COM port Windows 10:
Following these steps with Virtual Serial Port Driver (VSPD) will enable you to easily create virtual serial ports on a Windows 10 machine:
- Download and install VSPD on your Windows 10 computer.
- Launch the application and navigate to the “Manage Ports” tab. Here you can select ports from the drop-down menu or manually enter custom port names.
- After selecting the port names, simply click the “Add Pair” button and you are done! You have now created virtual COM ports which will appear as if they were physical ports in both Serial Ports Explorer and your system’s Device Manager.
- If you desire to delete the pair of ports, simply select it in the Serial Ports Explorer. In the “Manage port” tab just select and click on “Delete pair” and they are gone.
Native method to mount virtual COM ports in Windows 10
There is a fix to the problem of mounting virtual COM ports in Windows 10 that does not require the use of a third-party app. These are the steps to follow to use the Windows 10 operating system fix:
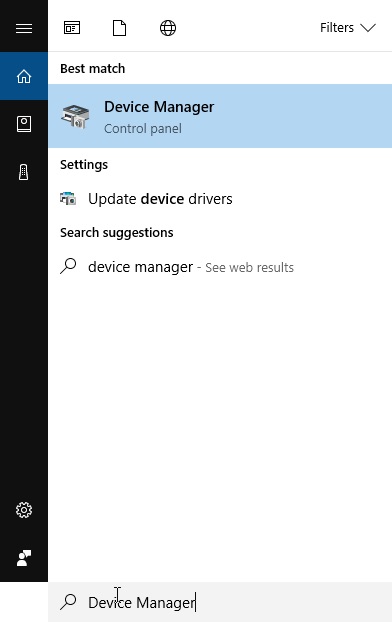
- Go to the Device Manager and type “Device Manager” in the lower left corner of the screen. (See below) Device Manager

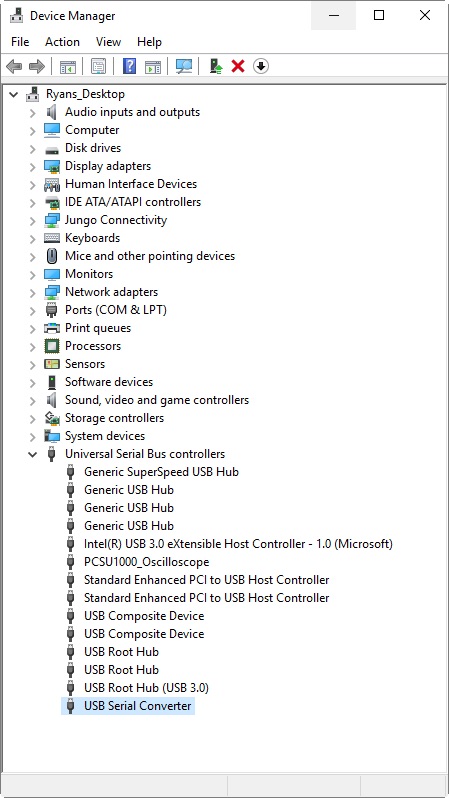
- Locate the USB to Serial Converter Settings. After plugging a USB device into your machine, expand the “Universal Serial Bus controllers” list in Device Manager. Click on the “USB Serial Converter” and open the USB Serial Converter properties.
- Enable the VCP Driver loading by opening the “Advanced” tab within the USB Serial Converter properties. Make sure the “Load VCP” option is enabled and then click OK to load the VCP.
- Re-connect the device. Unplug the USB device and re-connect it to your computer. At this time, Windows 10 should recognize the device and load the Virtual Com Port Driver.
How to change COM port settings in Windows 10
Some software applications are designed to only operate with designated serial ports. If you need to work with this kind of program, you may need to know how to find port numbers in Windows 10 so you can modify them if necessary.
In many cases when working with older devices or applications, you will be called upon to change COM port numbers to successfully operate the programs and peripherals. Some legacy equipment is only capable of working with specifically named serial ports.
The following procedure allows Windows users to change the COM port number for any attached device.
Just follow these simple steps on a Windows 10 machine to change the default COM port number.
Tip: Here is what you can try if COM ports are not showing in Device Manager:
How to assign a COM port to a USB device Windows 10?
There are multiple scenarios in which you may need to assign a COM port to a USB device on your Windows 10 computer. Some devices need to have a COM port identifier that falls within a certain range, say between COM1 and COM4. Windows may have assigned a different identifier to the port which you will be required to modify. It’s a relatively simple procedure to perform.
Here is how to assign a COM port to a USB device Windows 10:
- Open the Windows Device Manager.
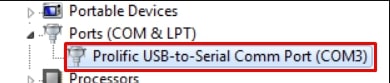
- Click on the Ports (COM & LPT) to expand the selection. You will see the ports currently in use along with their designated port identifier.
- Right-click on the device whose designation you want to change and select Properties.
- Click on Port Settings and then click the Advanced button .
- Locate the COM Port Number at the lower left of the Advanced Settings window.
- Click the Com Port Number to change the currently assigned port identifier. Select the COM port identifier that you wish to assign to the USB device attached to the port.
- Click OK on all open Property windows.
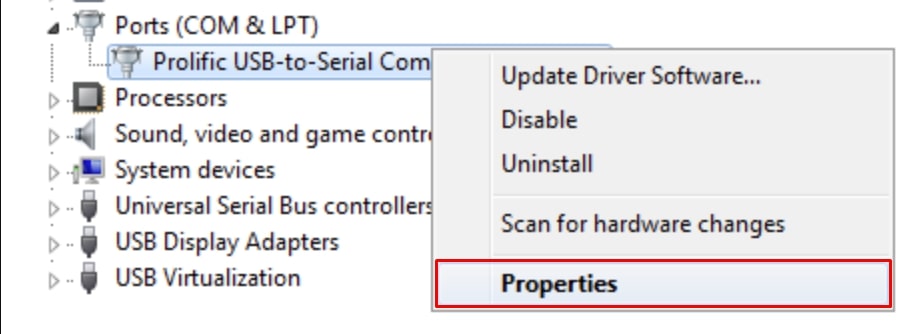
Following these steps will enable you to change the COM port identifier for USB devices attached to your Windows 10 machine.
Conclusion
Virtual COM Port Driver is an advanced way to add virtual COM port pairs. There are many instances where this Windows 10 COM Port Driver software can be instrumental when working with serial devices and applications. Some of the uses of the software include testing and debugging in usage scenarios that include:
- Verifying the functionality of serial applications for intercepting data transmitted over the network;
- Troubleshooting serial applications which are using null-modem connections;
- Developing firmware for devices that are not physically located near your computer;
- Testing virtual serial port emulators such as GPS, fax, and other devices.
How to Check for Ports in Use in Windows 10

At any one time, there’s a whole bunch of information being sent between your Windows 10 PC and the endless void of the Internet. This is done using a process whereby network-dependent processes seek out TCP and UDP ports, which they use to communicate with the Internet. First, your data gets sent to remote ports at the destination or website your processes are trying to connect to, then it gets received at local ports back on your PC.
Most of the time, Windows 10 knows how to manage ports and ensure that traffic is being directed through the right ports so that those processes can connect with what they need to. But sometimes two processes may be assigned to one port, or maybe you just want to get a better picture of your network traffic and what’s going in and out.
That’s why wrote this guide that shows you how to get an overview of your ports and see which applications are using which ports.
Use Nirsoft CurrPorts
NirSoft is one of the best indie software developers, giving us great utilities, like PassView and WirelessKeyView. While some people will prefer checking their ports without installing third-party software (in which case, scroll down to the CMD method), CurrPorts is easily the fastest and most convenient way to view your ports.

Once you’ve installed CurrPorts, just open it to see a list of all your ports currently in use. If you’re looking for local ports in use, just click the “Local Port” column at the top to order the list by port number (handy if you’re looking for a specific one). You can do the same thing with remote ports, too.
If you want to really find specific ports, click the “Advanced Filters” icon at the top and enter your string in the format they suggest. It should look something like the below image.

Hit OK when you’re ready, and the list will filter down to your queries.
Command Prompt Method
The integrated – though not necessarily the simplest – way to check open ports is to use the trusty command prompt.
Click the Start button, type cmd , then right-click “Command Prompt” when it shows up in the search results. Click “Run as administrator.”
Once you’re in the elevated command prompt, enter the following command:
This will steadily bring up a list of ports that is probably quite long, along with the Windows processes that are using them. (You can press Ctrl + A , then Ctrl + C to copy all information to the clipboard.) On the average PC, there will be two main local IP addresses that contain ports on your PC.

The first, in our case, is “127.0.0.1.” This IP address is otherwise known as “localhost” or a “loopback address,” and any process listening to ports here is communicating internally on your local network without using any network interface. The actual port is the number you see after the colon. (See image below.)

The bulk of your processes will probably be listening to ports prefixed with “192.168.xxx.xxx,” which is your IP address. This means the processes you see listed here are listening for communications from remote Internet locations (such as websites). Again, the port number is the number after the colon.

TCPView
If you don’t mind installing a third-party app and want to have more control over what’s going on with all your ports, you can use a lightweight app called TCPView. This immediately brings up a list of processes and their associated ports.

What make this better than the command prompt is that you can actively see the ports opening, closing and sending packets. Just look for the green, red and yellow highlights. You can also reorder the list by clicking the column headings, making it easier to find the process you want or two separate processes vying for the same port.
If you do find a process or connection you want to close, just right-click that process. You can then select “End process,” which is exactly the same function as the one in Windows task manager. Or you can click “Close Connection” to leave the process open but stop it from listening on a given port.

If you’re having some trouble in Windows 10, then see whether a Windows update may be causing it. We also have a handy guide for managing the health of your hard drive in Windows 10.
Related:
Content Manager at Make Tech Easier. Enjoys Android, Windows, and tinkering with retro console emulation to breaking point.


