- Time sync for Windows VMs in Azure
- Overview
- Configuration options
- Use the default
- Host-only
- External time server
- Check your configuration
- Opt-in for host-only time sync
- Windows Server 2012 and R2 VMs
- Next steps
- Create a Virtual Machine with Hyper-V
- Windows 10 Fall Creators Update (Windows 10 version 1709)
- Windows 10 Creators Update (Windows 10 version 1703)
- Before Windows 10 Creators Update (Windows 10 version 1607 and earlier)
- Синхронизации времени VMware vSphere с доменом Windows
Time sync for Windows VMs in Azure
Time sync is important for security and event correlation. Sometimes it is used for distributed transactions implementation. Time accuracy between multiple computer systems is achieved through synchronization. Synchronization can be affected by multiple things, including reboots and network traffic between the time source and the computer fetching the time.
Azure is now backed by infrastructure running Windows Server 2016. Windows Server 2016 has improved algorithms used to correct time and condition the local clock to synchronize with UTC. Windows Server 2016 also improved the VMICTimeSync service that governs how VMs sync with the host for accurate time. Improvements include more accurate initial time on VM start or VM restore and interrupt latency correction for samples provided to Windows Time (W32time).
For a quick overview of Windows Time service, take a look at this high-level overview video.
Overview
Accuracy for a computer clock is gauged on how close the computer clock is to the Coordinated Universal Time (UTC) time standard. UTC is defined by a multinational sample of precise atomic clocks that can only be off by one second in 300 years. But, reading UTC directly requires specialized hardware. Instead, time servers are synced to UTC and are accessed from other computers to provide scalability and robustness. Every computer has time synchronization service running that knows what time servers to use and periodically checks if computer clock needs to be corrected and adjusts time if needed.
Azure hosts are synchronized to internal Microsoft time servers that take their time from Microsoft-owned Stratum 1 devices, with GPS antennas. Virtual machines in Azure can either depend on their host to pass the accurate time (host time) on to the VM or the VM can directly get time from a time server, or a combination of both.
Virtual machine interactions with the host can also affect the clock. During memory preserving maintenance, VMs are paused for up to 30 seconds. For example, before maintenance begins the VM clock shows 10:00:00 AM and lasts 28 seconds. After the VM resumes, the clock on the VM would still show 10:00:00 AM, which would be 28 seconds off. To correct for this, the VMICTimeSync service monitors what is happening on the host and prompts for changes to happen on the VMs to compensate.
The VMICTimeSync service operates in either sample or sync mode and will only influence the clock forward. In sample mode, which requires W32time to be running, the VMICTimeSync service polls the host every 5 seconds and provides time samples to W32time. Approximately every 30 seconds, the W32time service takes the latest time sample and uses it to influence the guest’s clock. Sync mode activates if a guest has been resumed or if a guest’s clock drifts more than 5 seconds behind the host’s clock. In cases where the W32time service is properly running, the latter case should never happen.
Without time synchronization working, the clock on the VM would accumulate errors. When there is only one VM, the effect might not be significant unless the workload requires highly accurate timekeeping. But in most cases, we have multiple, interconnected VMs that use time to track transactions and the time needs to be consistent throughout the entire deployment. When time between VMs is different, you could see the following effects:
- Authentication will fail. Security protocols like Kerberos or certificate-dependent technology rely on time being consistent across the systems.
- It’s very hard to figure out what have happened in a system if logs (or other data) don’t agree on time. The same event would look like it occurred at different times, making correlation difficult.
- If clock is off, the billing could be calculated incorrectly.
The best results for Windows deployments are achieved by using Windows Server 2016 as the guest operating system, which ensures you can use the latest improvements in time synchronization.
Configuration options
There are three options for configuring time sync for your Windows VMs hosted in Azure:
- Host time and time.windows.com. This is the default configuration used in Azure Marketplace images.
- Host-only.
- Use another, external time server with or without using host time.
Use the default
By default Windows OS VM images are configured for w32time to sync from two sources:
- The NtpClient provider, which gets information from time.windows.com.
- The VMICTimeSync service, used to communicate the host time to the VMs and make corrections after the VM is paused for maintenance. Azure hosts use Microsoft-owned Stratum 1 devices to keep accurate time.
w32time would prefer the time provider in the following order of priority: stratum level, root delay, root dispersion, time offset. In most cases, w32time on an Azure VM would prefer host time due to evaluation it would do to compare both time sources.
For domain joined machines the domain itself establishes time sync hierarchy, but the forest root still needs to take time from somewhere and the following considerations would still hold true.
Host-only
Because time.windows.com is a public NTP server, syncing time with it requires sending traffic over the internet, varying packet delays can negatively affect quality of the time sync. Removing time.windows.com by switching to host-only sync can sometimes improve your time sync results.
Switching to host-only time sync makes sense if you experience time sync issues using the default configuration. Try out the host-only sync to see if that would improve the time sync on VM.
External time server
If you have specific time sync requirements, there is also an option of using external time servers. External time servers can provide specific time, which can be useful for test scenarios, ensuring time uniformity with machines hosted in non-Microsoft datacenters, or handling leap seconds in a special way.
You can combine external servers with the VMICTimeSync service and VMICTimeProvider to provide results similar to the default configuration.
Check your configuration
Check if the NtpClient time provider is configured to use explicit NTP servers (NTP) or domain time sync (NT5DS).
If the VM is using NTP, you will see the following output:
To see what time server the NtpClient time provider is using, at an elevated command prompt type:
If the VM is using the default, the output will look like this:
To see what time provider is being used currently.
Here is the output you could see and what it would mean:
- time.windows.com — in the default configuration, w32time would get time from time.windows.com. The time sync quality depends on internet connectivity to it and is affected by packet delays. This is the usual output you would get on a physical machine.
- VM IC Time Synchronization Provider — the VM is syncing time from the host. This is the usual output you would get on a virtual machine running on Azure.
- Your domain server — the current machine is in a domain and the domain defines the time sync hierarchy.
- Some other server — w32time was explicitly configured to get the time from that another server. Time sync quality depends on this time server quality.
- Local CMOS Clock — clock is unsynchronized. You can get this output if w32time hasn’t had enough time to start after a reboot or when all the configured time sources are not available.
Opt-in for host-only time sync
Azure is constantly working on improving time sync on hosts and can guarantee that all the time sync infrastructure is collocated in Microsoft-owned datacenters. If you have time sync issues with the default setup that prefers to use time.windows.com as the primary time source, you can use the following commands to opt-in to host-only time sync.
Mark the VMIC provider as enabled.
Mark the NTPClient provider as disabled.
Restart the w32time Service.
Windows Server 2012 and R2 VMs
Windows Server 2012 and Windows Server 2012 R2 have different default settings for time sync. The w32time by default is configured in a way that prefers low overhead of the service over to precise time.
If you want to move your Windows Server 2012 and 2012 R2 deployments to use the newer defaults that prefer precise time, you can apply the following settings.
Update the w32time poll and update intervals to match Windows Server 2016 settings.
For w32time to be able to use the new poll intervals, the NtpServers need to be marked as using them. If servers are annotated with 0x1 bitflag mask, that would override this mechanism and w32time would use SpecialPollInterval instead. Make sure that specified NTP servers are either using 0x8 flag or no flag at all:
Check what flags are being used for the used NTP servers.
Next steps
Below are links to more details about the time sync:
Create a Virtual Machine with Hyper-V
Create a virtual machine and install its operating system.
We’ve been building new tools for creating virtual machines so the instructions have changed significantly over the past three releases.
Pick your operating system for the right set of instructions:
Let’s get started.
Windows 10 Fall Creators Update (Windows 10 version 1709)
In Fall Creators Update, Quick Create expanded to include a virtual machine gallery that can be launched independently from Hyper-V Manager.
To create a new virtual machine in Fall Creators Update:
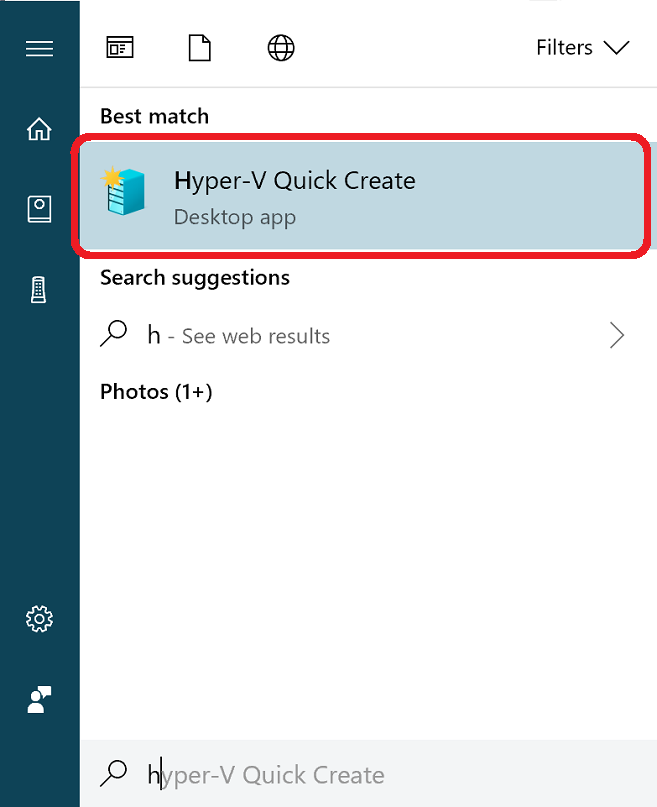
Open Hyper-V Quick Create from the start menu.
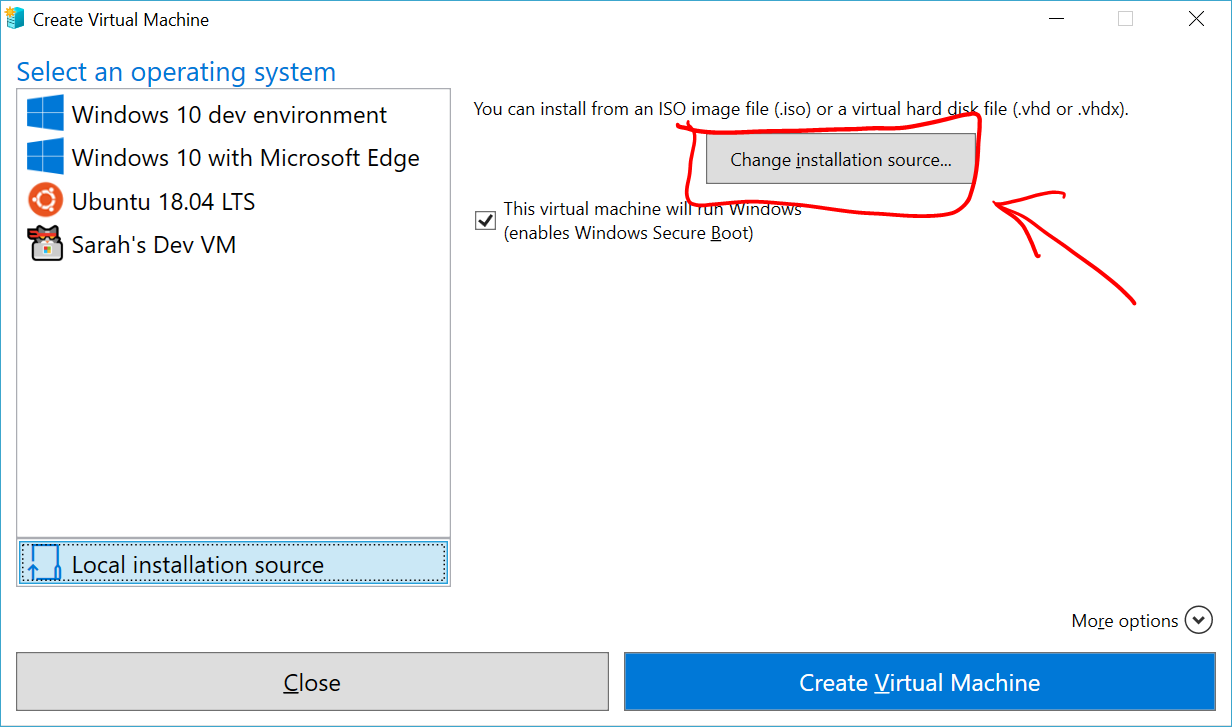
Select an operating system or choose your own by using a local installation source.

- If you want to use your own image to create the virtual machine, select Local Installation Source.
- Select Change Installation Source.

- Pick the .iso or .vhdx that you want to turn into a new virtual machine.
- If the image is a Linux image, deselect the Secure Boot option.
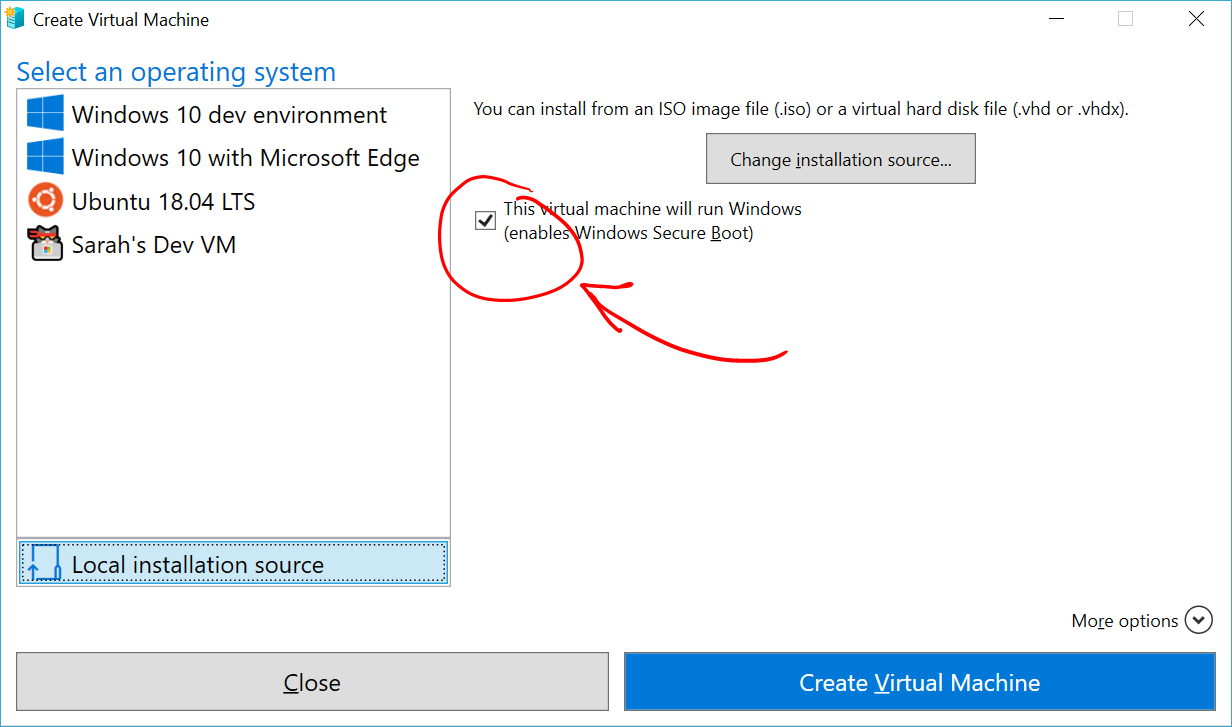
Select «Create Virtual Machine»
That’s it! Quick Create will take care of the rest.
Windows 10 Creators Update (Windows 10 version 1703)
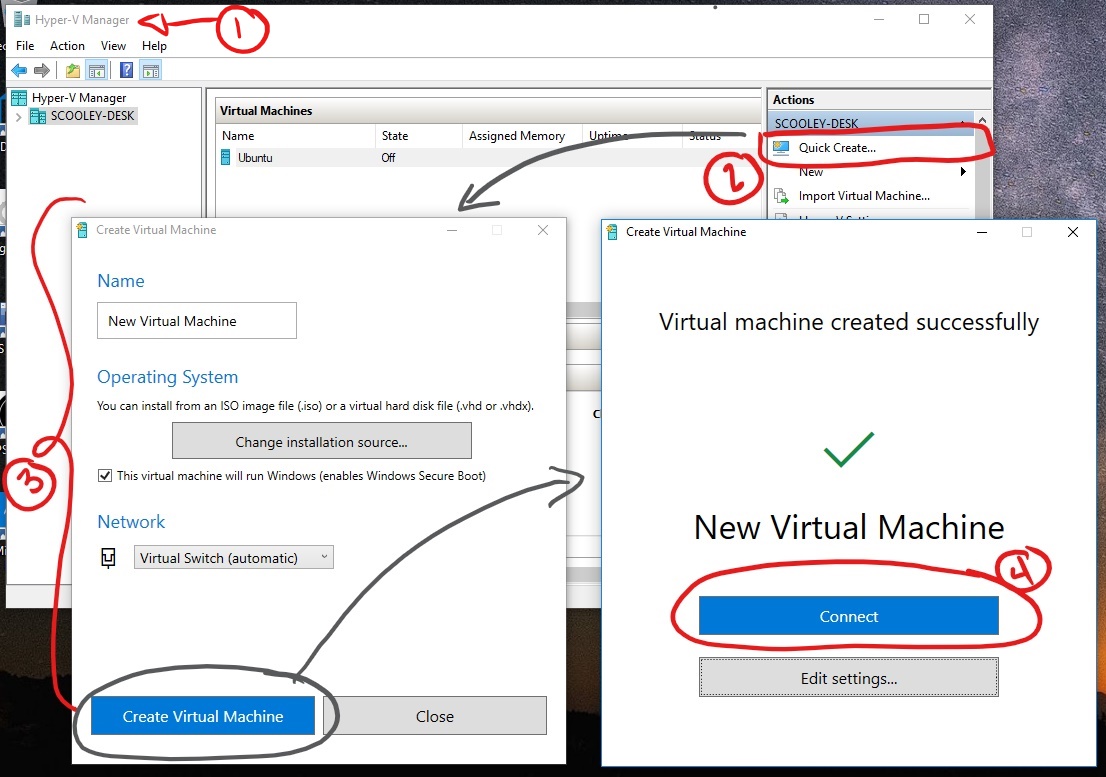
Open Hyper-V Manager from the start menu.
In Hyper-V Manager, Find Quick Create in the right hand Actions menu.
Customize your virtual machine.
- (optional) Give the virtual machine a name.
- Select the installation media for the virtual machine. You can install from a .iso or .vhdx file. If you are installing Windows in the virtual machine, you can enable Windows Secure Boot. Otherwise leave it unselected.
- Set up network. If you have an existing virtual switch, you can select in the network dropdown. If you have no existing switch, you will see a button to set up an automatic network, which will automatically configure a virtual network.
Click Connect to start your virtual machine. Don’t worry about editing the settings, you can go back and change them any time.
You may be prompted to вЂPress any key to boot from CD or DVD’. Go ahead and do so. As far as it knows, you’re installing from a CD.
Congratulations, you have a new virtual machine. Now you’re ready to install the operating system.
Your virtual machine should look something like this:

Note: Unless you’re running a volume-licensed version of Windows, you need a separate license for Windows running inside a virtual machine. The virtual machine’s operating system is independent of the host operating system.
Before Windows 10 Creators Update (Windows 10 version 1607 and earlier)
If you aren’t running Windows 10 Creators Update or later, follow these instructions using New Virtual Machine Wizard instead:
Синхронизации времени VMware vSphere с доменом Windows
Не секрет, что в домене Windows синхронизация времени имеет огромное значение. Ведь в том случае, если время на рядовом сервере домена будет более чем на 5 минут отличаться от времени других служб домена, то начнутся проблемы с получением билетов от службы Kerberos. В результате клиент не сможет нормально пользоваться сетевыми сервисами и в системном логе будут появляться различные ошибки аутентификации, в которых зачастую очень сложно разобраться и диагностировать.
Синхронизация времени в домене Windows основана на четкой иерархии домена. Контроллер домена с ролью FSMO обычно настроен на получение времени с авторитетного сервера времени NTP (настройка синхронизации с внешним NTP сервером), и в дальнейшем все остальные контроллеры домена синхронизируют время именно с ним. Клиенты домена в различных сайтах синхронизируют свое время с контроллером домена в своем сайте, тем самым реализуется механизм синхронизации времени в домене Windows.
Виртуальные машины ничем не отличаются от физических компьютеров и обычно синхронизируют время по той же самой иерархической схеме домена. Однако, я не раз замечал, что виртуальные машины на VMware vSphere загружаются с временем, существенно расходящимся с доменным. Именно об этой проблеме и поговорим в этой статье.
Такая ситуация возникает, когда VMware vSphere (точнее сервер ESX или ESXi), не настроен на синхронизацию времени с внешним NTP сервером, либо же когда время на физическом сервере «плавает» из-за проблем с системным таймером. Так как сервера ESX/ESXi используют собственную ОС, и не являются членами домена, они не попадают в стройную синхронизации времени в иерархии домена.
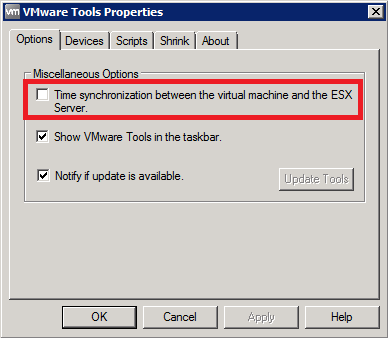
Как вы знаете, многие организации, применяющие виртуализацию в своей инфраструктуре, для управлением парком гипервизоров ESX используется vCenter. И т.к. сервер с установленным vCenter является членом домена Windows, администраторы думают, что т.к. vCenter синхронизирует свое время с доменным, то время на серверах ESXi и запущенных на них виртуальных машинах также синхронизировано с доменом. Но это не так! Вы можете настроить сервер vSphere или ESX на синхронизацию времени с неким источником, однако гостевые ОС все равно могут загружаться с неправильным временем, даже если в VMWare Tools опция «time synchronization between the virtual machine and the ESX server» отключена!
Настроить синхронизацию времени вашего сервера vSphere с доменом можно следующим образом:
- Подключитесь к консоли управления vCenter / хоста ESX.
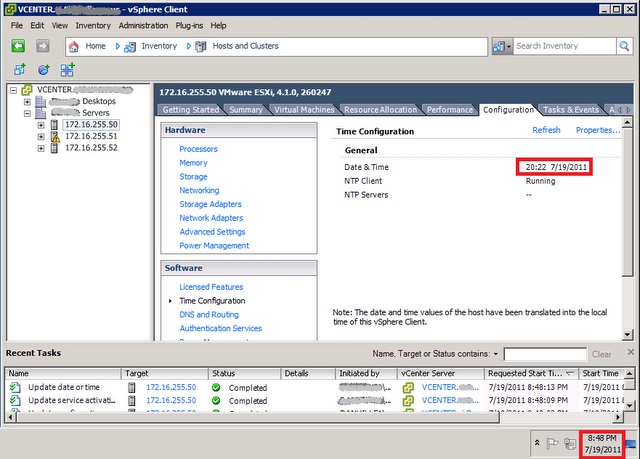
- Перейдите на вкладку Configuration и выберите пункт TimeConfiguration в разделе Software. Убедитесь, что время на хосте отличается от времени вашего домена Windows.
- В правом верхнем углу вкладки Configuration выберите Properties. В результате откроется окно настройки времени Time Configuration.

- Нажмите кнопку Options и укажите новый NTP сервер, который будет служить источником времени. Я рекомендую указать здесь адрес вашего контроллера домена PDC, т.к. он настроен на получение сетевого времени от авторитетного источника.

- Отметьте чекбокс Restart NTP service to apply changes и дважды щелкните OK. В результате вы увидите, что ваш сервер ESX получает доменное время от сервера NTP с именем dc01.companyabc.com.

Для того, чтобы внутри гостевых ОС началась синхронизация времени с доменом, вам придется их перезапустить. Дело в том, что служба Windows Time автоматически не исправит время, если время виртуальной машины сильно отличается от доменного. А при загрузке же, все члены домена выполняют синхронизацию своего времени с временем домена, не зависимо от того, какое время на их установлено.


