- Startup settings in Windows Terminal
- Default profile
- Launch on machine startup
- Launch mode
- New instance behavior
- Launch size
- Columns on first launch
- Rows on first launch
- Launch position
- Center on launch
- Disable dynamic profiles
- Startup actions
- Windows Terminal: The Complete Guide
- Free JavaScript Book!
- How to Install Windows Terminal
- Getting Started with Windows Terminal
- Managing Tabs and Panes
- Text size
- Scrolling
- Search
- Copy and Paste
- Settings
- Global Settings
- Profile Settings
- Save and restore terminal on reboot
- 4 Answers 4
Startup settings in Windows Terminal
The properties listed below affect the entire terminal window, regardless of the profile settings. These should be placed at the root of your settings.json file.
Default profile
Set the default profile that opens by typing ctrl+shift+t , typing the key binding assigned to newTab , running wt new-tab without specifying a profile, or clicking the ‘+’ icon.
Property name: defaultProfile
Necessity: Required
Accepts: GUID or profile name as a string
Default value: PowerShell’s GUID
Launch on machine startup
When set to true , this enables the launch of Windows Terminal at startup. Setting this to false will disable the startup task entry.
Note: if the Windows Terminal startup task entry is disabled either by org policy or by user action this setting will have no effect.
Property name: startOnUserLogin
Necessity: Optional
Accepts: true , false
Default value: false
Launch mode
This defines whether the terminal will launch as maximized, full screen, or in a window. Setting this to focus is equivalent to launching the terminal in the default mode, but with focus mode enabled. Similarly, setting this to maximizedFocus will result in launching the terminal in a maximized window with focus mode enabled.
Property name: launchMode
Necessity: Optional
Accepts: «default» , «maximized» , «fullscreen» , «focus» , «maximizedFocus»
Default value: «default»
New instance behavior
This setting controls how new terminal instances attach to existing windows. This property is only used if the —window,-w window command line argument is not provided. This setting accepts the following possible values:
- useNew : Create a new window, always. This is how the terminal always behaved prior to version 1.7.
- useExisting : Create new tabs in the most recently used window on this desktop. If there’s not an existing window on this virtual desktop, then create a new terminal window.
- useAnyExisting : Create new tabs in the most recently used window, regardless of which virtual desktop the window is on.
Property name: windowingBehavior
Necessity: Optional
Accepts: «useNew» , «useExisting» , «useAnyExisting»
Default value: «useNew»
Launch size
Columns on first launch
This is the number of character columns displayed in the window upon first load. If launchMode is set to «maximized» or «maximizedFocus» , this property is ignored.
Property name: initialCols
Necessity: Optional
Accepts: Integer
Default value: 120
Rows on first launch
This is the number of rows displayed in the window upon first load. If launchMode is set to «maximized» or «maximizedFocus» , this property is ignored.
Property name: initialRows
Necessity: Optional
Accepts: Integer
Default value: 30
Launch position
This sets the pixel position of the top left corner of the window upon first load. On a system with multiple displays, these coordinates are relative to the top left of the primary display. If an X or Y coordinate is not provided, the terminal will use the system default for that value. If launchMode is set to «maximized» or «maximizedFocus» , the window will be maximized on the monitor specified by those coordinates.
Property name: initialPosition
Necessity: Optional
Accepts: Coordinates as a string in the following formats: «,» , «#,#» , «#,» , «,#»
Default value: «,»
Center on launch
When set to true , the terminal window will auto-center itself on the display it opens on. The terminal will use the «initialPosition» to determine which display to open on.
This interacts with the other launch settings in the following ways:
- «initialPos»: x,y , «centerOnLaunch»: true , «launchMode»: «default» : center on the monitor that x,y is on.
- «initialPos»: x,y , «centerOnLaunch»: true , «launchMode»: «maximized» : maximized on the monitor that x,y is on ( centerOnLaunch adds nothing).
- «initialPos»: , «centerOnLaunch»: true , «launchMode»: «default» : center on the default monitor.
- «initialPos»: , «centerOnLaunch»: true , «launchMode»: «focus» : center and enter focus mode on the default monitor.
- «initialPos»: , «centerOnLaunch»: true , «launchMode»: «maximized» : maximized on the default monitor ( centerOnLaunch adds nothing).
Property name: centerOnLaunch
Necessity: Optional
Accepts: true , false
Default value: false
Disable dynamic profiles
This sets which dynamic profile generators are disabled, preventing them from adding their profiles to the list of profiles on startup. For information on dynamic profiles, visit the Dynamic profiles page.
Property name: disabledProfileSources
Necessity: Optional
Accepts: «Windows.Terminal.Wsl» , «Windows.Terminal.Azure» , and/or «Windows.Terminal.PowershellCore» inside an array
Default value: []
Startup actions
This sets the list of actions to execute on startup, allowing the terminal to launch with a custom set of tabs and panes by default. These actions will be applied only if no command line arguments were supplied. The list of actions is represented by a string with the same format as commands in the command line arguments. For more information about the commands format, visit the Command line arguments page.
Property name: startupActions
Necessity: Optional
Accepts: String representing a list of commands to run
Windows Terminal: The Complete Guide
Free JavaScript Book!
Write powerful, clean and maintainable JavaScript.
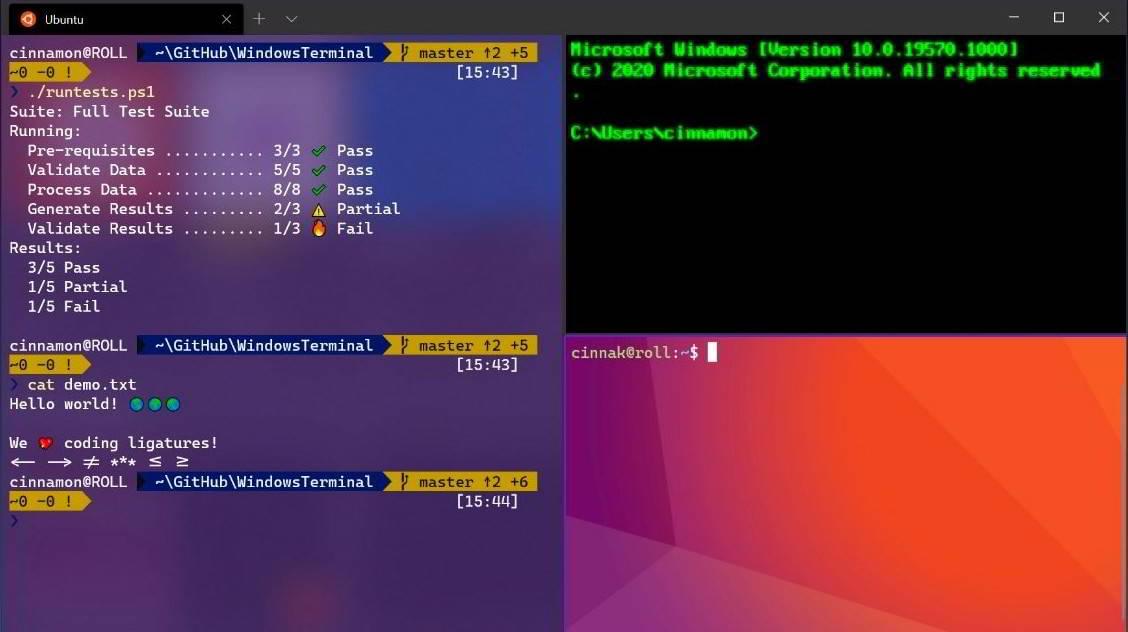
In this article, we’ll explore Windows Terminal, the ideal accompaniment to WSL2. It’s fast, configurable, looks great, and offers all the benefits of both Windows and Linux development.
Windows has fully embraced Linux, and WSL2 makes it a seamless pleasure.
Your distro’s terminal can be accessed by:
- clicking its Start menu icon
- entering wsl or bash at a Powershell or command prompt
- using a third-party terminal option such as Cmder, ConEmu, and Hyper with a profile which launches %windir%\system32\bash.exe
Windows Terminal (downloadable from the Microsoft Store) offers a further choice, but you won’t regret installing it. The new application features:
- support for WSL2, SSH, Powershell, cmd and other command lines
- multiple tabs and split panes
- configurable themes, background images, and transparency effects
- a search box
- custom key bindings
- GPU accelerated text rendering
- a great-looking new font, Cascadia Code
- low resource usage (typically 10MB per tab)
- auto-updating (if using the Microsoft Store)
- good documentation
- and it’s open source!
How to Install Windows Terminal
The easiest way to install Windows Terminal is via the Microsoft Store:
If this link fails, try opening the Microsoft Store in your browser or launching the Microsoft Store app from the Windows Start menu and searching for “Terminal”.
Note: be careful not to select the earlier “Windows Terminal Preview” application.
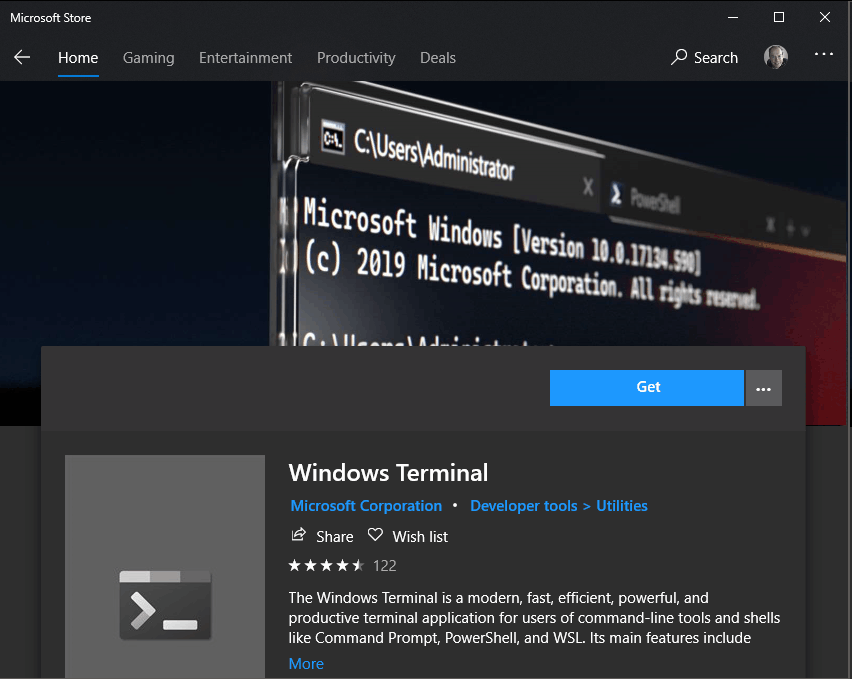
Hit Get and wait a few seconds for installation to complete.
If you don’t have access to the Store, you can download the latest release from GitHub.
The Windows Terminal app icon is now available in the Windows Start menu. For easier access, right-click the icon and choose Pin to Start or More, followed by Pin to taskbar.
Getting Started with Windows Terminal
When it’s first run, Windows Terminal starts with Powershell as the default profile. A drop-down menu is available to launch other tabs and access the settings:
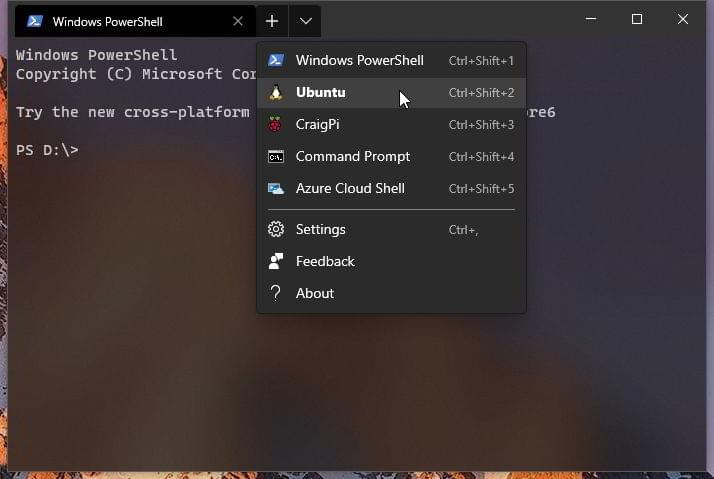
Terminal automatically generates profiles for all WSL distros and Windows shells you have installed, although it’s possible to disable generation in the global settings.
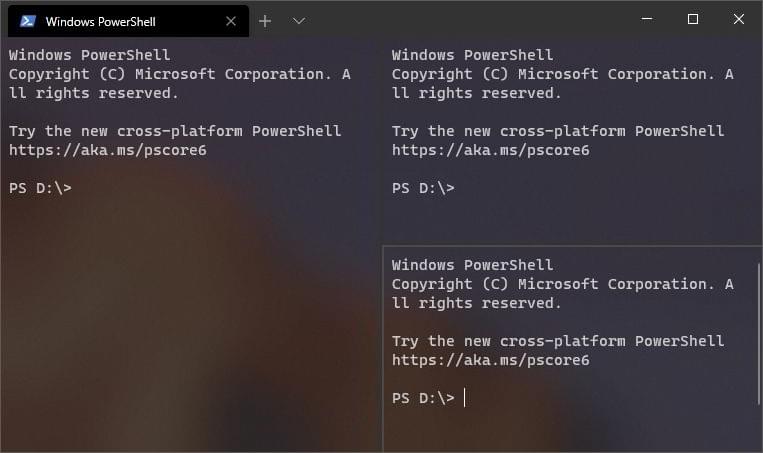
Managing Tabs and Panes
Open a new tab for the default profile by clicking the + icon or Ctrl + Shift + T . To open a tab for a different profile, choose it from the drop-down menu or press Ctrl + Shift + N, where N is the profile’s number.
Press Alt + Shift + D to duplicate and split the pane. The active pane is split in two along the longest axis each time it is used:
To force creation of a:
- vertical pane, press Alt + Shift + + , or
- horizontal pane, press Alt + Shift + —
To open another profile in a new pane, hold down the Alt key when choosing it from the drop-down menu.
Hold down Alt and use the cursor keys to switch between active panes from the keyboard. The size of a pane can be adjusted by holding Alt + Shift and using the cursor keys to resize accordingly.
Tabs can be renamed by double-clicking the text. You can also change the name or color by right-clicking the tab and choosing a menu option:
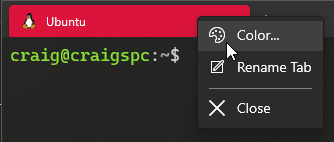
This only affects the current tab; it doesn’t permanently change the profile.
To close the active pane or tab, press Alt + Shift + W or enter the terminal’s standard exit command (usually exit ).
Text size
The text size of the active terminal can be resized with Ctrl + + and Ctrl + — . Alternatively, hold down Ctrl and scroll the mouse wheel.
Scrolling
Use the scroll bar to navigate through the terminal output. Alternatively, hold down Ctrl and press cursor up, cursor down, Page Up or Page Down to navigate using the keyboard.
Search
Press Ctrl + Shift + F to open the search box:
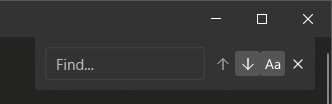
Enter any term then use the up and down icons to search the terminal output. Click the Aa icon to activate and deactivate exact-case matching.
Copy and Paste
By default, copy and paste are bound to Ctrl + Shift + C and Ctrl + Shift + V respectively, although Ctrl + C and Ctrl + V will also work.
Note: be wary that Ctrl + C can terminate a Linux application, so using Shift is advisable.
An automatic copy-on-select option is available in the global settings, and you can also paste the current clipboard item by right-clicking the mouse.
Settings
Settings are accessed from the drop-down menu or Ctrl + , (comma). The configuration is defined in a single settings.json file, so you may be prompted to choose a text editor. VS Code is a great choice, although Notepad is fine if you’re happy to edit without color-coding and syntax checking.
The file uses the following format:
Defaults are defined in defaults.json . Open it by holding down Alt when clicking Settings in the drop-down menu.
Warning: do not change the defaults file! Use it to view default settings and, where necessary, add or change a setting in settings.json .
Global Settings
The following global settings are the most useful, although more are documented in the Terminal documentation.
«defaultProfile» defines the GUID of the profile used as the default when Windows Terminal is launched.
Set «copyOnSelect» to true to automatically copy selected text to your clipboard without having to press Ctrl + Shift + C .
Set «copyFormatting» to false to just copy plain text without any styling. (I wish this were the default for every application everywhere!)
Set «initialColumns» and «initialRows» to the number of characters for the horizontal and vertical dimensions.
«tabWidthMode» can be set to:
- «equal» : each tab is the same width (the default)
- «titleLength» : each tab is set to the width of its title, or
- «compact» : inactive tabs shrink to the width of their icon.
«disabledProfileSources» sets an array which prevents profiles being automatically generated. For example:
This would disable all generated profiles; remove whichever ones you want to retain.
Profile Settings
New profiles are defined by creating an object group in the «profiles» , «list» array. A WSL2 Ubuntu example:
Each profiles is defined with the following settings:
Save and restore terminal on reboot
Is there a way to save my terminal emulator windows and tabs for when I reboot the computer?
I generally have about 10 or so open tabs at any given time and opening each tab to set up everything after a reboot is relatively long. I would like to at least save the current working directories and name each tab works with so I can be more efficient.
If it helps, I am running Xubuntu 14.04.


4 Answers 4
The following method does not save the directories upon exit. It uses always the same directories until you change them in «Preferences», although you may have multiple indipendent groups of directories.
We will install «terminator».
These are the step-by-step instructions for three tabs. The steps are the same for any number of tabs.
Alternatively, you can install it with aptitude, or ubuntu software center.
- Run terminator, f.e. from the «KDE» menu.
- Right-click on the black screen.
- Click «Open tab».
- Then again, right-click on the black screen.
- Click «Open tab».
- Then again, right-click on the black screen.
- Click «Preferences»
- Click on the «Layouts» tab.
- Click «Add».
- Write a name and press ENTER. I will use the name «mylayout» in this procedure. Do NOT click «Save».
You can see on the right pane the words: «Window», «Notebook», «Terminal», «Terminal», «Terminal».
- Click on the LOWEST of the words «Terminal».
- Click inside the blank field to the right of «Working directory:».
- Write the path of the directory which you want to be the first tab; f.e. /a/dir1.
- Click on the word «Terminal» just above the lowest one.
- Click inside the blank field to the right of «Working directory:».
- Write the path of the directory which you want to be the second tab.
- Click on the HIGHEST of the words «Terminal».
- Click inside the blank field to the right of «Working directory:».
- Write the path of the directory which you want to be the third tab.
- Click «Close».
- Click the «X» in the upper right corner to close terminator.
- Right click on an empty space of the desktop.
- Click «Create new».
- Click «Link to application».
- Click the tab «Application».
- Click inside the blank field to the right of «Command:».
Now click on the new icon. You should see all your tabs.
You can create multiple layouts in the same way, and you can modify the directories and other settings by right-clicking on the black screen and clicking «Preferences».


