- Wiping free disk space
- Disk Wipe: CCleaner Wipe Free Space and the Alternative Ways [Partition Manager]
- Summary :
- Quick Navigation :
- Why You Need to Wipe Free Space
- CCleaner Wipe Free Space
- Alternative Method 1: Wipe Free Space with Command Prompt
- Alternative Method 2: Wipe Free Space Using MiniTool Partition Wizard
- Bottom Line
- CCleaner Wipe Free Space FAQ
- ABOUT THE AUTHOR
- Free up drive space in Windows 10
Wiping free disk space
When you delete a file, Windows removes the reference to that file, but doesn’t delete the actual data that made up the file on your hard drive. Over time, this data will be overwritten as Windows writes new files to that area of the drive.
This means that, given the right software, someone could reconstruct all, or parts of files that you’ve deleted. For privacy and security reasons, you can set CCleaner to wipe the free areas of your hard disk so that deleted files can never be recovered.
Note: Wiping free space can take a substantial amount of time.
Method 1 (Automatically wipe when cleaning):
- In CCleaner, click the CCleaner icon at left.
- On the Windows tab, select the Wipe Free Space check box.
- CCleaner displays a warning about extra time. Click OK.
- Run CCleaner as usual.
Method 2 (Manually wipe with Drive Wiper):
- Select Tools > Drive Wiper
- Choose the type of wipe you require:
- Free Space Only will leave your normal files intact
- Entire Drive will erase all of the files on the drive. WARNING, this means the whole of the partition will be erased. The drive will still be formatted, but all data will be erased. For safety reasons, this feature is disabled for the boot drive.
- Choose the type of security you require (Simple Overwrite is ok for most situations)
- CCleaner will warn you before proceeding
Changing CCleaner settings
To select the drives whose free space CCleaner will wipe, see this topic.
Wipe Free Disk Space limitations
CCleaner can’t wipe every deleted file from your free disk space. There are some limitations, because of the way Windows stores some files. Here are some examples:
- The file has been overwritten by another file (so no need to overwrite this again)
- The file had been overwritten by another file before you ran CCleaner, but the second file has now been deleted as well.
- The file was created almost exactly when you ran CCleaner.
Disk Wipe: CCleaner Wipe Free Space and the Alternative Ways [Partition Manager]
By Amanda | Follow | Last Updated December 31, 2020
Summary :

Do you know that your deleted files might still exist on the free space on your hard drive? Someone else can restore all or parts of the files you’ve deleted using certain professional tool. For data privacy and security, you’d better wipe free space so that your data cannot be recovered. Apart from “CCleaner wipe free space”, you will learn in this post how to wipe a hard drive using MiniTool Partition Wizard and Command Prompt.
Quick Navigation :
You may have the awareness of employing certain programs to shred your files which are useless but contain your private information. In addition, perhaps you have been suggested wiping free space after deleting some files from your hard drive.
However, do you know why you have to wipe free space or shred the deleted files? Do you know how to wipe a hard drive conveniently and safely? Do you know what tool you can use when you really need to wipe free space?
Don’t worry! You will get the answers from this post.
Why You Need to Wipe Free Space
When you delete a file on your computer, you are just removing the indexes and the links to the file, rather than the actual data that makes up the file on your hard drive. Even though Windows cannot figure out the location of the file, the file still exists on your hard drive indeed.
So, given the right recovery software, even an ordinary user who gets your computer could also reconstruct the files you deleted. This kind of tool will scan your hard drive, look for the files and restore the links and indexes so the deleted files could be available and editable again.
However, Windows gets permission to overwrite the area containing the deleted file on the hard drive. This means that you can make the data you have deleted unrecoverable by overwriting the free space, or commonly known as wiping free space.
Therefore, if you prepare to sell or dispose of a computer, you’d better perform disk wipe in advance to prevent other people from stealing your private information. Although there are several ways to keep your digital data secure, disk wipe is your best choice in this case.
Today, I will show you “CCleaner wipe free space”, which is asked by most Windows users. Besides, I will display how to wipe a hard drive using Command Prompt and another professional hard drive wipe software – MiniTool Partition Wizard.
CCleaner Wipe Free Space
CCleaner is a popular Windows optimization and cleaning utility. Also, it provides a tool called Drive Wiper that allows you to wipe your hard drive securely.
You need to aware that CCleaner has been hacked to spread malware to users of the 32-bit version. The hackers were able to inject the malware into the application by accessing the download servers used by the antivirus provider Avast (the parent company that owns CCleaner), according to the security researchers at Cisco Talos Group.
However, you don’t need to worry about this issue. CCleaner is still a useful and reliable hard drive wipe software, only if you can disarm the threat by keeping it as the latest version. So, let’s see how to use CCleaner to wipe your free space.
Step 1: Update to or download the latest version of CCleaner. Then open the program to get its main interface.
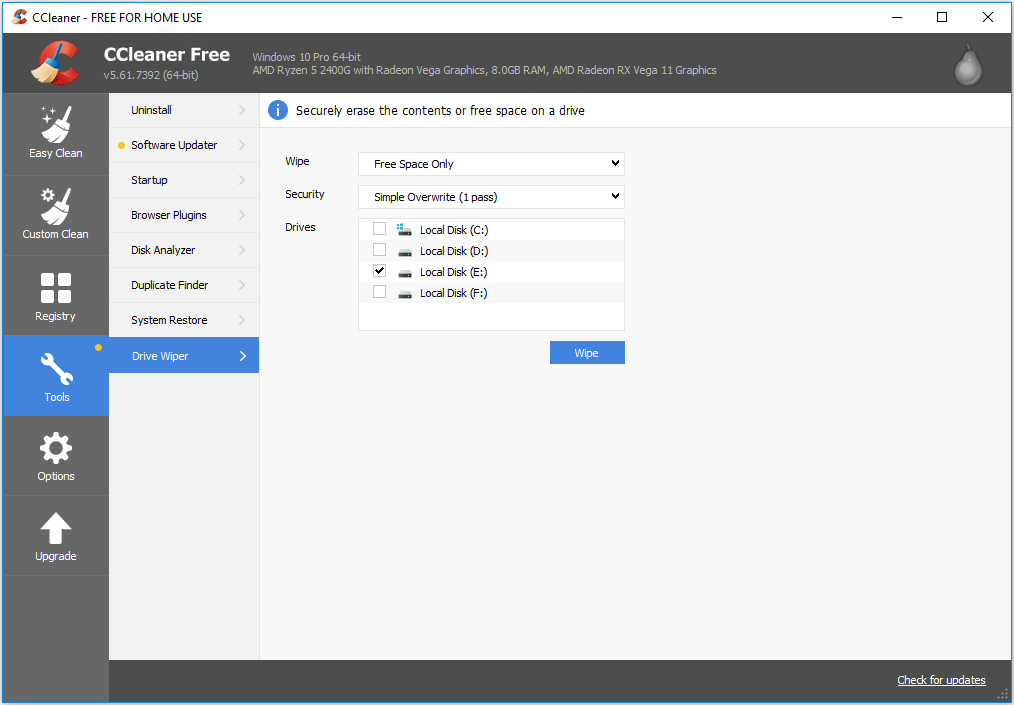
Step 2: Click Tools from the left pane and choose Drive Wiper.
Step 3: In the right panel, choose Free Space Only from the Wipe drop-down list.
Step 4: Select a particular type of overwriting procedure you prefer from the Security drop-down list. Here are 4 types available:
- Simple Overwrite (1 pass)
- Advanced Overwrite (3 passes)
- Complex Overwrite (7 passes)
- Very Complex Overwrite (35 passes)
Step 5: In the Drives box, select the drive on which you want to “CCleaner wipe free space”. Finally, click Wipe button to perform the operation.
In this way, CCleaner will securely wipe the free space on your hard drive to protect your privacy.
Alternative Method 1: Wipe Free Space with Command Prompt
If you don’t want to download any third-party software to perform disk wipe, you can wipe free space using Command Prompt instead.
As a built-in feature of Windows, Command Prompt allows you to execute various operations with simple commands. Of course, you can also wipe free space with Command Prompt just using cipher command.
Cipher command is available on Windows operating system since 2000. It displays or alters the encryption of directories and files on NTFS volumes. There are plenty of parameters of cipher, and here in our case you just need to use /w: to wipe free space. When you use it, all other parameters will be ignored.
At first, you should run Command Prompt as administrator. To do that, just type Command Prompt in your Cortana’s search bar and right-click the search result, then select Run as administrator.
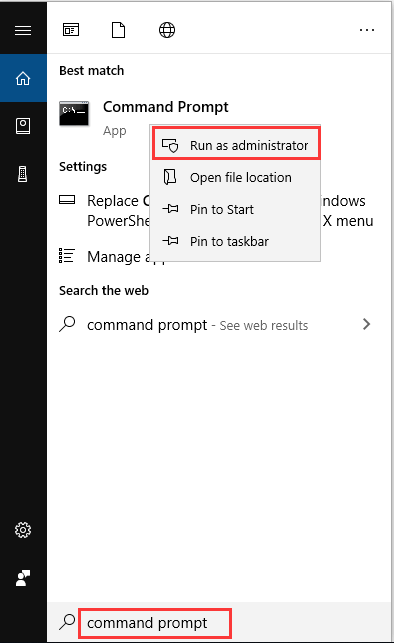
Type the command cipher /w:E: (E: can be replaced by the drive letter of any hard drive on which you want to perform free space wipe) and press Enter key. This will remove data from available unused disk space on the entire volume.
Cipher uses 3 passes algorithm to wipe free space securely on your hard drive. It overwrites the specific free space with zeros in the first pass, ones in the second pass and random numbers in the last pass. This is the same as Advanced Overwrite of “CCleaner wipe free space”.
Alternative Method 2: Wipe Free Space Using MiniTool Partition Wizard
Actually, some Windows users might fear that their computers will be attacked by malware after installing CCleaner.
Furthermore, while selling the old computer or deserting old hard drive, you may prefer directly wiping the whole hard drive which can also be realized by selecting Entire Drive wiping method of CCleaner.
Therefore, I recommend MiniTool Partition Wizard to you as your alternative tool which is also a reliable hard drive wipe software.
MiniTool Partition Wizard is a professional partition manager as well as reliable disk clone tool. In addition to helping you to manage partitions and disks better and easier, it can help you migrate your operating system to another SSD/HDD without reinstallation.
Among its various features, you can choose Wipe Partition or Wipe Disk to complete hard drive wipe effectively with several simple steps. The two features are provided in every version. So, if you just need to wipe hard drive, don’t hesitate to download the free version.
The detailed instructions are provided below as well.
step 1: Download and install MiniTool Partition Wizard on your computer.
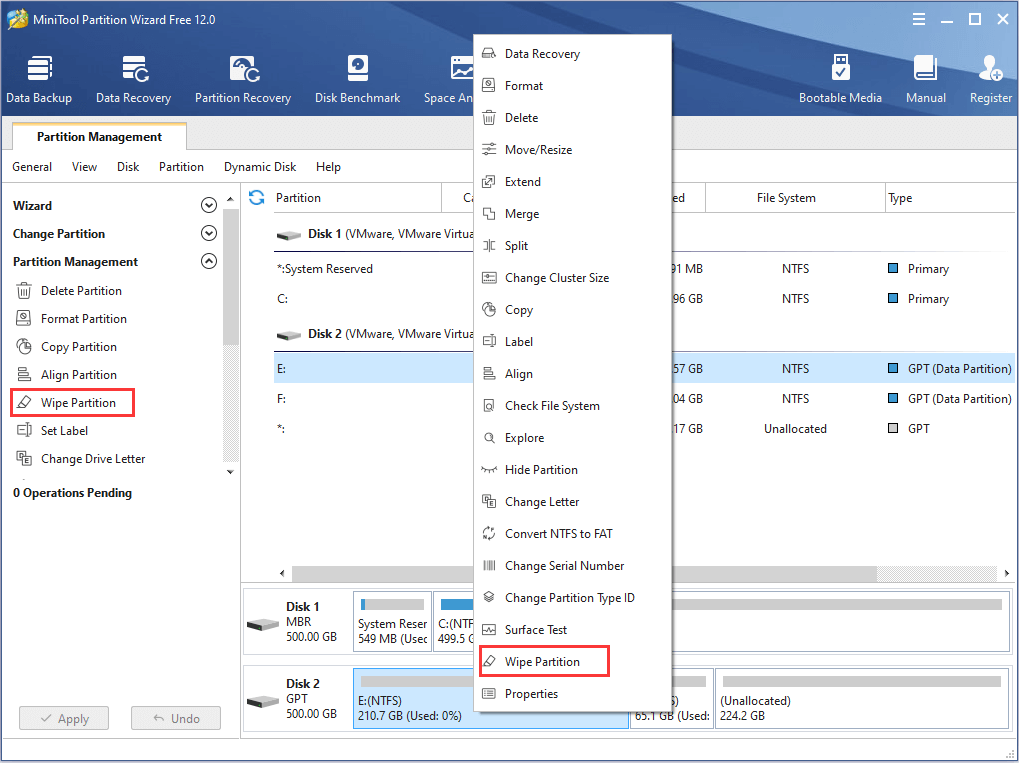
Step 2: Launch the application to get its main interface and select the partition you want to wipe. Then, right-click the partition and choose Wipe Partition from the context menu, or select Wipe Partition directly from the left pane to activate the feature.
Step 3: You will get a pop-up window requiring you to choose a wiping method. 5 wiping methods are provided here and you need choose one then click OK button.
- Fill Sectors with Zero
- Fill Sectors with One
- Fill Sectors with Zero & One
- DoD 5220.22 (3 passes)
- DoD 5220.28 (7 passes)
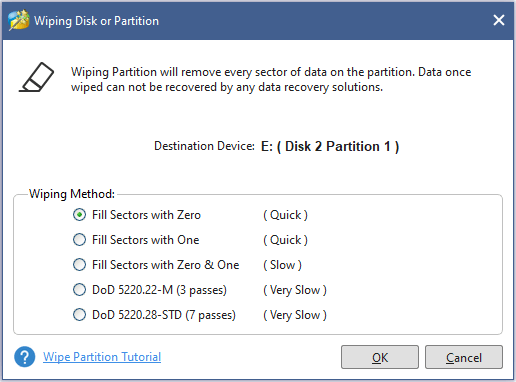
Step 4: Click Apply button to perform the pending operation.
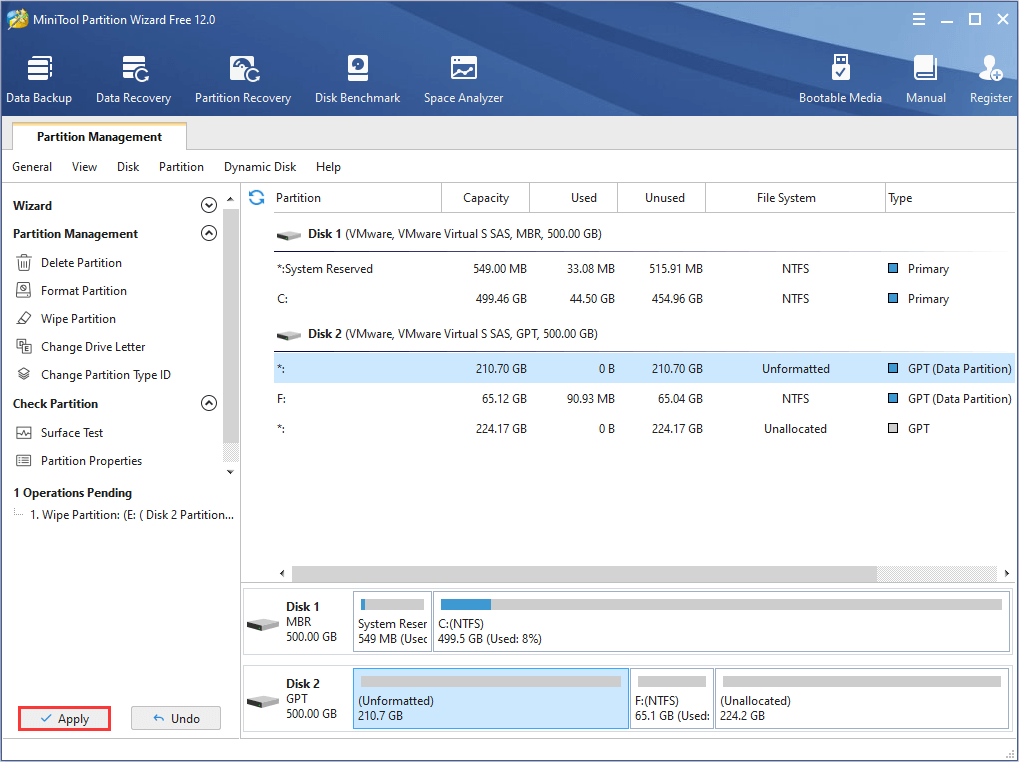
The time of completing this operation will vary with the amount of data the partition contains and the wiping method you have chosen before. Just wait patiently until the process finishes for the best wipe result. In this way, your hard drive will be wiped securely.
After wiping the partition, this partition will be shown as Unformatted. If you are wiping for selling computer, you can ignore it. But if you want to put this partition into use again, you have to format the partition to NTFS or FAT or other file system you want and assign a drive letter for it.
Bottom Line
“CCleaner wipe free space” and 2 alternative methods have been introduced in this post.
If you want to clean the unused free space on your hard drive that contains other saved files, just try cipher command in Command Prompt or “CCleaner wipe free space”.
If you desire to clear all the data on the partition or disk and wipe every deleted file from your free disk space, then MiniTool Partition Wizard is a better choice.
What do you use to securely wipe free space on your hard drive? Do you have any problem while using the tools mentioned above? Just share your thoughts and experiences in the comments below, or you can send an email to [email protected] .
CCleaner Wipe Free Space FAQ
ABOUT THE AUTHOR

Position: Columnist
Amanda has been working as English editor for the MiniTool team since she was graduated from university. She enjoys sharing effective solutions and her own experience to help readers fix various issues with computers, dedicated to make their tech life easier and more enjoyable.
She has published many articles, covering fields of data recovery, partition management, disk backup, and etc. In order to provide more useful tips and information, she is still committed to expand her technical knowledge.
Free up drive space in Windows 10
If your PC is running low on free space, you might not be able to install important Windows updates, and your PC’s performance may be affected. Here are some ways to free up space so you can keep your PC up to date and running smoothly. These suggestions are listed in order, so start with the first one, see if that helps, and then continue to the next one if it doesn’t.
To check the total disk space left on your Windows 10 device, select File Explorer from the taskbar, and then select This PC on the left. The available space on your drive will appear under Devices and drives.
Note: If you follow the steps below and continue to have trouble updating Windows because of low disk space, resetting or reinstalling Windows might help. For more info, see Reinstall Windows 10.
If you used Disk Cleanup to free up space on your device and then see a Low Disk Space error, it’s possible that your Temp folder is quickly filling up with application (.appx) files that are used by Microsoft Store. For more info, see Low Disk Space error due to a full Temp folder.
Storage Sense can automatically free up drive space for you by getting rid of items that you don’t need, like temporary files and items in your Recycle Bin. For more info, see Manage drive space with Storage Sense.
If your system doesn’t have Storage sense, you can use the Disk Cleanup tool to delete temporary files and system files from your device.
In the search box on the taskbar, type disk cleanup, then select itfrom the results.
Select the check box next to the type of files you want to delete. (To view a description of each type of file, select the name.) By default, Downloaded Program Files, Temporary Internet Files, and Thumbnails are selected. Be sure to clear those check boxes if you don’t want to delete those files.
To free up even more space, select Clean up system files, and then select the type of system files you want to delete. Disk Cleanup will take a few moments to calculate the amount of space that can be freed up.
Note: If it’s been fewer than 10 days since you upgraded to Windows 10, your previous version of Windows will be listed as a system file you can delete. If you need to free up drive space, you can delete it, but keep in mind that you’ll be deleting your Windows.old folder, which contains files that give you the option to go back to your previous version of Windows. If you delete your previous version of Windows, this can’t be undone. (You won’t be able to go back to your previous version of Windows.)
After you’ve selected the types of files you want to delete, select OK, and then select Delete files in the confirmation window to start the cleanup.
There’s also an option in Disk Cleanup to Compress your OS drive. Selecting this option compresses the drive on which Windows is installed, helping you gain extra space to install important updates. This action does not delete the contents of this drive, and you shouldn’t experience problems opening and saving files from the compressed drive.
After you install the update, you can manually decompress the OS drive at any time. To do this, select File Explorer from the taskbar, and in the left pane, select This PC. Right-click or tap and hold the OS drive (usually disk C), and then select Properties on the shortcut menu. Clear the Compress this drive to save disk space check box, and then select Apply > OK.
Windows 10 may indicate that it needs more space to get the latest Windows 10 feature update. You can use an external storage device to help you complete the update.
Note: You may need to use a micro-USB adapter if your device doesn’t have a standard USB port.
Personal files such as videos, music, photos, and documents can take up a lot of space on your device. To see which files are using the most space:
Select File Explorer from the taskbar and find the files you want to move.
Under This PC in the menu on the left, select a folder to see what files are saved in it. The Videos, Music, Pictures, and Downloads folders usually contain the largest files that you’ve saved to your device.
To see the size of the files in a folder, select View > Details. Right-click in the open space and then select Sort by > Size to show the largest files at the top of the list.
If there are files you no longer need on your device, you can either delete them or move them to an external storage device like a USB drive or an SD card.
Note: If you delete any files, remember to empty the Recycle Bin to completely remove them from your device and free up space.
To move photos, music, videos, or other files that you want to keep but don’t use very often, consider saving them to an external storage device like a USB drive or an SD card. You’ll still be able to use them when the drive is connected, but they won’t take up space on your PC.
Connect an external storage device like a USB drive or SD card to your PC.
Select File Explorer from the taskbar and go to the folder that contains the files you want to move.
Select the files, select the Home tab, and then select Move to > Choose location.
Select the external storage device you connected in the location list, and then select Move.
Saving new files to another drive will help prevent low space problems on that drive in the future, so you won’t have to move your files to another drive repeatedly. Instead of saving all your new files to the default drive, you can save some of them to a different drive that has more free space.
Under More storage settings, select Change where new content is saved.
For each content type, select a drive from the drop-down menu. If the drive you want to use isn’t listed there, make sure it’s connected to your PC.
Note: OneDrive Files On-Demand requires Windows 10 version 1709 or later and OneDrive client version 17.3.7064.1005 or later. To see which version of Windows you’re running, select Start > Settings > System > About . To see which version of the OneDrive client you have installed, see Which version of OneDrive am I using?
Open About settings
You can save space by turning on OneDrive Files On-Demand, which stores a smaller placeholder file on your hard drive instead of the full-size file that’s stored in your OneDrive account in the cloud. You’ll be able to get to your OneDrive files from your PC without having to use up hard-drive space downloading full-size versions of them all. See Learn about OneDrive Files On-Demand for more info.
Sometimes a virus or other malware can consume significant hard-drive space by corrupting your system files. If you suspect your PC is infected with malware, use an antivirus program like Windows Defender to run a virus scan and cleanup. If this doesn’t fix the problem, you might need to reset your PC.
If you’ve followed the instructions here but still need help freeing up space on your device, you can contact Microsoft support to chat with a support agent. This is also recommended if your attempts to free up drive space trigger particular error codes that you need help resolving.
The following questions concern low disk space and Windows Update specifically. Learn more about Windows Update.
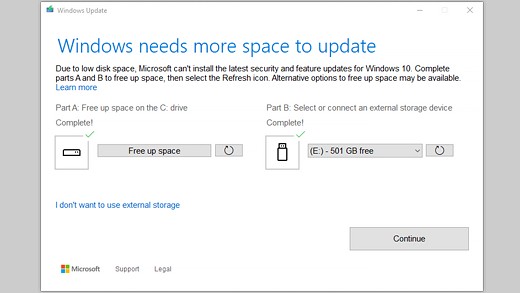
When there isn’t enough free space available to install an update, a pop-up notification will prompt you that additional space is required to install the update.
When you select Fix issues, you’ll be informed about how much additional space is needed. You’ll also be notified that you can use an external storage device so that you don’t need to free up quite as much space on your system drive. Learn how to free up space to install Windows updates.
The total free disk space your device requires to complete an update varies. Typically, feature updates require 6 GB–11 GB or more of free space, while quality updates require 2 GB–3 GB or more. Learn about the difference between a feature update and a quality update.
You need disk space to download the update, download new versions of any optional features and languages that are currently installed, and to apply the update. Additional space is temporarily required to support removal of the update (typically for 10 days). This space can be reclaimed after the update is completed. To do this, Select Start > Settings > System > Storage > Free up space now.
Open Storage settings
The update is compressed to reduce download size.
Note: For devices with reserved storage, an update will first use the reserved storage space before using other disk space. For more info, see How reserved storage works in Windows 10.
The space required to complete a feature update depends on two factors: which update path is followed and the size of optional content and other updates that apply to your PC when the feature update is installed.
Note: For devices with reserved storage, an update will first use the reserved storage space before using other disk space. For more info, see How reserved storage works in Windows 10.
Windows follows three different feature update paths, depending on the amount of disk space currently available.
1. For PCs with plenty of free disk space
Windows automatically tries to complete more of the update process in the background while you use your PC. This significantly reduces the time your PC will be offline (or unusable) during the update, although it might temporarily use more disk space to complete the update. Learn more about our efforts to reduce offline time during updates (English only at this time).
2. For PCs with limited free space but still enough to complete the update automatically
Windows will automatically optimize for reducing the amount of free disk space required to install the update. This will result in a longer offline install time.
3. For PCs that don’t have enough space to automatically install the update
Windows will prompt you to free up disk space or use external storage to temporarily extend the storage on your PC. If you use an external storage device, Windows won’t need as much free space on the system drive as it temporarily uses your external storage.
Across each of these update paths, the total amount of free disk space required will vary, depending on the optional content installed and other updates that apply to your PC. For example:
Optional features. Many optional features available for Windows are pre-installed or acquired on demand by the system, or manually by you. You can see which ones are installed on your PC by going to Settings > Apps > Apps & features > Manage optional features.
Open Optional features settings
These features range in size from less than 1 MB to almost 2 GB for the Windows Mixed Reality portal. You can reduce the amount of space required to install a feature update on your PC by uninstalling optional features you aren’t using.
Languages installed. Windows is localized into many languages. Although many people only use one language at a time, some people switch between two or more languages. You can see which languages are installed on your PC by selecting Start > Settings > Time & Language > Language .
Open Language settings
During each update, all language resources and any associated typing, text-to-speech, speech-to-text, and handwriting recognition resources must be updated. The content for each language can range from about 175 MB to more than 300 MB. You can reduce the amount of space required to install a feature update on your PC by uninstalling languages you aren’t using.
Driver updates. OEMs and other hardware partners sometimes publish new graphics, networking, audio, and other drivers in conjunction with the new OS update. The size of these drivers can vary significantly, depending on your PC and on which drivers have been updated.
OS quality updates. During a feature update, Windows tries to download and automatically install the latest quality update so that your PC is fully up to date when you start using it. Shortly after the feature update is released, the quality update for that feature update could be as small as a few hundred MB, but as more quality and security changes are implemented, the quality update can increase in size to 1 GB or more.If your PC is short on disk space, you can download and install the quality update after the feature update is complete.
Finally, Windows Update will temporarily disable hiberfile.sys, pagefile.sys, and other system files in order to use the space these files typically consume to apply the feature update. Any files that are disabled to apply the update will be automatically re-enabled when the update is complete. Because these files vary in size depending on how you use your PC and the amount of RAM your PC has, even in cases where two different PCs have the exact same OS image, the amount of free disk space required to complete an update may vary.
The combination of update path and features means there’s a wide range of free disk space required to complete an update. Here are a few examples for PCs updating to Windows version 1803:
Optimized for reduced offline time
Optimized for minimal disk space
Optimized for minimal disk space with external storage
Minimal optional features, languages, and updates


