- How to Make Your Screen Stay On in Windows 10
- Stop Screen from Turning Off in Windows 10
- 8 Ways to Quickly Turn Off Your Screen in Windows 10
- 1. Use Your Windows Power Management Settings
- 2. Set Your Power and Sleep Settings
- 3. Turn Your Screen Off in Windows Using a Keyboard Shortcut
- 4. Use the Start Menu
- 5. Using a BAT Script
- 6. Use DisplayOff Tool
- 7. Use Dark Tool to Turn Off Windows PC Screen
- 8. Use Blacktop Tool to Turn Off Your Screen in Windows
- Wrapping Up
- 4 comments
- 3 Ways to Keep a Window Always on Top on Windows 10
- 1. Use a Keyboard Shortcut with an Always on Top AutoHotkey Script
- 2. Use Your Mouse with DeskPins
- 3. Use a System Tray Menu with TurboTop
- Bring the Always-on-Top Feature to All Windows
How to Make Your Screen Stay On in Windows 10

By default, Windows 10 will turn off your screen after a period of inactivity. This is to help save battery power and to some extent the life of the screen. But no everyone wants the screen to go black. Some people would rather their screen stay on all the time. Here’s how to stop your screen from turning off in Windows 10.
Stop Screen from Turning Off in Windows 10
To prevent the screen from turning off automatically, you need to adjust some power and sleep settings. Start by heading to Settings > System > Power & Sleep.
Under the Power & Sleep section set the screen to turn off Never for both “On battery power” and “when plugged in.” If you are working on a desktop there will only be the option for when the PC is plugged in.
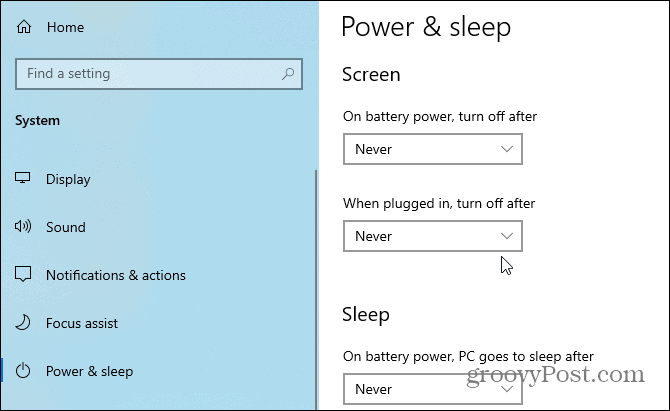
Note that you might also want to set the PC to go to sleep never, too. This is because the screen turns off when the PC goes into Sleep mode. Just keep in mind that if you are conscious about the life of your battery, you need to consider the battery life will be impacted by not turning the screen off.
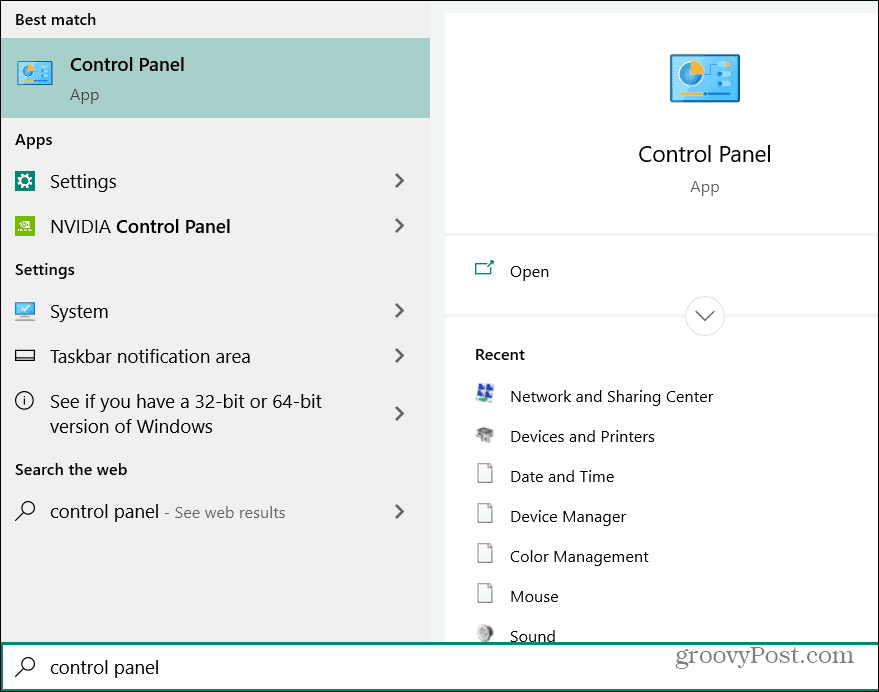
You can also keep your screen from turning off via the classic Control Panel. To do that hit the Windows key and type: control panel and choose the top result from the list.
Then choose Power Options from the list. Then under the Power Options section click on “Choose when to turn off the display” from the panel on the right.
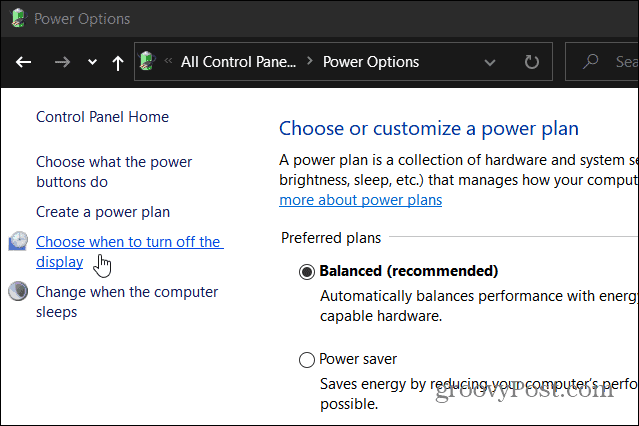
Now, set the “Turn off display” drop-down menus to Never for both “on battery” and the “Plugged in” section. Then make sure to click the “Save changes” button for the changes to go into effect.
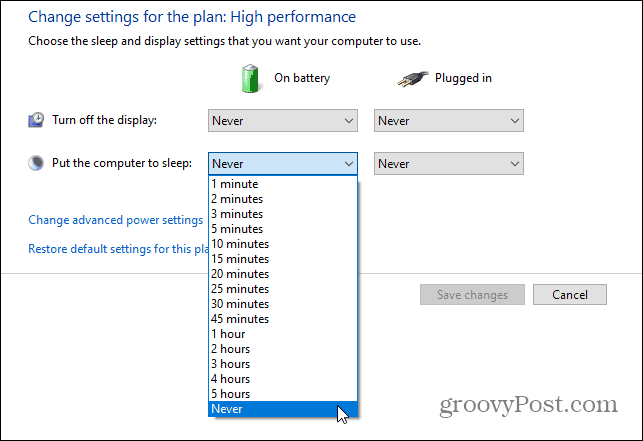
Here you might want to set the “Put the computer to sleep” drop-down menus to Never for On battery and Plugged in sections, too. Just remember that if you’re on a laptop the battery will take a hit if you set it to never. A good compromise is setting it to an hour or two instead. That way if you forget your laptop is on, it will go to sleep automatically after a period of time and help you save the battery juice.
8 Ways to Quickly Turn Off Your Screen in Windows 10

Say you had to attend to an emergency at work or your child or spouse needed something suddenly. This means leaving your PC and attending to other relevant issues every once in a while. But there are risks attached, especially if you don’t turn off the screen.
Someone could access your data and use it for malicious purposes. Or they could ruin an entire day’s work by mistake when going through your computer. To prevent any of that from happening and to also help use less energy, here are several ways to turn your Windows PC screen off more quickly.
1. Use Your Windows Power Management Settings
You can create a custom setting that forces your computer to shut down the screen just by using the power button. To do this, you will need to do the following:
1. Go to your computer’s Control Panel and search for the terms “change what the power buttons do.”
2. Click on the result and set your PC to sleep each time you press the power button. You can do this by clicking the drop-down menu.
3. As soon as you finish, save your settings.
2. Set Your Power and Sleep Settings
Using the power settings is an efficient way to turn off your screen in Windows quickly. It is especially useful when you have to step away from your computer at a moment’s notice. It works by turning the display off after a set period elapses. Here’s how to do this:
1. Go to Windows search and search for “power & sleep settings.” (You must use the ampersand sign.)

2. Click on the result. It should present a screen that looks like the following image:

3. Click on the first two drop-down menus and set the screen to go off in two minutes.

4. Repeat the same step for the sleep settings too.

That’s all. The next time you step away from your PC, you can be sure it would go to sleep after two minutes.
3. Turn Your Screen Off in Windows Using a Keyboard Shortcut
Windows has many built-in shortcuts for many functions. There is also one that you can use for turning off your PC screen more quickly. Follow the steps below to achieve this.
1. Go to your desktop screen/home screen. This is important because the next step only works on the home screen.
2. Press the keyboard combination keys Alt + F4 .

3. Choose “sleep” and your PC screen will turn off immediately.
4. Use the Start Menu
All it takes is two quick clicks to put your Windows computer into Sleep mode. As long as you have a username/password set up, no one can access your screen until you get back.
Open the Start menu and click the Power icon. Click Sleep to immediately turn off your screen without turning off your computer. You don’t even have to save your work before you do it.

5. Using a BAT Script
A BAT script is an executable file for Windows. You can run it from the command prompt tool. You can use the script to turn your screen off in Windows, and it is safe too.
Follow these steps to use the BAT script:
1. Download the BAT file and place it on your desktop.

2. Right-click and select “Run as Administrator.” This will shut off your PC screen immediately.
6. Use DisplayOff Tool
The DisplayOff tool is a free utility program designed to help you switch off your Windows PC screen. It is easy to use and doesn’t have any Graphical User Interface. It is run the same way as a BAT file.
How to use the DisplayOff tool:
- Download the tool
- Run as administrator.
- Your Windows PC screen will go off immediately.
7. Use Dark Tool to Turn Off Windows PC Screen
Dark is a small tool that you can install to help you quickly turn your screen off in Windows. It requires installation. After installation, it places an icon as a shortcut in your Windows taskbar.
1. Download and install Dark Tool.

2. Start the Dark tool. It will create an icon on your taskbar.
3. Click the icon to turn off your screen.
8. Use Blacktop Tool to Turn Off Your Screen in Windows
The Blacktop tool is like the Windows BAT file, except that it allows you to use a keyboard shortcut to run it instead of clicking on it. The shortcut is Ctrl + Alt + B .
You can download this tool on Softpedia.
Wrapping Up
Turning off your Windows PC screen should not be a tedious task. The above steps should be more than enough to help you achieve that. When you next need to shut off your PC screen more quickly, remember that you have many options.
Related:
Crystal Crowder has spent over 15 years working in the tech industry, first as an IT technician and then as a writer. She works to help teach others how to get the most from their devices, systems, and apps. She stays on top of the latest trends and is always finding solutions to common tech problems.
4 comments
I use [+] L (where [+] represents the ‘Windows’ key). This locks your PC and puts up the log-in screen or screensaver. I find this works on my Linux machines too (assuming I have a Windows Keyboard)_.
Since the title of your article is “8 Ways to Quickly Turn Off Your Screen in Windows 10” and doesn’t mention going into hibernation, I’d like to mention an old trick I’ve been using for years. I simply assign a keystroke combination to a shortcut for the scrnsave.scr screen saver. I use “Ctrl-Alt-B” with the “B” standing for either “blank” or “black”.
o blank my screen, I simply turn off the monitor with its power switch.
If you have bluetooth on your computer and phone, you can also use your phone to lock and activate the screen when you’re away from the computer. It’s passive. The only thing you have to do is have pair your phone to the computer and enable “Dynamic Lock” under the Windows sign-in options menu. Once you’re out of bluetooth range the screen is locked. The screen isn’t *off* though, so this is just a security feature.
Technically, Microsoft claims it’s just a bluetooth “device” that’s needed, so presumably bluetooth headphones/IEMs would also work. I’ve tested the phone part and it works, but I haven’t tried the other.
The **easiest** way is Tim’s suggestion as it’s built-in and requires no additional work.
3 Ways to Keep a Window Always on Top on Windows 10


When you are working in Windows with limited screen space, it’s useful to have certain windows stay on top of others. Some programs in Windows automatically incorporate this “always on top” feature, but most programs don’t, and Windows doesn’t include this feature either.
Today we’ll cover three ways to easily add the “always on top” feature to every single program in Windows.
1. Use a Keyboard Shortcut with an Always on Top AutoHotkey Script
AutoHotkey is a free program that allows you to create scripts to perform multiple actions with a single keyboard shortcut. It runs in the background and sits in the system tray.
We’re going to use AutoHotkey to create a script that will keep a selected window on top of all others when you press Ctrl + Spacebar when that window is active. We’ll show you the script and explain how it works. But we’ll also provide a downloadable AutoHotkey script file you can use.
Download and install AutoHotkey and then run it.
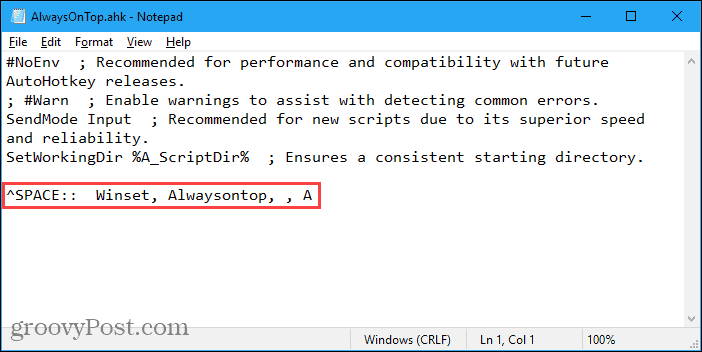
Download the AlwaysOnTop.ahk script file, extract the .zip file, and put the script in a folder on your hard drive that won’t be moved or deleted.
The script contains some comments and then the following command:
This command sets the currently active window to always be on top when you press Ctrl + Spacebar. If you’d rather use a different key combination, you can change the first part of the command, “^SPACE“. The “^” character represents the Ctrl key. You’ll find the symbols to use for other hotkeys in the Hotkey Modifier Symbols section on this AutoHotkey help page.
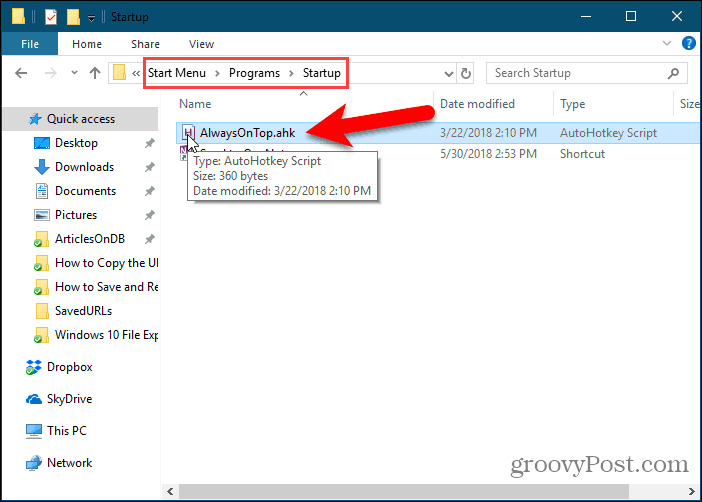
You can put the script in the Windows startup folder (%AppData%\Microsoft\Windows\Start Menu\Programs\Startup), so it starts automatically when Windows starts.
The AutoHotkey script stays in the system tray.
To make the active window always on top, press Ctrl + Spacebar (or the keyboard shortcut you assigned). Press the keyboard shortcut again to disable “always on top” for the active window.
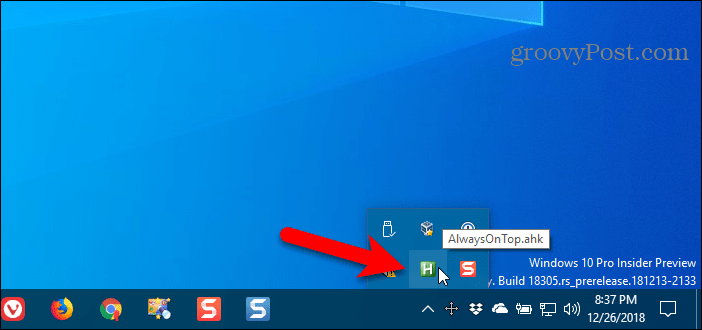
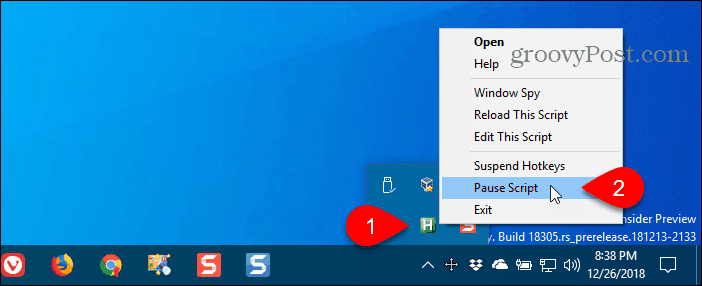
For script options, right-click on the AutoHotkey icon in the system tray.
2. Use Your Mouse with DeskPins
DeskPins provides pins you can grab and use to keep any window on top of all other windows. The program sits in the system tray and uses minimal resources.
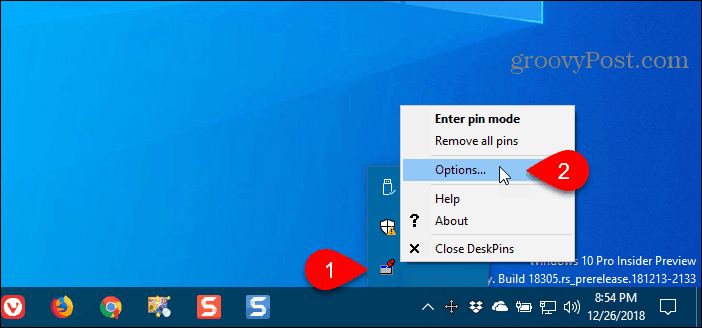
Download and install DeskPins. Run the program, right-click the icon in the system tray, and select Options to change the Pins, Autopin, and Hotkeys settings.
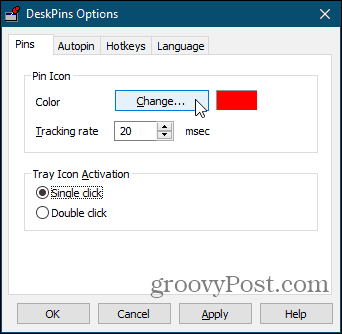
On the Pins tab, you can change the color of the pins. The Tracking rate controls how often each pin checks the pinned window’s position and state. Lower values make the pins more responsive. You can enter any number from 10 to 1000 msec (milliseonds).
If you have an older computer, you may want to increase the Tracking rate number to avoid slowing down your computer.
You can also choose Single click or Double click under Tray Icon Activation to indicate how you get pins from the DeskPins system tray icon. The default is Single click.
You can have DeskPins automatically pin certain types of windows using rules on the Autopin tab.
Check the Enable box and then click Add to add a new rule. Use the check boxes next to the rules to enable and disable individual rules.
Click Help to access the DeskPins help file for more information about automatically pinning windows.

DeskPins provides default shortcuts for entering pin mode and toggling the active window pin. You can change these shortcuts on the Hotkeys tab.

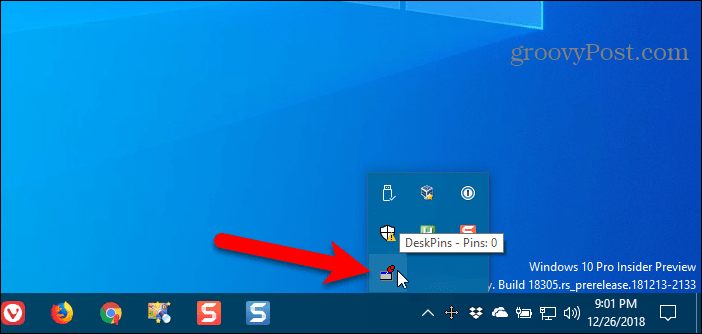
To pin a window on top, click (or double-click, depending on the setting) the DeskPins icon in the system tray.
Then, click the title bar on the window you want to keep always on top.
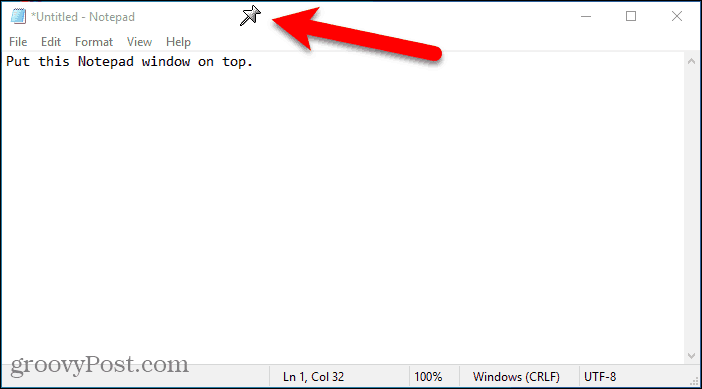
A pin displays on the title bar of the chosen window in the color you specified, or in the default color red.
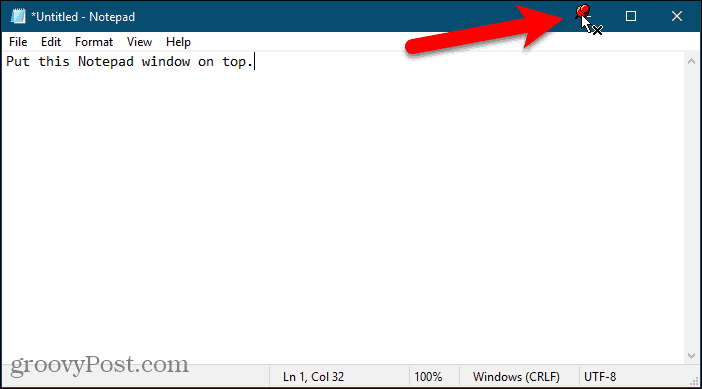
Click the pin again to disable always on top for the window.
3. Use a System Tray Menu with TurboTop
TurboTop also sits in your system tray like DeskPins. But it operates differently.
Download and install TurboTop. Then, run the program.
To keep a window always on top, click the TurboTop icon in the system tray. A list of all open windows displays. Select the title of the window you want.
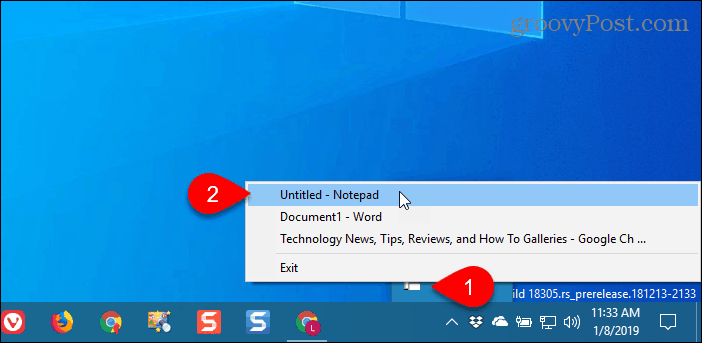
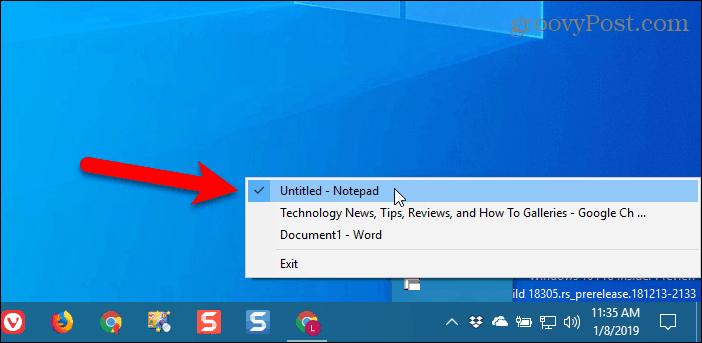
Any windows you choose to be always on top are indicated with a check mark on the TurboTop menu.
To stop keeping a window always on top, click the TurboTop icon in the system tray and select that window again, so there’s no check mark next to the window name on the menu.
Bring the Always-on-Top Feature to All Windows
Whether you like using keyboard shortcuts or prefer using the mouse, there’s an easy solution for keeping windows always on top. If you’ve found other options for keeping windows always on top, let us know in the comments.


