- Устранение ошибки «Startup Repair Offline» при загрузке Windows 7
- Исправляем ошибку «Startup Repair Offline»
- Способ 1: Сброс настроек BIOS
- Способ 2: Подключение шлейфов
- Способ 3: Восстановление запуска
- Способ 4: «Командная строка»
- Заключение
- Windows 7 computer keeps automatically starting up Startup Repair and fails.
- Fix ‘Startup Repair cannot repair this computer automatically’ in Windows 10/8/7/Vista
- «Startup Repair cannot repair this computer automatically»
- 6 Fixes for «Startup Repair cannot repair this computer automatically» in Windows 10/8/7
- Method 1. Remove Peripheral Devices
- Method 2. Run Bootrec.exe
- Method 3. Run CHKDSK
- Method 4. Run Windows System File Checker Tool
- Method 5. Perform System Restore
- Procedure 1. Restore Important Data from the Dead PC
- Procedure 2. Perform a System Restore
- Method 6. Repair Startup Error Without System Backup
- Procedure 1. Restore from the Problem PC
- Procedure 2. Clean Install/Reinstall Windows OS
- How to Prevent «Startup Repair cannot repair this computer automatically» Error
- The Bottom Line
Устранение ошибки «Startup Repair Offline» при загрузке Windows 7
Исправляем ошибку «Startup Repair Offline»
Буквально данная неисправность означает – «восстановление запуска не в сети». После перезапуска компьютера, система предприняла попытку по восстановлению работы (не подключаясь к сети), но попытка оказалась неудачной.
Неисправность «Startup Repair Offline» зачастую появляется из-за проблем с жестким диском, а именно из-за повреждения сектора, на котором находятся системные данные, отвечающие за правильный запуск Windows 7. Также возможны проблемы с поврежденными разделами реестра системы. Перейдем к способам исправления этой неполадки.
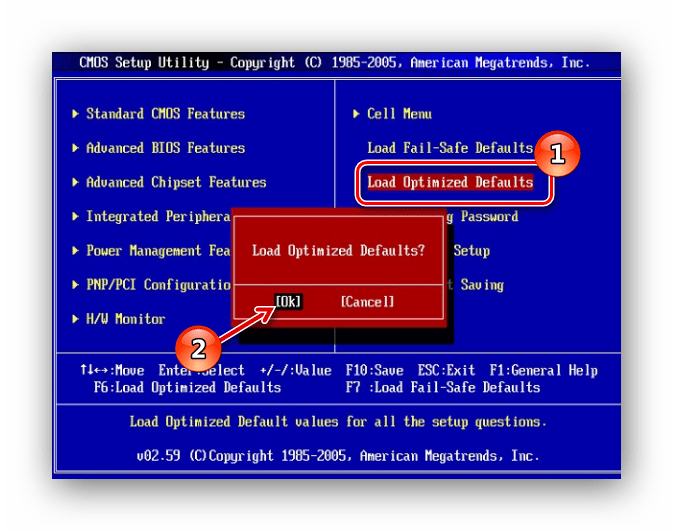
Способ 1: Сброс настроек BIOS
Переходим в БИОС (при помощи клавиш F2 или Del при загрузке компьютера). Производим загрузку настроек по умолчанию (пункт «Load optimized defaults»). Сохраняем сделанные изменения (нажав клавишу F10) и перезапускаем Виндовс.
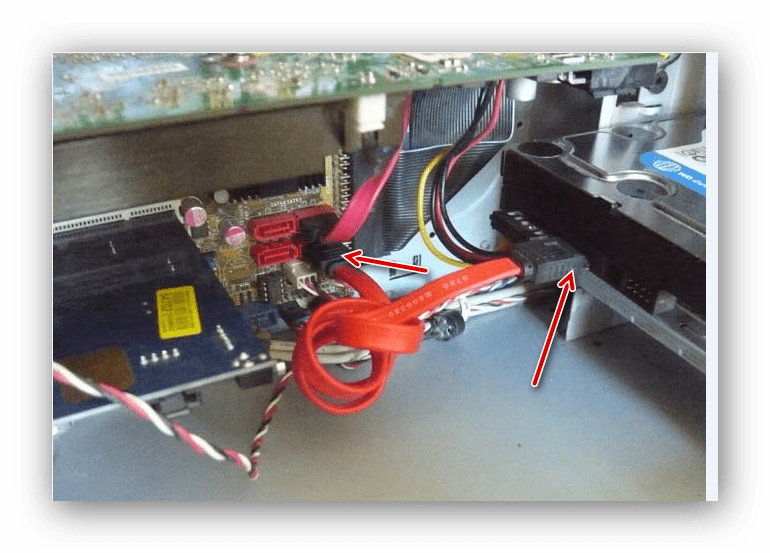
Способ 2: Подключение шлейфов
Необходимо произвести проверку целостности разъемов и плотность подключения шлейфов жесткого диска и материнской платы. Убедитесь, что все контакты подключены качественно и плотно. После проверки перезапускаем систему и проверяем на наличие неисправности.
Способ 3: Восстановление запуска
Так как обычный запуск операционной системы невозможен, рекомендуем воспользоваться загрузочным диском или флешкой с системой, которая является идентичной установленной.
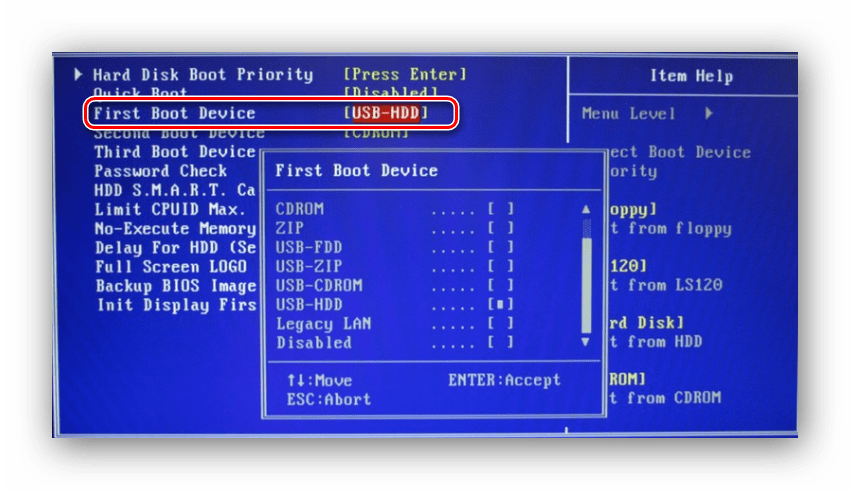
- Выполняем запуск с загрузочной флешки или диска. В БИОСе устанавливаем опцию запуска с диска или флеш-накопителя (устанавливаем в пункте «First Boot Device USB-HDD» параметр «USB-HDD«). Как это сделать на различных версиях BIOS, подробно описано в уроке, который представлен ниже.
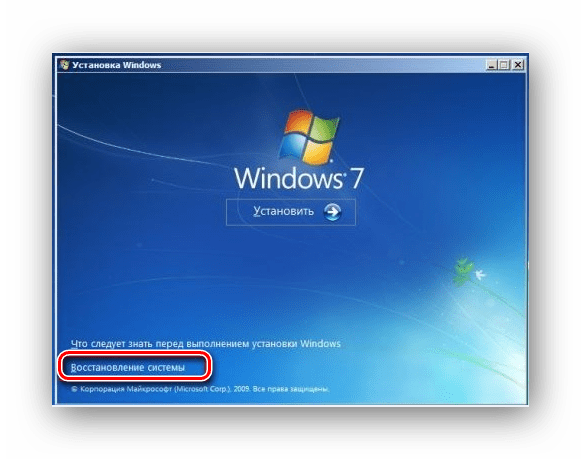
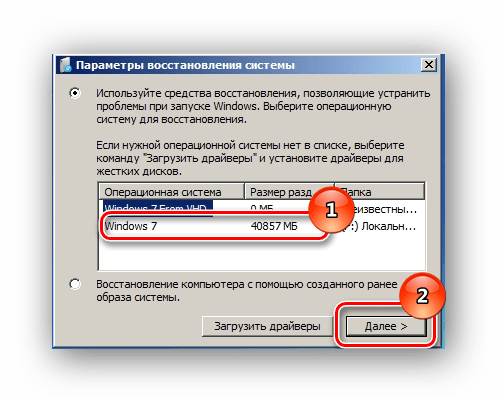
Системой будет произведён поиск неполадок в автоматическом режиме. Жмём на кнопочку «Далее» в открывшемся окне, выбрав необходимую ОС.
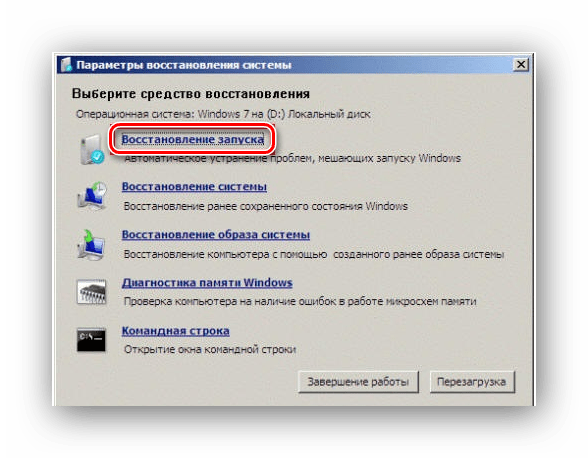
В окошке «Параметры восстановления системы» щелкаем по пункту «Восстановление запуска» и дожидаемся завершения проверочных действий и корректного запуска компьютера. После окончания проверки перезагружаем ПК.
Способ 4: «Командная строка»
Если приведенные выше способы не помогли устранить неполадку, тогда вновь запускаем систему с флешки или установочного диска.
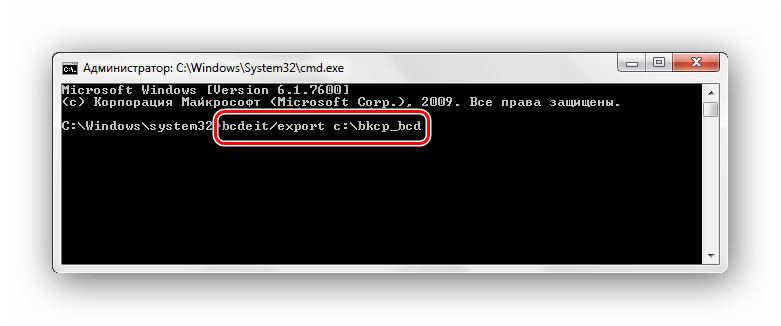
Нажимаем клавиши Shift+F10 в самом начале установочного процесса. Попадаем в меню «Командной строки», где необходимо набрать поочередно определенные команды (после ввода каждой из них нажимаем Enter).
bcdedit /export c:\bckp_bcd
attrib c:\boot\bcd -h -r –s

ren c:\boot\bcd bcd.old


После того, как ввели все команды, перезапускаем ПК. Если Виндовс 7 не запустилась в работоспособном режиме, тогда в данных о неисправности может быть имя проблемного файла (например, библиотеки расширения .dll). Если было указано название файла, то необходимо попробовать совершить поиска данного файла в интернете и поместить его на ваш винчестер в необходимую директорию (в большинстве случаев, это папка windowds\system 32 ).
Заключение
Итак, что же делать с неполадкой «Startup Repair Offline»? Самый простой и эффективный способ – это использование восстановления запуска ОС, применяя загрузочный диск или флеш-накопитель. Если способ с восстановлением системы не исправил проблему, то воспользуйтесь командной строкой. Также проверьте целостность всех соединений компьютера и настройки BIOS. Применение этих методов позволит устранить ошибку запуска Windows 7.
Windows 7 computer keeps automatically starting up Startup Repair and fails.
There are several factors that can contribute to cause this issue.
2. Are you able to boot in Safe mode ?
3. Were there any recent changes made to the computer prior to the issue?
I would suggest you to follow the steps provided and later update us on the status of the issue.
Method 1: Check if the issue is caused by some of the hardware malfunctioning on your computer. I suggest that you disconnect all the External devices connected to your computer, except the mouse and keyboard and check if you can able to boot in Safe mode.
For your reference: “Windows Vista or Windows 7 no longer starts, and the Startup Repair tool does not fix the problem” http://support.microsoft.com/kb/934540/en-us
Method 2: Try to perform system restore from system recovery options in Windows 7.
Note: When you perform System Restore to restore the computer to previous state, programs and updates you installed are removed.
Method 3: If the issue persists then try to run the Startup Repair tool by using Windows 7 installation disc.
Method 4: How to use the Bootrec.exe tool in the Windows Recovery Environment to troubleshoot and repair startup issues in Windows: http://support.microsoft.com/kb/927392/en-us
Important : While performing check disk on the hard drive if any bad sectors are found on the hard drive when check disk tries to repair that sector if any data available on that might be lost.
(Try all the steps except re-install Windows 7)
For any Windows related issues please feel free to contact us and we will be glad to help.
2 people found this reply helpful
Was this reply helpful?
Sorry this didn’t help.
Great! Thanks for your feedback.
How satisfied are you with this reply?
Thanks for your feedback, it helps us improve the site.
Fix ‘Startup Repair cannot repair this computer automatically’ in Windows 10/8/7/Vista
On this page, we collected 6 fixes for you to get rid of «Startup repair cannot repair this computer automatically» error on Windows 10/8/7 with step-by-step tutorial guides.
| Workable Solutions | Step-by-step Troubleshooting |
|---|---|
| Fix 1. Remove Peripheral Devices | If you have recently attached a device to your computer, remove the device. Full steps |
| Fix 2. Run Bootrec.exe | Restart your computer and press «F8», then choose «Repair Your Computer». Full steps |
| Fix 3. Run CHKDSK | Restart your computer, choose «Repair Your Computer» > «Command Prompt». Full steps |
| More Fixes | Restart your computer. Once it starts, press «F8», choose «Safe Mode with Command Prompt». Full steps |
«Startup Repair cannot repair this computer automatically»
Startup Repair is a Windows built-in tool that can check and replace the missing or damaged system files on your computer. Generally, this tool is applied when your computer cannot boot properly. However, many users have encountered an issue while using this utility, which is «Startup Repair cannot repair this computer automatically». This is the error message in Windows 7 or Windows Vista. In Windows 10, it’s equivalent is «Automatic Repair couldn’t repair your PC».
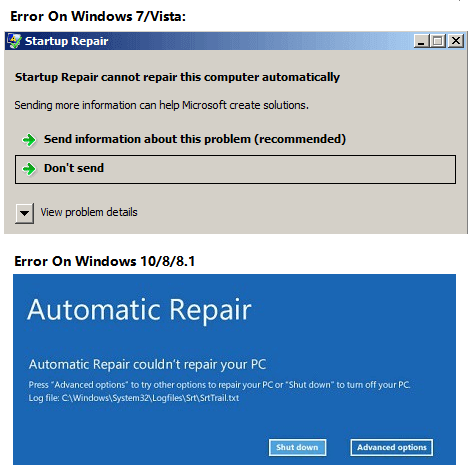
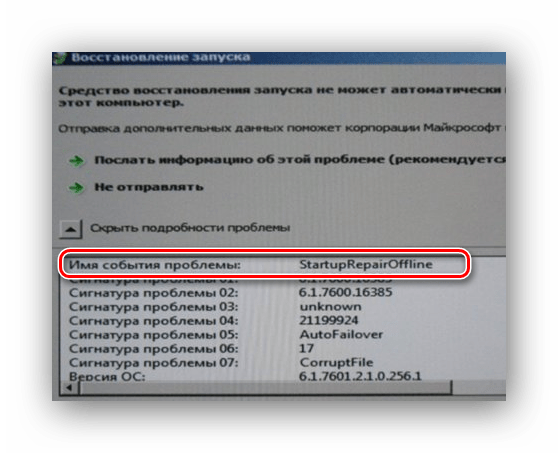
If you click «View problem details» in Windows 7/Vista, you will the information below. (The problem signature might be shown different variables from the ones above on different OS.)
Problem Event Name: StartupRepairOffline
Problem Signature 01: 6.1.7600.16385
Problem Signature 02: 6.1.7600.16385
Problem Signature 03: unknown
Problem Signature 04: 21200442
Problem Signature 05: AutoFailover
Problem Signature 06: 65
Problem Signature 07: CorruptFile
OS Version: 6.1.7600.2.0.0.256.1
Locale ID: 1033
Then why did Startup Repair fail to work? Generally, when you receive the error message, it may indicate:
- There is a problematic device attached to your computer
- The file system of your system disk is damaged
- The MBR (Master Boot Record) of the hard drive is corrupted
- There may be virus attacks, disk write errors or power outages on your disk
6 Fixes for «Startup Repair cannot repair this computer automatically» in Windows 10/8/7
If you cannot specify the cause of why Windows Startup Repair failed, never mind trying the simple fixes first.
Method 1. Remove Peripheral Devices
Based on the information given by Microsoft, if you have recently attached a device to your computers like a camera or portable music player, you can remove the device and restart your computer. Sometimes, Windows cannot repair the computer automatically due to the device connected.
If this tip doesn’t work, don’t get upset. There are many other ways for you to try.
Method 2. Run Bootrec.exe
Bootrec, also called bootrec.exe utility, is a tool provided by Microsoft in the Windows Recovery Environment. Bootrec.exe can be used to fix the Master Boot Record (MBR), Boot Sector, Boot Configuration (BCD), and boot.ini. If it’s the corrupt MBR or BCD that caused the problem, the solution is to correct the MBR or BCD record with the help of bootrec. By the way, this method requires a Windows recovery disk. Since you are using it when you perform a startup repair, you can run bootrec.exe following the steps below.
Step 1. Restart your computer and press «F8» once you see the Windows logo.
Step 2. Among the advanced boot options, choose «Repair Your Computer».
Step 3. In the system recovery options, choose «Command Prompt».
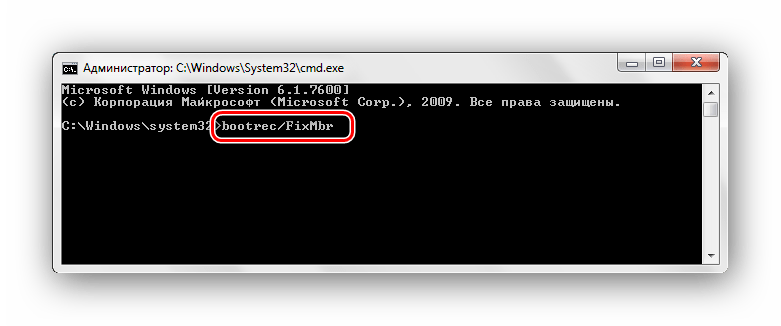
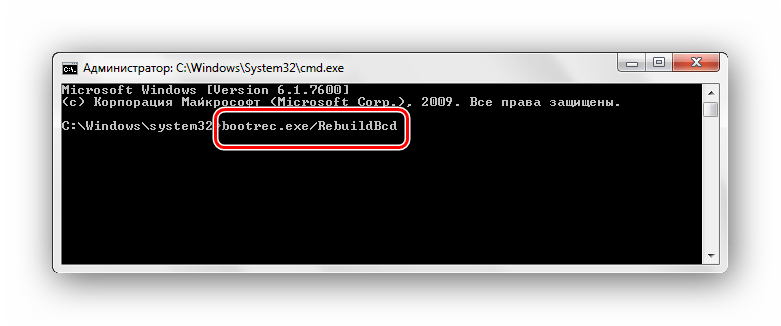
Step 4. Enter the commands below in order:
bootrec /fixmbr
bootrec /fixboot
Method 3. Run CHKDSK
As mentioned, bad sectors and file system errors on your hard drive may be the reason why you receive the error message «Startup Repair cannot repair the computer automatically». Running CHKDSK is able to check and repair your disk errors including bad sectors and file system errors.
Step 1. Restart your computer and press «F8» once you see the Windows logo.
Step 2. Among the advanced boot options, choose «Repair Your Computer».
Step 3. In the system recovery options, choose «Command Prompt».
Step 4. Enter the command below: chkdsk C: /f /r
«C» is the drive letter of your Windows installation drive.
Method 4. Run Windows System File Checker Tool
Windows System File Checker Tool can check and repair missing or corrupted Windows system files on your computer. Besides, using this tool doesn’t need the Windows installation CD. All you need is to boot into the Safe Mode with Command Prompt.
Step 1. Restart your computer. Once it starts, press «F8» in 1-second intervals until you see the Windows logo.
Step 2. Then you will see the menu of «Advanced Boot Options». Under it, choose «Safe Mode with Command Prompt».
Step 3. In Command Prompt, enter the following command: sfc /scannow /offbootdir=d:\ /offwindir=d:\windows
Step 4. Restart your computer.
Method 5. Perform System Restore
If you’ve created a Windows system restore point as a system backup on your Windows 10/8/7 PC, you have the chance to fully restore your PC to its original state, at least to the previous state. System Restore is a feature in Microsoft Windows that allows users to revert their computer’s state (including system files, installed applications, Windows Registry, and system settings) to a previous point in time. Thus, it can be used to recover from system malfunctions or other problems.В
Procedure 1. Restore Important Data from the Dead PC
When youВ are stuck with «Startup Repair cannot repair this computer automatically» or ‘»Automatic Repair couldn’t repair your PC» error message on Windows PC, don’t rush to perform System Restore. Performing a system restore will takeВ your PC back to an earlier point in time, called a system restore point. Restore points are generated when you install a new app, driver, or Windows update, and when you create a restore point manually. Restoring won’t affect your personal files, but it will remove apps, drivers, and updates installed after the restore point was made. Therefore, we highly recommend you to try powerful data recovery software -В EaseUS Data Recovery Wizard with Bootable Media to get your data out of the current ‘dead’ PC:
Notice: This will require a second healthy computer for help.
Step 1. Select a location and start scanning.
Launch EaseUS Data Recovery Wizard, hover on the location(hard drive partition, external HDD, Card devices) where you lost data, then click «Scan».

Step 2. Preview and select the files.
Wait until the scanning completes. If you need to double-click the item to preview the file, then select the data you attempt to recover.

Step 3. Recover lost data.
Click «Recover», choose a location to save the recovered data, then click «OK». You should store the data in another place instead of the original one.

Procedure 2. Perform a System Restore
If you have enabled the System Restore on your computer and created a system restore point, you can fix «Startup repair cannot repair this computer automatically» in Windows 10/8/7/Vista be performing a system restore:
For Windows 10/8/8.1 users:
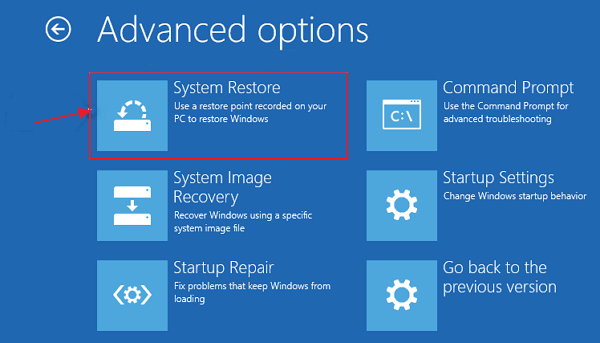
Step 1. Reboot your Windows 10/8 PC into Advanced Startup, and click «Troubleshoot».

Step 2. SelectВ «Advanced options», chooseВ «System Restore».В
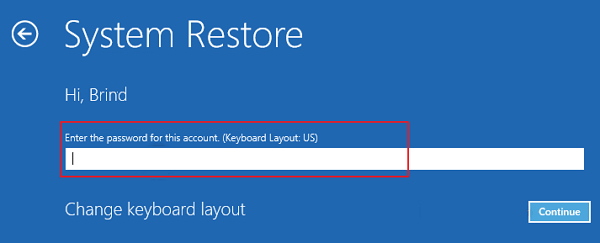
Step 3. Click on the Administrator Account and enter your password, clickВ «Continue» to move on.В
Step 4. Choose your system restore point created previous and follow the on-screen guidelines to complete the whole process.
For Windows 7/Vista Users:
Step 1. Insert your Windows installation CD or disc.
Step 2. Press any key when «Press any key to boot from CD or DVD» message appears.
Step 3. Select a language, a time and currency, and a keyboard or input method, and then clickВ «Next».
Step 4. Click «Repair your computer».
Step 5. Select your WindowsВ installation drive, which is usuallyВ C:\В and clickВ «Next».
Step 6. In the System Recovery Options Dialog Box, click on «System Restore».
Step 7. Follow the System Restore Wizard instruction and choose the appropriate restore point.
Step 8. ClickВ «Finish» to restore the system.
Finally, restart your computer and copy your restore data back to your PC. You should be able to use your computer and data again.
Method 6. Repair Startup Error Without System Backup
If you don’t have a system backup, fixing «Startup Repair couldn’t repair your PC» error will be more complex. You can:
Procedure 1. Restore from the Problem PC
You can directly follow the detail guidelines above to rescue your data with the help of EaseUS Data Recovery Wizard with Bootable Media. It fully allows you toВ recover data when PC won’t boot or startВ in Windows 10/8/7/Vista.
Procedure 2. Clean Install/Reinstall Windows OS
When you don’t have a system restore point on your PC, the best way to remove ‘Startup Repair’ error on Windows 10/8/7, etc. is to perform a clean install of Windows OS. You can directly turn to Microsoft for online assistanceВ (and Windows 7/Vista users are recommended to try this way). Or you can refer to the article about how toВ clean install Windows 10.
How to Prevent «Startup Repair cannot repair this computer automatically» Error
After restoring your PC back to life and rescuing all precious data, it doesn’t mean that your PC and data are safe now. Virus attack, system failure, system crash, data loss, and other unknown issues may occur anytime. How to prevent these issues from happening? That’s quite difficult! Is it possible to protect your System and data securely from these disasters? Sure!
Powerful Windows system backup software — EaseUS Todo Backup can help. It provides System Backup, File Backup, Disk/Partition Backup, System Clone, and other more advanced features to help you fully protect your PC from these issues.В It will help you prevent and protect your computer from ‘Startup Repair failure’ error or similar issues. Making a backup is always the best way to prevent complete data loss.
The Bottom Line
«Startup Repair cannot repair this computer automatically» is a relatively complex issue related to Windows. Although there are solutions to the problem, it may be difficult for you to apply since these operations are seldom taken during your daily use. If you don’t want to try it yourself, you can send your computer to professionals for manual repair.


