- В какой папке Windows хранит ярлыки меню «Пуск»
- Windows 10: как открыть меню «Пуск» в проводнике
- How to Pin Folders to Start Menu in Windows 10
- How do I pin folders to the start menu in Windows 10?
- How to pin folders to Start menu in Windows 10?
- 1. From the folder’s right-click menu
- 2. Drag the folder
- 3. Pin other Windows 10 elements to start menu
- How to Access the Windows 10 Startup Folder
- How to Access the Windows 10 Startup Folder
- The Startup Folder In The Start Menu
- Two Windows 10 Startup Folders
- Accessing The Windows 10 Startup Folder
- Enabling and Disabling Startup Programs
- To access Startup using the Task Manager:
- To access Startup using via Windows Settings:
- The Launch Order For The Windows 10 Startup Folder
В какой папке Windows хранит ярлыки меню «Пуск»
В этой статье вы узнаете, как открыть папку «Пуск» в Windows 10.
Вам нравится держать меню Пуск в чистоте, порядке и организованно? Все, что вам нужно сделать, это открыть специальную папку «Пуск» и упорядочить все, что душе угодно. Далее показано, как управлять ярлыками в главном меню Windows.
В Windows 10 предусмотрены различные способы настройки меню «Пуск», но вы все равно можете организовать свои приложения так же, как всегда — упорядочив содержимое папки «Пуск» в Windows. Со всеми изменениями меню «Пуск» за последние годы способ открытия папки «Пуск» изменился от версии к версии. Мы расскажем, как открыть папку «Пуск» в Windows 10, этот способ также подходит для предыдущих версий Windows.
Организация списка «Все приложения» в Windows 10 несколько сложнее, чем в предыдущих версиях. Следует иметь в виду одно большое отличие: в Windows 10 используется внутренняя база данных для создания списка «Все приложения» в меню «Пуск». Это означает, что папка будет отображать не всё содержимое вашего меню «Пуск» — только обычные приложения для рабочего стола. Вы не увидите приложения, загруженные из магазина Windows, поэтому вам придётся управлять ими в другом месте.
Следует также помнить, что Windows создаёт меню «Пуск» из двух мест. Одна папка содержит общесистемные папки и ярлыки, которые появляются в меню «Пуск» любого пользователя, вошедшего в систему. Существует также папка для конкретного пользователя, которая содержит ярлыки и папки, отображаемые только для текущего пользователя, вошедшего в систему. Если вы когда-либо устанавливали приложение и должны были выбрать, устанавливать ли его только для текущего пользователя или для всех пользователей, то вы должны понимать, что это значит. Эти две папки объединяются для создания элементов, которые вы видите в меню «Пуск».
Windows 10: как открыть меню «Пуск» в проводнике
Вы всегда можете получить доступ к папкам «Пуск» в вашей системе в проводнике. Просто запустите его и перейдите в одно из следующих мест (совет: вы можете скопировать эти места и вставить их в адресную строку Проводника).
Вот местоположение глобальной папки «Пуск» для всех пользователей:
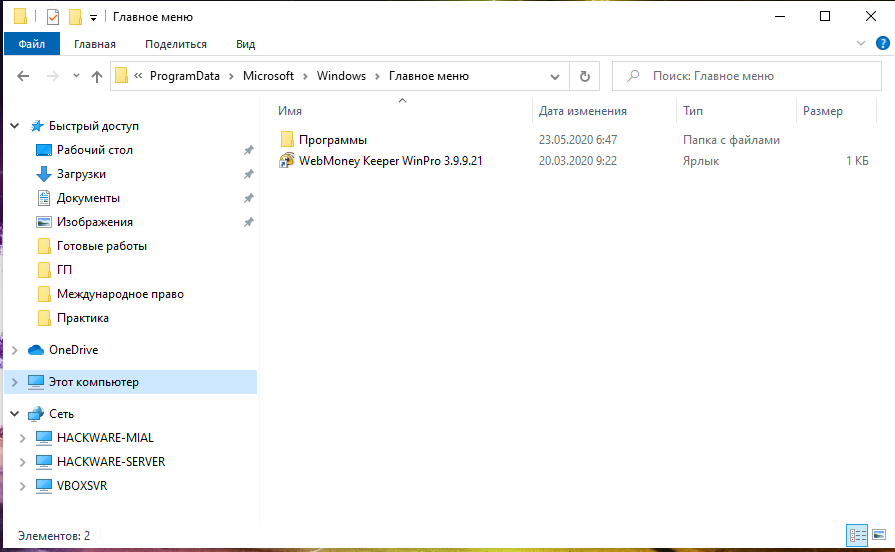
А вот местоположение личной папки «Пуск» для текущего пользователя, вошедшего в систему:
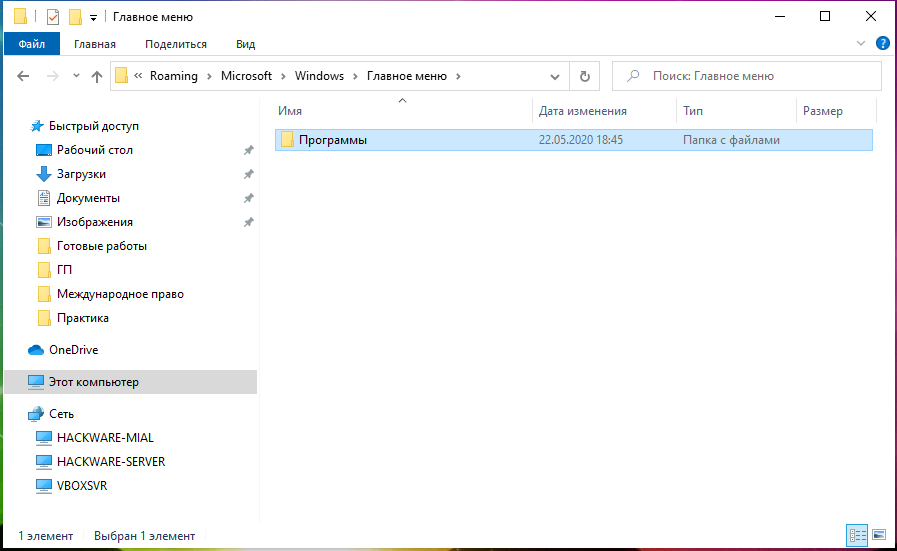
Обратите внимание, что переменная %appdata% — это просто ярлык, который приведёт вас в папку AppData\Roaming внутри структуры папок текущего пользователя.
Поэтому, если по какой-то причине вам нужно организовать личную папку «Пуск» для другой учётной записи пользователя, отличной от той, в которой вы в данный момент вошли, вы можете просто перейти в то же место в их пользовательской папке. Например, если имя учётной записи пользователя было «mial», вы можете перейти в следующее местоположение:
И если вы думаете, что будете регулярно посещать эти папки, сделайте для них ярлыки, чтобы их было легче найти в следующий раз.
How to Pin Folders to Start Menu in Windows 10

How do I pin folders to the start menu in Windows 10?
- From the folder’s right-click menu
- Drag the folder
- Pin other Windows 10 elements to start menu
You will learn in this tutorial exactly how to pin your folders and also if you wish other applications to your Start menu in the new Windows 10 technical preview version. Doing the steps below is a very easy task and you will be ready to pin your folders to the Start menu in no time. 
Pinning folders to the Start menu in Windows 10 is just one of the most useful features you have access to this new operating system. You can use one of two methods that we are going to explain a bit below but basically, you either have to drag and drop a folder to the Start menu or just right click on it and select the feature from there.
How to pin folders to Start menu in Windows 10?
1. From the folder’s right-click menu
- Open the Start menu in Windows 10.
- Find the folder you want to pin to the Start menu.
- Right click on the folder.
- Left click or tap on the “Pin to Start menu” feature.
- You should now have that specific folder in the Start menu.
2. Drag the folder
- Left click and hold on the folder you wish to pin to the Start menu.
- Drag the folder while holding the left click pressed all the way to the “Start” button.
- Wait for a “Pin to Start menu” message to pop up.
- Release the left click in order to place that folder in the Start menu.
- Now left click or tap on the “Start” button and you will see that the folder is present in the menu.
3. Pin other Windows 10 elements to start menu
While you have pinned already some folders on your Start Menu, you might have issues while pinning apps on that Start Menu. You will fix this problem from the link previously mentioned. You can also pin your favorite games in Windows 10, and here’s how to do that. Some interested users can see how they can pin Settings to the Start Menu.
This is the short and very quick tutorial on how to pin your folders to the Start menu in Windows 10. If you have any further questions on this subject don’t hesitate to write us below in the lower section of the page and we will get back to you as soon as possible.
How to Access the Windows 10 Startup Folder
Plus how to disable or enable programs
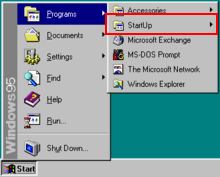
The Windows Startup Folder was an important folder that was easily discoverable via the Start Menu in Windows versions past. It began as far back as Windows 95 and any programs located within the Startup Folder would boot up and run anytime the computer was powered on.
It used to be that whenever you booted up your Windows operated computer, it would seek out and execute a batch script called autoexec.bat. Anyone with knowledge of Power DOS could use a text editor to modify this script in order to add their favorite programs to boot up, along with the Windows operating system. This made it so that everything you wanted to use was already loaded once the computer booted.

The use of autoexec.bat continued all the way through the Windows NT years, but Microsoft was intent on moving users away from a scripted, command-line environment. It instead wanted to encourage the use of the graphical interface model with windows, files, and folders, and, in doing so, made all subsequent versions of their operating systems not require autoexec.bat.
They would eventually do away with it entirely, however, the Windows 10 Startup Folder can still be found today.
How to Access the Windows 10 Startup Folder
Back before Windows 95, batch scripts and command-line interfaces were essential in getting your computer to do anything at all. All of the clickable icons you take for granted today didn’t exist. Instead, to run something like Microsoft Word, it required that you opened a command-line interpreter and typed winword.exe.

Windows 95, though it still allowed for users to perform nearly every important task using a command line, such actions were easier through the graphical user interface. You could click on the Program Files folder and find icons labeled with the program you wanted to run. All that was needed was a quick double-click and the program was launched.
Windows 95 was the first step in changing how we access programs. Today, clicking a program to have it launch is commonplace. It feels as if this is how it has always been. Barely anyone uses commands to open programs anymore. However, interestingly enough with Windows 10, we’ve actually seen a small surge in the revival of command line access via the use of PowerShell.
The Startup Folder In The Start Menu

The Start Menu was first created in Windows 95 and slightly resembles the Start Menu we have today in Windows 10. It’s that little flyout menu that pops out when you click the Start or Windows icon in the lower-left corner of your desktop. In Windows 95, this is where you’d find the Startup Folder.
When Windows 8 was launched, Microsoft decided to eliminate the Start Menu. Even though all of the functionality was still present in the operating system, it was much harder to locate everything. Microsoft wanted users to go a different way with scheduling programs for automatic execution.
Much to Microsoft’s dismay, the pushback from the user community was so great that the Start Menu was quietly brought back in with Windows 10.
The Windows 10 Startup Folder is similar to the one found in Windows 7. However, it’s no longer accessible the same way. The Windows 10 Startup Folder no longer pops up in the Start Menu as it once did. The functions are still there, although some of the operational details have changed. Now, accessing the Windows 10 Startup Folder takes a bit of navigation.
Two Windows 10 Startup Folders

When it comes to the Windows 10 Startup folder, it can be found in two different locations. One Windows 10 Startup folder operates at the system level and is shared among all user accounts (All Users folder), while the other operates at a user level and is unique to that user’s account (Current User folder).
The second one only really matters if you have multiple accounts on your Windows 10 computer. Each account will contain a unique Startup Folder in addition to the universal Startup Folder.
Understanding the distinction between the All Users and Current User Startup Folders is important when it comes to troubleshooting. Attempting to understand why a certain application isn’t opening, or when working with applications that feature user-based licensing or access restrictions will require you know which Startup Folder to configure.
There is one area that enables you to interact with the Startup function, which contains all of the programs found inside of the folder. The only difference is that programs cannot be added or removed. You can only enable or disable those currently inside of the Startup folder. This location is the Windows Task Manager.

Accessing The Windows 10 Startup Folder
There are a few ways in which to access the Windows 10 Startup folder. To access the Windows 10 Startup folder, the first option is through File Explorer.
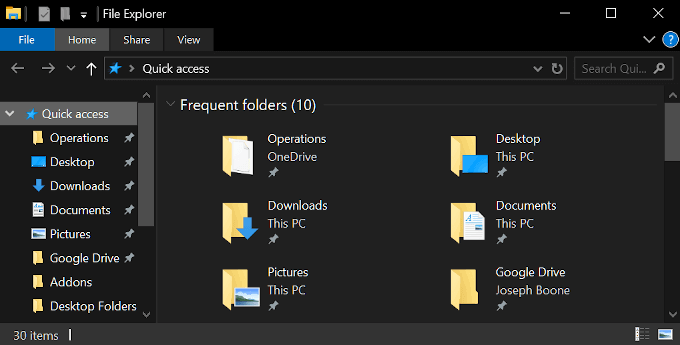
You’ll need to enable the “Show Hidden Files” option in order to see certain folders in the path. Open the File Explorer and drop one of the following paths into the Quick access bar.
- The All Users Startup Folder is located at the following path:
- C:\ProgramData\Microsoft\Windows\Start Menu\Programs\StartUp
- The Current User Startup Folder is located here:
- C:\Users\[User Name]\AppData\Roaming\Microsoft\Windows\Start Menu\Programs\Startup
From these locations, you can add or remove programs that you want executed whenever you boot up your Windows 10 computer.
An alternative way to do this is to jump directly to each folder with a Run command.
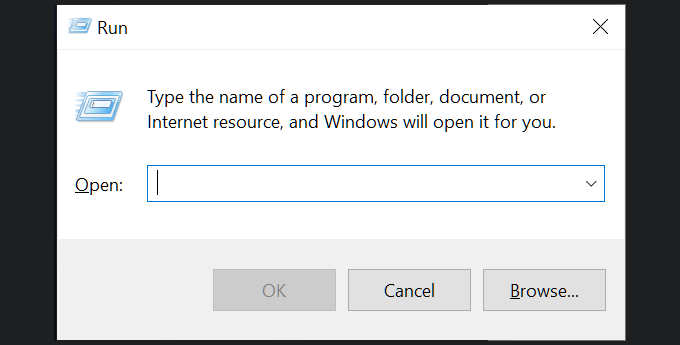
Open the Run function dialog box by pressing the Windows key + R key simultaneously.
- The All Users Startup Folder requires the following path:
- Shell:common startup
- The Current User Startup Folder requires:
- Shell:startup
These will take you directly to the folder containing the startup programs pertaining to the specified folder.
Enabling and Disabling Startup Programs

If all you want to do is enable or disable certain programs within the Windows 10 Startup folder, you can access this functionality through both the Windows Task Manager or Settings window.
To access Startup using the Task Manager:
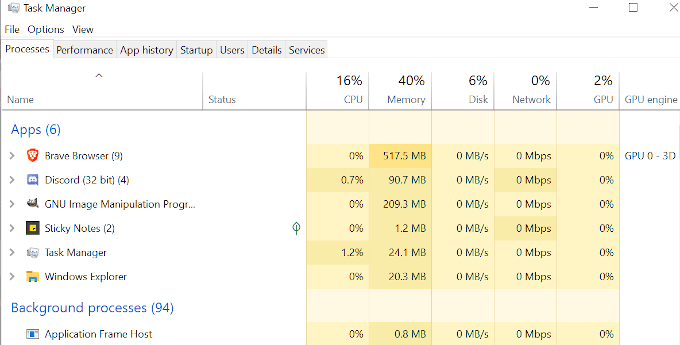
- Right-click the Taskbar and from the menu that pops up, select Task Manager.
- In the Task Manager window, click over to the Startup tab to see the programs.
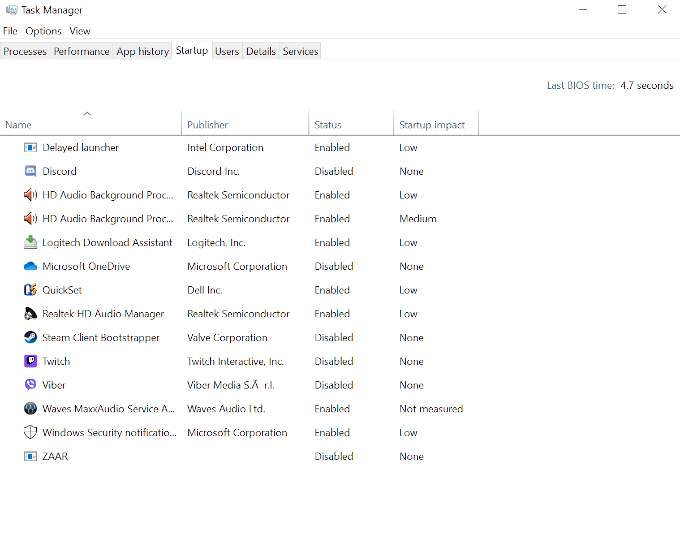
- Right-click a program. In the pop-up, select either enable or disable.
- The program will now adhere to the status set on your next boot up.
To access Startup using via Windows Settings:
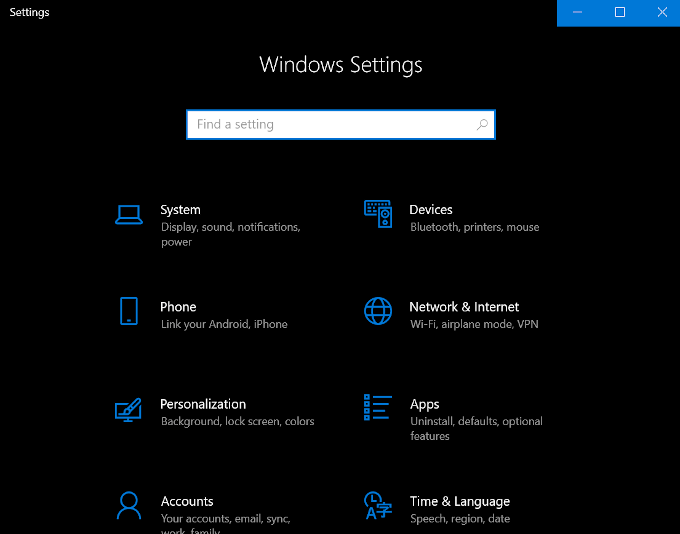
- Open the Start Menu by clicking the Windows icon in the lower-left portion of your desktop.
- From the menu, select Settings (Cogwheel icon).
- Choose Apps.
- On the left side menu, select Startup.
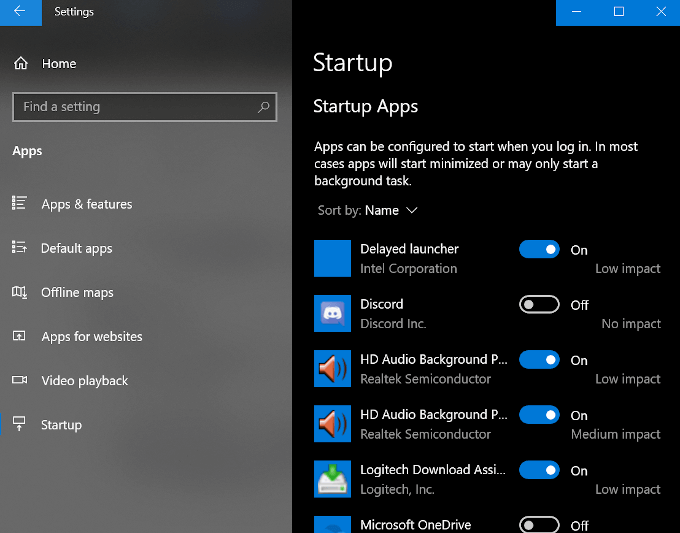
- In the main menu, click the toggles of those programs you want to enable or disable, to On or Off.
The Launch Order For The Windows 10 Startup Folder

Any item placed in either of the Startup Folders will not launch immediately upon login as it did back in the days of Windows 95. Instead, Windows 10 launches programs in a very specific order beginning with necessary system processes and any items in the Task Manager’s Startup tab. The programs you’ve added to the Startup Folders will follow after.
This usually doesn’t take long, but if you have lots of first- and third-party applications and services already configured to launch at boot, it could take a few minutes depending on the processing speed of your computer.
Too many programs in the Windows 10 Startup folder may run the risk of extensive downtime, slowing your computer to unworkable speeds while it attempts to launch each program. It’s a good idea to ensure that you only place necessary programs in these folders and keep the overall count to a minimum.
Former US Army IT communications specialist who began his online blogging career in 2016. Joseph has over 10 years experience in the IT industry as both an analyst and communications expert. He’s a night owl and an avid Red Bull consumer who spends most of his downtime enthralled by online gaming and website building. Read Joseph’s Full Bio


