- Share and NTFS Permissions
- Introduction
- Permissions
- Configuring Permissions
- Windows share folder share permissions
- Answered by:
- Question
- Answers
- All replies
- Немного о share и NTFS permissions
- How to set up network file sharing on Windows 10
- How to share files using File Explorer
- Sharing files using basic settings
- Sharing files using advanced settings
- Sharing files with a specific user
- How to share files over the network without password
- How to share files using Homegroup (deprecated)
- Creating a Homegroup
- Joining a Homegroup
- Sharing files on a Homegroup
- How to share files using OneDrive
- Sharing OneDrive files from the web
Share and NTFS Permissions
Introduction
The file server permissions must be carefully implemented to provide appropriate access to content. This involves locking down permissions on the share and physical folders.
Permissions
The following table lists permissions that were used for the file server share and folders in the Shared Hosting Setup mentioned in the Planning the Web Hosting Architecture section of the Hosting Guidance. Based on the shared hosting environment used, server administrators should develop their own custom permissions that meet their needs.
| Path | Permissions | Reason |
|---|---|---|
| \server\share$ (share) | Domain Administrators — Full Control Domain Users — Change MachineAccounts$ — Full Control | The share permissions need to allow the administrators and site accounts to access the content. The physical path will be restricted to actual needed permissions. |
| E:\Content (physical path of share) | Administrators — Full Control System — Full Control | This is the folder that is shared. It does not need permissions for any accounts aside from the built-in Administrators group and System account. |
| E:\Content (the container for a specific site or user) | Administrators — Full Control System — Full Control Site Owner — List Folder Contents | This folder is used as a container for folders like the site’s home directory and its log files. The Site Owner should be able to read this folder but does not need write access. |
| E:\Content \wwwroot (the IIS home directory for the site) | Administrators — Full Control System — Full Control Site Owner — Modify App Pool Username — Read | This is the root of a Web site belonging to the user account. App Pool Username is used as both the application pool identity and the anonymous username for the Web site. |
| E:\Content \Logs (the container for logs) | Administrators — Full Control System — Full Control Site Owner — Read | Note that this folder for logs is stored ABOVE the root of the site, so that it is not accessible by a visitor browsing the site. It is not recommended that you put this folder in any location accessible from a Web browser, for security purposes. |
| E:\Content \Logs\FailedReqLogs (the container for failed request tracing logs) | Administrators — Full Control System — Full Control App Pool Username — Full Control | This is the folder used to store Failed Request log files, which allow a site owner to diagnose problems with their Web site. These logs are written by the worker process identity, App Pool Username. |
| E:\Content \Logs\W3SVCLogFiles (the container for W3SVC traffic logs) | Administrators — Full Control System — Full Control MachineAccount$ — Full Control | This is the folder used to store the log files for the Web site, which allow a site owner to see their traffic patterns. If the server administrator does not wish to share these files or wants to provide an alternate method for determining traffic, these files can be stored elsewhere. MachineAccount$ is the Web server’s machine account, as these logs are written by HTTP.SYS. |
Configuring Permissions
To configure permissions for the share
In Windows Explorer, right-click the folder you want to share, and then click Properties.
On the Sharing tab, click Advanced Sharing.
In User Account Control, click Continue to accept the prompt that Windows needs your permission to perform the action.
In the Advanced Sharing dialog box, check Share this folder.
Set the Share name and Comments as appropriate. To make the share hidden, add a $ to the end of the share name.
Hiding a share means that when you connect to \server you will not see the share unless you specifically enter the path \server\share$.
Click Permissions.
In the Permissions dialog box, remove the Everyone group, if it exists.
Add the appropriate user or group that should have access to the share.
Specify the permissions (Full Control, Change, Read) for the user or group.
Click OK twice and then click Close to close the dialog boxes.
To configure permissions for the folder structure
- In Windows Explorer, right-click the folder you want to share, and then click Properties.
- On the Security tab, click Edit.
- In the Permissions dialog box, add the appropriate users or groups that should have access at each level of the folder structure.
- Specify the permissions (Full control, Modify, Read & execute, List folder contents, Read, Write Special permissions) for the users or groups.
- Click OK twice to close the dialog boxes.
See C# and PowerShell Scripts Samples for a sample script to configure default documents. as an example of creation of a share and setting of permissions.
Windows share folder share permissions
This forum has migrated to Microsoft Q&A. Visit Microsoft Q&A to post new questions.
Answered by:
![]()
Question
![]()
![]()
I want to share a folder and set permission for the shared folder.
I’ve shared the folder. I used «net use z: \\server\folder» and «$shares=[WMICLASS]»WIN32_Share» $shares.Create(«\\server\folder»,»z:»,0). Both work as expected.
Now I want to set share permission for the shared folder. I’ve use CACLS and Get/Set-ACL. But I can only set the security permission for the folder, not sharing permission level.
Is there any cmdlet or other ways to modify the share permission?
Answers
![]()
![]()
To share a file, I also recommend you to set NTFS permission instead of share permission as the second link I posted, and you can set NTFS permission with the cmdlet Get/Set-ACL, which is more easy than setting share permission with cmd.
Because the access permission of a shared file is dependent on NTFS permission and Share permission, we usually set the Share permission with everyone: full controll, which can be set with the cmd net share, and limit the access permission with setting the NTFS permission.
All replies
![]()
![]()
Try the ShareUtils PowerShell Module:
Something like below using above module:
Knowledge is Power
![]()
![]()
In addition, Please try the script below to set share permission of a folder with change permission of everyone and full control of admins:
net share ‘shareName=E:\2’ ‘/Grant:Everyone,CHANGE’ ‘/Grant:Administrators,FULL’
If you are running windows server 2012 and later, you can also run the cmdlet Grant-SmbShareAccess to set share permission, for more detailed iformation, please refer to this blog:
And this forum is also helpful for you to set the share permission:
I hope this helps.
![]()
![]()
Thanks for your reply, AnnaWY.
I’ve tried «net share /grant» before. But the problem is I don’t know how can I change permission after I shared the folder. If I type «net share ‘shareName=path’ ‘/Grant:domain\user,full'» I’ll get the result «The name has already been shared.»
Unfortunately, I’ll use this script on many servers, include server 2012 and server 2008 R2. So, I can’t use Grant-SmbShareAccess to do this work.
The last link said that «Share permissions should be Everyone:F and the resources should be secured at the file system level.» My purpose is sharing folder for specific user with full control or read only permission, not resources in the folder.
Немного о share и NTFS permissions
Хочу немного рассказать, как грамотно настроить разрешения на файловом сервере.
Права на сетевые ресурсы бывают двух типов, это share permissions – то есть разрешение на доступ именно по сети, и NTFS permissions – разрешения на доступ к файлу или папке.
Немного теории о правах NTFS. Каждый объект в системе содержит два ACL (access control list), которые называются DACL и SACL. Discretionary Access Control List и System Access Control List. Первый ACL контролирует доступ к файлу, второй настройки аудита файла. Оба этих листа доступа содержат записи ACE – access control entry. DACL содержит SID (Security Identifier) пользователей и групп и права доступа, а SACL из объекта системного аудита, и записываемых действий. По умолчанию аудит отключен.
Когда мы задаём доступ к сетевой папке, то как правило назначаем share и ntfs permissions. Права у нас назначаются, исходя из минимальных назначенных права. Например если share permissions у нас только “чтение” для всех, то несмотря на то, что на папку назначены права “полный доступ”, у всех будут права только только чтение. И соответственно наоборот.
Поэтому в примере ниже, правильный способ назначения share permissions.
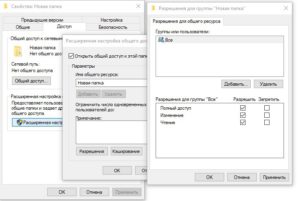
По умолчанию мы предоставляем всем полный сетевой доступ.
Следующим этапом создаём группы, в которые впоследствии будем добавлять пользователей. Например test_folder_read, и test_folder_write. Добавляем эти группы на доступ в папку, и выставляем права. При выставлении полных прав на доступ к папке, никогда не ставьте галочку “полные права”, всегда достаточно чтения и изменения. Связано это с тем, что галочка “полные права” даёт возможность изменять атрибуты папки и права на неё, что согласитесь для пользователей совсем лишнее.
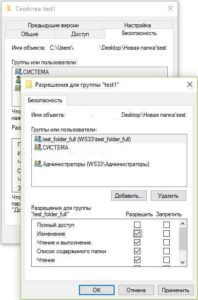
Теперь, сочетание прав у нас следующее: хоть сетевой доступ у нас предоставлен всем, права доступа в папку ограниченны группами read и write, и те кто не добавлен в них, доступа в папку иметь не будут.
В windows server есть очень интересная фича, которая называется ABE – access base enumerate, или перечисление на основе доступа. Включить её можно установить роль “файловые службы”, и зайдя в остнастку “управление общими ресурсами и хранилищами”
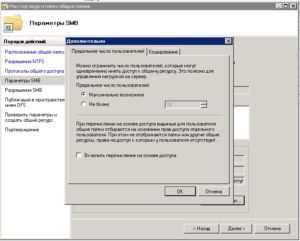
При её включении, если у человека нет доступа на просмотр этой папки, он не будет видеть её в проводнике.
Часто возникает потребность, дать доступ к вложенной папке, таким образом, что бы файлы в папках верхних уровней были не видны. Допустим у нас есть вложенные друг в друга папки folder1, folder2 и folder3, и нам нужно дать полный доступ к folder3, но не давая доступ на чтение к folder1 и folder2. Делается это следующим образом. Заходим на вкладку безопасность, дополнительно папки folder1. Выбираем пользователя, которому нужно заходить в эту папку, но не нужно видеть её содержимое. (при условии что включен ABE), в противном случае файлы будут видны, но к ним не будет доступа. Выставляем права “чтение” и применяем их только к этой папке.

Применительно к folder2 делаем то же самое. А на папку folder3 выставляем разрешения для нужной группы или пользователя. В конечном итоге, пользователь будет заходить в папки folder1 и folder2, и увидит в них только одну папку – folder3.
Еще частым бывает вопрос – на folder1 у нас прописаны права для групп, которые наследуются. Как пользователю оставить доступ к папкам folder1 и folder2, но запретить доступ к папке folder3 не затрагивая других пользователей? Для этого сделаем следующее. Заходим в настройки безопасности, вкладка дополнительно папки folder3. Нажимаем кнопку “отключить наследования”, и становимся перед выбором – очистить все права доступа, или преобразовать наследованные права доступа в явные. Во втором случае это значит, что все права останутся такие же, какие и были, но больше не будут наследоваться, и мы спокойно можем их менять.
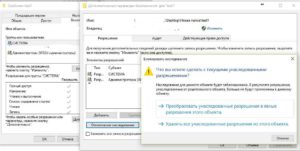
Например сможем явно запретить пользователю доступ к этой папке. А так как запрещающие правила имеют больший приоритет – то даже несмотря на то, что пользователь состоит в группе, которая имеет полные права – запрет будет эти права перебивать.
Если у Вас есть вопросы, задавайте их на форуме, или ниже в комментариях.
How to set up network file sharing on Windows 10
Windows 10 lets you quickly share files with other users over a network — here are three ways to do it.

On Windows 10, you can share files on your computer with other users over the network. While this might seem complicated, it’s actually a simple task when using the tools the operating system provides.
Depending on your network environment and what you want to accomplish, there are at least four ways to set up file sharing on Windows 10. You can use the Public folder, a special setup that allows you to share files over the local network without configuring permissions. Or you can share content using the File Sharing feature on Windows 10. And if you are looking to share files with other people across the internet, you can use file sharing with OneDrive.
In previous versions, you were also able to use Homegroup, which unlike the Public folder, automatically shared Windows 10 libraries folders (Pictures, Videos, Music, Documents), Printers, and other devices connected to your computer. However, it is no longer a feature on Windows 10.
In this guide, you will learn the steps to share files over the network using File Sharing and OneDrive on Windows 10. (Although Homegroup is no longer available in the latest version of Windows 10, the steps to use the feature will continue to be available, as it’s still a feature in older releases.)
How to share files using File Explorer
Using the built-in File Sharing feature on Windows 10 is the best method you can use to share files in a local network, as it is more flexible. You can use more restrictive permissions, and you can share files with virtually any device, including Mac, Android, and Linux devices.
There are two ways to share files using File Explorer. You can use the basic settings, which allows you to share files on the network with minimal configuration quickly, or you can use the advanced settings to set custom permissions and set other advanced options.
Sharing files using basic settings
To share files on a local network using the express settings, use these steps:
Open File Explorer on Windows 10.
Navigate to the folder you want to share.
Right-click the item, and select the Properties option .
 Folder Properties option
Click on the Sharing tab.
Click the Share button.
 Folder Sharing tab
Use the drop-down menu to select the user or group to share a file or folder. (For this guide, select the Everyone group.)
Click the Add button.
 Choose people to share with
Under the “Permission Level” section, select the sharing permissions you want the folder to have. For example, you can select Read (default) if you only want users to view and open files. If you select Read/Write, users can view, open, modify, and delete the content on the folder you are sharing.
Click the Share button.
 Share permission level
Confirm the folder’s network path that other users will need to access the network’s content and click the Done button.
Click the Close button.
 Shared folder path
Sharing files using advanced settings
To share files on a local network using the advanced sharing settings, use these steps:
Open File Explorer.
Navigate to the folder you want to share.
Right-click the item, and select the Properties option.
 Folder Properties option
Click on the Sharing tab.
Click the Advanced Sharing button.
 Folder Sharing tab, Advanced Sharing
Check the Share this folder option.
Windows 10, by default, allows other users read-only access to the content you share, which means that they can only view files, but they cannot do anything else. If you want users to edit the files, delete, and create new documents in the location, you will need to click the Permissions button.
 Advanced Sharing options
On the “Permissions” window, you will notice the “Everyone” group is the default option highlighted. In the section below, you can customize the permissions for a specific user or group. If you want users to open, edit, delete, and create files, then make sure to check the Read and Change permissions under the “Allow” column.
Click the Apply button.
Click the OK button.
 Share Permissions options
Click the OK button again.
Sharing files with a specific user
If you only want to share files with only a specific user, you can follow the same steps, but on step 8, use these instructions:
Select the Everyone group and click the Remove button.
Click the Add button.
 Add or remove users and groups.
Type the name of the user you want to share the files with.
Click the Check Name button.
Click the OK button.
 Select users and groups to share with
Select the user account, and you will notice that the “Read” permission is checked by default. If you want the user to be able to edit, delete, and create new files, make sure also to check the Change permission option.
Click the Apply button.
Click the OK button.
 Share permissions for a specific user.
Once you complete the steps, the shared content should be available when browsing the remote computer on File Explorer > Network.
How to share files over the network without password
On Windows 10, any file you share is by default secured with a username and password. This means only people who have an account and password on the computer can access shared files.
If you’re setting up file sharing on a local network for your family members or people you know, it is possible to disable the requirement to sign-in with Windows credentials to allow users to access files on the sharing computer without needing a password.
To disable password protection for file sharing on Windows 10, use these steps:
Open Control Panel.
Click on Network and Internet.
Click on Network and Sharing Center.
On the left pane, click the Change advanced sharing settings link.
 Change advanced sharing settings.
Expand the All Networks tab.
Under the “Password protected sharing” section, select the Turn off password protected sharing option.
Click the Save changes button.
 Password protections sharing
After you complete the steps, users should be able to access the shared folder without a password.
How to share files using Homegroup (deprecated)
Microsoft created Homegroup to be an easy to use method for non-technical users to securely share files between computers running Windows 7 and later versions of the operating system connected to the same local network.
Typically, home users are the ones who will use Homegroup, as it offers a straightforward and convenient way to share files, but this method has limited options. For example, you can share your libraries (Pictures, Videos, Music, Documents), folders, printers, and other devices connected to your computer. However, you cannot share files with versions of Windows older than Windows 7 or other devices running a different operating system, such as Android and iOS.
Creating a Homegroup
To create a Homegroup on a local network, use these steps:
Open Control Panel.
Click on Network and Internet.
Click on Homegroup.
Click the Create a homegroup button.
 Create Homegroup on Windows 10
Click the Next button.
Use the drop-down menu to select which folders and resources (Pictures, Videos, Music, Documents, Printer & Devices) you want to share. If you don’t want to share an item, make sure to select the Not Shared option.
Click the Next button.
 Share libraries with Homegroup
Make sure to note the Homegroup password as you will need it to join other computers, and click Finish to complete the task.
 Homegroup password
Once you complete the task, the Homegroup settings page will be updated, displaying the libraries you are currently sharing and additional options, including the ability to leave the Homegroup and change the resources you are sharing.
Joining a Homegroup
Use these steps to join another computer to the Homegroup to access the files you are sharing on your device:
Open Control Panel.
Click on Network and Internet.
Click on the Choose homegroup and sharing options link.
 Control Panel Network and Internet
Click the Join now button.
 Join a PC to a Homegroup
Continue with the on-screen directions to complete the setup.
If you do not see the Join now button, click the Start the Homegroup troubleshooter option, which will force a rescan of the network and make the option available.
Sharing files on a Homegroup
Once you have a Homegroup created, your PC is already sharing those files and folders within the libraries you shared during the setup process. However, if you want to share files on a different location with users connected to the Homegroup, do the following.
Use these steps to start sharing files using Homegroup:
Open File Explorer.
Navigate to the content you want to share.
Right-click the folder you want to share and select the Give access to option.
You will see several sharing options in the submenu, including Homegroup (view) and Homegroup (view and edit).
If you only want users to read permissions to your files, select the Homegroup (view) option.
If you want users to have read and write permissions (which also allows them to delete and create files and folders), select the Homegroup (view and edit) option.
 Share additional folders on a Homegroup.
In the case, you want to stop sharing a folder you previously shared, right-click the folder, select the Give access to option, and select the Remove access option.
Once you complete the steps, the shared content should be available when browsing the remote computer from File Explorer > Homegroup.
How to share files using OneDrive
You can also share files with other people across a network or around the world using OneDrive.
To share files using OneDrive on Windows 10, use these steps:
Open your OneDrive folder on Windows 10.
Navigate to the folder you want to share.
Right-click the folder and select the Share option.
 OneDrive share option in File Explorer
Specify the email for the person you want to share the content with. (Or the available options to copy the link or share files using other apps.)
 OneDrive share options on Windows 10
Click the Send button.
Any user who receives your message will be able to click the link and view the folder’s content on any web browser.
Sharing OneDrive files from the web
If you want users to view and edit the content inside of an OneDrive folder, you’ll need to share the folder using OneDrive on the web.
To share OneDrive files from the web, use these steps:
Open OneDrive online.
Navigate to the file or folder you want to share.
Right-click the item and select the Share option.
 OneDrive online share option
Specify the email for the person you want to share the content with. (Or the available options to copy the link.)
 OneDrive online share settings
Click the Send button.
Once you complete the steps, anyone with the link can view and edit the file or the content inside of the folder.
If you only want to share files with specific users privately, you want to select the option to share via email.
Files you share will only be available to users as long as your computer is turned on, except for the OneDrive sharing method. However, using OneDrive, users must have an internet connection to access the shared content.
Update January 26, 2021: This guide has been revised to ensure the instructions are still accurate.
We may earn commission for purchases using our links to help keep offering the free content. Privacy policy info.
All content on this site is provided with no warranties, express or implied. Use any information at your own risk. Always backup of your device and files before making any changes. Privacy policy info.


