- Install Docker Engine
- Supported platforms
- Desktop
- Server
- Other Linux distributions
- Release channels
- Stable
- Nightly
- Support
- Backporting
- Upgrade path
- Licensing
- Reporting security issues
- Get started
- Container host deployment: Windows Server
- Install Docker
- Install a specific version of Docker
- Update Docker
- Install base container images
- Windows Server 2019 and newer
- Windows Server 2016 (versions 1607-1803)
- Hyper-V isolation host
- Nested virtualization
- Enable the Hyper-V role
- Как запустить Docker контейнеры на Windows Server 2019
- Как запустить Docker контейнеры на Windows Server 2019
- Шаг 1. Включите функцию контейнеров в Windows Server 2019
- Шаг 2. Установите Docker на Windows Server 2019
- Шаг 3: Запустите Docker контейнер
- Запуск контейнеров Linux на Windows Server 2019
- Подсистема Docker в Windows Docker Engine on Windows
- Установка Docker Install Docker
- Настройка Docker с помощью файла конфигурации Configure Docker with a configuration file
- Настройка Docker в службе Docker Configure Docker on the Docker service
- Распространенные конфигурации Common configuration
- Создание сети по умолчанию Default network creation
- Задание группы безопасности для Docker Set Docker security group
- Конфигурация прокси-сервера Proxy configuration
- Удаление Docker How to uninstall Docker
- Подготовка системы к удалению Docker Prepare your system for Docker’s removal
- Удаление Docker Uninstall Docker
- Очистка данных и системных компонентов Docker Clean up Docker data and system components
- Перезагрузка системы Reboot your system
Install Docker Engine
Estimated reading time: 5 minutes
Supported platforms
Docker Engine is available on a variety of Linux platforms, macOS and Windows 10 through Docker Desktop, and as a static binary installation. Find your preferred operating system below.
Desktop
Server
Docker provides .deb and .rpm packages from the following Linux distributions and architectures:
| Platform | x86_64 / amd64 | ARM | ARM64 / AARCH64 |
|---|---|---|---|
| CentOS |  | В | |
| Debian | | | |
| Fedora | | В | |
| Raspbian | В | | |
| Ubuntu | | | |
Other Linux distributions
While the instructions below may work, Docker does not test or verify installation on derivatives.
- Users of Debian derivatives such as “BunsenLabs Linux”, “Kali Linux” or “LMDE” (Debian-based Mint) should follow the installation instructions for Debian, substituting the version of their distro for the corresponding Debian release. Refer to the documentation of your distro to find which Debian release corresponds with your derivative version.
- Likewise, users of Ubuntu derivatives such as “Kubuntu”, “Lubuntu” or “Xubuntu” should follow the installation instructions for Ubuntu, substituting the version of their distro for the corresponding Ubuntu release. Refer to the documentation of your distro to find which Ubuntu release corresponds with your derivative version.
- Some Linux distributions are providing a package of Docker Engine through their package repositories. These packages are built and maintained by the Linux distribution’s package maintainers and may have differences in configuration or built from modified source code. Docker is not involved in releasing these packages and bugs or issues involving these packages should be reported in your Linux distribution’s issue tracker.
Docker provides binaries for manual installation of Docker Engine. These binaries are statically linked and can be used on any Linux distribution.
Release channels
Docker Engine has three types of update channels, stable, test, and nightly:
- The Stable channel gives you latest releases for general availability.
- The Test channel gives pre-releases that are ready for testing before general availability (GA).
- The Nightly channel gives you latest builds of work in progress for the next major release.
Stable
Year-month releases are made from a release branch diverged from the master branch. The branch is created with format . , for example 19.03 . The year-month name indicates the earliest possible calendar month to expect the release to be generally available. All further patch releases are performed from that branch. For example, once v19.03.0 is released, all subsequent patch releases are built from the 19.03 branch.
In preparation for a new year-month release, a branch is created from the master branch with format YY.mm when the milestones desired by Docker for the release have achieved feature-complete. Pre-releases such as betas and release candidates are conducted from their respective release branches. Patch releases and the corresponding pre-releases are performed from within the corresponding release branch.
Nightly
Nightly builds give you the latest builds of work in progress for the next major release. They are created once per day from the master branch with the version format:
where the time is the commit time in UTC and the final suffix is the prefix of the commit hash, for example 0.0.0-20180720214833-f61e0f7 .
These builds allow for testing from the latest code on the master branch. No qualifications or guarantees are made for the nightly builds.
Support
Docker Engine releases of a year-month branch are supported with patches as needed for one month after the next year-month general availability release.
This means bug reports and backports to release branches are assessed until the end-of-life date.
After the year-month branch has reached end-of-life, the branch may be deleted from the repository.
Backporting
Backports to the Docker products are prioritized by the Docker company. A Docker employee or repository maintainer will endeavour to ensure sensible bugfixes make it into active releases.
If there are important fixes that ought to be considered for backport to active release branches, be sure to highlight this in the PR description or by adding a comment to the PR.
Upgrade path
Patch releases are always backward compatible with its year-month version.
Licensing
Docker is licensed under the Apache License, Version 2.0. See LICENSE for the full license text.
Reporting security issues
The Docker maintainers take security seriously. If you discover a security issue, please bring it to their attention right away!
Please DO NOT file a public issue; instead send your report privately to security@docker.com.
Security reports are greatly appreciated, and Docker will publicly thank you for it.
Get started
After setting up Docker, you can learn the basics with Getting started with Docker.
Container host deployment: Windows Server
Deploying a Windows container host has different steps depending on the operating system and the host system type (physical or virtual). This document details deploying a Windows container host to either Windows Server 2016 or Windows Server Core 2016 on a physical or virtual system.
Install Docker
Docker is required in order to work with Windows containers. Docker consists of the Docker Engine and the Docker client.
To install Docker, we’ll use the OneGet provider PowerShell module. The provider will enable the containers feature on your machine and install Docker, which will require a reboot.
Open an elevated PowerShell session and run the following cmdlets.
Install the OneGet PowerShell module.
Use OneGet to install the latest version of Docker.
When the installation is complete, reboot the computer.
Install a specific version of Docker
There are currently two channels available for Docker EE for Windows Server:
- 17.06 — Use this version if you’re using Docker Enterprise Edition (Docker Engine, UCP, DTR). 17.06 is the default.
- 18.03 — Use this version if you’re running Docker EE Engine alone.
To install a specific version, use the RequiredVersion flag:
Installing specific Docker EE versions may require an update to previously installed DockerMsftProvider modules. To Update:
Update Docker
If you need to update Docker EE Engine from an earlier channel to a later channel, use both the -Update and -RequiredVersion flags:
Install base container images
Before working with Windows containers, a base image needs to be installed. Base images are available with either Windows Server Core or Nano Server as the container operating system. For detailed information on Docker container images, see Build your own images on docker.com.
With effect from May 2018, delivering a consistent and trustworthy acquisition experience, almost all of the Microsoft-sourced container images are served from the Microsoft Container Registry, mcr.microsoft.com, while maintaining the current discovery process via Docker Hub.
Windows Server 2019 and newer
To install the ‘Windows Server Core’ base image run the following:
To install the ‘Nano Server’ base image run the following:
Windows Server 2016 (versions 1607-1803)
To install the Windows Server Core base image run the following:
To install the Nano Server base image run the following:
Please read the Windows containers OS image EULA, which can be found here – EULA.
Hyper-V isolation host
You must have the Hyper-V role to run Hyper-V isolation. If the Windows container host is itself a Hyper-V virtual machine, nested virtualization will need to be enabled before installing the Hyper-V role. For more information on nested virtualization, see Nested Virtualization.
Nested virtualization
The following script will configure nested virtualization for the container host. This script is run on the parent Hyper-V machine. Ensure that the container host virtual machine is turned off when running this script.
Enable the Hyper-V role
To enable the Hyper-V feature using PowerShell, run the following cmdlet in an elevated PowerShell session.
Как запустить Docker контейнеры на Windows Server 2019

В этом руководстве мы рассмотрим, как настроить сервер Windows 2019 для запуска контейнеров Docker.
Docker изменил правила работы с контейнерами приложений и проектированием и развертыванием микросервисов.
Docker позволяет легко создавать, отправлять и запускать образы, содержащие приложения с их зависимостями, и избегать сумасшедших проблем с зависимостями, характерных для виртуальных машин.
Docker engine – это то, что заставляет работать контейнеры.
Первоначально он был написан для Linux, но была проделана большая работа, чтобы позволить пользователям Windows и macOS запускать контейнеры Docker.
Как запустить Docker контейнеры на Windows Server 2019
Прежде чем вы сможете использовать контейнеры Windows для запуска нескольких изолированных приложений вашей системы, вам нужно включить функцию контейнеров и установить Docker на Windows Server 2019.
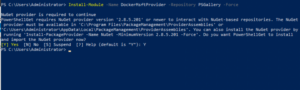
Шаг 1. Включите функцию контейнеров в Windows Server 2019
Первый шаг – включить функцию контейнеров Windows Server 2019. Откройте PowerShell от имени администратора.
Запустите следующие команды.
Это установит Docker-Microsoft PackageManagement Provider из галереи PowerShell.
Пример вывода, как показано ниже:
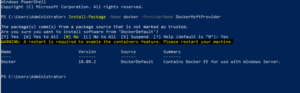
Шаг 2. Установите Docker на Windows Server 2019
как только функция «Контейнеры» будет включена в Windows Server 2019, установите последнюю версию Docker Engine и Client, выполнив следующую команду в сеансе PowerShell.
Согласитесь на установку, используя «yes», «Y» или «А», чтобы согласиться со всеми.
После завершения установки перезагрузите компьютер.
Установленную версию Docker можно проверить с помощью:
Тожe самое можно выполнить командой docker —version
Обновление можно выполнить в любое время, выполнив следующие команды в PowerShell.
Шаг 3: Запустите Docker контейнер
Запустить Docker Daemon
После запуска службы Docker Engine загрузите предварительно созданный образец образа .NET из реестра Docker Hub:
Затем разверните простой контейнер с приложением .Net Hello World.
Контейнер запустится, напечатает сообщение hello world и завершится.
Запуск контейнеров Linux на Windows Server 2019
Из коробки Docker в Windows запускает только контейнер Windows.
Чтобы использовать контейнеры Linux на Windows Server, вам нужно использовать Docker Enterprise Edition Preview, который включает в себя полную систему LinuxKit для запуска контейнеров Docker Linux.
Удалите ваш текущий Docker CE.
Включите вложенную виртуализацию, если вы используете Docker Containers с использованием виртуальной машины Linux, работающей в Hyper-V.
Затем установите текущую предварительную сборку Docker EE.
Включить систему LinuxKit для запуска контейнеров Linux
Перезапустите Docker Service после изменения.
Вытащите образ тестового докера.
Чтобы вернуться к работе с контейнерами Windows, выполните:
Наслаждайтесь работой контейнеров Linux и Windows на Windows Server 2019. Оставьте нам комментарий в случае каких-либо проблем.
Подсистема Docker в Windows Docker Engine on Windows
Подсистема и клиент Docker не входят в состав Windows, потому их нужно устанавливать и настраивать отдельно. The Docker Engine and client aren’t included with Windows and need to be installed and configured individually. Кроме того, подсистема Docker может принимать множество пользовательских конфигураций. Furthermore, the Docker Engine can accept many custom configurations. Например, можно настроить то, как управляющая программа принимает входящие запросы, сетевые параметры по умолчанию и параметры ведения журнала и отладки. Some examples include configuring how the daemon accepts incoming requests, default networking options, and debug/log settings. В ОС Windows эти конфигурации можно указать в файле конфигурации или с помощью диспетчера служб Windows. On Windows, these configurations can be specified in a configuration file or by using Windows Service control manager. В этом документе объясняется установка и настройка подсистемы Docker; также представлены примеры некоторых часто используемых конфигураций. This document details how to install and configure the Docker Engine, and also provides some examples of commonly used configurations.
Установка Docker Install Docker
Для работы с контейнерами Windows требуется Docker. You need Docker in order to work with Windows Containers. Docker состоит из подсистемы Docker (dockerd.exe) и клиента Docker (docker.exe). Docker consists of the Docker Engine (dockerd.exe), and the Docker client (docker.exe). Самый простой способ установить все необходимые компоненты изложен в кратком руководстве, которое поможет настроить и запустить первый контейнер. The easiest way to get everything installed is in the quickstart guide, which will help you get everything set up and run your first container.
Сведения об установке с помощью сценария см. в разделе Использование сценария для установки Docker EE. For scripted installations, see Use a script to install Docker EE.
Прежде чем использовать Docker, необходимо установить образы контейнеров. Before you can use Docker, you’ll need to install the container images. Дополнительные сведения см. в документации по образам контейнеров. For more information, see docs for our container base images.
Настройка Docker с помощью файла конфигурации Configure Docker with a configuration file
Предпочтительным способом настройки подсистемы Docker в Windows является использование файла конфигурации. The preferred method for configuring the Docker Engine on Windows is using a configuration file. Путь к файлу конфигурации — C:\ProgramData\Docker\config\daemon.json. The configuration file can be found at ‘C:\ProgramData\Docker\config\daemon.json’. Если этот файл еще не существует, его можно создать. You can create this file if it doesn’t already exist.
Не все доступные параметры конфигурации Docker применяются к Docker в Windows. Not every available Docker configuration option applies to Docker on Windows. В примере ниже показаны параметры конфигурации, которые применяются. The following example shows the configuration options that do apply. Дополнительные сведения о конфигурации подсистемы Docker см. в статье Docker daemon configuration file (Файл конфигурации управляющей программы Docker). For more information about Docker Engine configuration, see Docker daemon configuration file.
Достаточно только внести необходимые изменения в файл конфигурации. You only need to add the desired configuration changes to the configuration file. Например, в этом случае подсистема Docker настраивается на прием входящих подключений через порт 2375. For example, the following sample configures the Docker Engine to accept incoming connections on port 2375. В других параметрах конфигурации будут использоваться значения по умолчанию. All other configuration options will use default values.
Аналогично в примере ниже настраивается хранение образов и контейнеров по альтернативному пути в управляющей программе Docker. Likewise, the following sample configures the Docker daemon to keep images and containers in an alternate path. Если оно не указано, по умолчанию используется значение c:\programdata\docker . If not specified, the default is c:\programdata\docker .
В примере ниже управляющая программа Docker настраивается на прием только защищенных подключений через порт 2376. The following sample configures the Docker daemon to only accept secured connections over port 2376.
Настройка Docker в службе Docker Configure Docker on the Docker service
Подсистему Docker можно также настроить, изменив службу Docker командой sc config . The Docker Engine can also be configured by modifying the Docker service with sc config . При использовании этого способа флаги подсистемы Docker задаются непосредственно в службе Docker. Using this method, Docker Engine flags are set directly on the Docker service. Выполните указанную ниже команду в командной строке (cmd.exe, не PowerShell). Run the following command in a command prompt (cmd.exe not PowerShell):
Не нужно выполнять эту команду в том случае, если файл daemon.json уже содержит запись «hosts»: [«tcp://0.0.0.0:2375»] . You don’t need to run this command if your daemon.json file already contains the «hosts»: [«tcp://0.0.0.0:2375»] entry.
Распространенные конфигурации Common configuration
В следующих примерах файла конфигурации представлены распространенные конфигурации Docker. The following configuration file examples show common Docker configurations. Их можно объединить в один файл конфигурации. These can be combined into a single configuration file.
Создание сети по умолчанию Default network creation
Чтобы настроить подсистему Docker таким образом, чтобы не была создана сеть NAT по умолчанию, используйте следующую конфигурацию. To configure the Docker Engine so that it doesn’t create a default NAT network, use the following configuration.
Дополнительные сведения см. в статье Управление сетями Docker. For more information, see Manage Docker Networks.
Задание группы безопасности для Docker Set Docker security group
После входа в систему на узле Docker и запуска команд Docker эти команды выполняются через именованный канал. When you’ve signed in to the Docker host and are locally running Docker commands, these commands are run through a named pipe. По умолчанию только члены группы «Администраторы» могут получить доступ к подсистеме Docker через именованный канал. By default, only members of the Administrators group can access the Docker Engine through the named pipe. Чтобы указать группу безопасности, имеющую такой доступ, используйте флаг group . To specify a security group that has this access, use the group flag.
Конфигурация прокси-сервера Proxy configuration
Чтобы задать данные о прокси-сервере для docker search и docker pull , создайте переменную среды Windows с именем HTTP_PROXY или HTTPS_PROXY и значением, содержащим данные о прокси-сервере. To set proxy information for docker search and docker pull , create a Windows environment variable with the name HTTP_PROXY or HTTPS_PROXY , and a value of the proxy information. Это можно сделать в PowerShell, используя команду следующего вида: This can be completed with PowerShell using a command similar to this:
После задания переменной перезапустите службу Docker. Once the variable has been set, restart the Docker service.
Дополнительные сведения см. в разделе Windows Configuration File (Файл конфигурации Windows) на сайте Docker.com. For more information, see Windows Configuration File on Docker.com.
Удаление Docker How to uninstall Docker
В этом разделе описывается, как удалить Docker и выполнить полную очистку компонентов системы Docker в Windows 10 или Windows Server 2016. This section will tell you how to uninstall Docker and perform a full cleanup of Docker system components from your Windows 10 or Windows Server 2016 system.
Все команды в этих инструкциях необходимо выполнять из сеанса PowerShell с повышенными привилегиями. You must run all commands in these instructions from an elevated PowerShell session.
Подготовка системы к удалению Docker Prepare your system for Docker’s removal
Перед удалением Docker убедитесь, что в системе не запущены контейнеры. Before you uninstall Docker, make sure no containers are running on your system.
Выполните следующие командлеты, чтобы найти работающие контейнеры: Run the following cmdlets to check for running containers:
Кроме того, перед удалением Docker рекомендуется удалить все контейнеры, образы контейнеров, сети и тома из системы. It’s also good practice to remove all containers, container images, networks, and volumes from your system before removing Docker. Это можно сделать, выполнив следующий командлет: You can do this by running the following cmdlet:
Удаление Docker Uninstall Docker
Затем необходимо начать собственно удаление Docker. Next, you’ll need to actually uninstall Docker.
Удаление Docker в Windows 10 To uninstall Docker on Windows 10
- На компьютере с Windows 10 перейдите в раздел Параметры >Приложения. Go to Settings >Apps on your Windows 10 machine
- В разделе Приложения и компоненты найдите пункт Docker для Windows Under Apps & Features, find Docker for Windows
- Последовательно выберите Docker для Windows >Удалить. Go to Docker for Windows >Uninstall
Удаление Docker в Windows Server 2016 To uninstall Docker on Windows Server 2016:
В сеансе PowerShell с повышенными привилегиями используйте командлеты Uninstall-Package и Uninstall-Module, чтобы удалить модуль Docker и соответствующий ему поставщик Управление пакетами из системы, как показано в следующем примере: From an elevated PowerShell session, use the Uninstall-Package and Uninstall-Module cmdlets to remove the Docker module and its corresponding Package Management Provider from your system, as shown in the following example:
Вы можете найти поставщик пакетов, который использовался для установки Docker с помощью команды PS C:\> Get-PackageProvider -Name *Docker* You can find the Package Provider that you used to install Docker with PS C:\> Get-PackageProvider -Name *Docker*
Очистка данных и системных компонентов Docker Clean up Docker data and system components
После удаления Docker необходимо удалить сети Docker по умолчанию, чтобы их конфигурация не оставалась в системе после того, как Docker будет удален. After you uninstall Docker, you’ll need to remove Docker’s default networks so their configuration won’t remain on your system after Docker is gone. Это можно сделать, выполнив следующий командлет: You can do this by running the following cmdlet:
Удалите сети по умолчанию Docker в Windows Server 2016. To remove Docker’s default networks on Windows Server 2016.
Выполните следующий командлет, чтобы удалить программные данные Docker из системы: Run the following cmdlet to remove Docker’s program data from your system:
Можно также удалить необязательные компоненты Windows, связанные с Docker и контейнерами в Windows. You may also want to remove the Windows optional features associated with Docker/containers on Windows.
К ним относится компонент «Контейнеры», который автоматически включается в любом экземпляре Windows 10 или Windows Server 2016 при установке Docker. This includes the «Containers» feature, which is automatically enabled on any Windows 10 or Windows Server 2016 when Docker is installed. Это также может быть компонент «Hyper-V», который автоматически включается в Windows 10 при установке Docker, однако в Windows Server 2016 он включается вручную. It may also include the «Hyper-V» feature, which is automatically enabled on Windows 10 when Docker is installed, but must be explicitly enabled on Windows Server 2016.
Компонент Hyper-V является общим компонентом виртуализации, который обеспечивает гораздо большую функциональность, чем при использовании одних только контейнеров. The Hyper-V feature is a general virtualization feature that enables much more than just containers. Прежде чем отключить Hyper-V, убедитесь, что в системе нет других виртуальных компонентов, которые зависят от Hyper-V. Before disabling the Hyper-V feature, make sure there are no other virtualized components on your system that require Hyper-V.
Удаление компонентов Windows 10 To remove Windows features on Windows 10:
- Выберите последовательно Панель управления >Программы >Программы и компоненты >Включение или отключение компонентов Windows. Go to Control Panel >Programs >Programs and Features >Turn Windows features on or off.
- Найдите имя компонента, который требуется отключить — в данном случае это Контейнеры и (необязательно) Hyper-V. Find the name of the feature or features you want to disable—in this case, Containers and (optionally) Hyper-V.
- Снимите флажок рядом с именем компонента, который нужно отключить. Uncheck the box next to the name of the feature you want to disable.
- Нажмите кнопку ОК. Select «OK»
Удаление компонентов Windows Server 2016 To remove Windows features on Windows Server 2016:
В сеансе PowerShell с повышенными привилегиями выполните следующие командлеты, чтобы отключить компоненты Контейнеры и (необязательно) Hyper-V. From an elevated PowerShell session, run the following cmdlets to disable the Containers and (optionally) Hyper-V features from your system:
Перезагрузка системы Reboot your system
Чтобы завершить удаление компонентов и очистить систему, выполните следующий командлет из сеанса PowerShell с повышенными привилегиями для перезагрузки системы: To finish uninstallation and cleanup, run the following cmdlet from an elevated PowerShell session to reboot your system:


