- Windows Server 2012 Operating System (Monitoring)
- Microsoft.Windows.Server.2012.Monitoring :: 6.0.7323.0 (Management Pack)
- Summary
- Configuration
- Мониторинг производительности Windows Server, настройка оповещений счетчиков PerfMon
- Мониторинг производительности процессора с Perfomance Monitor
- Группы сборщиков данных в PerfMon
- Создание Alert для мониторинга загрузки CPU
- Monitor Storage Tiers Performance in Windows Server 2012 R2
- In this topic
- How storage tiers optimize performance
- Leave room for tuning when you create storage spaces
- Recommended monitoring frequency
- What to use
- Save a report when Storage Tiers Optimization runs
- To change the Storage Tiers Optimization task to save a report (Task Scheduler)
- To change the Storage Tiers Optimization task to save a report (command line)
- Run Storage Tiers Optimization on demand
- To run Storage Tiers Optimization on demand (Task Scheduler)
- To run Storage Tiers Optimization on demand (Windows PowerShell)
- To optimize storage tiers using Defrag.exe
- What to watch for
- Is the SSD tier capacity sufficient for my workload?
- Provide additional SSD tier capacity for a workload
- To add capacity to the SSD tier (Server Manager)
- Are storage tiers being optimized frequently enough for the workload?
- Change the task frequency for Storage Tiers Optimization
- When should I consider pinning files to a storage tier?
- Pin a file to a storage tier
- Monitor the effects of pinned files on storage tiers performance
- Use performance counters to monitor storage tiers
- Counter descriptions: Tier object (Storage Spaces)
Windows Server 2012 Operating System (Monitoring)
Microsoft.Windows.Server.2012.Monitoring :: 6.0.7323.0 (Management Pack)
Microsoft Windows Server 2012 Operating System Management Pack: This management pack monitors Windows Server 2012.
- Show Management Pack XML
- Get Management Pack data in Excel format
- Download: Microsoft.Windows.Server.2012.Monitoring.mp
Summary
The Microsoft Windows Server 6.2 Base OS Management Pack monitors the availability and performance of Windows Server 2012 operating systems. By detecting, alerting, and automatically responding to critical events and performance indicators, this Management Pack helps identify, correct, and prevent possible Windows Server 2012 related outages. As a result this Management Pack can play an important role in ensuring that you’re Windows Server 2012 infrastructure and related components are available and working correctly.
By using embedded expertise, this Management Pack highlights performance, health, and availability conditions that indicate problems. It can in some cases even identify issues before they become critical thus providing you with a level of customer responsiveness that increases the overall availability and performance of your Windows Server 2012 infrastructure and related components. As a result this Management Pack will reduce the total cost of ownership (TOC) by enabling proactive management and reducing resolution times for the issues identified.
The Microsoft Windows Server 6.2 Base OS Management Pack includes the following features and capabilities:
Application Structure
A rich Application Structure is discovered by the Management pack. This Application Structure exposes the relationships between all Windows components and logical devices. For instance the relationships between the Computer, Operating System, Logical Disks, Partitions, and Physical Disks can all be discovered and viewed from diagram and topology surfaces.
Monitors and Rules
A complete set of Monitors and Rules have been provided to monitor Windows services, components, and infrastructure. The Management Pack includes monitoring capabilities for:
Service and Application Management
Local Storage Management
Tasks
A set of commonly used Tasks have been provided to assist in the diagnosis and remediation of issues that affect the availability, performance, and configuration of Windows Server related services and components.
Knowledge
A complete set of Knowledge has been provided for all Monitors, Rules, and Discoveries. For Alert generating Monitors and Rules you’ll find Knowledge that will help expedite resolution process. Where applicable Inline Tasks, Views, and Reports have been added to the Knowledge enable quick diagnostics and the fastest possible resolution.
Reports
A series of reports have been provided which will provide administrators with the ability to take a historical look at the Windows Server 2012 environment.
Configuration
This Management Pack doesn’t require any out of the box configuration. Overrides may be applied to features to modify the out of the box configuration (e.g.: enable/disable monitors and rules, change thresholds, etc).
Note: This Management Pack depends on the Microsoft Windows Server Library. As a result this Management Packs must be imported during or after the import of the Windows Server Library Management Pack.
Мониторинг производительности Windows Server, настройка оповещений счетчиков PerfMon
В этой статье мы рассмотрим особенности использования встроенных счетчиков производительности Performance Monitor для мониторинга состояния Windows Server. Счетчики PerfMon можно использовать для отслеживания изменений определенных параметров производительности сервера (алертов) и оповещать администратора в случае возникновения высокой загрузки или других нештатных состояниях.
Чаще всего для мониторинга работоспособности, доступности, загруженности серверов используются сторонние продукты. Если вам нужно получать информацию о производительности приложений либо железа только с одного-двух Windows-серверов, либо когда это нужно на непостоянной основе, либо возник более сложный случай, требующий глубокого траблшутинга производительности, то можно воспользоваться встроенным функционалом Windows Performance Monitor.
Основные возможности Performance Monitor, которые можно использовать отдельно или совместно с другими сторонними системами мониторинга (типа Zabbix, Nagios, Cacti и другие):
- cистема мониторинга при выводе информации о производительности сначала обращается к Performance Monitor;
- главной задачей системы мониторинга является оповещение о наступлении тревожного момента, аварии, а у Performance Monitor – собрать и предоставить диагностические данные.
Текущие значения производительности Windows можно получить из Task Manager, но Performance Monitor умеет несколько больше:
- Task Manager работает только в реальном времени и только на конкретном (локальном) хосте;
- в Performance Monitor можно подключать счётчики с разных серверов, вести наблюдение длительное время и собранную информацию сохранять в файл;
- в Task Manager очень мало показателей производительности.
Мониторинг производительности процессора с Perfomance Monitor
Для снятия данных о производительности процессора воспользуемся несколькими основными счётчиками:
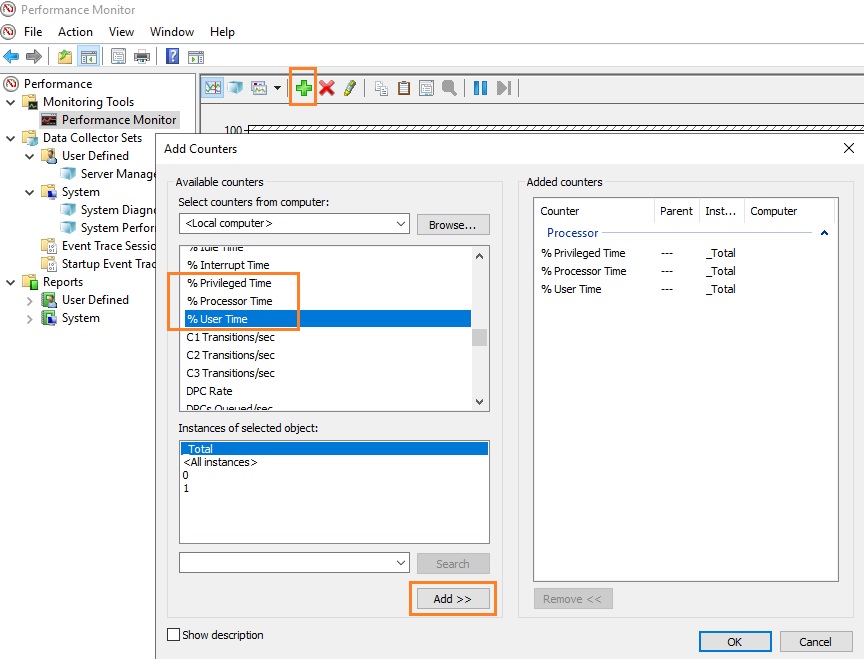
- \Processor\% Processor Time— определяет уровень загрузки ЦП, и отслеживает время, которое ЦП затрачивает на работу процесса. Уровень загрузки ЦП в диапазоне в пределах 80-90 % может указывать на необходимость добавления процессорной мощности.
- \Processor\%Privileged Time — соответствует проценту процессорного времени, затраченного на выполнение команд ядра операционной системы Windows, таких как обработка запросов ввода-вывода SQL Server. Если значение этого счетчика постоянно высокое, и счетчики для объекта Физический диск также имеют высокие значения, то необходимо рассмотреть вопрос об установке более быстрой и более эффективной дисковой подсистемы (см. более подробную статью об анализе производительности дисков с помощью PerfMon).
- \Processor\%User Time — соответствует проценту времени работы CPU, которое он затрачивает на выполнение пользовательских приложений.
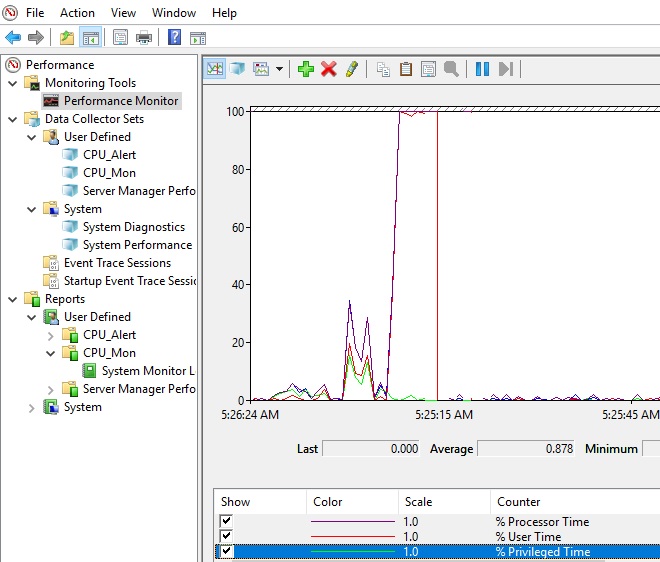
Запустите Performance Monitor с помощью команды perfmon. В разделе Performance Monitor отображается загрузкой CPU в реальном времени с помощью графика (параметр Line), с помощью цифр (параметр Report), с помощью столбчатой гистограммы (параметр Histogram bar) (вид выбирается в панели инструментов). Чтобы добавить счетчики, нажмите кнопку “+” (Add Counters).
Слева направо двигается линия в реальном времени и отображает график загрузки процессора, на котором можно увидеть, как всплески, так и постоянную нагрузку.
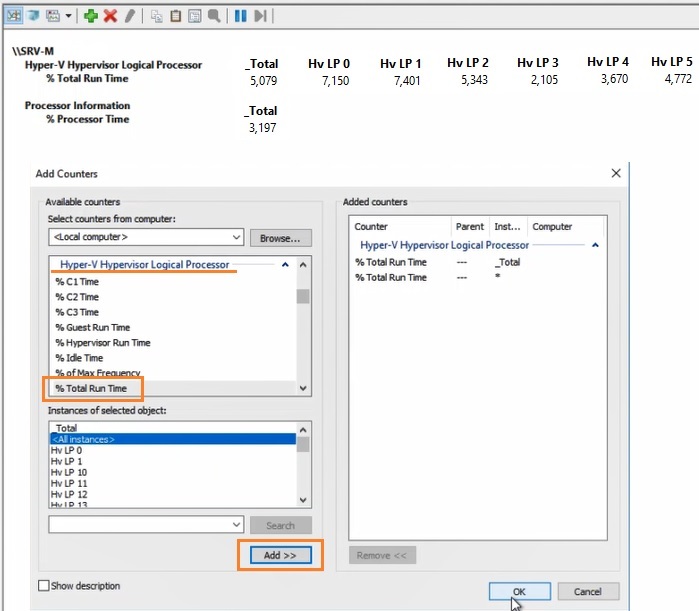
Например, вам нужно посмотреть загрузку процессора виртуальными машинами и самим Hyper-V. Выберите группу счетчиков Hyper-V Hypervisor Logical Processor, выберите счетчик % Total Run Time. Вы можете показывать нагрузку по всем ядрам CPU (Total), либо по конкретным (HV LP №), либо всё сразу (All Instances). Выберем Total и All Instances.
Группы сборщиков данных в PerfMon
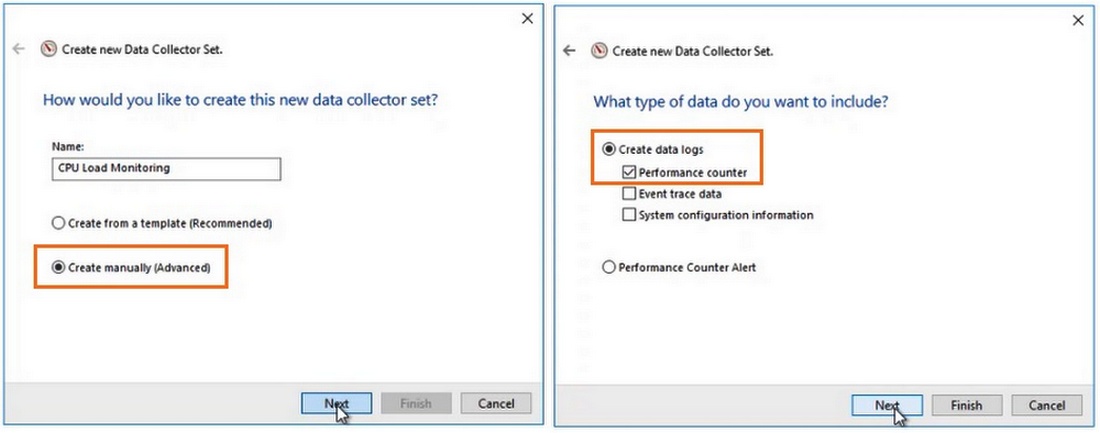
Чтобы не сидеть целый за наблюдением движения линии, создаются группы сбор данных (Data Collector Set), задаются для них параметры и периодически просматриваются.
Чтобы создать группу сбора данных, нужно нажать на разделе User Defined правой кнопкой мыши, в меню выбрать New -> Data Collector Set. Выберите Create manually (Advanced) -> Create Data Logs и включите опцию Performance Counter. Нажмите Add и добавите счётчики. В нашем примере % Total Run Time из группы Hyper-V Hypervisor Logical Processor и Available MBytes из Memory. Установите интервал опроса счётчиков в 3 секунды.
Далее вручную запустите созданный Data Collector Set, нажав на нём правой кнопкой мыши и выбрав в меню пункт Start.
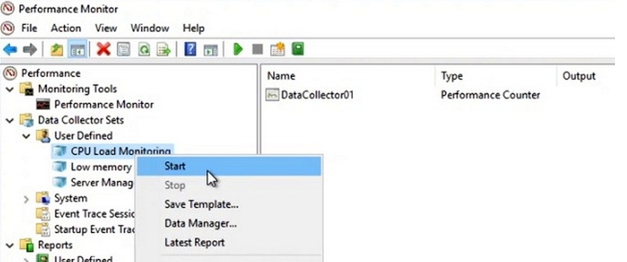
Через некоторое время можно просмотреть отчёт. Для этого в контекстном меню группы сбора данных нужно выбрать пункт Latest Report. Вы можете посмотреть и проанализировать отчёт производительности в виде графика. Отчёт можно скопировать и переслать. Он хранится в C:\PerfLogs\Admin\CPU_Mon и имеет расширение .blg.
Если нужно на другом сервере запустить такой же набор счётчиков, как на первом, то их можно переносить экспортом. Для этого в контекстном меню группы сбора данных выберите пункт Save Template, укажите имя файла (расширение .xml). Скопируйте xml файл на другой сервер, создайте новую группу сбора данных, выберите пункт Create from a template и укажите готовый шаблон.
Создание Alert для мониторинга загрузки CPU
В определённый критический момент в Performance Monitor могут срабатывать алерты, которые помогают ИТ-специалисту прояснить суть проблемы. В первом случае алерт может отправить оповещение, а во втором – запустить другую группу сбора данных.
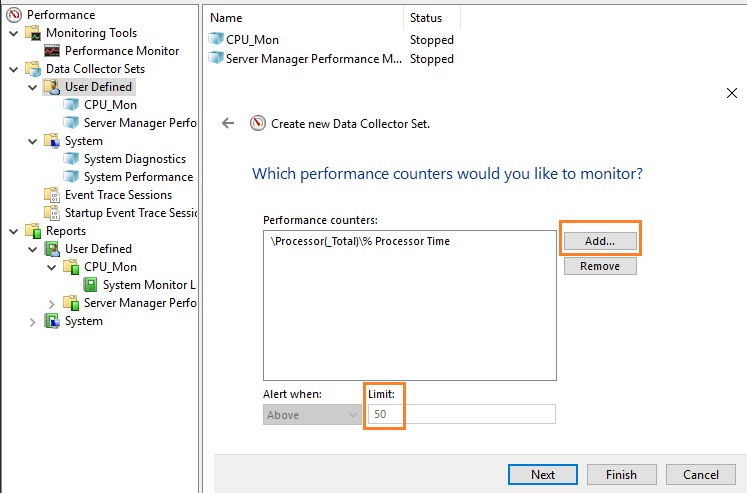
Чтобы создать алерт в PerfMon, нужно создать ещё один Data Collector Set. Укажите его имя CPU_Alert, выберите опцию Create manually (Advanced), а затем — Performance Counter Alert. Добавьте счётчик % Total Run Time из Hyper-V Hypervisor Logical Processor, укажите границу загрузки 50 %, при превышении которой будет срабатывать алерт, установите интервал опроса счётчика в 3 секунды.
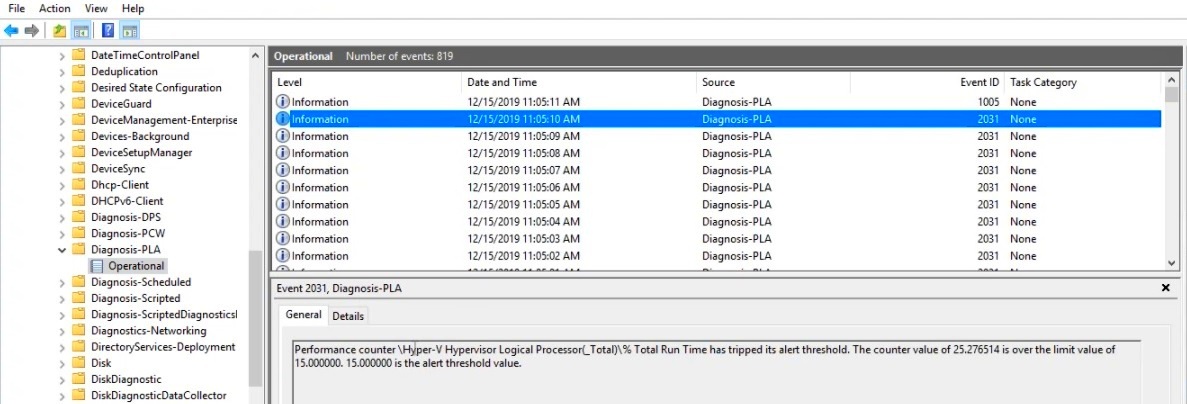
Далее нужно зайти в свойства данной группы сбора информации, перейти на вкладку Alert Action, включить опцию Log an entry in the application event log и запустить группу сбора данных. Когда сработает алерт, в журнале (в консоли Event Viewer в разделе Applications and Services Logs\Microsoft\Windows\Diagnosis-PLA\Operational) появится запись:
“Performance counter \Processor(_Total)\% Processor Time has tripped its alert threshold. The counter value of 100.000000 is over the limit value of 50.000000. 50.000000 is the alert threshold value”.
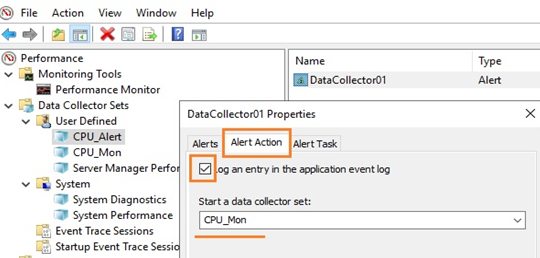
Здесь же рассмотрим и второй случай, когда нужно запустить другую группу сбора данных. Например, алерт срабатывает при достижении высокой загрузки CPU, делает запись в лог, но вы хотите включить сбор данных с других счётчиков для получения дополнительной информации. Для этого необходимо в свойствах алерта в меню Alert Action в выпадающем списке Start a data collector set выбрать ранее созданную группу сбора, например, CPU_Mon. Рядом находится вкладка Alert Task, в которой можно указать разные аргументы либо подключить готовую задачу из консоли Task Scheduler, указав её имя в поле Run this task when an alert is triggered. Будем использовать второй вариант.
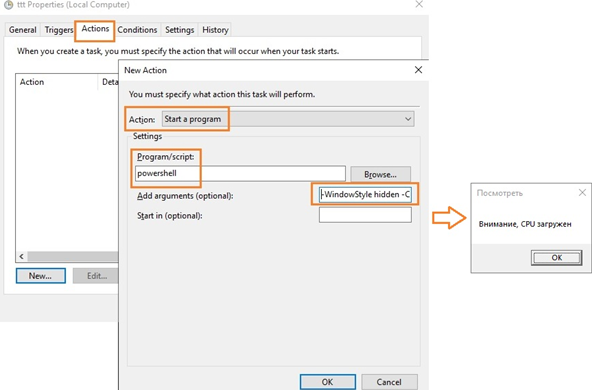
С помощью Task Scheduler можно выполнить какие-то действия: выполнить команду, отправить письмо или вывести сообщение на экран (сейчас последниед ве функции не поддерживаются, считаются устаревшими (deprecated)). Для вывода на уведомления на экран можно использовать скриптом PowerShell. Для этого в консоли Task Scheduler создайте новую задачу, на вкладке Triggers выберите One time, на вкладке Actions в выпадающем поле Action выбирите параметр Start a program, в поле Program/Script укажите powershell.exe, а в поле Add arguments (optional) следующий код:
-WindowStyle hidden -Command «& <[System.Reflection.Assembly]::LoadWithPartialName('System.Windows.Forms'); [System.Windows.Forms.MessageBox]::Show('Внимание, CPU загружен', 'Посмотреть')>«
Для отправки письма вы можете воспользоваться командлетом PowerShell Send-MailMessage или стороннюю утилиту mailsend.exe.. Для этого создайте аналогичное задание в Task Scheduler, в поле Program/Script укажите полный путь к утилите (у нас C:\Scripts\Mail\mailsend.exe), а в поле Add arguments (optional) через параметры нужно передать значения: электронный адрес, адрес и номер порта SMTP-сервера, текст письма и заголовка, пароль:
-to dep.it@ddd.com -from dep.it@ddd.com -ssl -port 465 -auth -smtp smtp.ddd.com -sub Alarm -v -user dep.it@ddd.com +cc +bc -M «Alarm, CPU, Alarm» -pass «it12345»
где +cc означает не запрашивать копию письма, +bc — не запрашивать скрытую копию письма.
Monitor Storage Tiers Performance in Windows Server 2012 R2
Applies To: Windows Server 2012 R2
To make sure your storage tiers are optimizing performance of your storage spaces efficiently in Windows Server 2012 R2, you should evaluate the performance of your storage configuration after a few days, when your workloads have run long enough to become established and predictable, and then check a few simple data points each week in a Storage Tier Optimization Report to make sure the storage tiers are performing optimally. Use performance counters for the Tier object to gather additional data about Reads and Writes to the tiers.
In this topic
How storage tiers optimize performance
If you’re using tiered storage spaces in Windows Server 2012 R2, Windows is automatically optimizing your storage performance by transparently moving the data that’s accessed most frequently to your faster solid-state drives (the SSDВ tier) and switching out less active data to your less expensive hard disk drives (the HDDВ tier).
Storage tiers optimization is a two-part process, as shown below:
Over the course of the day, Storage Spaces creates a heat map of the data based on how often each piece of data is accessed. (1)
During its nightly run (at 1:00 a.m., by default), the Storage Tiers Optimization task moves the most frequently accessed («hot») data to your faster solid-state drives (the SSDВ tier) and the «cooler» data to the less expensive hard disk drives (the HDDВ tier). (2)
.jpeg)
Optimization moves data, not files—The data is mapped and moved at a sub-file level. So if only 30В percent of the data on a virtual hard disk is «hot,» only that 30В percent moves to your solid-state drives.
A write-back cache backed by SSDs minimizes the impact of random writes—In addition, a 1 GB write-back cache backed by SSDs reduces the latency of random writes, which increases the overall throughput performance of the storage.
This typically delivers very efficient storage management with little or no intervention on your part. However, you might occasionally need to adjust the storage tiers configuration to get the performance you want for a specific workload.
Leave room for tuning when you create storage spaces
When you create storage spaces, plan ahead, and give yourself room to fine-tune the storage spaces after you observe your workloads in action. After a week or two of observing input/output operations per second (IOPS) and latency, you’ll be able to more accurately predict the storage requirements of each workload. Designing your storage spaces
Don’t allocate all available SSD capacity for your storage spaces immediately—Keep some SSD capacity in the storage pool in reserve (in addition to what you reserve for rebuilding failed disks) so you’ll be able to increase the size of an SSDВ tier when a workload needs it.
Don’t pin files to storage tiers until you see how well Storage Tiers Optimization can optimize storage performance—When a tenant or workload requires a particular level of performance, you can pin files to a storage tier to ensure that all I/O activity is performed on that tier. The entire file is moved to the tier, and then is excluded from Storage Tiers Optimization. If Storage Tiers Optimization can efficiently move only the frequently accessed data to the SSDВ tier, you can avoid storing entire large files such as virtual hard disks on your more expensive solid-state drives.
Do consider pinning the parent VHDX file to the SSD tier if you’re providing pooled desktops through VDI—If you’re using Virtual Desktop Infrastructure (VDI) to provide pooled desktops for users (you might know these as non-persistent desktops or dynamic desktops), consider pinning the master image that’s used to clone users’ desktops to the SSDВ tier if you have the needed SSD capacity. (You might also need to run Storage Tiers Optimization more than once a day.)
Recommended monitoring frequency
After you observe your workloads for a few days, review a Storage Tier Optimization Report, and then fine-tune the configuration of your storage spaces to meet workload requirements. To get a report, run Storage Tiers Optimization on demand.
After that, review a history of storage tiers optimizations weekly in the Storage Tier Optimization Report. The easiest way to get a report is to change the Storage Tiers Optimization scheduled task to save a report.
If you’re experiencing performance issues and want to optimize storage tiers outside the usual schedule, run Storage Tiers Optimization on demand.
What to use
Use the Storage Tier Optimization Report to check the performance of your storage tiers and identify changes that might optimize their performance.
Be aware that when you request a Storage Tier Optimization Report, your storage tiers are optimized as part of the reporting process before the report is displayed. That can take several hours. That’s why we recommend that you save a report automatically when the Storage Tiers Optimization task runs. That requires changing the scheduled task, as described below. To keep a record of storage tiers performance over time, configure the task to append the new data to the end of the file instead of overwriting it.
Save a report when Storage Tiers Optimization runs
You can change the Storage Tiers Optimization task to save a report by using Task Scheduler in Server Manager or from the command line.
To change the Storage Tiers Optimization task to save a report (Task Scheduler)
In Server Manager, open Task Scheduler (on the Tools menu).
In the Task Scheduler console tree, expand Task Scheduler Library > Microsoft > Windows, and click Storage Tiers Management.
Open the properties of the Storage Tiers Optimization task.
On the Actions tab, click Start a program, and then click Edit.
In Add arguments, add the instruction to save an output file to the default arguments:
Example entry: /c /h /g /# >> C:\Windows\StorageReports\StorageTiersOutput.txt
This string requires a literal path—you can’t use environment variables such as %windir% to indicate the system folder.
To change the Storage Tiers Optimization task to save a report (command line)
Run the following command at an elevated command prompt:
Run the example command as it is to save the data in a StorageTiersOutput.txt file in the Windows installation folder. You can substitute any path or filename.
The >> appends the latest data to the existing file so you can compare performance data over time. If you prefer to overwrite the previous data each time the task runs, use a single > instead.
Run Storage Tiers Optimization on demand
To perform Storage Tiers Optimization on demand, you can either run the Storage Tiers Optimization task—either in Task Scheduler or Windows PowerShell—or you can run defrag.exe with the appropriate parameters.
You can’t use some of the storage cmdlets with Windows PowerShell (x86) or Windows PowerShell ISE (x86). Instead, use the normal (64-bit) Windows PowerShell or Windows PowerShell ISE.
To run Storage Tiers Optimization on demand (Task Scheduler)
In the Task Scheduler console tree, expand Task Scheduler Library > Microsoft > Windows, and click Storage Tiers Management.
Right-click the Storage Tiers Optimization task, and click Run.
To run Storage Tiers Optimization on demand (Windows PowerShell)
Open Windows PowerShell with administrator rights, and run this command. (You’ll only get a report if you’ve updated the task to save one.)
To optimize storage tiers using Defrag.exe
Enter the following command at an elevated command prompt:
This command optimizes storage tiers (/g) on the volume, returning a Post Defragmentation Report and a Storage Tier Optimization Report. Include /h to process the job at normal priority instead of low priority (the default).
What to watch for
There are three things to monitor to ensure your storage tiers perform optimally for each workload:
Is the SSD tier capacity sufficient for my workload?
A quick look at a Storage Tier Optimization Report can tell you whether you have provided sufficient SSD tier capacity to get the I/O optimization—that is, the percentage of I/O serviced by the SSD tier—that you want for the workloads in the storage space. The appropriate performance goal depends on the nature and requirements of a workload.
Detection—If the percentage of I/Os that your SSD tier is currently servicing (at the bottom of the Storage Tier Optimization Report) is lower than the percentage you want for the workloads, check the table at the top of the report to find out the SSD tier size that is required to reach the desired percentage based on current activity of your workloads.
.jpeg)
- You can increase the size of the SSDВ tier or move a workload to a different storage space (to reduce the SSD capacity requirement of the current storage space) at any time. Moving a workload typically involves moving virtual machine storage, which is performed as a background task.
Provide additional SSD tier capacity for a workload
If additional SSD capacity is available for the storage space, you can enlarge the SSDВ tier to meet the needs of a workload. After you resize the tier, you will need to extend the partition and volume for the storage space. You can do this in Server Manager or in Windows PowerShell.
To add capacity to the SSD tier (Server Manager)
In Server Manager, open File and Storage Services (on the Tools menu).
If you’re already working in Server Manager, refresh the display to make sure you’re seeing any recent changes made in Windows PowerShell.
In the console tree, expand Volumes, and click Storage Pools.
Select the storage pool. Then, under Virtual Disks, right-click the storage space and click Extend virtual disk. For a tiered storage pool, you extend individual tiers.
To extend a tier, click Specify size, and enter the total amount of space to allocate to the tier—that is, current size plus the additional space that is needed. Then click OK.
Make sure the resized SSD tier will not encroach on the space that you reserved in the storage pool to support automatic rebuild when a physical disk fails. Guidelines for allocating capacity for storage pools and storage spaces
Open the properties of the storage pool. Note Allocated space (the sum of space allocated to both tiers). You will need to extend the volume to accommodate the allocation.
To extend the volume (this also extends the partition):
In the console tree, click Volumes.
Under Volumes, right-click the volume assigned to the storage space, and click Extend volume.
In the Extend Volume dialog box, enter a larger size to enable use of the expanded tier capacity.
Don’t assign the maximum size. You need to reserve some space for the GPT partitioning scheme. We recommend leaving 256 MB (0.25 GB). That is, resize the partition for a 66GB storage space to 65.75GB.
To add capacity to the SSD tier (Windows PowerShell)
Open Windows PowerShell as an administrator.
Before you resize the SSDВ tier, run the following commands to verify the health of the storage space, the current size of the tier you want to resize, and available capacity. Replace the $StorageSpaceName variable with the friendly name of the storage space.
Commands throughout this procedure use the $StorageSpaceName and $SSDtier variables, with the assumption that you will run all commands in the same Windows PowerShell session. If you open a new Windows PowerShell session, either define the variables again or substitute the friendly name of the storage space or SSD tier for the variable.
Sample output—Shows a tiered storage space, Space01, with:
64 GB capacity (SSD tier = 32 GB, HDD tier = 32 GB)
Volume (D) and partition size of 64.87 GB. Note that the volume and partition are slightly smaller than the storage space capacity. Remaining space is used for the GPT partitioning scheme.
Resiliency setting of Mirror
Add capacity to the SSDВ tier by running the following command. Enter the size in GBs, TBs, or MBs, using this format: 34GB.
Make sure the resized SSD tier will not encroach on the space that you reserved in the storage pool to support automatic rebuild when a physical disk fails. Guidelines for allocating capacity for storage pools and storage spaces
Update the virtualВ disk to incorporate the additional tier size:
Recheck the status of the storage space and its tiers by repeating the commands that you ran in StepВ 2, and note the size of the total allocated space (the sum of allocated capacity for both tiers).
Resize the partition for the storage space (this also resizes the volume). You’ll have to make the partition slightly smaller than the storage space capacity to leave space for the GPT partitioning scheme. We recommend that you reserve 256В MB (0.25В GB) for this purpose. That is, resize the partition for a 66GB storage space to 65.75GB.
Verify the changes to the partition and volume by running the following commands:
Sample output—Shows a healthy volume and partition enlarged to 65.75 GB.
Are storage tiers being optimized frequently enough for the workload?
By default, the Storage Tiers Optimization task runs daily at 1:00 a.m. For large, highly active workloads, more frequent volume optimization might be needed to maintain consistent storage performance throughout the day.
Detection—In the Storage Tier Optimization Report, check whether the actual percentage of I/Os being serviced by the SSDВ tier is about what’s expected for your SSDВ tier size, as shown below. The expected percentage for each tier size is calculated based on the heat map for your storage space. If the actual percentage is a lot lower than expected, you should schedule additional runs of the Storage Tiers Optimization task.
.jpeg)
If your workload is changing more frequently than the current Storage Tiers Optimization schedule supports, you can increase the task frequency or run Storage Tiers Optimization immediately.
Recommended maximum frequency: Every 6 hours
Change the task frequency for Storage Tiers Optimization
To change task frequency for Storage Tiers Optimization (command line)
At an elevated command prompt, enter the following command:
The example sets the run interval to every 360 minutes (6 hours) (/ri 360). There’s nothing to gain by running the task any more frequently.
To change task frequency for Storage Tiers Optimization (Task Scheduler)
In Server Manager, open Task Scheduler (on the Tools menu).
In the Task Scheduler console tree, expand Task Scheduler Library > Microsoft > Windows, and click Storage Tiers Management.
Open properties for the Storage Tiers Optimization task.
On the Triggers tab, click Daily, and then click Edit.
Under Advanced Settings, select Repeat task every, and type in 6 hours (if you want to run Storage Tiers Optimization four times daily). (The trigger should remain Daily.)
When should I consider pinning files to a storage tier?
An administrator can override Storage Tiers Optimization by pinning files to a storage tier to ensure the files are always accessed on the preferred tier.
That’s useful in some circumstances, but we recommend that you pin files sparingly—and only after you observe your workloads to see whether Storage Tiers Optimization can accomplish your goals. Each pinned file on the SSDВ tier reduces the space that can be used for data placement based on the heat map—and the pinned file typically takes up more space on your more expensive solid-state drives than the frequently accessed data that moves there during Storage Tiers Optimization.
When should you consider pinning files to a storage tier?
If you need to guarantee performance levels for workloads—You can pin files to differentiate tenant virtual machines, and the underlying VHD files, based on service-level agreements.
For workloads that require that certain files be pinned to a tier—For example, for VDI pooled desktops, you should pin the parent VHDX file that is used to clone the desktops at startup to the SSD tier.
For workloads that frequently access different data at different times—If a workload’s active working set is not stable, you can get churn from data moving often between the SSDВ tier and the HDDВ tier.
To debug performance issues relating to a tier
To remove streaming media from I/O servicing on the SSD tier—It can be useful to pin the VHDs that store videos and audio files to the HDD tier. These media are accessed sequentially, and can be handled fine by hard disk drives.
Detection–Whether to pin a file to a storage tier is the administrator’s choice based on the requirements and behavior of workloads. You should use pinning sparingly in situations like those noted earlier.
- You can pin a file at any time with no immediate effect on storage performance. Storage Tiers Optimization attempts to move the file to the desired tier during its next run. If you decide to optimize tiers immediately, bear in mind the trade-off between possibly reduced performance during the extra Storage Tiers Optimization run and the added benefit of immediate tier optimization.
Pin a file to a storage tier
Use Windows PowerShell to pin files to a storage tier. This feature is not available in Server Manager.
To be pinned a storage tier, a file must be on a volume that is hosted by the same tiered storage space.
To pin a file to a storage tier (Windows PowerShell)
Open Windows PowerShell as an administrator.
To get the friendly name of the storage tier, run this:
To pin the file to the tier, run this:
This pins the file but doesn’t move it immediately. Storage Spaces will attempt to move the pinned files to the desired volumes during its next Storage Tiers Optimization run.
If you want to move the file now, perform Storage Tiers Optimization on demand:
In Windows PowerShell, run: Get-ScheduledTask -TaskName «Storage Tiers Optimization» | Start-ScheduledTask
At an elevated command prompt, run: defrag : /g /h /#
To verify that a pinned file has been moved to the tier, run the following command in Windows PowerShell, and check the placement status and state of the file:
Sample output:
Monitor the effects of pinned files on storage tiers performance
If you pin files to your storage tiers, you should check the effects of the pinned files on I/O servicing when you review the Storage Tier Optimization Report. At the bottom of the report, you’ll see the total volume of pinned files on each tier, and the percentage of I/O on the tier accounted for by pinned files.
.jpeg)
How you interpret the data depends on why you pinned the files. For example, if you aren’t getting the storage performance that you need for a workload, and pinned files account for a large percentage of I/O serviced by the SSDВ tier, then it’s a good idea to review a list of the pinned files to make sure they all need to be pinned.
To view a list of files pinned to the storage tiers (Windows PowerShell)
Open Windows PowerShell as an administrator, and run the following command:
Use performance counters to monitor storage tiers
You can use the performance counters for the Tier object in Storage Spaces to get additional data that can help you evaluate the following aspects of storage tiers performance:
Check for bottlenecks on a tier—Two performance counters—Tier Transfers/Sec and Tier Queue Length—can probably give you a good idea of whether a bottleneck has developed on a tier.
Review Write latency—Ideally, the SSD tier and the HDD tier have similar Write latency because all Writes to the HDD tier are being absorbed by the write-back cache. A higher Write latency on the HDD tier can indicate a couple of things:
The write-back cache is full and is throttling. Check Bytes Used for the Cache object.
The Writes are large enough to bypass the write-back cache (Writes larger than 256 KB are not written to the cache). Compare Cache Writes/sec (Cache object) with Tier Writes/sec (Tier object).
Review Read performance—Be aware that for Reads, especially in random I/O, the HDD tier is expected to perform more slowly than the SSD tier.
Counter descriptions: Tier object (Storage Spaces)
Avg. Tier Bytes/Transfer
The average size of individual Read and Write requests (I/O size) to the storage tier for the capture interval.
Tier Transfer Bytes/sec
The transfer speed for Read and Write requests to the tier (in bytes per second).
Avg. Tier Queue Length
Measures latency over time—the average number of outstanding Read and Write requests to the tier, including requests currently in service and those waiting for service.
Avg. Tier sec/Transfer
The average time it takes to complete a Read or Write operation on the tier.
The number of transfers completed in the previous second—known as IOPS, or Inputs/Outputs per second. If the capture interval in Performance Monitor is greater than 1 second, the average of the values captured is presented.
Current Tier Queue Length
The number of outstanding Read and Write requests to the tier, including requests currently in service and requests waiting for service.
Avg. Tier Bytes/Write
The average size, including metadata, of individual Write requests that went to the storage tier during the capture interval.
Tier Write Bytes/sec
The average speed of Writes to the tier (in bytes per second).
Avg. Tier Write Queue Length
The average number of outstanding Write requests to the tier, including requests currently in service and requests waiting for service.
Avg. Tier sec/Write
The average number of seconds required per Write on the tier.
Writes per second on the tier. If the capture interval in Performance Monitor is greater than 1 second, the average of the values captured is displayed.
Avg. Tier Bytes/Read
The average size of individual Read requests (I/O size) on the storage tier for the capture interval (in bytes).
Tier Read Bytes/se
The average speed of Reads to the tier (in Bytes per second).
Avg. Tier Read Queue Length
The average number of outstanding Read requests to the tier, including requests currently in service and requests waiting for service.
Avg. Tier sec/Read
Average seconds per Read on the tier.
Reads per second on the tier. If the capture interval in Performance Monitor is greater than 1 second, the average of the values captured is presented.


