- How to change monitor refresh rates in Windows 10
- How to set a different screen refresh rate in Windows 10
- More Windows 10 resources
- Halo: MCC’s live service elements make it better, not worse
- Microsoft’s Surface Duo is not ‘failing up’
- Here’s what you can do if Windows 10 update KB5001330 is causing issues
- These are the best PC sticks when you’re on the move
- How to change Monitor Refresh Rate in Windows 10
- What is Refresh Rate of a Monitor
- Change Monitor Refresh Rate in Windows
- How to Change Screen Refresh Rates in Windows 10
- RelatedPosts
- Download KB5001567, KB5001566, KB5001568, KB5001565 Offline Installers – Update to fix BSOD and Printing Issue
- How to Clean Install Windows 10
- Download March 2021 Patch Tuesday Update KB5000802, KB5000808 and KB5000822 Offline Installers
- Microsoft February 2021 Patch Tuesday Updates KB4601319, KB4601315 Offline Installers
- Will my gameplay be improved after changing the screen refresh rate?
- Will my Laptop battery be drained faster on increasing the screen refresh rate?
- How to change screen refresh rate in windows 10
- How to change screen refresh rate for secondary display in windows 10
- Change Display Refresh Rate in Windows 10
- To change display refresh rate in Windows 10,
- Change Display Refresh Rate in Windows 10 from Command Prompt
- About Sergey Tkachenko
How to change monitor refresh rates in Windows 10

Refresh rate refers to the number of times per second an image refreshes on the screen — in a process measured in Hertz (Hz). The higher the refresh rate, the better the experience, while lower refresh rate usually results on screen flickering, and it can cause eye strain and headaches.
Typically, a refresh rate of 60Hz is good enough for everyday computing tasks. You’ll notice some jitters while moving the mouse on the screen, but it’s an optimal rate. If you drop below 60Hz, that’s when you’ll start experiencing problems.
If you’re a gamer, things are a bit different. Although 60Hz should provide a good experience, using a higher screen refresh rate of 144Hz or even 240Hz will offer a much better and smoother gaming experience.
Depending on the monitor, resolution, and graphics card you’re using, on Windows 10, it’s possible to adjust the refresh rate manually for a sharper and smoother viewing experience.
In this Windows 10 guide, we’ll walk you through the steps to change the screen refresh rate on a monitor using the Settings app.
How to set a different screen refresh rate in Windows 10
If you’re experiencing monitor issues because of the refresh rate configuration, use these steps to set the most accurate rate:
- Open Settings.
- Click on System.
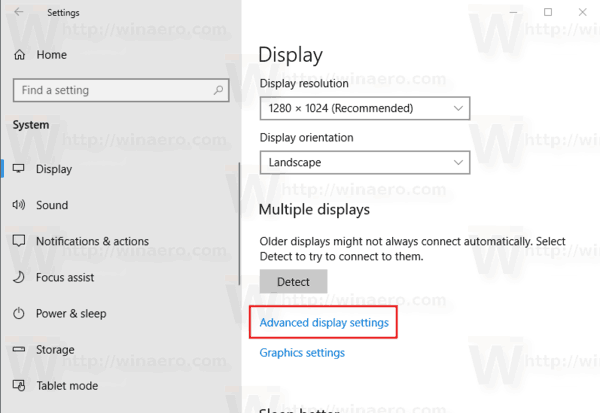
- Click on Display.
Click the Advanced display settings link.

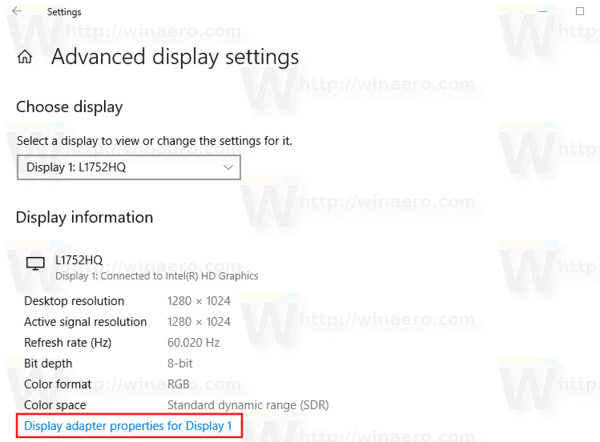
Click the Display adapter properties for Display 1 link.
Quick Tip: Alongside resolution, bit depth, and color format, in this page, you can also see the refresh rate currently set on your monitor.
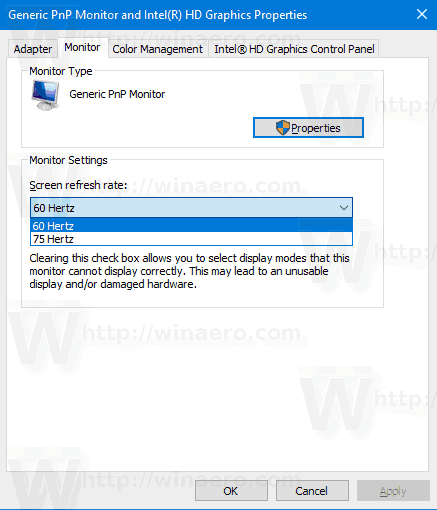
Under «Monitor Settings,» use the drop-down menu to select the refresh rate you wish.
![]()
Once you’ve completed the steps, the monitor should start using the new refresh rate that you’ve applied.
The rates you can select will always depend on the monitor, graphics adapter, and resolution your device is using.
If your display supports a higher refresh rate, but the option is not available, make sure to re-install the latest graphics driver. Also, you can try setting a lower resolution as many times displays can support higher refresh rate but on a lower resolution.
In the case that you’re changing the screen refresh rate from 59 to 60 Hertz, but the refresh rate reverts to 59 Hertz, this is an expected behavior, and no additional action is required.
The reason for this behavior is that specific displays will only report 59.94 Hertz, and when this happens, Windows will display two frequencies, including 59Hz and 60Hz for compatibility reasons. However, both 59 to 60 Hertz will set the refresh rate to 59.94 Hertz.
More Windows 10 resources
For more helpful articles, coverage, and answers to common questions about Windows 10, visit the following resources:
![]()
Halo: MCC’s live service elements make it better, not worse
Halo: The Master Chief Collection is more popular than ever, but some fans don’t agree with the live service approach 343 Industries has taken with it. Here’s why those elements are, at the end of the day, great for the game and for Halo overall.
![]()
Microsoft’s Surface Duo is not ‘failing up’
Microsoft announced this week that it was expanding Surface Duo availability to nine new commercial markets. While Surface Duo is undoubtedly a work in progress, this is not a sign of a disaster. It’s also doesn’t mean that Surface Duo is selling a ton either. Instead, the reason for the expansion is a lot more straightforward.
![]()
Here’s what you can do if Windows 10 update KB5001330 is causing issues
In this guide, we’ll show you the steps to get rid of the update KB5001330 to fix profile, gaming, and BSoD problems with the Windows 10 October 2020 Update and May 2020 Update.
![]()
These are the best PC sticks when you’re on the move
Instant computer — just add a screen. That’s the general idea behind the ultra-portable PC, but it can be hard to know which one you want. Relax, we have you covered!
How to change Monitor Refresh Rate in Windows 10
This post explains what is Refresh Rate for computer monitors and how you can change the Monitor Refresh Rate in Windows 10. You can change it for best gaming experience or flickering screen issues via NVIDIA or AMD graphics card Advanced Display Settings. For instance, if you see a flickering screen or ‘stop-motion’ effect while playing heavy games, there is a chance that it is happening because of the monitor refresh rate. If you have an old graphics card and modern monitor with a high refresh rate, you could still face such issues.
What is Refresh Rate of a Monitor
Refresh Rate is a unit that measures how many times your computer monitor updates you with new information every second. The unit of refresh rate is Hertz. In other words, if your monitor’s refresh rate is 30Hz (which is very rare, nowadays), it implies that your monitor can update maximum 30 times in every second. It may not update the screen 30 times all the times, but the maximum number will be 30.
There are plenty of monitors which come with 240Hz refresh rate. But you will need an equally advanced graphics card to make it work correctly while gaming. Otherwise, if you have an old GPU, you might see stop-motion effects while playing games.
Change Monitor Refresh Rate in Windows
Not all monitors allow you to change the Refresh Rate some monitors do If your computer allows you to, you can press Win+I to open Windows Settings. Having done this, go to System > Display. On your right-hand side, you will find an option called Display adaptor properties.
Click on it and switch to Monitor tab after opening the Properties window. In this window, you will see a drop-down menu where you can select other given refresh rates.
Select the appropriate one and save your change.
If you have more than one monitor, you need to select the monitor before clicking on Display adaptor properties button on the Display page.
Date: February 13, 2018 Tags: Settings, Tips
How to Change Screen Refresh Rates in Windows 10

Refresh rate is number of times the image on your monitor is refreshed by the system each second. The term for measuring the refresh rates is called Hertz (Hz). Better the refresh rate better and smoother is the viewing experience.
Normally, refresh rate is kept at 60Hz which is an optimum setting for majority of users. But if you are a gamer and not satisfied by an average setting you can change it to some higher screen refresh rates settings to 144Hz or above.
RelatedPosts

Download KB5001567, KB5001566, KB5001568, KB5001565 Offline Installers – Update to fix BSOD and Printing Issue

How to Clean Install Windows 10
Download March 2021 Patch Tuesday Update KB5000802, KB5000808 and KB5000822 Offline Installers

Microsoft February 2021 Patch Tuesday Updates KB4601319, KB4601315 Offline Installers

Increasing the screen refresh rates and resolution depends upon the monitor and graphic card you are using. You may have questions in mind about changing the windows 10 screen refresh rates like:
Will my gameplay be improved after changing the screen refresh rate?
Yes, you will see some improvements in the gaming experience like more clarity and smoother game. So, it is recommended to change the refresh rate if your GPU and Monitor allows.
Will my Laptop battery be drained faster on increasing the screen refresh rate?
Higher screen refresh rates require more power. So, it’s right to say that your laptop’s battery will be drained quickly than on lower refresh rates on Windows 10.
How to change screen refresh rate in windows 10
- Open Settings.
- Hit the System icon.
- Click on Display.
- Now tap on Advanced display settings under “Multiple Displays” Section

- Click on Refresh rate drop-down menu and select the desired refresh rate for your display.

How to change screen refresh rate for secondary display in windows 10
- Navigate to Settings->System->Display->Advanced display settings.
- Click on Display adapter properties for Display 1

- Click on Monitor tab and select the desired Screen refresh rate in Monitor settings.

- Click apply and OK.
You may encounter issues like flickering of screen if correct screen refresh rate is not selected. You can select the default refresh rate on Windows 10 by following the same process. In case, you still face issues, you can reinstall the Graphic Card drivers to get back to your default settings.
Change Display Refresh Rate in Windows 10
The refresh rate is the number of frames per second your monitor can display. Hertz frequency is used as the measurement at which the screen is redrawn. 1Hz means it can draw 1 image per second. A high-frequency rate allows getting a clearer visibility and lesser strain on your eyes. In this article, we will review two methods which you can use to change the screen refresh rate in Windows 10, using the GUI, and with a command line tool.
Traditionally, a refresh rate of 60Hz is considered to be the optimal screen refresh rate. That was meant to be the best refresh rate for human eyes. Many modern displays which are designed for games and professionals support a higher screen refresh rate of 144Hz or even 240Hz to provide a sharper and smoother viewing experience.
A combination of the monitor, and graphics card you have connected to your computer provide a variety of display resolutions, most of these allow adjusting the screen refresh rate.
In previous versions of Windows you could use the classic Control Panel. The Display option could be used to change parameters for connected monitors. This has changed with recent Windows 10 versions. The Display options were moved to the modern Settings app.
To change display refresh rate in Windows 10,
- Open the Settings app.
- Go to System -> Display.
- On the right, click on the Advanced display settings link.

- On the next page, click the link Display adapter properties.
- On the Monitor tab, select a Screen refresh rate in the drop down list.
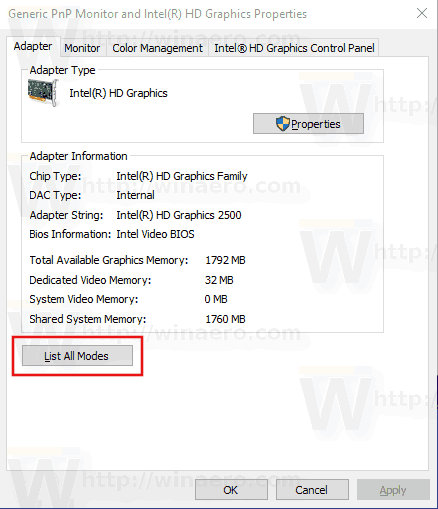
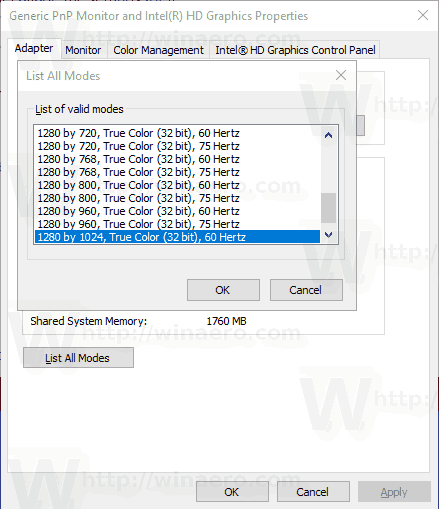
- Alternatively, you can select a display mode with screen refresh rate. On the Adapter tab, click on the button List All Modes.
- Select a suitable display resolution that comes with the desired screen refresh rate, and click OK.
Tip: Starting with May 2019 Update, Windows 10 comes with support for the variable refresh rate feature. The appropriate options can be found in Settings. See the following post: Windows 10 Version 1903 Supports Variable Refresh Rate.
Also, it is possible to change the screen refresh rate from the command line. Windows 10 doesn’t include built-in tools for this task, so we have to use QRes — a tiny open source app.
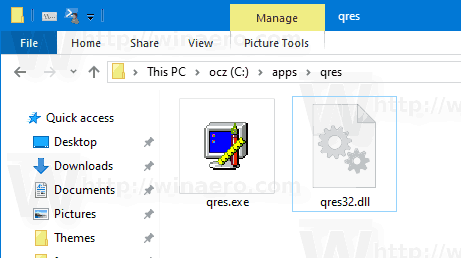
QRes is a small application that allows changing screen mode with command line arguments. It can change color depth, screen resolution, and the refresh rate. The core application qres.exe is a small (32 kB) executable file.
Change Display Refresh Rate in Windows 10 from Command Prompt
- Download Qres from HERE.
- Extract the archive contents to a convenient folder, e.g. c:\apps\qres.
- Unblock the files.
- Open a new command prompt in the destination folder.
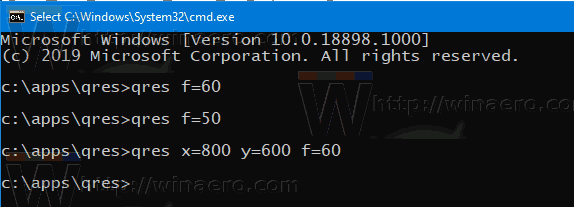
- Type the command: qres f=60 to set the screen refresh rate to 60Hz. Replace 60 with the desired value supported by your display.
- Finally, you can use qres to change screen resolution, by running a command like this qres x=800 y=600 f=75 . This will set the 800×600 resolution and the 75Hz refresh rate.
So, with QRes you can create a shortcut to change your screen resolution and/or its refresh rate, or use it in a batch file for various automation scenarios.
Winaero greatly relies on your support. You can help the site keep bringing you interesting and useful content and software by using these options:
Share this post
About Sergey Tkachenko
Sergey Tkachenko is a software developer from Russia who started Winaero back in 2011. On this blog, Sergey is writing about everything connected to Microsoft, Windows and popular software. Follow him on Telegram, Twitter, and YouTube.


