Run-Command

This utility is an alternative to the default Windows Run dialogue available on PCs. It is more comprehensive, reliable, and effective than the default program on your PC for running programs or opening of files. Already, your PC comes with a built-in tool for this purpose and as such the developers of this tool have made to be a portable app so that you won’t have to install it on your PC before you can make use of it; simply get the app installed on your removable drive, then insert the drive on any PC and run this app without going through the traditional installation means.
Interestingly, this utility features shortcuts to popular PC utilities like the CPanel, Task Manager, and Regedit. It even comes with a more comfortable and intuitive interface that the built-in program. Also, the app won’t obstruct any current open window because it launches in the system tray menu. Interestingly, all programs you launch from this command utility will open with administrative rights. Plus, you can utilize command-line controls when using this app to run programs or browse files. However, you need to add “services.msc” command if you intend running Windows Services Utilities with this app. Generally, it is better than the inbuilt Run program on Windows.
Run-Command is licensed as freeware for PC or laptop with Windows 32 bit and 64 bit operating system. It is in launchers & shutdown category and is available to all software users as a free download.
Download Windows 10
Before updating, please refer to the Windows release information status for known issues to confirm your device is not impacted.
Windows 10 October 2020 Update
The Update Assistant can help you update to the latest version of Windows 10. To get started, click Update now.
Create Windows 10 installation media
To get started, you will first need to have a license to install Windows 10. You can then download and run the media creation tool. For more information on how to use the tool, see the instructions below.

Here’s when to use these instructions:
- You have a license to install Windows 10 and are upgrading this PC from Windows 7 or Windows 8.1.
- You need to reinstall Windows 10 on a PC you’ve already successfully activated Windows 10.
If you are installing Windows 10 on a PC running Windows XP or Windows Vista, or if you need to create installation media to install Windows 10 on a different PC, see Using the tool to create installation media (USB flash drive, DVD, or ISO file) to install Windows 10 on a different PC section below.
Note: Before you install Windows 10, check to make sure your PC meets the system requirements for Windows 10. We also recommend going to the PC manufacturer’s website for any additional info about updated drivers and hardware compatibility.
- Select Download tool, and select Run. You need to be an administrator to run this tool.
- On the License terms page, if you accept the license terms, select Accept.
- On the What do you want to do? page, select Upgrade this PC now, and then select Next.
After downloading and installing, the tool will walk you through how to set up Windows 10 on your PC. All Windows 10 editions are available when you select Windows 10, except for Enterprise edition. For more information on Enterprise edition, go to the Volume Licensing Service Center.
- If you don’t have a license to install Windows 10 and have not yet previously upgraded to it, you can purchase a copy here: https://www.microsoft.com/en-us/windows/get-windows-10.
- If you previously upgraded to Windows 10 on this PC and you’re reinstalling it, you don’t need to enter a product key. Your copy of Windows 10 will automatically activate later using your digital license.
Follow these steps to create installation media (USB flash drive or DVD) you can use to install a new copy of Windows 10, perform a clean installation, or reinstall Windows 10.
Before you download the tool make sure you have:
- An internet connection (internet service provider fees may apply).
- Sufficient data storage available on a computer, USB or external drive for the download.
- A blank USB flash drive with at least 8GB of space or blank DVD (and DVD burner) if you want to create media. We recommend using a blank USB or blank DVD, because any content on it will be deleted.
- When burning a DVD from an ISO file, if you are told the disc image file is too large you will need to use Dual Layer (DL) DVD Media.
Check a few things on the PC where you want to install Windows 10:
- 64-bit or 32-bit processor (CPU). You’ll create either a 64-bit or 32-bit version of Windows 10. To check this on your PC, go to PC info in PC settings or System in Control Panel, and look for System type.
- System requirements. Make sure the PC meets the system requirements for Windows 10. We also recommend going to the PC manufacturer’s website for additional info about updated drivers and hardware compatibility.
- Language in Windows. You’ll need to choose the same language when you install Windows 10. To see what language you’re currently using, go to Time and language in PC settings or Region in Control Panel.
- Edition of Windows. You should also choose the same edition of Windows. To check what edition you’re currently running, go to PC info in PC settings or System in Control Panel, and look for Windows edition. Windows 10 Enterprise isn’t available in the media creation tool. For more info, go to the Volume Licensing Service Center.
- Microsoft Office products. If you just purchased a new device that includes Office 365, we recommend redeeming (installing) Office before upgrading to Windows 10. To redeem your copy of Office, please see Download and install Office 365 Home, Personal, or University on your PC. For more information, check How to upgrade to Windows 10 on new devices that include Office 365.
If you have Office 2010 or earlier and choose to perform a clean install of Windows 10, you will need to locate your Office product key. For tips on locating your product key, check Find your Office 2010 product key or Enter the product key for your Office 2007 program.
Using the tool to create installation media:
- Select Download tool now, and select Run. You need to be an administrator to run this tool.
- If you agree to the license terms, select Accept.
- On the What do you want to do? page, select Create installation media for another PC, and then select Next.
Select the language, edition, and architecture (64-bit or 32-bit) for Windows 10. This table will help you decide which edition of Windows 10 you’ll choose:
| Your current edition of Windows | Windows 10 edition |
|---|---|
| Windows 7 Starter Windows 7 Home Basic Windows 7 Home Premium Windows 7 Professional Windows 7 Ultimate Windows 8/8.1 Windows 8.1 with Bing Windows 8 Pro Windows 8.1 Pro Windows 8/8.1 Professional with Media Center Windows 8/8.1 Single Language Windows 8 Single Language with Bing Windows 10 Home Windows 10 Pro | Windows 10 |
| Windows 8/8.1 Chinese Language Edition Windows 8 Chinese Language Edition with Bing | Windows 10 Home China |
- USB flash drive. Attach a blank USB flash drive with at least 8GB of space. Any content on the flash drive will be deleted.
- ISO file. Save an ISO file to your PC, which you can use to create a DVD. After the file is downloaded, you can go to location where the file is saved, or select Open DVD burner, and follow the instructions to burn the file to a DVD. For more info about using an ISO file, see Additional methods for using the ISO file to install Windows 10 section below.
After completing the steps to install Windows 10, please check that you have all the necessary device drivers installed. To check for updates now, select the Start button, and then go to Settings > Update & Security > Windows Update, and select Check for updates. You may also wish to visit your device manufacturer’s support site for any additional drivers that may be needed.
Note: Drivers for Surface devices may be found on the Download drivers and firmware for Surface page.
Before you install Windows 10, it’s a good idea to save any work and back up your PC before you start. If you used the media creation tool to download an ISO file for Windows 10, you’ll need to burn it to a DVD before following these steps.
- Attach the USB flash drive or insert the DVD on the PC where you want to install Windows 10.
- Restart your PC.
If your PC does not automatically boot to the USB or DVD media, you might have to open a boot menu or change the boot order in your PC’s BIOS or UEFI settings. To open a boot menu or change the boot order, you’ll typically need to press a key (such as F2, F12, Delete, or Esc) immediately after you turn on your PC. For instructions on accessing the boot menu or changing the boot order for your PC, check the documentation that came with your PC or go to the manufacturer’s website. If you do not see the USB or DVD media device listed within the boot options, you may need to reach out to the PC manufacturer for instructions for temporarily disabling Secure Boot in your BIOS settings.
If changing the boot menu or order doesn’t work, and your PC immediately boots into the OS you want to replace, it is possible the PC had not fully shut down. To ensure the PC fully shuts down, select the power button on the sign-in screen or on the Start menu and select Shut down.
If you downloaded an ISO file for Windows 10, the file is saved locally at the location you selected. If you have a third-party DVD burning program installed on your computer that you prefer to use for creating the installation DVD, that program might open by going to the location where the file is saved and double-clicking the ISO file, or right-click the ISO file, select Open with and choose your preferred DVD burning software.
If you want to use the Windows Disk Image Burner to create an installation DVD, go to the location where the ISO file is saved. Right-click the ISO file and select Properties. On the General tab, click Change and select Windows Explorer for the program you would like to use to open ISO files and select Apply. Then right-click the ISO file and select Burn disc image.
If you want to install Windows 10 directly from the ISO file without using a DVD or flash drive, you can do so by mounting the ISO file. This will perform an upgrade of your current operating system to Windows 10.
Configure and allow Windows 10 to run Specified Programs only
In certain situations, you might want to allow others to run only programs you specify on your computer. What you need is the Windows Group Policy Editor (which is available in Professional and above versions of Windows). To open Group Policy Editor, press the Start button, type gpedit.msc, and press Enter.
Run only specified Windows Applications
Explore down to User Configuration > Administrative Templates > System in the left pane.
Now double click Run only specified Windows Applications.
From the checkbox, select Enabled. To set the allowed applications, click Show from under Options.
Now click right next to the star (*) under Value and enter the name of the applications which you want to run. For example if you want to run Firefox, enter firefox.exe.
This setting will limit the Windows programs that users have permission to run on the computer. If you enable this setting, users can only run programs that you add to the List of Allowed Applications.
Click OK and you are done. Now the user will only be able to open the programs you specify this way.
Do note that this setting only prevents users from running programs that are started by the Windows Explorer process. It does not prevent users from running programs such as Task Manager, which are started by the system process or by other processes. Also, if users have access to the command prompt, Cmd.exe, this setting does not prevent them from starting programs in the command window that they are not permitted to start by using Windows Explorer.
Incidentally, you might want to check out Windows Program Blocker, a free App or Application blocker software to block software from running on Windows 10/8/7.
Autoruns for Windows v13.98
By Mark Russinovich
Published: June 24, 2020
 Download Autoruns and Autorunsc (2.5 MB)
Run now from Sysinternals Live.
Introduction
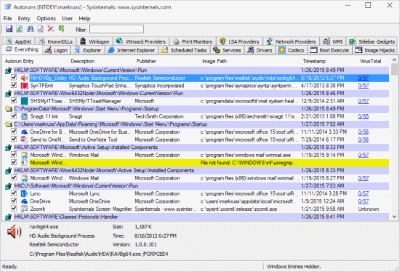
This utility, which has the most comprehensive knowledge of auto-starting locations of any startup monitor, shows you what programs are configured to run during system bootup or login, and when you start various built-in Windows applications like Internet Explorer, Explorer and media players. These programs and drivers include ones in your startup folder, Run, RunOnce, and other Registry keys. AutorunsВ reports Explorer shell extensions, toolbars, browser helper objects, Winlogon notifications, auto-start services, and much more.В Autoruns goes way beyond other autostart utilities.
Autoruns‘В Hide Signed Microsoft EntriesВ option helps you to zoom in on third-party auto-starting images that have been added to your system and it has support for looking at the auto-starting images configured for other accounts configured on a system. Also included in the download package is a command-line equivalent that can output in CSV format, Autorunsc.
You’ll probably be surprised at how many executables are launched automatically!
Screenshot
Usage
Simply runВ AutorunsВ and it shows you the currently configured auto-start applications as well as the full list of Registry and file system locations available for auto-start configuration. Autostart locations displayed by Autoruns include logon entries, Explorer add-ons, Internet Explorer add-ons including Browser Helper Objects (BHOs), Appinit DLLs, image hijacks, boot execute images, Winlogon notification DLLs, Windows Services and Winsock Layered Service Providers, media codecs, and more. Switch tabs to view autostarts from different categories.
To view the properties of an executable configured to run automatically, select it and use theВ PropertiesВ menu item or toolbar button. If Process ExplorerВ is running and there is an active process executing the selected executable then theВ Process ExplorerВ menu item in theВ EntryВ menu will open the process properties dialog box for the process executing the selected image.
Navigate to the Registry or file system location displayed or the configuration of an auto-start item by selecting the item and using theВ JumpВ to Entry menu item or toolbar button, and navigate to the location of an autostart image.
To disable an auto-start entry uncheck its check box. To delete an auto-start configuration entry use theВ DeleteВ menu item or toolbar button.
The Options menu includes several display filtering options, such as only showing non-Windows entries, as well as access to a scan options dialog from where you can enable signature verification and Virus Total hash and file submission.
Select entries in theВ UserВ menu to view auto-starting images for different user accounts.
More information on display options and additional information is available in the on-line help.
Autorunsc Usage
Autorunsc is the command-line version of Autoruns. Its usage syntax is:
Usage: autorunsc [-a ] [-c|-ct] [-h] [-m] [-s] [-u] [-vt] [[-z ] | [user]]]
| Parameter | Description |
|---|---|
| -a | Autostart entry selection: |
| * | All. |
| b | Boot execute. |
| d | Appinit DLLs. |
| e | Explorer addons. |
| g | Sidebar gadgets (Vista and higher) |
| h | Image hijacks. |
| i | Internet Explorer addons. |
| k | Known DLLs. |
| l | Logon startups (this is the default). |
| m | WMI entries. |
| n | Winsock protocol and network providers. |
| o | Codecs. |
| p | Printer monitor DLLs. |
| r | LSA security providers. |
| s | Autostart services and non-disabled drivers. |
| t | Scheduled tasks. |
| w | Winlogon entries. |
| -c | Print output as CSV. |
| -ct | Print output as tab-delimited values. |
| -h | Show file hashes. |
| -m | Hide Microsoft entries (signed entries if used with -v). |
| -s | Verify digital signatures. |
| -t | Show timestamps in normalized UTC (YYYYMMDD-hhmmss). |
| -u | If VirusTotal check is enabled, show files that are unknown by VirusTotal or have non-zero detection, otherwise show only unsigned files. |
| -x | Print output as XML. |
| -v[rs] | Query VirusTotal for malware based on file hash. Add ‘r’ to open reports for files with non-zero detection. Files reported as not previously scanned will be uploaded to VirusTotal if the ‘s’ option is specified. Note scan results may not be available for five or more minutes. |
| -vt | Before using VirusTotal features, you must accept the VirusTotal terms of service. If you haven’t accepted the terms and you omit this option, you will be interactively prompted. |
| -z | Specifies the offline Windows system to scan. |
| user | Specifies the name of the user account for which autorun items will be shown. Specify ‘*’ to scan all user profiles. |
Related Links
- Windows Internals Book The official updates and errata page for the definitive book on Windows internals, by Mark Russinovich and David Solomon.
- Windows Sysinternals Administrator’s Reference The official guide to the Sysinternals utilities by Mark Russinovich and Aaron Margosis, including descriptions of all the tools, their features, how to use them for troubleshooting, and example real-world cases of their use.
Download
Download Autoruns and Autorunsc (2.5 MB)
Run now from Sysinternals Live.


