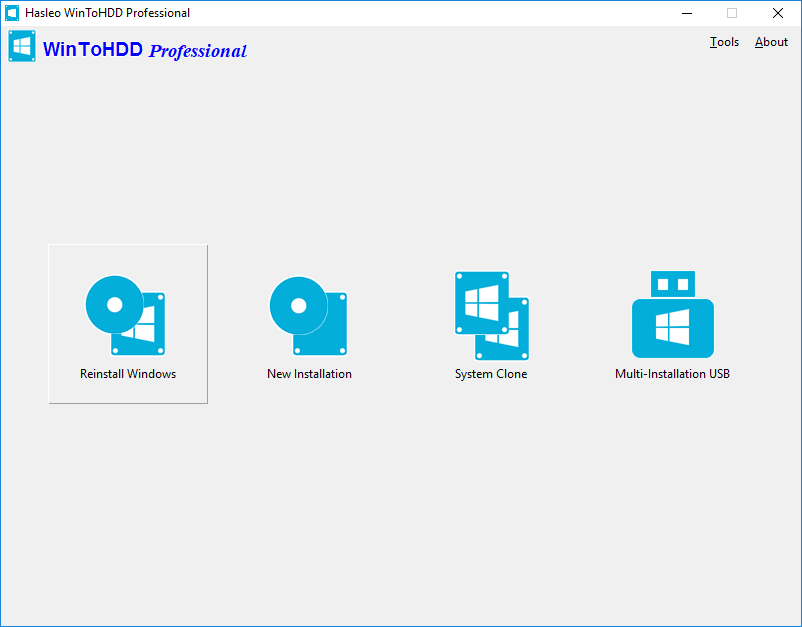
How to Reinstall Windows without using a CD/DVD or USB drive?
If you have a Windows 10/8.x/7/vista installation ISO/WIM/ESD/SWM, a VHD/VHDX file which have Windows 10/8.x/7/vista installed, or a Windows 10/8.x/7/vista installation CD/DVD, you can use free Windows deployment tool WinToHDD to reinstall Windows. With this feature, even if you know nothing about computer technology, you can also use it to reinstall the Windows operating system.
Tutorial to Reinstall Windows without using a CD/DVD or USB drive.
Step 1. Run WinToHDD, then click the «Reinstall Windows» button.
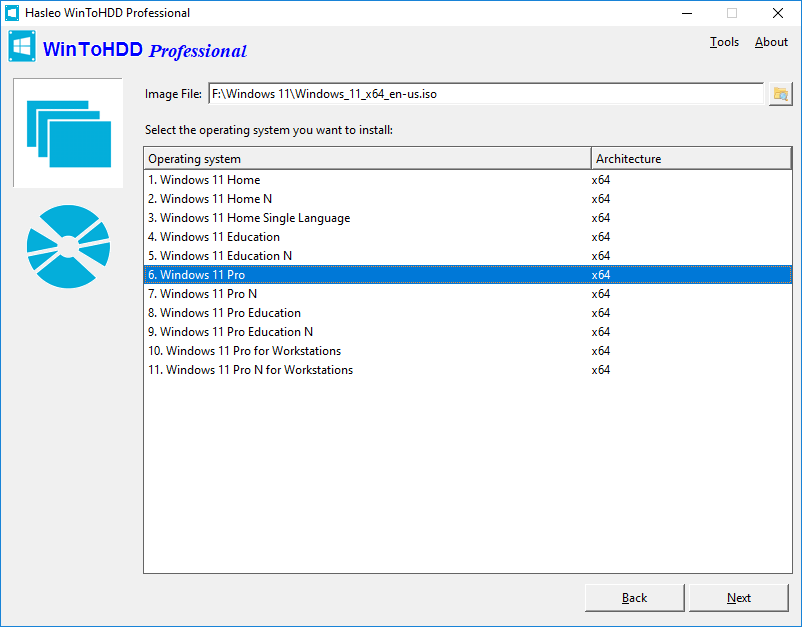
Step 2. Please use the following guidelines to prepare your installation source.
- Installing from an ISO/WIM/ESD/SWM/VHD/VHDX File: Click the button, then click the button and select the ISO/WIM/ESD/SWM/VHD/VHDX file from the open dialog box.
- Installing from a DVD drive: Insert the Windows installation CD/DVD into your CD/DVD drive. Once the CD/DVD is being detected in Windows, then click button and select the CD/DVD drive in the drop-down list. If your CD/DVD drive is not correctly recognized by WinToHDD, you need to click the button for the program to recognize the CD/DVD drive.
Step 3. WinToHDD scans for and lists installable operating systems. If you see the edition of Windows you want to install, select it, then click «Next».
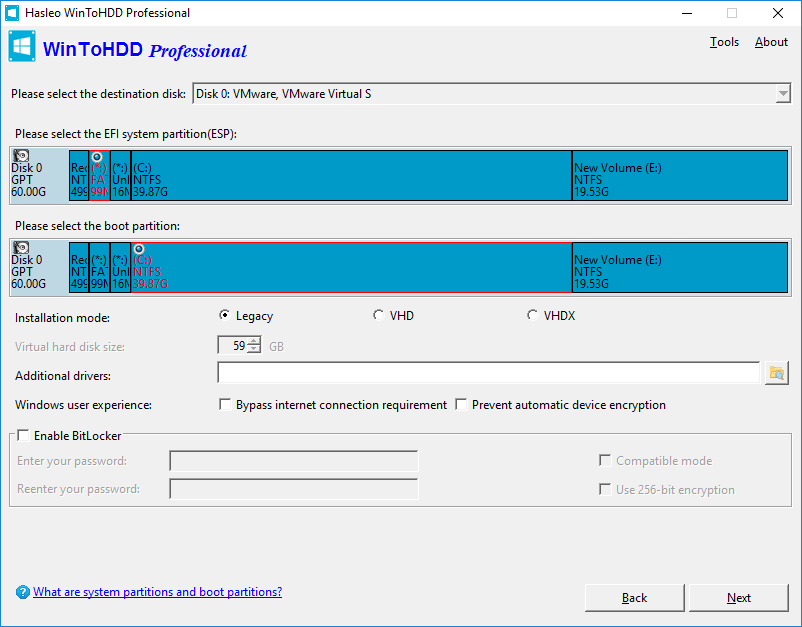
Step 4. WinToHDD will automatically select the target boot partition and system partition from the partition list, and the selected partitions will be marked as red.
 Tips:
Tips:
- The «Legacy» installation mode installs Windows directly into the boot partition on the drive, and the VHD/VHDX installation mode installs Windows on the VHD/VHDX file that is stored in the boot partition.
- If you want to encrypt boot partition using BitLocker, tick the «Enable BitLocker» check box and enter encryption password. You can also specify the encryption mode and encryption strength here.
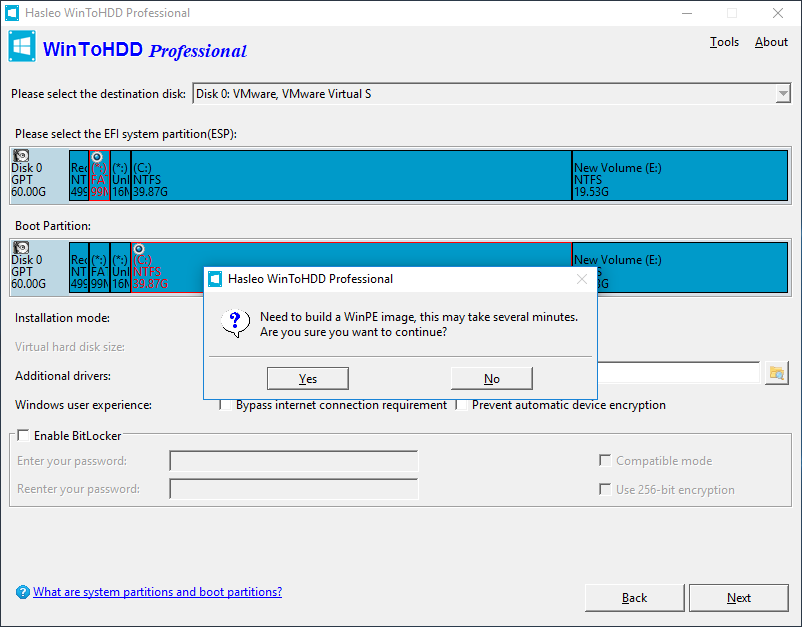
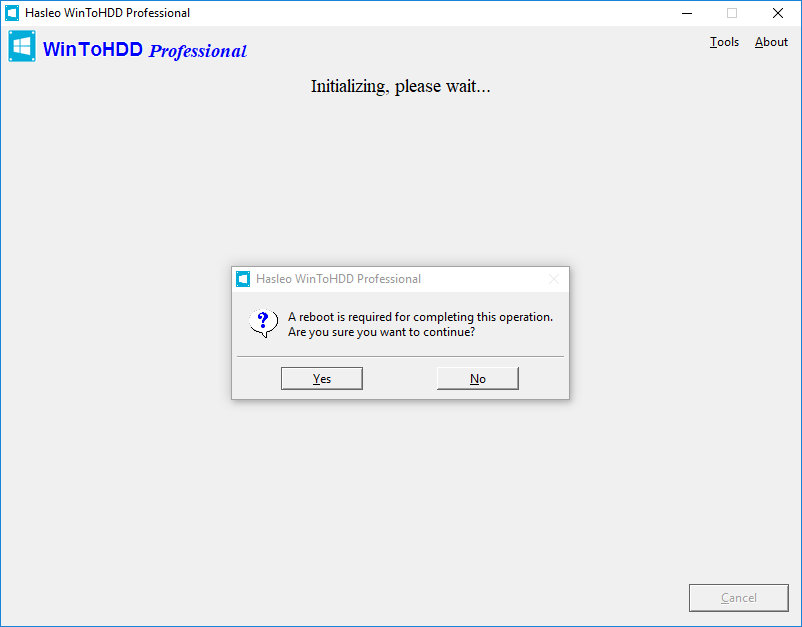
Step 5. Click «Next». After clicking «Next», a pop-up will appear asking you if you want to build a WinPE image to continue. Click «Yes».
Step 6. After successfully builded the WinPE image, WinToHDD will prompt you to reboot the computer, click «Yes» button to allow WinToHDD to reboot your computer.
Step 7. It takes some time to reinstall Windows. After successfully reinstalled restart the computer, Windows installation starts up and you have to complete all the installation steps.
Follow these simple steps, you can reinstall Windows with free Windows deployment tool WinToHDD easily.
How to reinstall Windows 7 without losing all my data and installed programs? Step by step guide 2020

On many occasions computers begin to present errors in their operating system, all this requires that it is necessary to format the computer in order to try improve its performance and make it work better.
Previously executing this whole process was a task that could only be carried out by professionals in the area of computer science and who had a broad knowledge of the subject. However, all this has been changing and today it can be done by anyone who handles the basic knowledge on the subject.
According to this, here we will explain how you can reinstall Windows 7 without losing the data and programs installed on the computer.
It has become very common for most users to eventually have to reinstall their Windows in order to improve computer performance. Taking into account that after a period of time the performance of the equipment is reduced either by the amount of garbage programs that are installed on it , virus, system errors, among others, which cause the operating system to malfunction.
The most frequent causes that can lead you to make the decision to execute a format on your PC can be the following:
- Stop errors occur, such as the blue screen or black screen that are caused by driver errors.
- Your team is constantly shutting down suddenly.
- It restarts unexpectedly .
- Submit a large number of viruses difficult to eliminate .
- The computer performance is well below expected.
- Operation the system is very slow .
It is important to keep in mind that most of these problems are usually due to problems with hardware or software and that they are usually very difficult to solve . Therefore, in these types of cases the most advisable thing is to reinstall the factory operating system and thus eliminate all those files and programs that cause a delay or malfunction of the PC.
Mainly recommended reinstall W7 every 8 or 12 months in order to maintain the PC performance in the best way, this will ensure that the machine works from the best possible way compared to how it would work if this process was not done constantly.
It should be mentioned that this process has been greatly simplified in recent years and therefore can be carried out by any user without the need to be a professional in the area. That is why here We explain what are the steps to follow to reinstall W7 after format the computer .
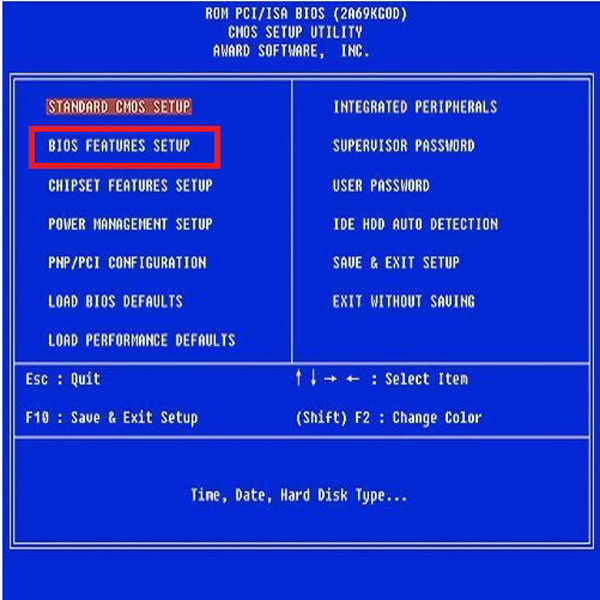
- The first thing will be turn on your computer, as soon as text appears on the screen press simultaneously the keys “DEL”and “DELETE” > to be able to enter the BIOS . On some occasions you can also access the BIOS by pressing F1, F2 or F10.
- Now look in the menu that appears on the screen the option of “Boot Order “ or any other similar one like ” Advance BIOS Features “, these could be found in the ” Advanced options “.
- Then select the “Firt Boot Device” tab and then choose the option of CD / DVD so that the machine can log in from the CD . In this case it is important to ensure that these options are met: “Second Boot Device: Floopy” and “Third Boot Device: HDD-0”.
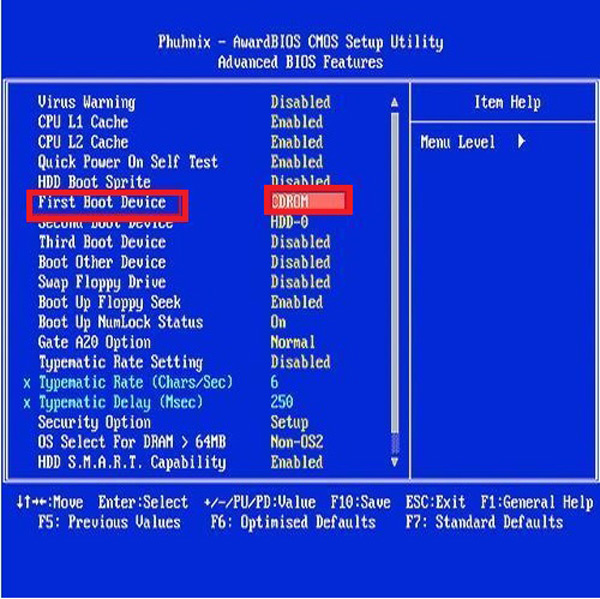
- Save the changes made by pressing the F10 key . This will allow you to keep the settings that have been set.
- Press “Escape” to exit the menu, here you will have to press “Y” when you a window appears for “Save changes.” And then your machine will restart.
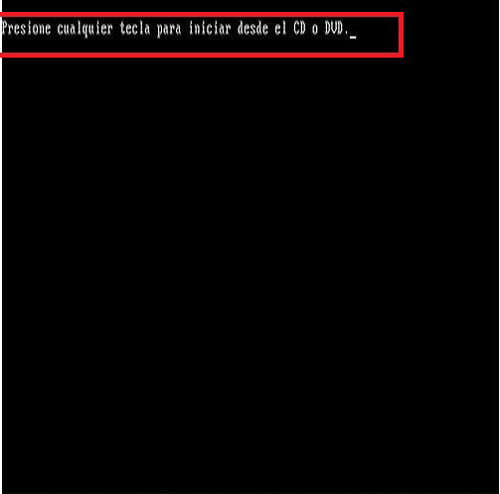
- When the computer has restarted, the following will be to insert the “Windows 7 installation CD” and wait a few seconds while the machine recognizes it.

- Now press any key “Start the computer from the CD”.
- Fill in the form that appears on the screen to indicate the language, the time format and the keyboard method , to finish click “Continue”:

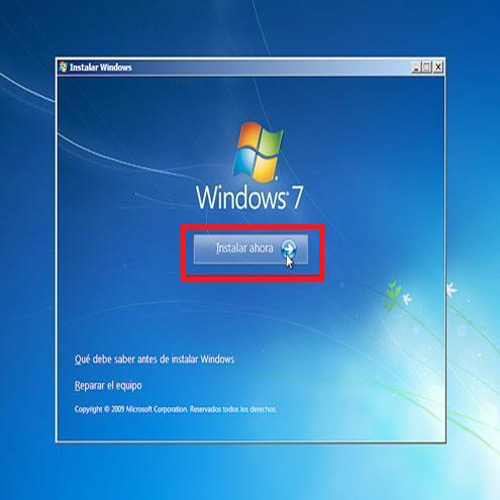
- In the new window select “Install now” and accept the Microsoft Windows license agreement to move forward.
- Here two options appear on the screen, you select the first “Upgrade”, in this way the device will start to perform the installation of W7 .

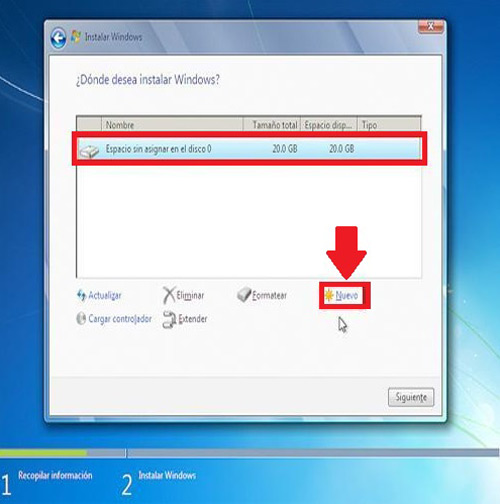
- Here you select “Custom” for a completely clean installation. Then click on “New” and separate the primary Unit C into two partitions for added security.
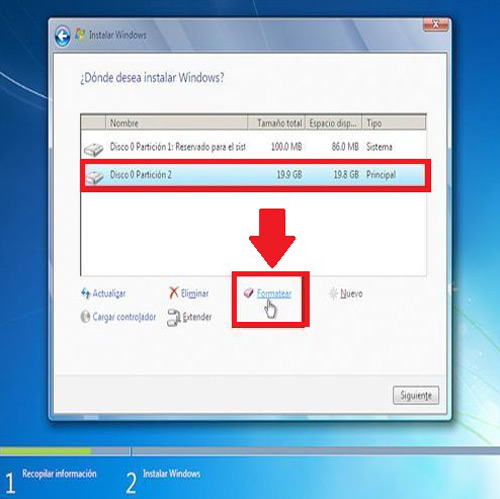
- Next create the secondary partition (Unit D) and click on furtherFormatear.
- Wait a few seconds while updates and features are installed of the operating system.

- You will have to write some data such as creating a username and password, also write the product key , the latter is not mandatory. Therefore, if you don’t have it, you can click on “Next”.

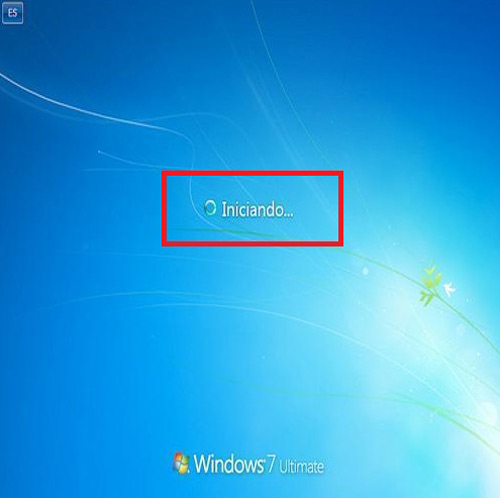
- Now wait a few seconds while loading the welcome page.
- Upon reaching this point you will have successfully completed the process and you can start enjoying your new W7 operating system.

It is highly recommended to perform a new installation of Windows on your computer in order to make it look like new. In addition, this allows to improve its performance considerably.
However, every time you want to format and reinstall Windows all this takes a series of processes to be able to leave the personalized and impeccable PC as you want. Therefore, it will be necessary to configure programs, files, settings , among others in order to keep all this data that you do not want to delete.
In this way, here are some tips to help you make a backup so you can restore them to the new system.
Before reinstalling the operating system it is necessary to know very well that programs are installed on the PC and which of them are really important to keep, as well as photo files, videos, documents, among others. So that all this can be included again in the new system.
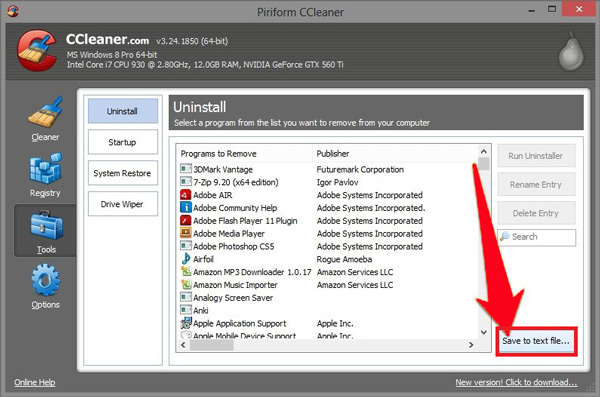
One of the easiest ways to do this is through CCLeaner, to do this, follow these steps:
- Install CCLeaner (below you will find the download link).
- Go to the option of “Tools” located on the left sidebar of your screen.
- Now click on “Save text files” located on the bottom right. There you have to select what you want to keep.
- Finally, save the file to a USB memoryor in the cloud storage as Drive, Dropbox , among others. This way you will have it available for when you install the new W7.
Next, it will be necessary to perform a backup of the Windows settings and the different programs installed on the computer . In order to perform the backup it is recommended to use Easy Tranfer, a specialized program for this type of occasion.
In this case it is necessary to perform these steps:
- Install Easy Transfer on your computer (download link below).
- There will appear a brief description of the steps to follow and click on “Next.”
- Now select an external hard drive or a USB drive for the files.
- You can define this like your old PC, and the data will be searched for backup.
- You can click on “Customize” to modify the selection. In this case it is recommended to uncheck all and only check the boxes of what you really need to do the backup.
Once this is done, the next thing will be to go to the backup part of the program data, only those we want to keep once the computer is formatted. Note that programs often store their settings in different locations. In this case it is important that you review areas such as the following: AppData folder, My Documents, Programs Files, Games, Registry, among others.
When you already have all the necessary information in the backups, then you can start to install the operating system again . To do this you must insert the W7 installation disc and boot it from CD / DVD and follow all the instructions already explained above.
Once W7 is installed again, it’s time to start restoring everything. To do this you reopen Easy Transfer in its new installation, you connect the USB drive with all the files that were stored. Now you select “This is my new team.”
Here the information that was stored and the Windows settings will be restored if it has also been stored, this will prevent you from having to configure everything again.
The following is restore W7 apps and programs , it is best to save all .exe of favorite programs in a external memory or storage of the cloud , so you can easily access them and install them on the computer you want.
In the case of the applications that were backed up you simply have to open the folders in their original locations of the AppData files. In the case of wanting to install the program only, we double click on it and all its configurations will be added to the new system and it will remain as if it had never been removed.
If, on the other hand, you want to recover all the information if you lose nothing, you only have to restore the “Previous Registry”, click on its. reg and if any problem during backup simply reboot the PC.


