- Create a recovery drive
- Create a USB recovery drive
- To create a USB recovery drive
- Создание USB-накопителя восстановления
- Создание USB-накопителя восстановления
- How to Create Windows 7 Recovery USB Drive Effortlessly? (2 Ways)
- Need to create Windows 7 recovery USB
- Create Windows 7 recovery USB drive from ISO
- Alternative way to create Windows 7 recovery USB drive
- Boot from Windows 7 recovery USB drive
- Conclusion
Create a recovery drive
It’s a good idea to create a recovery drive. That way, if your PC ever experiences a major issue such as hardware failure, you’ll be able to use the recovery drive to reinstall Windows 10. Windows updates to improve security and PC performance periodically so it is recommended to recreate the recovery drive annually. Personal files and any applications that did not come with your PC will not be backed up. You’ll need a USB drive that’s at least 16 gigabytes.
Warning: Use an empty USB drive because this process will erase any data that’s already stored on the drive.
To create a recovery drive in Windows 10:
In the search box next to the Start button, search for Create a recovery drive and then select it. You might be asked to enter an admin password or confirm your choice.
When the tool opens, make sure Back up system files to the recovery drive is selected and then select Next.
Connect a USB drive to your PC, select it, and then select Next.
Select Create. Many files need to be copied to the recovery drive, so this might take a while.
If you ever need to use the recovery drive to reinstall Windows 10 on your PC, see Recovery options in Windows 10 for further instructions. It’s a good idea to back up your files frequently because the recovery drive isn’t a system image. It doesn’t contain your personal files, settings, or programs.
Need more options for creating a recovery drive?
To download Windows 10 installation media, see Recovery options in Windows 10.
Create a USB recovery drive
If you run into problems with your PC running Windows, a USB recovery drive can help you troubleshoot and fix those problems, even if your PC won’t start.
Your PC might have come with a recovery image that’s used to refresh or reset your PC. The recovery image is stored on a dedicated recovery partition on your PC, and is typically 3 to 6 GB in size. To save space on your PC, you can delete the recovery image from your PC and use a recovery drive instead. Windows 8.1 includes a built-in tool to create a USB recovery drive. Windows will let you know how big the recovery partition is, and you’ll need a USB flash drive at least that big.
Warning: Creating a recovery drive will erase anything already stored on your USB flash drive. Use an empty USB flash drive or make sure to transfer any important data from your USB flash drive to another storage device before using it to create a USB recovery drive.
To create a USB recovery drive
Swipe in from the right edge of the screen, and then tap Search. (If you’re using a mouse, point to the lower-right corner of the screen, move the mouse pointer up, and then click Search.)
Enter recovery drive in the search box, and then select Create a recovery drive.
After the recovery drive tool opens, make sure the Copy the recovery partition from the PC to the recovery drive check box is selected, and then select Next.
Note: The check box is greyed out when your PC doesn’t have a recovery partition. The recovery drive will include only the recovery tools and a bootable image, but not a recovery image to use for refreshing or resetting your PC.
Insert a USB flash drive into your PC that’s at least as large as the size indicated on the screen.
Select the USB drive you’d like to use for your recovery drive, then select Next.
Select Create. The recovery image and necessary recovery tools will be copied to your USB flash drive, which will take a while, depending on your PC and the size of the recovery image.
When the process is done, do one of the following:
If you want to keep the recovery partition on your PC, select Finish.
If you want to remove the recovery partition from your PC and free up disk space, select Delete the recovery partition. Then select Delete. This will free up the disk space used to store your recovery image. When the removal is done, select Finish.
Note: Some PCs don’t offer the option to remove a recovery partition. If you experience this, there isn’t a recovery partition on your PC that’s using additional disc space.
Remove the USB flash drive. This is now your Windows 8.1 recovery drive, and you’ll need it if you ever need to refresh or reset your PC. Keep it in a safe place and don’t use it to store other files or data.
Note: If your PC came with Windows 8 and you upgraded it to Windows 8.1, your recovery drive will include Windows 8, and you’ll need to upgrade to Windows 8.1after you refresh or reset your PC.
Создание USB-накопителя восстановления
USB-накопитель восстановления поможет выявить и устранить проблемы с компьютером под управлением Windows даже в случае, когда компьютер не запускается.
Возможно, ваш компьютер поставлялся с образом восстановления, который используется для обновления или сброса компьютера. Образ для восстановления хранится на диске компьютера в специальном разделе восстановления и обычно занимает 3–6 ГБ. Чтобы сэкономить место на диске, можно удалить с компьютера образ для восстановления и использовать вместо него диск восстановления. Windows 8.1 включает встроенные средства для создания диска для восстановления USB. Windows поможет вам узнать, насколько сильно разделом восстановления, и вам понадобится USB флэш-накопитель по крайней мере.
Предупреждение: При создании накопителя восстановления будут стерты все данные, имеющиеся на USB-устройстве флэш-памяти. Перед созданием USB-накопителя восстановления скопируйте с него все важные данные на другое запоминающее устройство либо используйте пустое USB-устройство флэш-памяти.
Создание USB-накопителя восстановления
Выполните прокрутку от правого края экрана и нажмите кнопку Поиск. (Если вы используете мышь, переместите указатель в правый нижний угол экрана, потом вверх, а затем щелкните Поиск.)
Введите в поле поиска диск восстановления, а затем выберите пункт Создание диска восстановления.
После того как откроется средство создания диска восстановления, установите флажок Выполнить резервное копирование системных файлов на диск восстановления и нажмите кнопку Далее.
Примечание: Если на компьютере нет раздела восстановления, то этот значок будет недоступен. На диске восстановления будут только средства восстановления и загрузочный образ, но не будет образа для восстановления компьютера или возврата его в исходное состояние.
Вставьте USB-устройство флэш-памяти в компьютер. Необходимо, чтобы оно имело не меньший размер, чем указанный на экране.
Выберите USB-накопитель, который вы хотите использовать в качестве накопителя восстановления, а затем нажмите кнопку Далее.
Нажмите Создать. Изображение для восстановления и необходимые средства восстановления будут скопированы на USB-устройство, что займет некоторое время, в зависимости от вашего компьютера и размера образа восстановления.
По завершении процесса выполните следующее:
Если вы хотите сохранить раздел восстановления на компьютере, нажмите кнопку Готово.
Если вы хотите удалить раздел восстановления с компьютера и освободить место на диске, выберите пункт Удаление раздела восстановления. Затем нажмите кнопку Удалить. В результате на диске освободится место, которое занимал образ для восстановления. По окончании удаления нажмите кнопку Готово.
Примечание: Некоторые компьютеры не предлагают удалить раздел восстановления. Это значит, что на компьютере нет раздела восстановления, на хранение которого уходит часть места на диске.
Извлеките USB-устройство флэш-памяти. Это диск восстановления Windows 8.1, и вам понадобится его, если вам потребуется обновить или сбросить компьютер. Храните накопитель в безопасном месте и не используйте его для хранения других файлов и данных.
Примечание: Если ваш компьютер поставлялся с Windows 8 и вы обновили его на Windows 8.1, диск восстановления будет включать Windows 8, и вам потребуется выполнить обновление до Windows 8.1 после обновления или сброса компьютера.
How to Create Windows 7 Recovery USB Drive Effortlessly? (2 Ways)
It’s wise to learn to create Windows 7 recovery USB drive, which can help you to repair or restore your system if your computer fails to boot.

By Bryce  / Last Updated January 4, 2021
Quick Navigation:
Need to create Windows 7 recovery USB
If you encountered with serious events like system crashes during using Windows 7 computer, you can use system repair disc to fix these problems or reinstall system. Thus, it is reasonable to create a system repair disc via Windows Backup and Restore utility at first. But in this method, the media can only be CD or DVD. Obviously, this way is not suitable for users without CD/DVD.
At this point, you can create Windows 7 recovery USB drive. If you don’t have created recovery USB before your system running into problems, you can make a recovery USB drive from another computer.
Create Windows 7 recovery USB drive from ISO
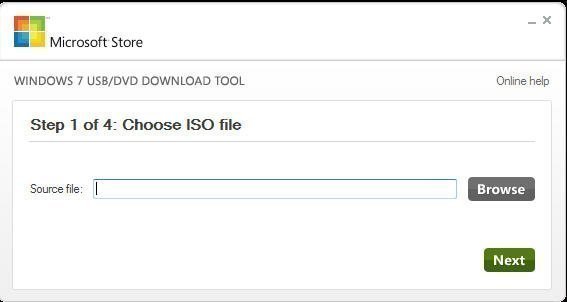
Before starting creating recovery USB via ISO, make sure that the following things are at your hand: ISO image file, USB drive and Windows 7 USB/DVD Download Tool. Then, have a closer look at how to create Windows 7 recovery USB drive.
Step 1. Plug your USB flash drive and run Windows 7 USB DVD Download Tool, click “Browse” button to choose your source file. Then, click “Next».
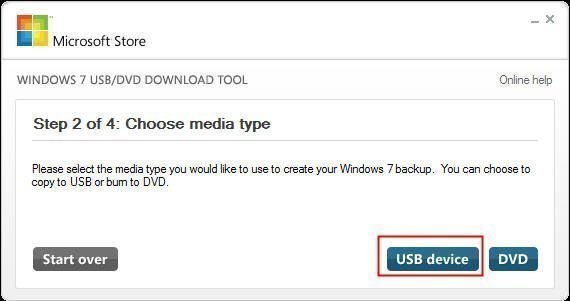
Step 2. Choose USB device as your media type.
Step 3. Insert your USB drive to the working computer and select it. Then, click “Begin copying”. When the whole process finishes, you can get a recovery USB drive.
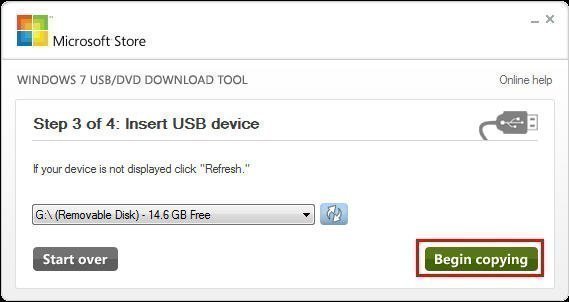
PS: Your USB will be formatted during this process. It is recommended to backup important files on it.
Alternative way to create Windows 7 recovery USB drive
It’s not hard to create a Windows 7 repair USB drive from ISO. However, this drive can’t be used for Windows versions that are different from the Windows version of the Windows ISO file. In other words, a Windows 7 recovery USB cannot be used to repair a computer running Windows 10 and a recovery USB from Windows 7 64bit is unable to repair Windows 7 32bit operating system.
To boot any version of Windows 10/8/7, you can turn to third party software like AOMEI Backupper Standard to create bootable media with USB drive. Apart from creating bootable media, AOMEI Backupper can:
в—‰ Backup and restore Windows system, disks, partitions, or specific files.
в—‰ You are allowed to save backup images on a local disk, external hard drive, network share, or cloud service, etc.
в—‰ It offers you various schedule modes including Daily, Weekly, Monthly, Event triggers and USB plug in to make a backup. To use the Event triggers and USB plug in modes, you need to use AOMEI Backupper Professional version.
If your system is unable to boot, you can boot your computer from created bootable device and restore system to normal status using system backup file. Have a look at how it works.
Step 1. Connect USB drive to your working computer and make sure that it can be detected by the operating system. Download AOMEI Backupper Standard.
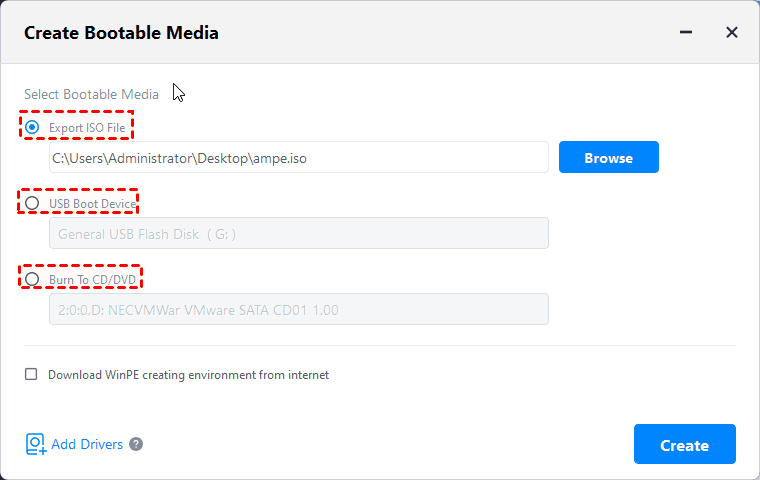
Step 2. Install and launch it. In the main interface, go to “Tools” > “Create Bootable Media”.

Step 3. Choose one between two bootable disc types. (Here Windows PE based bootable media is selected).

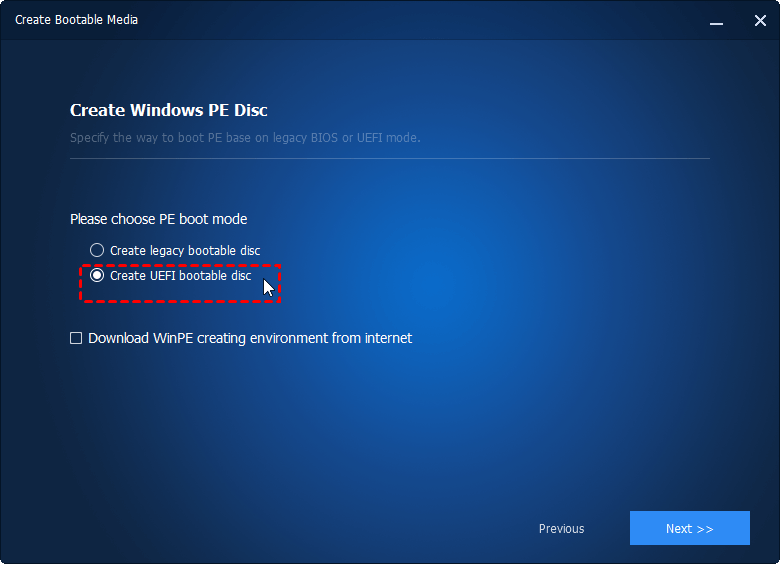
Step 4. If your system is UEFI boot mode, there are two options for you.
Create legacy bootable disc
Create UEFI bootable disc (Recommended)
Step 5. Select a bootable media among three options. Here choose USB Boot Device. Then click “Next” to perform this operation. When the progress reaches 100%, click “Finish” icon.
Notes:
For Step 3: Linux based bootable media allows you to apply basic functions like of AOMEI Backupper; Windows PE based bootable media allows you to access all functions.
For Step 4: Legacy BIOS-based and Unified Extensible Firmware Interface (UFEI) are two different boot modes. Now, UEFI is replacing Legacy BIOS.
Besides, you could enable AOMEI Backupper recovery environment in Windows boot options menu like this: Tools > Recovery Environemnt, and enable it, then you could boot from AOMEI Backupper recovery environment to restore data if system failed to boot.
Boot from Windows 7 recovery USB drive
After creating bootable USB drive successfully, you may want to know how to boot computer from it.
Firstly, you need to insert the USB drive to the computer that you need to restore system.
Secondly, Press certain key to enter BIOS while booting computer (For different computer models, the key can be different. In general, Del key for desktops and F2 for laptops. If you don’t know which key to press, you can refer to the PC’s manual or website).
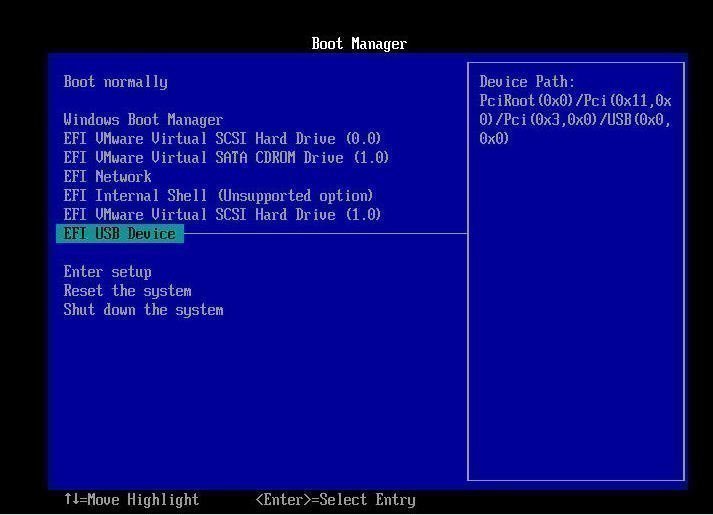
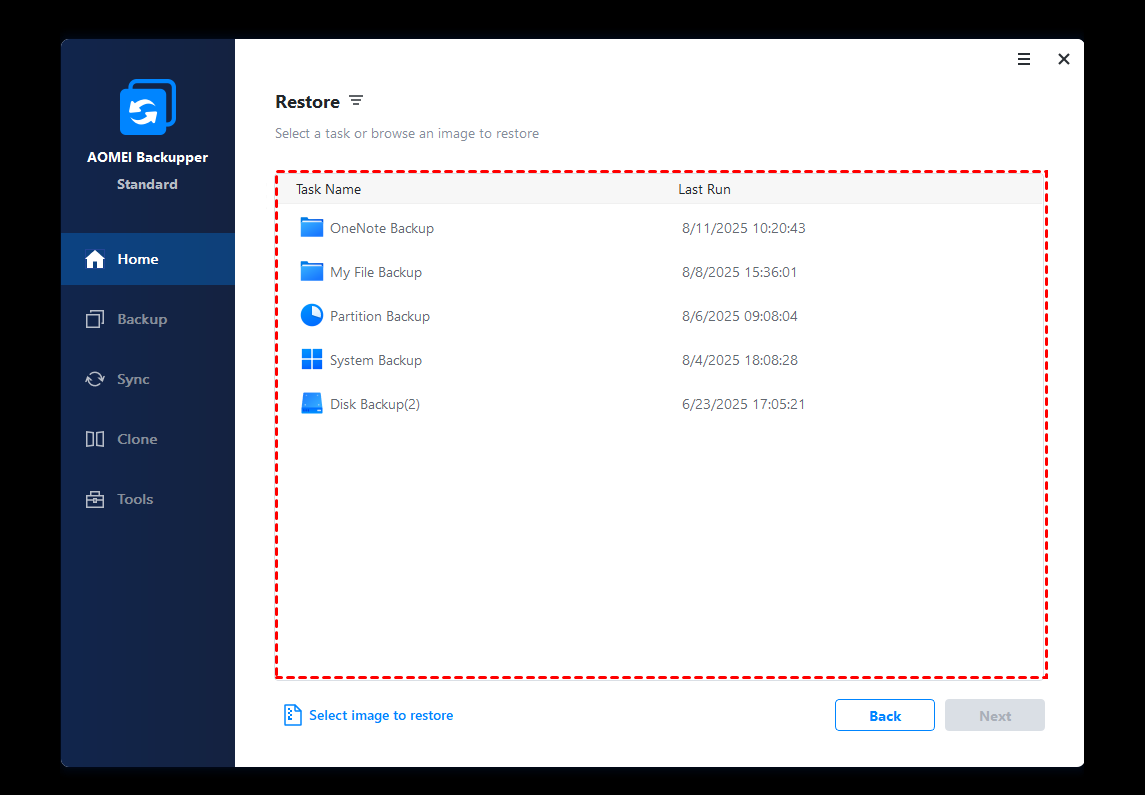
Finally, choose the USB device and press “Enter” key to boot form the bootable USB drive. Then, you’ll enter the main interface of AOMEI Backupper. Here you can restore system.
Conclusion
It is possible that your system stuck in troubles. To protect your Windows 7 computer, it is a good idea to create Windows 7 recovery USB drive. If you own computers run different Windows systems, you can choose to create bootable media via free backup software AOMEI Backupper. Just create one Windows 7 boot USB drive and it can be applied to Windows 7/8/10 computer.
AOMEI Backupper also allows you to backup disk, partition and file. If you don’t want to make a backup, it is also available to clone disk or system using AOMEI Backupper. All in all, it is a great backup and restore software to protect your data and system security.
If you want to protect unlimited computers within your company, you can pick AOMEI Backupper Technician. With the inbuilt AOMEI Image Deploy tool, you are also allowed to deploy/restore system image file on server-side computer to multiple client-side computers over network.


