- «Hello World!» for Microsoft Windows
- A Checklist
- Creating Your First Application
- Create a Source File
- Compile the Source File into a .class File
- Run the Program
- How to Compile and Run your First Java Program
- Simple Java Program:
- How to compile and run the above program
- Closer look to the First Java Program
- Быстрый старт в Java: от установки необходимого софта до первой программы
- Установка Java Development Kit
- Настройка JDK на примере Windows
- Установка IDE
- Блокнот
- NetBeans
- Eclipse
- IntelliJ IDEA
- JCreator
- Пишем свою первую программу
- Полезные ссылки для дальнейшего изучения
«Hello World!» for Microsoft Windows
It’s time to write your first application! The following instructions are for users of Windows Vista, Windows 7, and Windows 8. Instructions for other platforms are in «Hello World!» for Solaris OS and Linux and «Hello World!» for the NetBeans IDE.
A Checklist 

To write your first program, you’ll need:
The Java SE Development Kit 8 (JDK 8)
In this example, we’ll use Notepad, a simple editor included with the Windows platforms. You can easily adapt these instructions if you use a different text editor.
These two items are all you’ll need to write your first application.
Creating Your First Application
Your first application, HelloWorldApp , will simply display the greeting «Hello world!». To create this program, you will:
Create a source file
A source file contains code, written in the Java programming language, that you and other programmers can understand. You can use any text editor to create and edit source files.
Compile the source file into a .class file
The Java programming language compiler ( javac ) takes your source file and translates its text into instructions that the Java virtual machine can understand. The instructions contained within this file are known as bytecodes.
Run the program
The Java application launcher tool ( java ) uses the Java virtual machine to run your application.
Create a Source File
To create a source file, you have two options:
You can save the file HelloWorldApp.java on your computer and avoid a lot of typing. Then, you can go straight to Compile the Source File into a .class File.
Or, you can use the following (longer) instructions.
First, start your editor. You can launch the Notepad editor from the Start menu by selecting Programs > Accessories > Notepad. In a new document, type in the following code:
Be Careful When You Type 

Note: Type all code, commands, and file names exactly as shown. Both the compiler ( javac ) and launcher ( java ) are case-sensitive, so you must capitalize consistently.
HelloWorldApp is not the same as helloworldapp .
Save the code in a file with the name HelloWorldApp.java . To do this in Notepad, first choose the File > Save As menu item. Then, in the Save As dialog box:
- Using the Save in combo box, specify the folder (directory) where you’ll save your file. In this example, the directory is myapplication on the C drive.
- In the File name text field, type «HelloWorldApp.java» , including the quotation marks.
- From the Save as type combo box, choose Text Documents (*.txt).
- In the Encoding combo box, leave the encoding as ANSI.
When you’re finished, the dialog box should look like this .
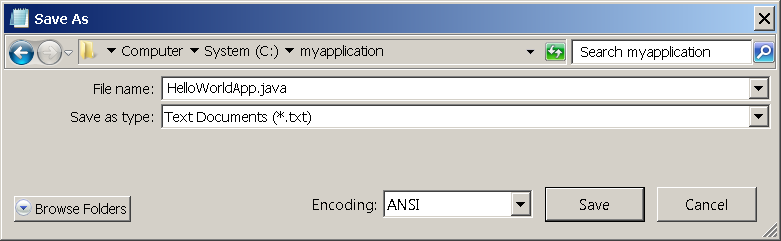
The Save As dialog just before you click Save.
Now click Save, and exit Notepad.
Compile the Source File into a .class File
Bring up a shell, or «command,» window. You can do this from the Start menu by choosing Run. and then entering cmd . The shell window should look similar to the following figure .
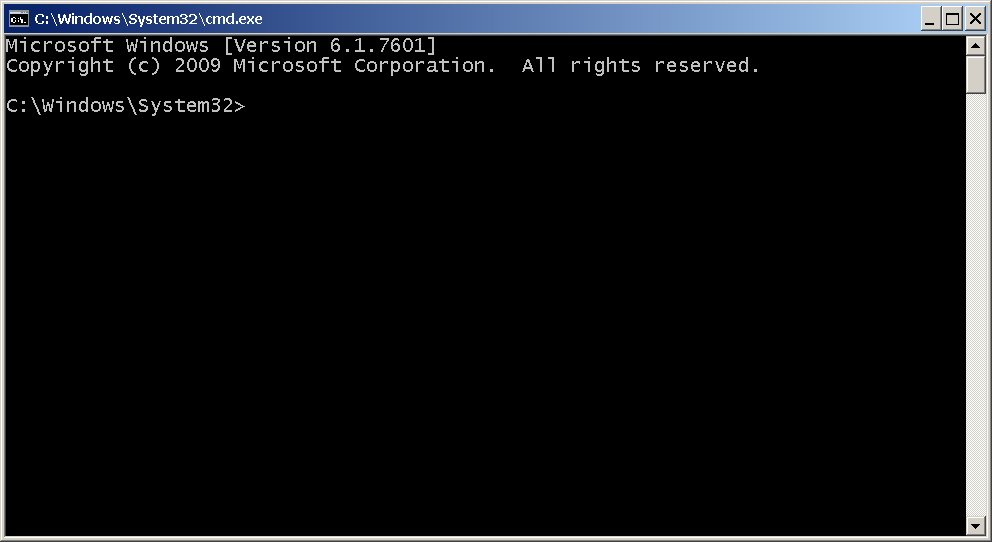
The prompt shows your current directory. When you bring up the prompt, your current directory is usually your home directory for Windows XP (as shown in the preceding figure.
To compile your source file, change your current directory to the directory where your file is located. For example, if your source directory is myapplication on the C drive, type the following command at the prompt and press Enter:
Now the prompt should change to C:\myapplication> .
To change to a directory on a different drive, you must type an extra command: the name of the drive. For example, to change to the myapplication directory on the D drive, you must enter D: , as follows:
If you enter dir at the prompt, you should see your source file, as follows:
Now you are ready to compile. At the prompt, type the following command and press Enter.
The compiler has generated a bytecode file, HelloWorldApp.class . At the prompt, type dir to see the new file that was generated as follows:
Now that you have a .class file, you can run your program.
If you encounter problems with the instructions in this step, consult the Common Problems (and Their Solutions).
Run the Program
In the same directory, enter the following command at the prompt:
You should see the following on your screen:
Congratulations! Your program works!
If you encounter problems with the instructions in this step, consult the Common Problems (and Their Solutions).
How to Compile and Run your First Java Program
By Chaitanya Singh | Filed Under: Learn Java
In this tutorial, we will see how to write, compile and run a java program. I will also cover java syntax, code conventions and several ways to run a java program.
Simple Java Program:
Output: This is my first program in java
How to compile and run the above program
Prerequisite: You need to have java installed on your system. You can get the java from here.
Step 1: Open a text editor, like Notepad on windows and TextEdit on Mac. Copy the above program and paste it in the text editor.
You can also use IDE like Eclipse to run the java program but we will cover that part later in the coming tutorials. For the sake of simplicity, I will only use text editor and command prompt (or terminal) for this tutorial
Step 2: Save the file as FirstJavaProgram.java. You may be wondering why we have named the file as FirstJavaProgram, the thing is that we should always name the file same as the public class name. In our program, the public class name is FirstJavaProgram , that’s why our file name should be FirstJavaProgram.java.
Step 3: In this step, we will compile the program. For this, open command prompt (cmd) on Windows, if you are Mac OS then open Terminal.
To compile the program, type the following command and hit enter.
You may get this error when you try to compile the program: “javac’ is not recognized as an internal or external command, operable program or batch file“. This error occurs when the java path is not set in your system
If you get this error then you first need to set the path before compilation.
Set Path in Windows:
Open command prompt (cmd), go to the place where you have installed java on your system and locate the bin directory, copy the complete path and write it in the command like this.
Note: Your jdk version may be different. Since I have java version 1.8.0_121 installed on my system, I mentioned the same while setting up the path.
Set Path in Mac OS X
Open Terminal, type the following command and hit return.
Type the following command on terminal to confirm the path.
The steps above are for setting up the path temporary which means when you close the command prompt or terminal, the path settings will be lost and you will have to set the path again next time you use it. I will share the permanent path setup guide in the coming tutorial.
Step 4: After compilation the .java file gets translated into the .class file(byte code). Now we can run the program. To run the program, type the following command and hit enter:
Note that you should not append the .java extension to the file name while running the program.
Closer look to the First Java Program
Now that we have understood how to run a java program, let have a closer look at the program we have written above.
This is the first line of our java program. Every java application must have at least one class definition that consists of class keyword followed by class name. When I say keyword, it means that it should not be changed, we should use it as it is. However the class name can be anything.
I have made the class public by using public access modifier, I will cover access modifier in a separate post, all you need to know now that a java file can have any number of classes but it can have only one public class and the file name should be same as public class name.
This is our next line in the program, lets break it down to understand it:
public : This makes the main method public that means that we can call the method from outside the class.
static : We do not need to create object for static methods to run. They can run itself.
void : It does not return anything.
main : It is the method name. This is the entry point method from which the JVM can run your program.
(String[] args) : Used for command line arguments that are passed as strings. We will cover that in a separate post.
This method prints the contents inside the double quotes into the console and inserts a newline after.
Checkout these basic java programs before reading next topic:
Быстрый старт в Java: от установки необходимого софта до первой программы

Как вы знаете, Java — один из самых популярных языков программирования в мире и его знание существенно увеличит вашу значимость как программиста. Итак, вы решили начать писать на этом языке. Вам понадобится поставить JDK для того, чтобы писать и запускать программы на Java. JDK — набор софта, разработанного Oracle, содержащий в себе компилятор (javac), среду выполнения (Java Runtime Environment), стандартную библиотеку языка, примеры и документацию. Прочитав эту статью, вы узнаете, как установить и настроить JDK на своей системе, что такое среда разработки и какие варианты IDE существуют для Java. Также вы напишете свою первую программу на Java.
Установка Java Development Kit
- Перейдите на сайт Oracle и загрузите JDK для вашей платформы.
- После загрузки извлеките полученный архив и запустите извлеченное приложение.
- В процессе установке выберите вариант «Development Tool» и нажмите «Next».
- Спустя некоторое время установка завершится.
Итак, вы установили Java Development Kit, но это еще не всё. Необходимо настроить его для вашей системы.
Настройка JDK на примере Windows
- Перейдите в папку %ProgramFiles%\Java\%версия установленного вами jdk%\bin , нажмите на свойства любого файла в этой папке и скопируйте путь к нему.
- Перейдите в свойства вашего компьютера, откройте вкладку «Дополнительно», нажмите «Переменные среды…». В открывшемся окне создайте новую переменную, назовите её Path , в её значение вставьте скопированный ранее путь.
- Теперь самое важное. Откройте командную строку и наберите javac , чтобы убедиться, что JRE установлен и настроен. Если выдаётся список аргументов к команде javac , то поздравляю, вы успешно установили и настроили всё, что необходимо для использования Java!
После установки JDK и JRE не помешает установить на компьютер одну из IDE.
Установка IDE
Для начала разберёмся, что такое IDE.
IDE (Integrated Development Environment) — это комплекс программных средств, используемый программистами для разработки программного обеспечения. IDE позволяет с лёгкостью писать, запускать, отлаживать и тестировать код.
Для написания сложных программ целесообразно использовать IDE. Мы рассмотрим наиболее популярные.
Блокнот
Да, и в блокноте можно писать код! Для разработки вам потребуется всего лишь установить JDK и указать путь к ней. Пишете код в блокноте, компилируете с помощью командной строки. Тем не менее, для разработки сложных программ это не самый лучший вариант из-за отсутствия каких-либо дополнительных возможностей, присутствующих в продвинутых IDE.
NetBeans
NetBeans — выбор профессиональных Java-разработчиков. В ней есть уникальные возможности и инструменты, которые позволят вам сделать вашу программу кроссплатформенной, а код удобочитаемым. NetBeans поддерживает не только Java, но и другие языки программирования для десктоп- и веб-разработки. Она полностью бесплатна, скачать её можно с официального сайта. Вот лишь некоторые её возможности:
- форматирование кода;
- установка сторонних библиотек;
- простой графический интерфейс;
- и многое, многое другое…
Eclipse
Eclipse, как и Netbeans — одна из наиболее популярных IDE. Она предоставляет впечатляющий интуитивно понятный интерфейс и производительную среду разработки, позволяющую комфортно разрабатывать приложения на Java. Скачать Eclipse можно бесплатно с официального сайта. Преимущества:
- возможность форматировать код так, как вам удобно;
- поддержка разбиения кода на модули;
- лёгкость использования одного и того же кода в разных проектах;
- перетаскивание (drag-and-drop);
- просмотр содержимого библиотек;
- удобный интерфейс.
IntelliJ IDEA
IntelliJ IDEA — известная IDE для Java, написанная, как ни странно, на Java. Укомплектована уникальными инструментами и позволяет без проблем ориентироваться в программе. Нахождение ошибок и отладка кода никогда не были такими легкими, как с IntelliJ IDEA.
JCreator
JCreator — продвинутая и самая быстрая IDE для Java, написанная на C++.
Пишем свою первую программу
Итак, вы установили и настроили JDK, JRE и IDE для Java. Каков следующий шаг? Конечно же, написать программу, чтобы окончательно убедиться, что всё работает и вы готовы к изучению языка. Вы познакомитесь с базовой структурой кода на Java и создадите свою первую программу! Стоит отметить, что перед изучением Java следует ознакомиться хотя бы с самыми простыми принципами объектно-ориентированного программирования.
Структуру программы на Java можно представить так:
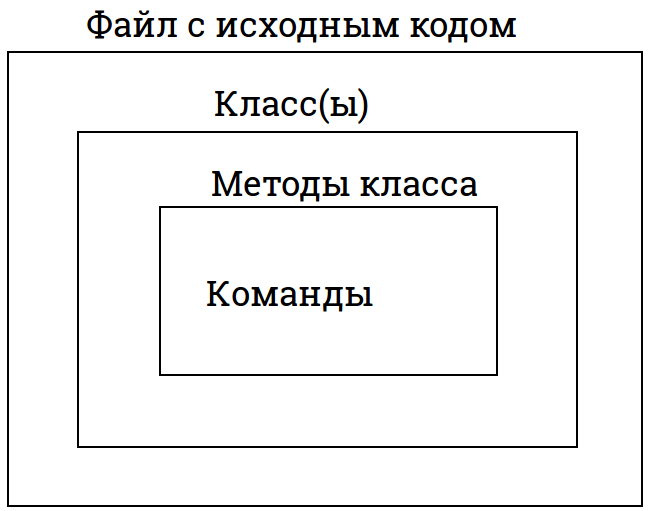
Структура программы на Java
В файле с исходным кодом содержится несколько классов — это части программы, имеющие определённые функции. Хорошей практикой считается разбиение программы на несколько файлов с исходным кодом, каждый со своим назначением. В классах содержатся методы — действия, которые могут выполнять объекты данного класса. В методе содержатся команды, с помощью которых вы можете получить желаемый результат.
ООО «БизнесКомпьютер» , Екатеринбург, можно удалённо , От 110 000 ₽
Перед тем, как приступить к созданию программы, необходимо создать проект, а в нём и файл, в котором будет содержаться ваш код. Рассмотрим создание проекта на IDE Eclipse, но в остальных IDE процесс отличается не сильно. Cверху выберите «File», затем наведите курсор на «New», в открывшемся меню выберите «Java Project». В появившемся окне введите имя проекта и другие нужные вам настройки (если не уверены, что делать, то можно просто оставить все как есть) и нажмите «Next». Готово, вы создали проект! Осталось лишь создать в нём класс, в котором вы напишете свою первую программу. Щёлкните правой кнопкой мыши по вашему проекту (он должен появиться справа) и выберите «New» → «Class». Присвойте новому классу имя (в данном примере — это first ) и нажмите «Finish».
Приступим к написанию вашей первой программы. По традиции — это программа, выводящая на экран «Hello, world!».
Разберём по частям написанное нами:
- public — это модификатор доступа, определяющий, из какой части программы может использоваться наш класс. В вашем примере public — это весь код;
- class — ключевое слово, показывающее, что вы объявляете класс, а не что-либо иное;
- first — имя вашего класса. Круглые скобки определяют начало и конец кода класса;
- public static void main(String args[]) — объявление публичного статического метода (то есть который можно вызвать, не создавая объект класса). Метод в примере ничего не возвращает и принимает в качестве аргументов массив строк. Единственная команда в этом методе выводит в консоль сообщение «Hello, world!». Заметьте, вместо println можно написать print , разница лишь в том, что в случае с println дополнительно выведется символ переноса строки.
Хорошо, вы написали вашу первую программу. Теперь её надо запустить. Для этого просто нажмите белую стрелочку в зеленом кружке на верхней панели (при наведении курсора на неё должно высветиться «Run»). После нажатия внизу откроется консоль, в которой вы увидите сообщение «Hello, world»! Поздравляю, вы написали вашу первую программу на Java и готовы погрузиться в увлекательный мир этого языка!
Полезные ссылки для дальнейшего изучения
Вот несколько ресурсов, которые помогут вам в изучении Java:
- документация Oracle по стандартной библиотеке языка;
- уроки по Java от Oracle;
- теория объектно-ориентированного программирования;
- хорошая книга-самоучитель;
- большое количество интересных и полезных статей про Java на русском языке.


