- Measure memory usage in Visual Studio
- Collect memory usage data
- Analyze memory usage data
- Managed types reports
- Native type reports
- Change (Diff) reports
- Blogs and videos
- Next steps
- How to Check Your Computer’s Memory Usage in Windows
- Check Computer Memory Usage Easily
- Check Detailed Memory Usage with Performance Monitor
- Schedule & Log Performance Monitoring
Measure memory usage in Visual Studio
Find memory leaks and inefficient memory while you’re debugging with the debugger-integrated Memory Usage diagnostic tool. The Memory Usage tool lets you take one or more snapshots of the managed and native memory heap to help understand the memory usage impact of object types. You can also analyze memory usage without a debugger attached or by targeting a running app. For more information, see Run profiling tools with or without the debugger.
Although you can collect memory snapshots at any time in the Memory Usage tool, you can use the Visual Studio debugger to control how your application executes while investigating performance issues. Setting breakpoints, stepping, Break All, and other debugger actions can help you focus your performance investigations on the code paths that are most relevant. Performing those actions while your app is running can eliminate the noise from the code that doesn’t interest you and can significantly reduce the amount of time it takes you to diagnose an issue.
The debugger-integrated Diagnostics Tools are supported for .NET development in Visual Studio, including ASP.NET, ASP.NET Core, native/C++ development, and mixed mode (.NET and native) apps. Windows 8 and later is required to run profiling tools with the debugger (Diagnostic Tools window).
In this tutorial, you will:
- Take snapshots of memory
- Analyze memory usage data
If Memory Usage does not give you the data that you need, other profiling tools in the Performance Profiler provide different kinds of information that might be helpful to you. In many cases, the performance bottleneck of your application may be caused by something other than your memory, such as CPU, rendering UI, or network request time.
Custom Allocator Support The native memory profiler works by collecting allocation ETW event data emitted during run time. Allocators in the CRT and Windows SDK have been annotated at the source level so that their allocation data can be captured. If you are writing your own allocators, then any functions that return a pointer to newly allocated heap memory can be decorated with __declspec(allocator), as seen in this example for myMalloc:
__declspec(allocator) void* myMalloc(size_t size)
Collect memory usage data
Open the project you want to debug in Visual Studio and set a breakpoint in your app at the point where you want to begin examining memory usage.
If you have an area where you suspect a memory issue, set the first breakpoint before the memory issue occurs.
Because it can be challenging to capture the memory profile of an operation that interests you when your app frequently allocates and de-allocates memory, set breakpoints at the start and end of the operation (or step through the operation) to find the exact point that memory changed.
Set a second breakpoint at the end of the function or region of code that you want to analyze (or after a suspected memory issue occurs).
The Diagnostic Tools window appears automatically unless you have turned it off. To bring up the window again, click Debug > Windows > Show Diagnostic Tools.
Choose Memory Usage with the Select Tools setting on the toolbar.

Click Debug / Start Debugging (or Start on the toolbar, or F5).
When the app finishes loading, the Summary view of the Diagnostics Tools appears.

Because collecting memory data can affect the debugging performance of your native or mixed-mode apps, memory snapshots are disabled by default. To enable snapshots in native or mixed-mode apps, start a debugging session (Shortcut key: F5). When the Diagnostic Tools window appears, choose the Memory Usage tab, and then choose Heap Profiling.

Stop (Shortcut key: Shift+F5) and restart debugging.
To take a snapshot at the start of your debugging session, choose Take snapshot on the Memory Usage summary toolbar. (It may help to set a breakpoint here as well.)

To create a baseline for memory comparisons, consider taking a snapshot at the start of your debugging session.
Run the scenario that will cause your first breakpoint to be hit.
While the debugger is paused at the first breakpoint, choose Take snapshot on the Memory Usage summary toolbar.
Press F5 to run the app to your second breakpoint.
Now, take another snapshot.
At this point, you can begin to analyze the data.
Analyze memory usage data
The rows of Memory Usage summary table lists the snapshots that you have taken during the debugging session and provides links to more detailed views.

The name of the columns depend on the debugging mode you choose in the project properties: .NET, native, or mixed (both .NET and native).
The Objects (Diff) and Allocations (Diff) columns display the number of objects in .NET and native memory when the snapshot was taken.
The Heap Size (Diff) column displays the number of bytes in the .NET and native heaps
When you have taken multiple snapshots, the cells of the summary table include the change in the value between the row snapshot and the previous snapshot.
To analyze memory usage, click one of the links that opens up a detailed report of memory usage:
- To view details of the difference between the current snapshot and the previous snapshot, choose the change link to the left of the arrow (
 ). A red arrow indicates an increase in memory usage, and a green arrow to indicates a decrease.
To help identify memory issues more quickly, the diff reports are sorted by object types that increased the most in overall number (click the change link in Objects (Diff) column) or that increased the most in overall heap size (click the change link in Heap Size (Diff) column).
To view details of only the selected snapshot, click the non-change link.
The report appears in a separate window.
Managed types reports
Choose the current link of a Objects (Diff) or Allocations (Diff) cell in the Memory Usage summary table.

The top pane shows the count and size of the types in the snapshot, including the size of all objects that are referenced by the type (Inclusive Size).
The Paths to Root tree in the bottom pane displays the objects that reference the type selected in the upper pane. The .NET garbage collector cleans up the memory for an object only when the last type that references it has been released.
The Referenced Objects tree displays the references that are held by the type selected in the upper pane.

To display the instances of a selected type in the upper pane, choose the icon.

The Instances view displays the instances of the selected object in the snapshot in the upper pane. The Paths to Root and Referenced Objects pane displays the objects that reference the selected instance and the types that the selected instance references. When the debugger is stopped at the point where the snapshot was taken, you can hover over the Value cell to display the values of the object in a tool tip.
Native type reports
Choose the current link of a Allocations (Diff) or Heap Size (Diff) cell in the Memory Usage summary table of the Diagnostic Tools window.

The Types View displays the number and size of the types in the snapshot.
Choose the instances icon ( ) of a selected type to display information about the objects of the selected type in the snapshot.
The Instances view displays each instance of the selected type. Selecting an instance displays the call stack that resulted in the creation of the instance in the Allocation Call Stack pane.

Choose Stacks View in the View Mode list to see the allocation stack for the selected type.

Change (Diff) reports
Choose the change link in a cell of the summary table of the Memory Usage tab on the Diagnostic Tools window.

Choose a snapshot in the Compare To list of a managed or native report.

The change report adds columns (marked with (Diff)) to the base report that show the difference between the base snapshot value and the comparison snapshot. Here’s how a Native Type View diff report might look:

Blogs and videos
Next steps
In this tutorial, you’ve learned how to collect and analyze memory usage data. If you already completed the tour of the profiler, you may want to get a quick look at how to analyze CPU usage in your apps.
How to Check Your Computer’s Memory Usage in Windows


Is it time to buy some more RAM and upgrade your computer’s total memory capacity? One way to find out is to test how much memory you’re using. Windows has two built-in tools that work perfectly for this and not just the basic little green boxes you find in the Task Manager.
Just like when I showed you how to check if memory is going bad, this time we’ll take a look at how it is being used. The tools we’ll look at are called the Resource Monitor and the Performance Monitor.
Check Computer Memory Usage Easily
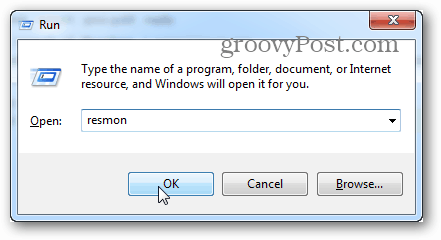
To open up Resource Monitor just press Windows Key + R and then type resmon into the search box.
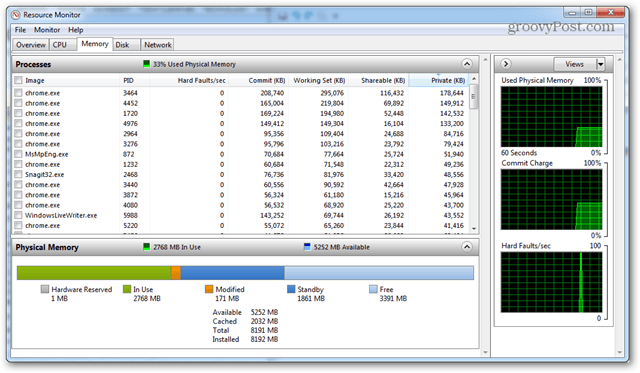
Resource Monitor will tell you exactly how much RAM is being used, what is using it, and allow you to sort the list of apps using it by several different categories. However, it doesn’t offer much else. For more details, you’ll need to open up Performance Monitor.
Check Detailed Memory Usage with Performance Monitor
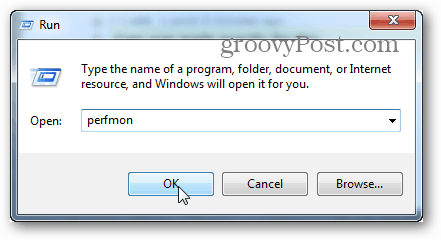
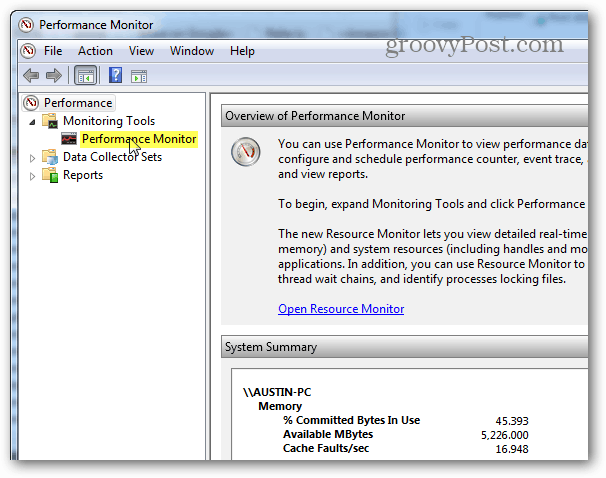
To open up Performance Monitor type: perfmon into the Run window (Windows Key + R).
In the window that comes up, click the Performance Monitor under Monitoring Tools in the left pane.
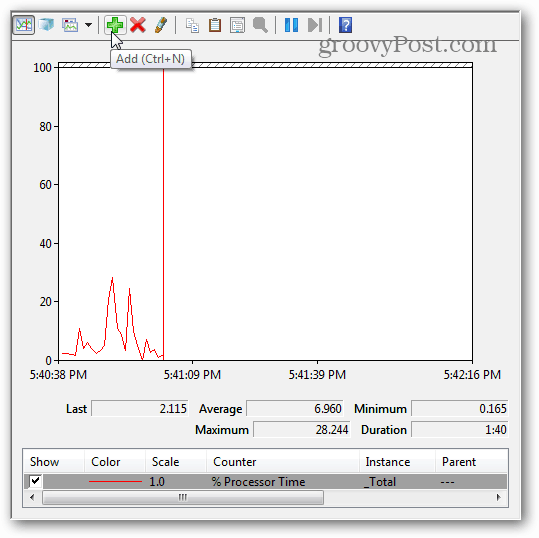
The right pane turns into a live graph/chart that looks like the screenshot below. Since you’re trying to look at memory usage, you need to add it to what’s tracked by the live graph. Click the green plus symbol or hit Ctrl + N on your keyboard.
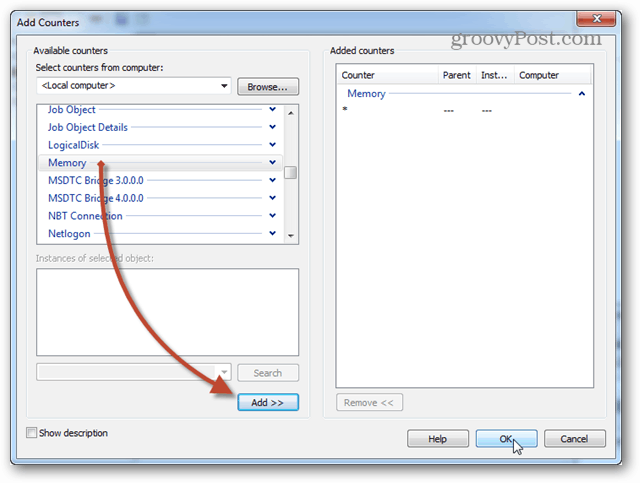
Now scroll down the list of counters in the left pane and select Memory, then click Add. Memory is added as an active counter in the right pane, and once it is, you can click OK to save changes and exit.
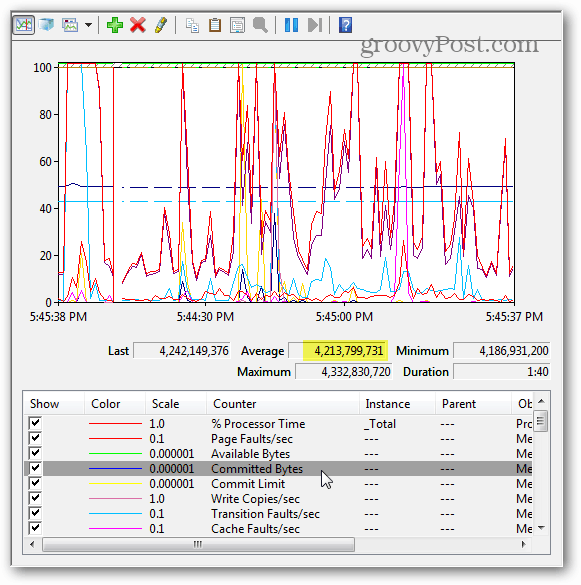
Now back on the graph, the memory will start to be tracked. If you’re looking for average memory use over time, click the Committed Bytes line and it will display that information in the box above. There are a few things to note about this chart:
- The graph and stats are generated live.
- This chart only shows data as far back as the moment you added the counter type.
Schedule & Log Performance Monitoring
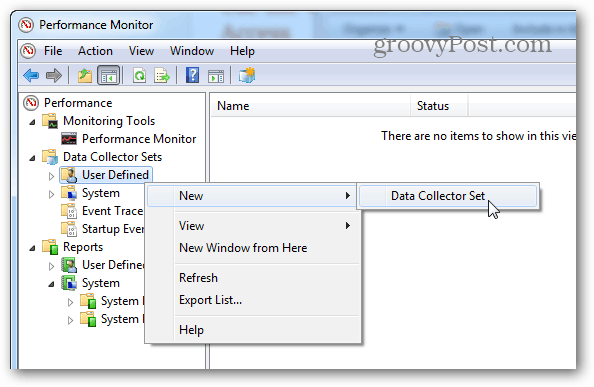
If live reporting isn’t what you’re looking for, scheduled/logged monitoring might work better. To set this up, right-click on the Data Collector Sets and select User Defined > New > Data Collector Set.
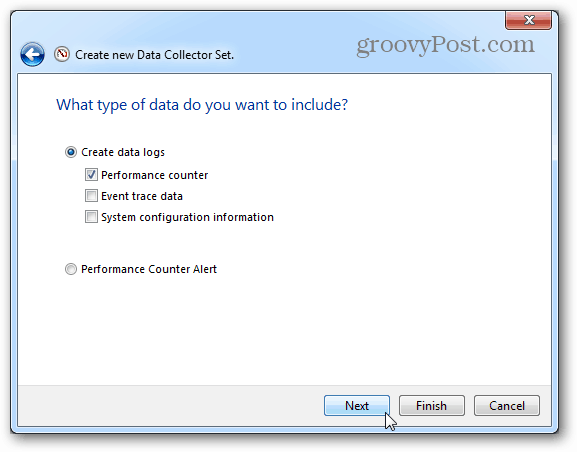
Give the data collector set a name (it can be whatever you like), and then set to Create Manually (Advanced) before clicking Next.

Next set it to a Create Data Logs, check the Performance counter box, and click Next.
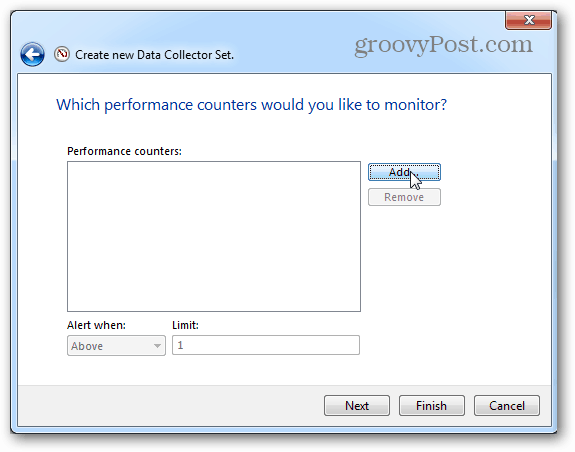
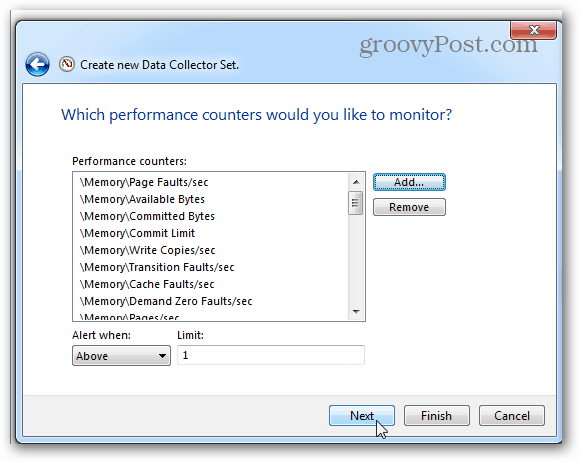
On the next page click the Add button.
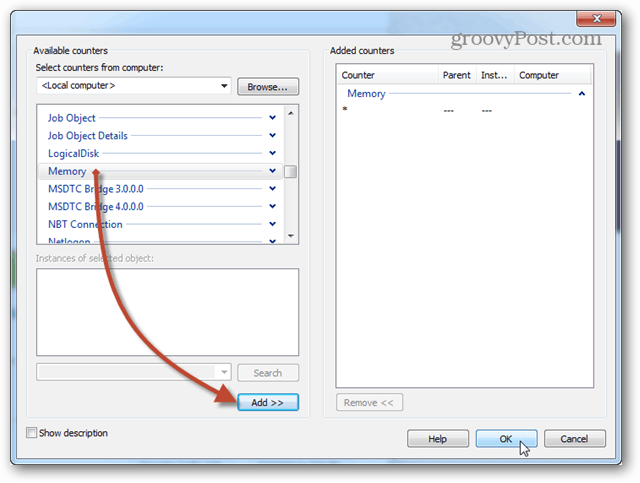
Just as before with the live graph, add Memory to the list of active counters.
The same page where we clicked the Add button will now show a list of the counters you just added. Now click the Next button to continue.
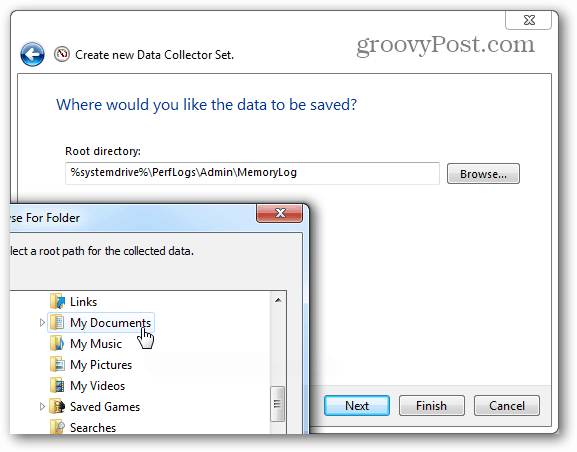
Then it’s time to choose where the logs will be saved. I suggest your Documents folder or somewhere easy to find.
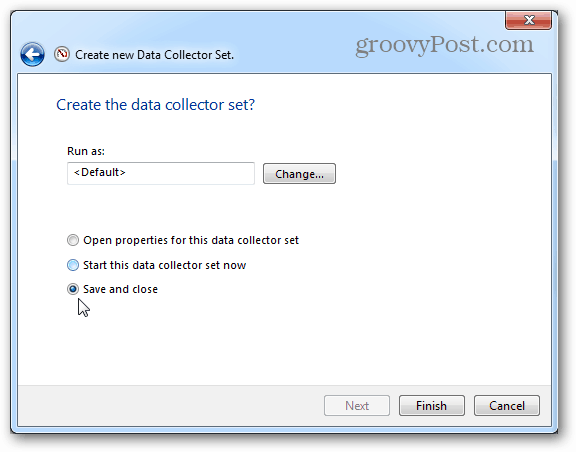
Now you can choose to Save and close, and then press Finish to exit.
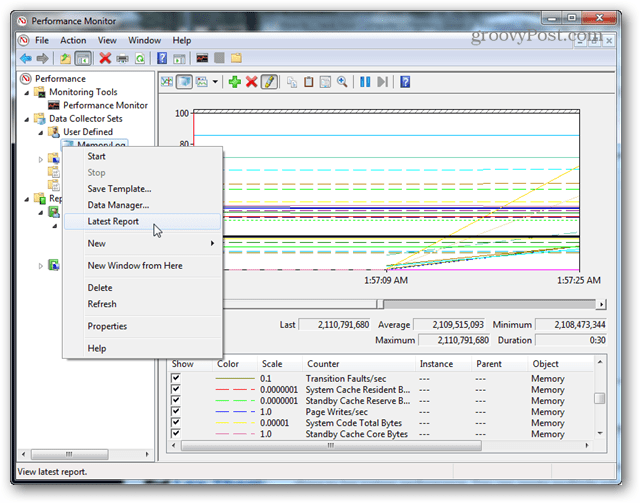
The performance log is ready to run; all you need to do is start it. There are two different ways to go about starting this thing too. The first is to right-click on it and manually start it. Yeah, annoying. The second way is to right-click and open up the Properties window.

Within the properties window of the data collector, you can set up when you want this thing to log system performance. You can create multiple schedules for multiple different times. It’s quite useful!

Once you’ve run a log, all that’s left to do is open it up and view the results in Performance Monitor.
These tools are still present in Windows 8 too. But it’s worth mentioning, though, that Task Manager in Windows 8 and RT provides a lot of additional info concerning memory usage on its own.


