- Windows Device Portal
- Shared Documentation
- Set up
- 1. Windows 10 IoT Dashboard
- 2. Browser
- IoT specific features
- Device Settings
- App File Explorer
- Debugging
- Kernel dumps
- Process dumps
- Kernel crash settings
- Bluetooth
- IoT Onboarding
- TPM configuration
- Azure Clients configuration
- Remote
- Additional Information
- Changing the default port
- Using HTTPS
- Provisioning Device Portal with a custom SSL certificate
- Crash Dump Settings for Capturing Memory Dump:
- Управление устройствами Windows IoT Core Managing Windows IoT Core Devices
- Разделы справки зарегистрировать устройство IoT Core в MDM? How do I enroll an IoT Core device into a MDM?
- Создание пакета подготовки Creating a Provisioning package
- Microsoft System Center Configuration Manager (автономная среда или гибридная среда SCCM + Intune) Microsoft System Center Configuration Manager (Standalone or SCCM+Intune Hybrid)
- Другие серверы MDM Other MDM Servers
- Установка пакета подготовки Installing the Provisioning package
- Копирование пакета на устройство Copying package to device
- Добавление пакета в образ Adding package to image
Windows Device Portal
The Windows Device Portal (WDP) lets you configure and manage your device remotely over your local network. The main features are documented on the Windows Device Portal overview page
Do not use maker images for commercialization. If you are commercializing a device, you must use a custom FFU for optimal security. Learn more here.
Live kernel debug is currently failing for ARM devices. We are working to get this fixed.
If you are building an open retail device for commercial deployment to a «specific/limited installation» (i.e. factory or retail store) where the end-user does the final configuration and you document your customers that they must obtain a certificate for WDP and install it on both WDP and connecting browsers and passwords are changed on WDP, then using WDP in this narrow commercial instance is acceptable. Retail images in this scenario should still not include IOT_TOOLKIT, but should use the IOT_WEBBEXTN package to pull in WDP.
Shared Documentation
WDP is a developer tool shared among all Windows 10 devices. Each product has its own unique features, but the core functionality is the same. Documentation for the main features is found on the Windows Device Portal overview page. The rest of the documentation below will be IoT specific.
Set up
There are two ways to go get the Windows Device Portal up and running.
1. Windows 10 IoT Dashboard
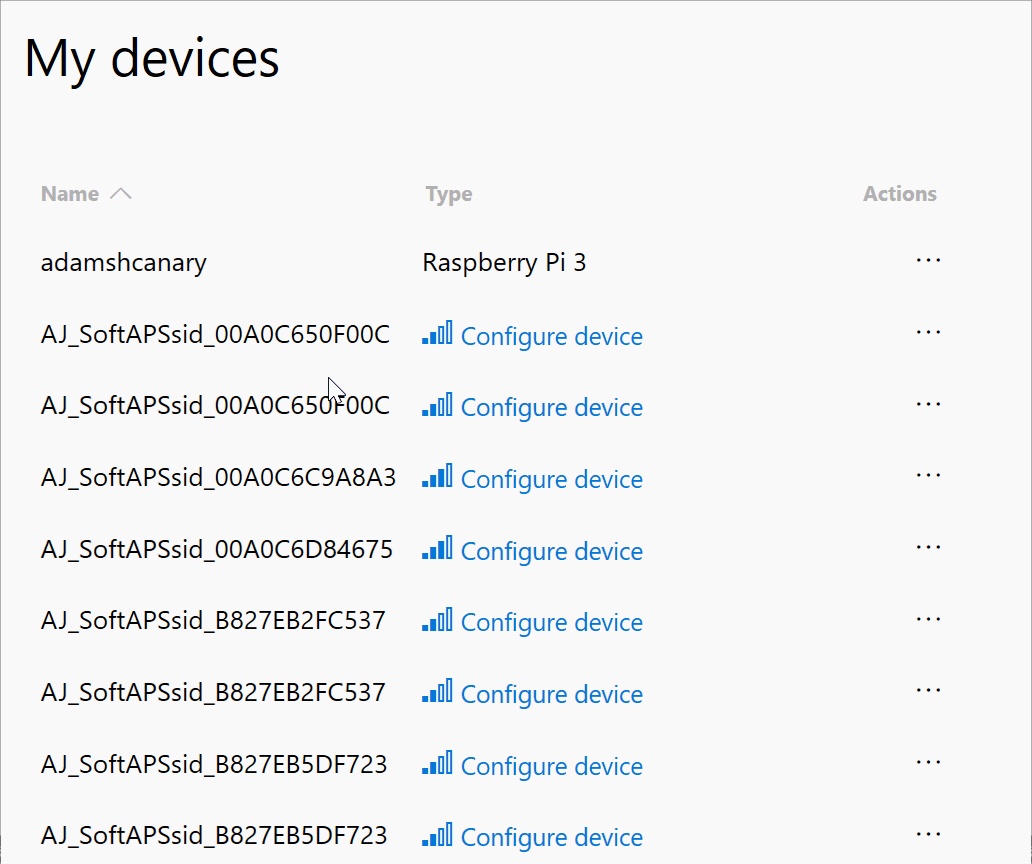
First, you’ll want to download the Windows 10 IoT Dashboard, a developer tool that makes it easy to set up new devices. Once you’ve used the Dashboard to flash a Windows 10 IoT Core image onto your device, check that your device shows up under «My devices».
From there, use the ellipses under «Actions» to select «Open in Device Portal». From there, you’ll be taken to the Device Portal authentication page where, unless you changed the credentials initially, the default credentials are:
2. Browser
If you cannot find your device in the dashboard or prefer to skip using the dashboard, you can also open the Device Portal by entering the IP address of your device plus :8080 onto the end. When done correctly, it should look something like this:
IoT specific features
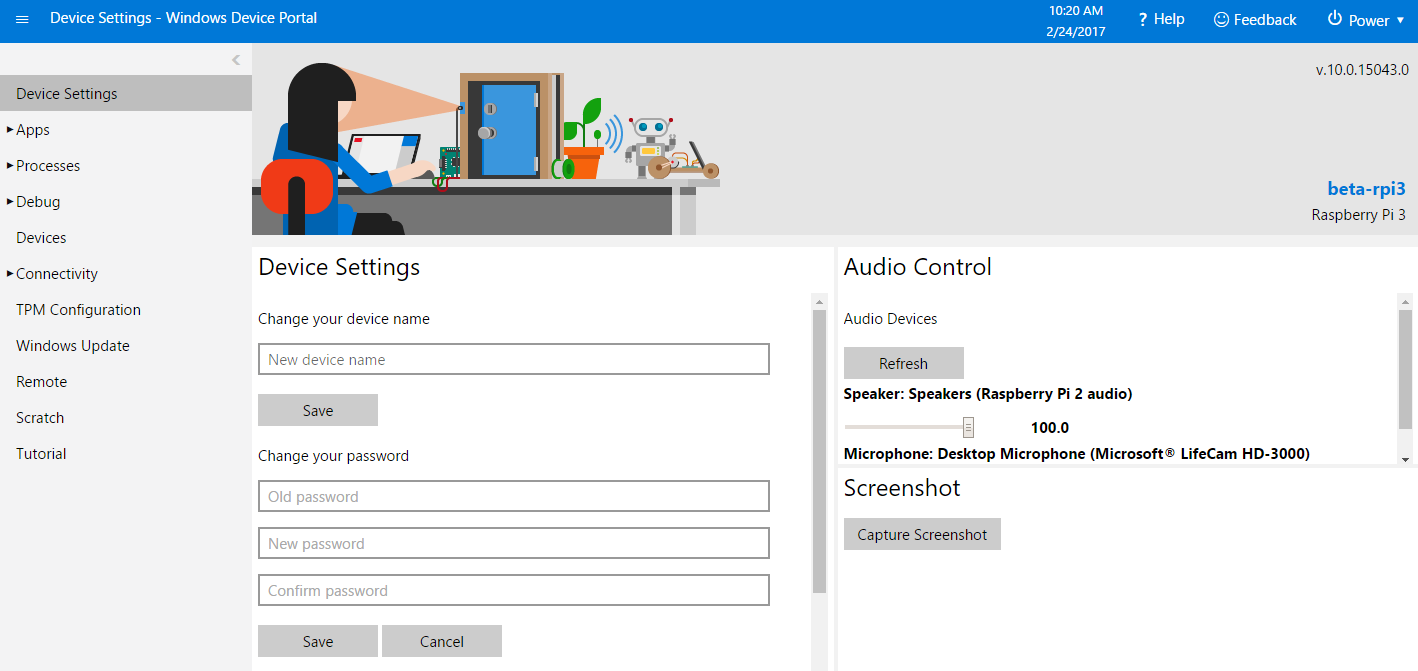
Device Settings
IoT Core adds a checkbox to enable or disable the on-screen keyboard
This checkbox has a known bug where it will «flash» from checked to non-checked. Please refresh the page (F5) after clicking to ensure that the checkbox is showing your desired state.
Provides install/uninstall functionality for AppX packages and bundles on your device. 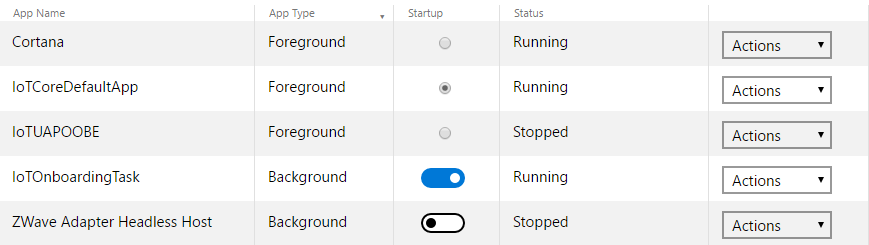
IoT Core is unique in that it only allows one foreground app to run at one time. The app list is modified to ensure that this is the case. Under the STARTUP column, you can select as many background applications to start by default, but can only set one foreground application.
App File Explorer
The app file explorer shows the directories that your apps can access.
- CameraRoll is shared among all apps
- Documents are shared among all apps
- LocalAppData contains folders specific to each app. This folder will be the same name as your app and other apps cannot access it.
Debugging
Kernel dumps

Any system crashes will automatically be logged and available to view through the web management tool. You can then download the kernel dump and try to figure out what’s going on.
Process dumps
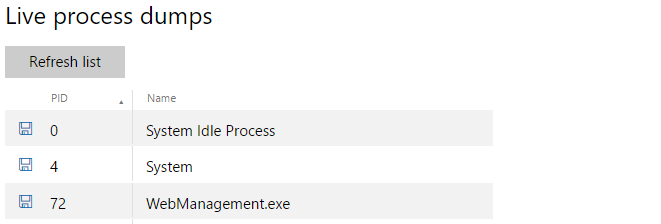
This is similar to Live kernel dumps, but for the user mode processes. Clicking the download button will cause a ‘minidump’, and the entire state of that process will be downloaded. This is good for debugging hanging processes.
Kernel crash settings

Bluetooth
This page shows you all the bluetooth paired devices and all the devices that are discoverable. To pair with another Bluetooth device, put the device in pairing mode and wait for it to appear in the available devices list. 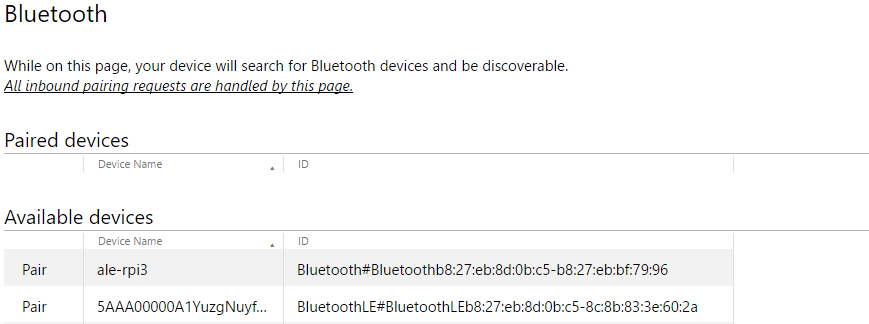
Click on Pair link to pair the device. If the device requires a PIN for pairing, it will pop up a message box displaying the PIN. Once the device is paired, it will show up in the Paired devices list. You can unpair the device by clicking on Remove.
Once you navigate to the Bluetooth page, your device will be discoverable by other devices. You can also find it from your PC/Phone and pair it from there.
More information on bluetooth can be found on the bluetooth page.
IoT Onboarding
IoT Onboarding provides support for configuring an IoT device’s Wi-Fi connectivity options.
Internet Connection Sharing (ICS) Internet Connection Sharing allows you to share the Internet access of your device with other devices connected to your device over the Wi-Fi SoftAP. To use this feature, your Windows 10 IoT Device needs to have access to the internet (e.g. through a wired LAN connection). In ‘Connectivity->Onboarding->SoftAP settings’ click ‘enable’ and set SSID name and password. Then in ‘Connectivity->Internet connection sharing’ for ‘access point adapter’ select «Microsoft Wi-Fi Direct Virtual Adapter #2» and for ‘shared network adapter’ select your wired ethernet adapter. Finally, click ‘start shared access.’ Once started, connect a separate Wi-Fi enabled device to the SoftAP on your Windows 10 IoT device. After a connection is established, your separate Wi-Fi enabled device will be able to connect to the internet through your Windows 10 IoT device.
ICS is disabled when a Wi-Fi profile exists on the device. For example, ICS will be disabled if you connect to a Wi-Fi access point and check “Create profile (auto re-connect)”.
SoftAP Settings The SoftAP Settings allow you to control whether or not your device’s SoftAP is enabled. It also provides a means for configuring your SoftAP’s SSID and the WPA2-PSK key, which are necessary to connect the SoftAP from another device.
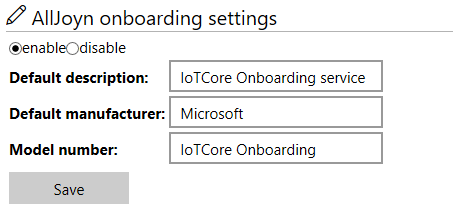
AllJoyn Onboarding Settings The AllJoyn Onboarding Settings allow you to control whether or not your device’s Wi-Fi connection can be configured through your device’s AllJoyn Onboarding Producer. When a separate device running an AllJoyn Onboarding Consumer application connects to your Windows 10 IoT SoftAP, the AllJoyn Onboarding Consumer application can be used to configure your IoT device’s Wi-Fi adapter. When enabled, the AllJoyn Onboarding Producer app (IoTOnboarding) uses the ECDHE_NULL authentication method.
To use AllJoyn Onboarding with Windows 10 IoT builds 10.0.14393 or earlier requires an update to the IotOnboarding sample which may be downloaded here.
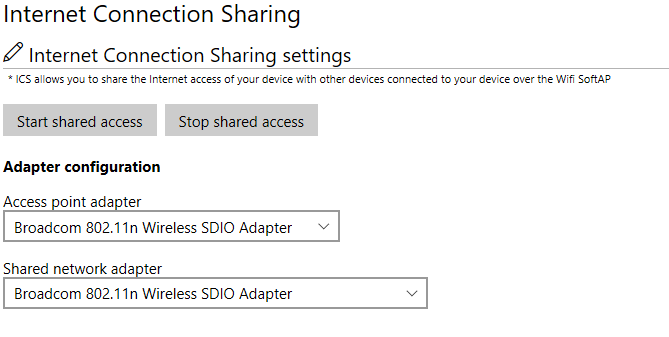
Access point adapter is the WiFi adapter that act as a WiFi access point (it usually has an IP address like 192.168.137.1). Shared network adapter is the adapter that connects to Internet (e.g.: Ethernet adapter).
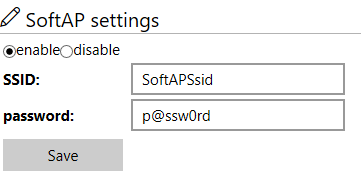
SoftAP SSID will be automatically prefixed by «AJ_» if AllJoyn onboarding is enabled and postfixed with the MAC address of the Wifi adapter. The SoftAP passphrase must be between 8 and 63 ASCII characters.
TPM configuration
The Trusted Platform Module (TPM) is a cryptographic coprocessor including capabilities for random number generation, secure generation of cryptographic keys and limitation of their use. It also includes capabilities such as remote attestation and sealed storage. To learn about the TPM and security on IoT Core, visit the Building secure devices page and the TPM page.
Limpet.exe used to be part of Windows IoT Core. Starting with October 2018, it is now available as an open source porject at https://github.com/ms-iot/azure-dm-client.
To make testing easier, we have a non-signed pre-built version of Limpet.exe available and can be downloaded right from WDP. You just need to go the ‘TPM Configuration’ tab and click the ‘Install Latest’ button.
This version of Limpet.exe should not be shipped with your final product. Instead, you need to build the open source project, sign it, and package it with your image.
Azure Clients configuration
IoT devices can be remotely managed through cloud services. Azure provides a rich set of services to enable such scenarios. We have created a device management client that complements Azure’s Device Provisioning Service (DPS) and Azure’s IoT Hub service on the Windows platform and which also exposes several Windows manageability features.
The clients will be provided as open-source projects. To make testing them easier, we will be providing pre-built binaries. You can use the ‘Azure Clients’ tab in WDP to install and run those test binaries.
This version of the tools should not be shipped with your final product. Instead, you need to build the open source project, sign it, and package it with your image.
We will update this documentation once the open-source projects are available for consumption.
Remote
The Windows IoT Remote Server allows users to see what their device is displaying without connecting a physical monitor to the keyboard.
Additional Information
Changing the default port
- Launch PowerShell and connect to your device.
- Download TakeRegistryOwnership tool, build it, and copy it to your device.
- Take ownership of the registry key for the service by running
- Set the desired port by modifying the registry settings
- Restart the WebManagement service by running following or by restarting the device
Using HTTPS
If you want to use HTTPS, first take the ownership of the registry key as described in previous section and set the HttpsPort and EncryptionMode registry keys as below and then restart the webmanagement service
Provisioning Device Portal with a custom SSL certificate
In the Windows 10 Creators Update, the Windows Device Portal added a way for device administrators to install a custom certificate for use in HTTPS communication.
Crash Dump Settings for Capturing Memory Dump:
To capture a Full Memory Dump, do the following:
Connect to a IoT device through WDP.
From Debug -> Debug settings -> Kernel crash settings -> Crash dump type.
Select: Complete memory dump (in use memory). Make sure the device is rebooted for the setting to take effect.
Verify that HKEY_LOCAL_MACHINE\SYSTEM\ControlSet001\Control\CrashControl\CrashDumpEnabled is set to 0x1.
Update HKEY_LOCAL_MACHINE\SYSTEM\ControlSet001\Control\CrashControl\DumpFileSize to 0x0.
Make sure you have enough space on the device for this Dump to be generated. You can configure the changing the DumpFile location from here: HKEY_LOCAL_MACHINE\SYSTEM\ControlSet001\Control\CrashControl\DumpFile
Управление устройствами Windows IoT Core Managing Windows IoT Core Devices
Устройства Windows 10 IoT базовая можно управлять с помощью традиционного сервера MDM DM, поддерживающего регистрацию на основе сертификата или с помощью управления устройствами центра Интернета вещей Azure. Windows 10 IoT Core devices can be managed using a traditional OMA DM MDM server that supports certificate-based enrollment or using Azure IoT Hub’s Device Management.
Дополнительные сведения о MDM и Windows 10 см. здесь. Learn more about MDM and Windows 10 here.
Для устройств, управляемых с помощью сервера OMA DM, политики MDM для Windows 10 IoT базовая согласовываются с политиками, поддерживаемыми в других выпусках Windows 10. For devices that are managed using an OMA DM server the MDM policies for Windows 10 IoT Core align with the policies supported in other editions of Windows 10. Дополнительные сведения о политиках, а также о том, что можно управлять на устройствах Интернета вещей, см. в справочнике поставщика службы настройки для Windows 10 здесь. To learn more about policies as well as what can be managed on IoT Core devices, see Configuration service provider reference for Windows 10 here. Поддержка MDM в Windows 10 основана на спецификации протокола управления устройствами (DM) Open Mobile Alliance (OMA). The MDM support in Windows 10 is based on Open Mobile Alliance (OMA) Device Management (DM) protocol 1.2.1 specification.
Разделы справки зарегистрировать устройство IoT Core в MDM? How do I enroll an IoT Core device into a MDM?
Регистрация MDM для устройства IoT базовая выполняется с помощью пакета подготовки. MDM enrollment of an IoT Core device is accomplished using a Provisioning package. Пакеты подготовки можно создавать с помощью конфигурации образа Windows и конструктора (ВИКД). Provisioning packages can be created using Windows Image Configuration and Designer (WICD). Давайте попробуем зарегистрировать устройство в MDM. Let’s try enrolling a device into a MDM.
Создание пакета подготовки Creating a Provisioning package
Microsoft System Center Configuration Manager (автономная среда или гибридная среда SCCM + Intune) Microsoft System Center Configuration Manager (Standalone or SCCM+Intune Hybrid)
Открытие консоли управления Configuration Manager (консоль Configuration Manager) Open the Configuration Manager Management Console (ConfigMgr Console)
Перейдите к разделу активы и соответствие > параметры соответствия > доступ к ресурсам компании > профили сертификата профили  Navigate to Assets and Compliance > Compliance Settings > Company Resource Access > Certificate Profiles
Щелкните создать профиль сертификата . Click Create Certificate Profile
Укажите имя и описание профиля. Provide a name and description for the profile
- Имя: пример Configuration Manager с доверенным корневым сертификатом Name: ConfigMgr Example Trusted Root Certificate
- Тип профиля сертификата: сертификат доверенного ЦС Type of certificate profile: Trusted CA certificate

- Тип профиля сертификата: сертификат доверенного ЦС Type of certificate profile: Trusted CA certificate

Нажмите кнопку Далее. Click Next.
Импортируйте файл сертификата. Import the certificate file.
Выберите хранилище сертификатов компьютера — корневой каталог для целевого хранилища. Select Computer certificate store — Root for the Destination Store.
Нажмите кнопку Далее. Click Next.
Выберите выбрать все для  Choose Select all for Supported Platforms
Щелкните Сводка, далее и закрыть, чтобы выйти из мастера. Click Summary, Next, and Close to exit the wizard.
Щелкните правой кнопкой мыши только что созданный профиль и выберите пункт Экспорт. Right-click on the profile just created and click Export.
Нажмите кнопку Обзор, найдите папку, в которую следует экспортировать файл ppkg, а затем нажмите кнопку сохранить. Click Browse, find a location where the .ppkg file should be exported, and then click Save.
Нажмите кнопку Экспорт и нажмите кнопку ОК , чтобы выйти из мастера. Click Export and click OK to exit the wizard.
Другие серверы MDM Other MDM Servers
Откройте конструктор образов и конфигураций Windows (ВИКД). Open Windows Imaging and Configuration Designer (WICD). 
Выбор расширенной подготовки Choose Advanced Provisioning
Задайте имя для пакета. Set a name for your package.
Выберите параметры, общие для Windows 10 IoT базовая. Choose settings common to Windows 10 IoT Core.
Пропустить шаг импорт пакета. Skip the Import Package step. 


Перейдите к рабочему месту — > регистрации. Navigate to Workplace -> Enrollments.
В поле UPN введите учетную запись, которую вы хотите зарегистрировать для устройства (например, trmck@contoso.co ), и нажмите кнопку Добавить. In the UPN field, enter the account you wish to enroll your device under (i.e. trmck@contoso.co) and click Add.

Для Аусполици выберите Проверка подлинности на основе пароля пользователя (OnPremises) или проверка подлинности на основе сертификата. For AuthPolicy choose between Username Password based authentication (OnPremises) or Certificate-based authentication.
Введите URL-адрес службы обнаружения для сервера MDM. Enter the Discovery Service URL for your MDM server.
URL-адрес службы регистрации и URL-адрес службы политики являются необязательными. Enrollment Service URL and Policy Service URL are optional.
Для секрета введите For the Secret enter
- OnPremises: пароль для учетной записи, с которой выполняется регистрация. OnPremises: The password for the account you’re enrolling with
- Certificate: отпечаток сертификата. Certificate: The thumbprint of the certificate

В верхней части окна ВИКД щелкните Export > подготовки пакета. At the top of WICD window click Export > Provisioning package.
Укажите имя и версию пакета и нажмите кнопку Далее. Provide a name and version for your package and click Next.
Не забудьте увеличить номер версии, чтобы обеспечить выполнение обновленного пакета. Be sure to increment the version number to ensure an updated package is executed.
На странице «сведения о безопасности» нажмите кнопку Далее . Click Next on the security details page.
Выберите расположение для экспорта пакета на локальном компьютере и нажмите кнопку Далее. Choose the location where the package is to be exported on the local machine and click Next.
Щелкните Сборка , а затем Готово , чтобы выйти из мастера. Click Build and then Finish to exit the wizard.
Установка пакета подготовки Installing the Provisioning package
Пакет подготовки может быть развернут на устройстве IoT несколькими способами. There are a few ways in which a Provisioning package can be deployed to an IoT device. Пакет можно развернуть путем копирования пакета на устройство или добавления пакета в образ во время процесса создания образа. It is possible to deploy a package by copying the package to the device or adding the package to the image during the imaging process.
Копирование пакета на устройство Copying package to device
Возьмите пакет подготовки, который был экспортирован из SCCM или ВИКД, и скопируйте файл ppkg в C:\Windows\Provisioning\Packages каталог на устройстве IOT. Take the Provisioning package that was exported from SCCM or WICD and copy the .ppkg file to C:\Windows\Provisioning\Packages directory on the IoT device. После перезагрузки устройства пакет будет выполнен, и устройство начнет процесс регистрации. Upon reboot of the device, the package will be executed and the device will start the enrollment process.
Добавление пакета в образ Adding package to image
См. раздел Добавление пакета подготовки в образ. See Add a provisioning package to an image. При первой загрузке устройство выполнит пакет и начнет процесс регистрации. Upon first boot, the device will execute the package and start the enrollment process.


