- How to enter UEFI (BIOS) on Windows 10 PCs
- How to access UEFI (BIOS) using Settings
- How to access UEFI (BIOS) using boot key option
- More Windows 10 resources
- Halo: MCC’s live service elements make it better, not worse
- Microsoft’s Surface Duo is not ‘failing up’
- Here’s what you can do if Windows 10 update KB5001330 is causing issues
- These are the best PC sticks when you’re on the move
- Как установить Windows 10
- Как узнать OEM ключ лицензионной Windows 8.1 ноутбука, если на нём нет жёсткого диска. Или другими словами, как узнать ключ Windows 8.1 «вшитый» в BIOS ноутбука
- Как узнать OEM ключ лицензионной Windows 8.1 ноутбука, если на нём нет жёсткого диска. Или другими словами, как узнать ключ Windows 8.1 «вшитый» в BIOS ноутбука
- Windows Secure Boot Key Creation and Management Guidance
- 1. Secure Boot, Windows and Key Management
- 1.1 Public-Key Infrastructure (PKI) and Secure Boot
- 1.2 Public Key Cryptography
- 1.3 Secure Boot PKI requirements
- 1.4 Signature Databases (Db and Dbx)
- 1.5 Keys Required for Secure Boot on all PCs
How to enter UEFI (BIOS) on Windows 10 PCs
 Source: Windows Central
On Computers, the Basic Input Output System (BIOS) is an essential low-level software that sits on one of the chips of the motherboard, and it’s responsible for basic operations, such as booting and configuring hardware (mouse, keyboard, memory, processor, etc.). The Unified Extensible Firmware Interface (UEFI) is a modern software designed to replace the legacy BIOS with additional benefits, such as improved security, faster boot times, large capacity hard drive support, and more.
Although these are different technologies, modern devices now use UEFI, but to avoid confusion, sometimes you’ll continue to hear the term «BIOS» to refer to «UEFI.»
If you use a Windows 10 device, usually, the firmware works automatically. However, sometimes you may still need to enter the motherboard BIOS to troubleshoot problems, enable or disable features (such as virtualization, RAID array, and secure boot), adjust memory and processor advanced settings, and more.
The only caveat is that the BIOS is a startup environment, which means that you can’t access it when Windows 10 is running. However, if you have to change some system settings, there are multiple methods to access the motherboard firmware.
In this Windows 10 guide, we’ll walk you through the steps to enter the BIOS/UEFI on your computer to change advanced system settings.
How to access UEFI (BIOS) using Settings
To enter the UEFI firmware from Windows 10, use these steps:
Warning: Changing the wrong firmware settings can prevent your computer from starting correctly. You should only access the motherboard firmware when you have an excellent reason. It’s assumed that you know what you’re doing.
- Open Settings.
- Click on Update & Security.
- Click on Recovery.
Under the «Advanced startup» section, click the Restart now button.
 Source: Windows Central
Click on Troubleshoot.
Source: Windows Central
Click on Advanced options.
Source: Windows Central
Click the UEFI Firmware settings option.
Quick tip: If you have a legacy BIOS, the option will not be available. Source: Windows Central
Click the Restart button.
Source: Windows Central
Once you complete the steps, the device will restart and boot into the UEFI firmware allowing you to change advanced settings, such as to disable or enable secure boot, change boot order, set up a hardware RAID array, enable virtualization, and other settings depending on the motherboard support.
How to access UEFI (BIOS) using boot key option
If you don’t have access to the Windows 10 desktop or you’re using a device with a legacy BIOS, then you can still access the firmware during boot.
To enter the UEFI or legacy BIOS during boot, use these steps:
- Press the Power button.
- See the screen splash to identify the key you must press to enter the firmware (if applicable).
- Press the required key repeatedly until you enter the setup mode. Usually, you need to press the ESC, Delete, or one of the Function keys (F1, F2, F10, etc.).
After you complete the steps, the device will access the BIOS or UEFI firmware, depending on the motherboard support. If you don’t see the information on the screen or the device boots too fast, restart the device again, and as soon as the boot starts, press the required key multiple times quickly.
If you can’t make the computer to access the firmware using the keyboard, you may need to check your device manufacturer to find out the key that you need to press during boot.
Here are some computer brands and their respective keys to access the motherboard firmware:
- Dell: F2 or F12.
- HP: ESC or F10.
- Acer: F2 or Delete.
- ASUS: F2 or Delete.
- Lenovo: F1 or F2.
- MSI: Delete.
- Toshiba: F2.
- Samsung: F2.
- Surface: Press and hold volume up button.
In the case that your device is using a UEFI firmware, and you can’t seem to access it during startup, then it’s recommended to use the Settings option from within Windows 10.
More Windows 10 resources
For more helpful articles, coverage, and answers to common questions about Windows 10, visit the following resources:
![]()
Halo: MCC’s live service elements make it better, not worse
Halo: The Master Chief Collection is more popular than ever, but some fans don’t agree with the live service approach 343 Industries has taken with it. Here’s why those elements are, at the end of the day, great for the game and for Halo overall.
![]()
Microsoft’s Surface Duo is not ‘failing up’
Microsoft announced this week that it was expanding Surface Duo availability to nine new commercial markets. While Surface Duo is undoubtedly a work in progress, this is not a sign of a disaster. It’s also doesn’t mean that Surface Duo is selling a ton either. Instead, the reason for the expansion is a lot more straightforward.
![]()
Here’s what you can do if Windows 10 update KB5001330 is causing issues
In this guide, we’ll show you the steps to get rid of the update KB5001330 to fix profile, gaming, and BSoD problems with the Windows 10 October 2020 Update and May 2020 Update.
![]()
These are the best PC sticks when you’re on the move
Instant computer — just add a screen. That’s the general idea behind the ultra-portable PC, but it can be hard to know which one you want. Relax, we have you covered!
Как установить Windows 10

- Просмотров: 239 545
- Автор: admin
- Дата: 5-12-2015
Как узнать OEM ключ лицензионной Windows 8.1 ноутбука, если на нём нет жёсткого диска. Или другими словами, как узнать ключ Windows 8.1 «вшитый» в BIOS ноутбука
- Здравствуйте дорогие администраторы! Вопрос: как узнать OEM ключ лицензионной Windows 8.1 ноутбука, если на нём нет жёсткого диска? Или другими словами, как узнать ключ Windows 8.1 вшитый в BIOS ноутбука? Моя проблема состоит в том, что у меня вышел из строя жёсткий диск и я купил новый, теперь хочу установить на него ранее предустановленную с магазина Windows 8.1 Single Language (Для одного языка), но боюсь, что система не активируется автоматически при установке. Читал в интернете, что с помощью каких-то программ можно узнать ключ Windows 8.1, «вшитый» в BIOS ноутбука и ключ это сохраняется в любом случае, на всё время жизни ноутбука.
- Привет админ! Покупал год назад ноутбук, тогда на нём была установлена Windows 8, которую я сразу снёс и установил Windows 7, а вот теперь думаю вернуть обратно Windows 8, да не знаю лицензионного ключа, можно его где-то посмотреть? Раньше ключ Windows был напечатан на днище ноутбука, а сейчас его там нет.
Как узнать OEM ключ лицензионной Windows 8.1 ноутбука, если на нём нет жёсткого диска. Или другими словами, как узнать ключ Windows 8.1 «вшитый» в BIOS ноутбука
- Примечание : Если посмотреть на вопрос с другой стороны, то узнавать ключ Windows 8.1, вшитый в БИОС ноутбука, обычному пользователю совсем не обязательно и вот почему. Дело в том, что при установке на ноутбук именно той версии операционной системы, которая была на нём предустановлена с магазина (в большинстве случаев Windows 8.1 Single Language), ключ подставится во время установки системы автоматически и вам не нужно будет ничего вводить. Другими словами, знать ключ прописанный в таблицу ACPI MSD БИОСа ноутбука не нужно ни при каких обстоятельствах, пусть даже вы замените на ноутбуке жёсткий диск. Обо всём этом с подробностями я написал в этой статье.
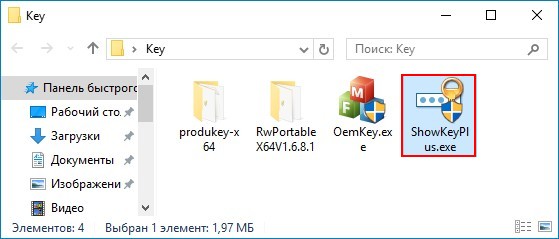
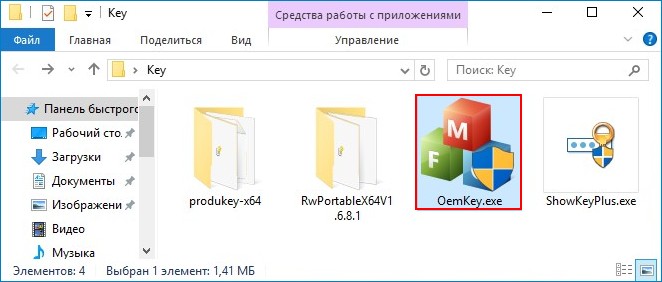
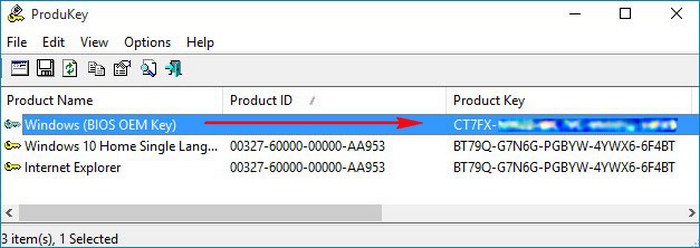
Итак, смотрим ключ Windows 8.1 прописанный в БИОСе программами: ShowKeyPlus, OemKey, RWEverything, ProduKey.
Первая на очереди программа ShowKeyPlus
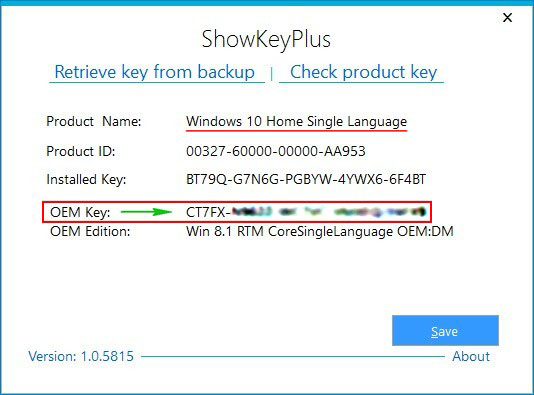
Программа выводит подробную информацию.
Product Name (Версия установленной на данный момент на ноутбуке операционной системы) — Windows 10 Single Language (Для одного языка).
Product ID : Код продукта .
Installed Key: Ключ установленной сейчас на ноутбуке Windows 10 Single Language.
OEM Key: К люч от Windows 8.1, прописанный в таблицу ACPI MSD БИОСа ноутбука (то, что нам и нужно, это и есть ключ вшитый в БИОС).
OEM Edition: Версия операционной системы ( Windows 8.1 Single Language) предустановленной на заводе изготовителем ноутбука. Именно к этой версии подойдёт ключ ( OEM Key) и подставится он во время установки системы автоматически, то есть вводить его вам не придётся.
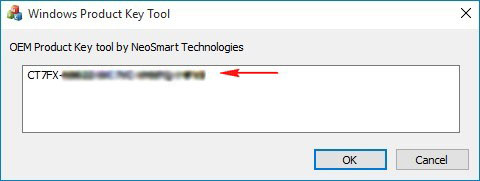
Показывает только ключ Windows 8.1 вшитый в БИОС ноутбука.
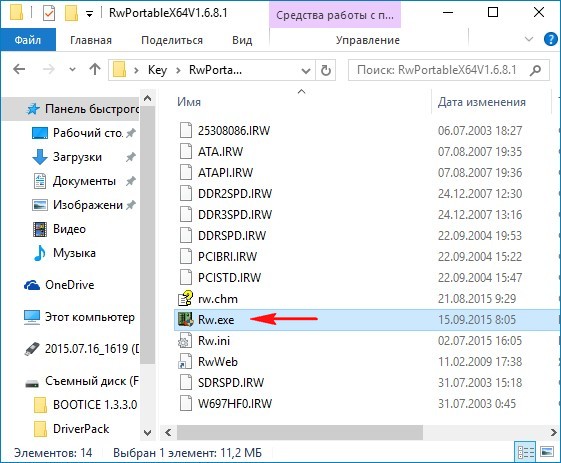
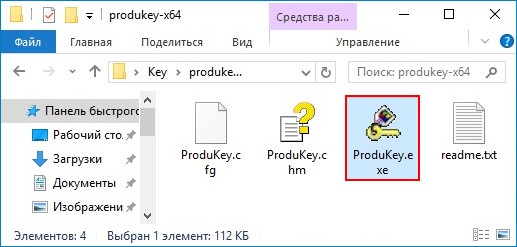
Заходим в папку программы и запускаем исполняемый файл Rw.exe.
Жмём на кнопку ACPI.
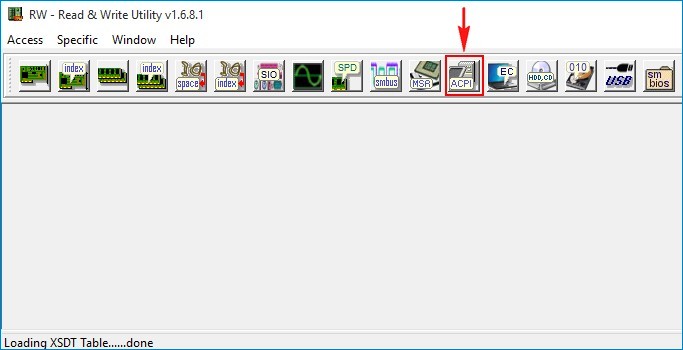
Жмём на кнопку MSDM и видим ключ Windows 8 или Windows 8.1.
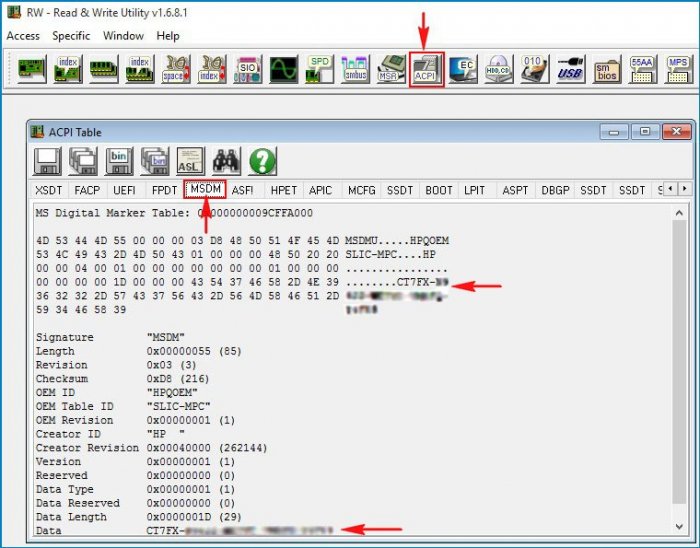
Утилита показывает два ключа, первый, это OEM ключ прописанный в таблицу ACPI MSD БИОСа ноутбука , а второй, ключ установленной на данный момент Windows 10.
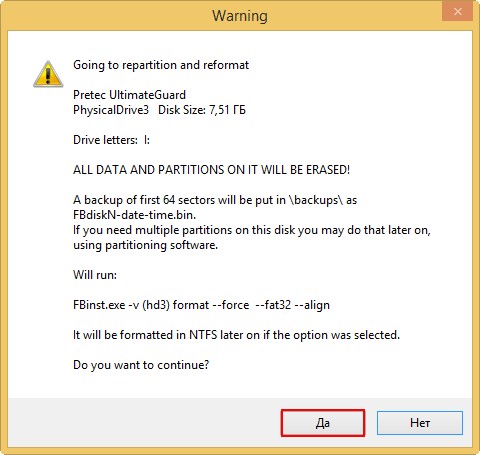
Как узнать OEM ключ лицензионной Windows 8.1 ноутбука, если на нём нет жёсткого диска?
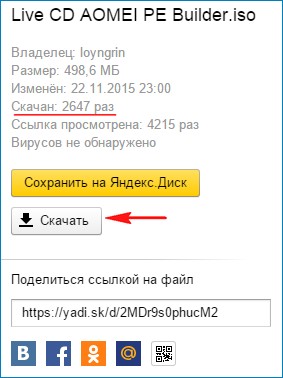
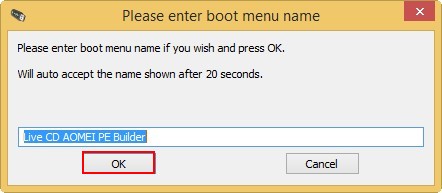
Создаём загрузочную флешку Live CD AOMEI PE Builder

После скачивания ISO образа запускаем программу WinSetupFromUSB, именно ей создадим загрузочную флешку.
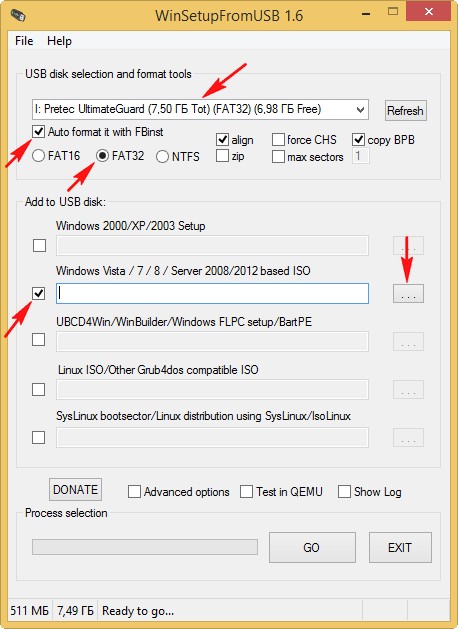
В главном окне программы WinSetupFromUSB выбираем нашу флешку (осторожно, все данные на флешке будут удалены).
Ставим галочку на пункте Auto format it with FBinst и отмечаем галочкой пункт FAT32.
Отмечаем галочкой пункт Vista/7/8/Server 2008/2012 based ISO и нажимаем на кнопку справа открывающую окно проводника.
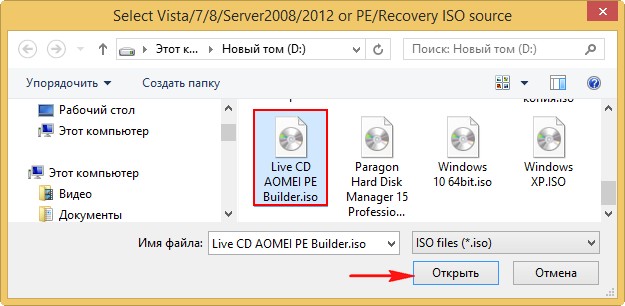
Открывается проводник, находим ISO образ Live CD AOMEI PE Builder выделяем его левой мышью и жмём «Открыть».
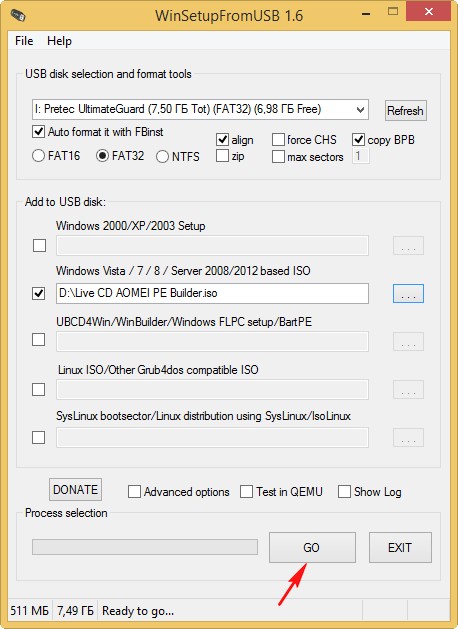
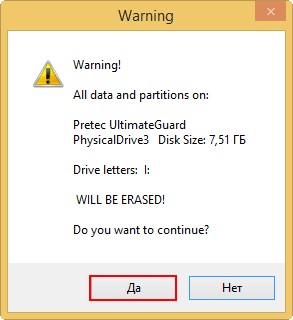
Начинается процесс создания загрузочной флешки.
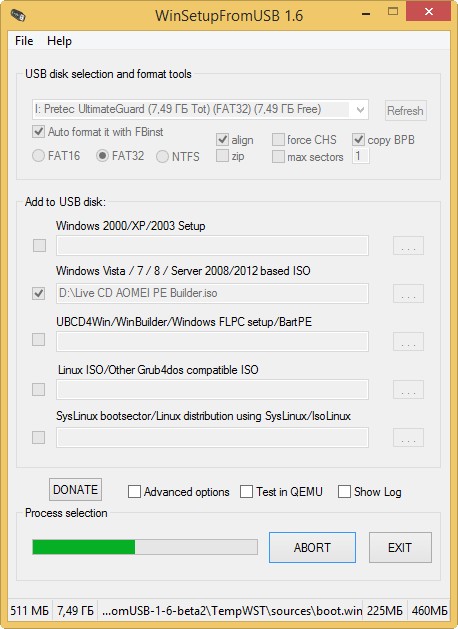
И заканчивается успешно.

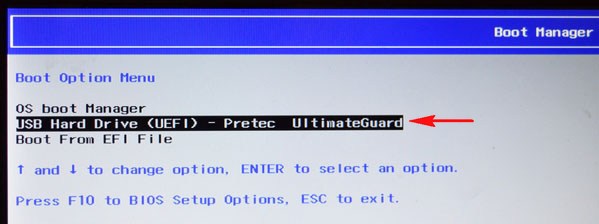
Открывается главное окно Live CD AOMEI PE Builder, представляющее из себя обычный рабочий стол Windows со значками программ.

Заходим в папку Софт.
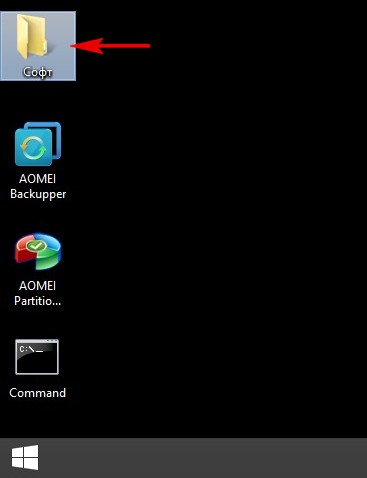
и видим те же самые программы, с которыми мы уже работали.
Точно также определяем ключ Windows 8, 8.1 вшитый в БИОС.
Windows Secure Boot Key Creation and Management Guidance
Vishal Manan, Architect, OEM Consulting, vmanan@microsoft.com
Arie van der Hoeven, Architect, OEM Consulting, ariev@microsoft.com
This document helps guide OEMs and ODMs in creation and management of the Secure Boot keys and certificates in a manufacturing environment. It addresses questions related to creation, storage and retrieval of Platform Keys (PKs), secure firmware update keys, and third party Key Exchange Keys (KEKs).
Note: These steps are not specific to PC OEMs. Enterprises and customers can also use these steps to configure their servers to support Secure Boot.
Windows requirements for UEFI and Secure Boot can be found in the Windows Hardware Certification Requirements. This paper does not introduce new requirements or represent an official Windows program. It is intended as guidance beyond certification requirements, to assist in building efficient and secure processes for creating and managing Secure Boot Keys. This is important because UEFI Secure Boot is based on the usage of Public Key Infrastructure to authenticate code before allowed to execute.
The reader is expected to know the fundamentals of UEFI, basic understanding of Secure Boot (Chapter 27 of the UEFI specification), and PKI security model.
Requirements, tests, and tools validating Secure Boot on Windows are available today through the Windows Hardware Certification Kit (HCK). However, these HCK resources do not address creation and management of keys for Windows deployments. This paper addresses key management as a resource to help guide partners through deployment of the keys used by the firmware. It is not intended as prescriptive guidance and does not include any new requirements.
1. Secure Boot, Windows and Key Management contains information on boot security and PKI architecture as it applies to Windows and Secure Boot.
2. Key Management Solutions is intended to help partners design a key management and design solution that fits their needs.
3. Summary and Resources includes appendices, checklists, APIs, and other references.
This document serves as a starting point in developing customer ready PCs, factory deployment tools and key security best practices.
1. Secure Boot, Windows and Key Management
The UEFI (Unified Extensible Firmware Interface) specification defines a firmware execution authentication process called Secure Boot. As an industry standard, Secure Boot defines how platform firmware manages certificates, authenticates firmware, and how the operating system interfaces with this process.
Secure Boot is based on the Public Key Infrastructure (PKI) process to authenticate modules before they are allowed to execute. These modules can include firmware drivers, option ROMs, UEFI drivers on disk, UEFI applications, or UEFI boot loaders. Through image authentication before execution, Secure Boot reduces the risk of pre-boot malware attacks such as rootkits. Microsoft relies on UEFI Secure Boot in Windows 8 and above as part of its Trusted Boot security architecture to improve platform security for our customers. Secure Boot is required for Windows 8 and above client PCs, and for Windows Server 2016 as defined in the Windows Hardware Compatibility Requirements.
The Secure Boot process works as follows and as shown in Figure 1:
Firmware Boot Components: The firmware verifies the OS loader is trusted (Windows or another trusted operating system.)
Windows boot components: BootMgr, WinLoad, Windows Kernel Startup. Windows boot components verify the signature on each component. Any non-trusted components will not be loaded and instead will trigger Secure Boot remediation.
Antivirus and Antimalware Software initialization: This software is checked for a special signature issued by Microsoft verifying that it is a trusted boot critical driver, and will launch early in the boot process.
Boot Critical Driver initialization: The signatures on all Boot-critical drivers are checked as part of Secure Boot verification in WinLoad.
Additional OS Initialization
Windows Logon Screen

Figure 1: Windows Trusted Boot Architecture
Implementation of UEFI Secure Boot is part of Microsoft’s Trusted Boot Architecture, introduced in Windows 8.1. A growing trend in the evolution of malware exploits is targeting the boot path as a preferred attack vector. This class of attack has been difficult to guard against, since antimalware products can be disabled by malicious software that prevents them from loading entirely. With Windows Trusted Boot architecture and its establishment of a root of trust with Secure Boot, the customer is protected from malicious code executing in the boot path by ensuring that only signed, certified “known good” code and boot loaders can execute before the operating system itself loads.
1.1 Public-Key Infrastructure (PKI) and Secure Boot
The PKI establishes authenticity and trust in a system. Secure Boot leverages PKI for two high-level purposes:
During boot to determine if early boot modules are trusted for execution.
To authenticate requests to service requests include modification of Secure Boot databases and updates to platform firmware.
A PKI consists of:
A certificate authority (CA) that issues the digital certificates.
A registration authority which verifies the identity of users requesting a certificate from the CA.
A central directory in which to store and index keys.
A certificate management system.
1.2 Public Key Cryptography
Public key cryptography uses a pair of mathematically related cryptographic keys, known as the public and private key. If you know one of the keys, you cannot easily calculate what the other one is. If one key is used to encrypt information, then only the corresponding key can decrypt that information. For Secure Boot, the private key is used to digitally sign code and the public key is used to verify the signature on that code to prove its authenticity. If a private key is compromised, then systems with corresponding public keys are no longer secure. This can lead to boot kit attacks and will damage the reputation of the entity responsible for ensuring the security of the private key.
In a Secure Boot public key system you have the following:
1.2.1 RSA 2048 Encryption
RSA-2048 is an asymmetric cryptographic algorithm. The space needed to store an RSA-2048 modulus in raw form is 2048 bits.
1.2.2 Self-signed certificate
A certificate signed by the private key that matches the public key of the certificate is known as a self-signed certificate. Root certification authority (CA) certificates fall into this category.
1.2.3 Certification Authority
The certification authority (CA) issues signed certificates that affirm the identity of the certificate subject and bind that identity to the public key contained in the certificate. The CA signs the certificate by using its private key. It issues the corresponding public key to all interested parties in a self-signed root CA certificate.
In Secure Boot, Certification Authorities (CAs) include the OEM (or their delegates) and Microsoft. The CAs generate the key pairs that form the root of trust and then use the private keys to sign legitimate operations such as allowed early boot EFI modules and firmware servicing requests. The corresponding public keys are shipped embedded into the UEFI firmware on Secure Boot-enabled PCs and are used to verify these operations.
(More information on usage of CAs and key exchanges is readily available on the internet which relates to the Secure Boot model.)
1.2.4 Public Key
The public Platform Key ships on the PC and is accessible or “public”. In this document we will use the suffix “pub” to denote public key. For example, PKpub denotes the public half of the PK.
1.2.5 Private Key
For PKI to work the private key needs to be securely managed. It should be accessible to a few highly trusted individuals in an organization and located in a physically secure location with strong access policy restrictions in place. In this document we will use the suffix “priv” to denote private key. For example, the PKpriv indicates private half of the PK.
1.2.6 Certificates
The primary use for digital certificates is to verify the origin of signed data, such as binaries etc. A common use of certificates is for internet message security using Transport Layer Security (TLS) or Secure Sockets Layer (SSL). Verifying the signed data with a certificate lets the recipient know the origin of the data and if it has been altered in transit.
A digital certificate in general contains, at a high level, a distinguished name (DN), a public key, and a signature. The DN identifies an entity — a company, for example — that holds the private key that matches the public key of the certificate. Signing the certificate with a private key and placing the signature in the certificate ties the private key to the public key.
Certificates can contain some other types of data. For example, an X.509 certificate includes the format of the certificate, the serial number of the certificate, the algorithm used to sign the certificate, the name of the CA that issued the certificate, the name and public key of the entity requesting the certificate, and the CA’s signature.
1.2.7 Chaining certificates

Figure 2: Three-certificate chain
User certificates are often signed by a different private key, such as a private key of the CA. This constitutes a two-certificate chain. Verifying that a user certificate is genuine involves verifying its signature, which requires the public key of the CA, from its certificate. But before the public key of the CA can be used, the enclosing CA certificate needs to be verified. Because the CA certificate is self-signed, the CA public key is used to verify the certificate.
A user certificate need not be signed by the private key of the root CA. It could be signed by the private key of an intermediary whose certificate is signed by the private key of the CA. This is an instance of a three-certificate chain: user certificate, intermediary certificate, and CA certificate. But more than one intermediary can be part of the chain, so certificate chains can be of any length.
1.3 Secure Boot PKI requirements
The UEFI-defined root of trust consists of the Platform Key and any keys an OEM or ODM includes in the firmware core. Pre-UEFI security and a root of trust are not addressed by the UEFI Secure Boot process, but instead by National Institute of Standards and Technology (NIST), and Trusted Computing Group (TCG) publications referenced in this paper.
1.3.1 Secure Boot requirements
You’ll need to consider the following parameters for implementing Secure Boot:
Windows Hardware Compatibility requirements
Key generation and management requirements.
You would need to pick hardware for Secure Boot key management like Hardware Security Modules (HSMs), consider special requirements on PCs to ship to governments and other agencies and finally the process of creating, populating and managing the life cycle of various Secure Boot keys.
1.3.2 Secure Boot related keys
The keys used for Secure Boot are below:

Figure 3: Keys related to Secure Boot
Figure 3 above represents the signatures and keys in a PC with Secure Boot. The platform is secured through a platform key that the OEM installs in firmware during manufacturing. Other keys are used by Secure Boot to protect access to databases that store keys to allow or disallow execution of firmware.
The authorized database (db) contains public keys and certificates that represent trusted firmware components and operating system loaders. The forbidden signature database (dbx) contains hashes of malicious and vulnerable components as well as compromised keys and certificates and blocks execution of those malicious components. The strength of these policies is based on signing firmware using Authenticode and Public Key Infrastructure (PKI). PKI is a well-established process for creating, managing, and revoking certificates that establish trust during information exchange. PKI is at the core of the security model for Secure Boot.
Below are more details on these keys.
1.3.3 Platform Key (PK)
As per section 27.5.1 of the UEFI 2.3.1 Errata C, the platform key establishes a trust relationship between the platform owner and the platform firmware. The platform owner enrolls the public half of the key (PKpub) into the platform firmware as specified in Section 7.2.1 of the UEFI 2.3.1 Errata C. This step moves the platform into user mode from setup mode. Microsoft recommends that the Platform Key be of type EFI_CERT_X509_GUID with public key algorithm RSA, public key length of 2048 bits, and signature algorithm sha256RSA. The platform owner may use type EFI_CERT_RSA2048_GUID if storage space is a concern. Public keys are used to check signatures as described earlier in this document. The platform owner can later use the private half of the key (PKpriv):
To change platform ownership you must put the firmware into UEFI defined setup mode which disables Secure Boot. Revert to setup mode only if there is a need to do this during manufacturing.
For desktop PC, OEMs manage PK and necessary PKI associated with it. For Servers, OEMs by default manage PK and necessary PKI. Enterprise customers or Server customers can also customize PK, replacing the OEM-trusted PK with a custom-proprietary PK to lock down the trust in UEFI Secure Boot firmware to itself.
1.3.3.1 To enroll or update a Key Exchange Key (KEK) Enrolling the Platform Key
The platform owner enrolls the public half of the Platform Key (PKpub) by calling the UEFI Boot Service SetVariable() as specified in Section 7.2.1 of UEFI Spec 2.3.1 errata C, and resetting the platform. If the platform is in setup mode, then the new PKpub shall be signed with its PKpriv counterpart. If the platform is in user mode, then the new PKpub must be signed with the current PKpriv. If the PK is of type EFI_CERT_X509_GUID, then this must be signed by the immediate PKpriv, not a private key of any certificate issued under the PK.
1.3.3.2 Clearing the Platform Key
The platform owner clears the public half of the Platform Key (PKpub) by calling the UEFI Boot Ser¬vice SetVariable() with a variable size of 0 and resetting the platform. If the platform is in setup mode, then the empty variable does not need to be authenticated. If the platform is in user mode, then the empty variable must be signed with the current PKpriv; see Section 7.2(Variable Services) under UEFI specification 2.3.1 Errata C for details. It is strongly recommended that the production PKpriv never be used to sign a package to reset the platform since this allows Secure Boot to be disabled programmatically. This is primarily a pre-production test scenario.
The platform key may also be cleared using a secure platform-specific method. In this case, the global variable Setup Mode must also be updated to 1.

Figure 4: Platform Key State diagram
1.3.3.3 PK generation
As per UEFI recommendations, the public key must be stored in non-volatile storage which is tamper and delete resistant on the PC. The Private keys stay secure at Partner or in the OEM’s Security Office and only the public key is loaded onto the platform. There are more details under section 2.2.1 and 2.3.
The number of PK generated is at the discretion of the Platform owner (OEM). These keys could be:
One per PC. Having one unique key for each device. This may be required for government agencies, financial institutions, or other server customers with high-security needs. It may require additional storage and crypto processing power to generate private and public keys for large numbers of PCs. This adds the complexity of mapping devices with their corresponding PK when pushing out firmware updates to the devices in the future. There are a few different HSM solutions available to manage large number of keys based on the HSM vendor. For more info, see Secure Boot Key Generation Using HSM.
One per model. Having one key per PC model. The tradeoff here is that if a key is compromised all the machines within the same model would be vulnerable. This is recommended by Microsoft for desktop PCs.
One per product line. If a key is compromised a whole product line would be vulnerable.
One per OEM. While this may be the simplest to set up, if the key is compromised, every PC you manufacture would be vulnerable. To speed up operation on the factory floor, the PK and potentially other keys could be pre-generated and stored in a safe location. These could be later retrieved and used in the assembly line. Chapters 2 and 3 have more details.
1.3.3.4 Rekeying the PK
This may be needed if the PK gets compromised or as a requirement by a customer that for security reasons may decide to enroll their own PK.
Rekeying could be done either for a model or PC based on what method was selected to create PK. All the newer PCs will get signed with the newly created PK.
Updating the PK on a production PC would require either a variable update signed with the existing PK that replaces the PK or a firmware update package. An OEM could also create a SetVariable() package and distribute that with a simple application such as PowerShell that just changes the PK. The firmware update package would be signed by the secure firmware update key and verified by firmware. If doing a firmware update to update the PK, care should be taken to ensure the KEK, db, and dbx are preserved.
On all PCs, it is recommended to not use the PK as the secure firmware update key. If the PKpriv is compromised then so is the secure firmware update key (since they are the same). In this case the update to enroll a new PKpub might not be possible since the process of updating has also been compromised.
On SOCs PCs, there is another reason to not use the PK as the secure firmware update key. This is because the secure firmware update key is permanently burnt into fuses on PCs that meet Windows Hardware Certification requirements.
1.3.4 Key Exchange Key (KEK)Key exchange keys establish a trust relationship between the operating system and the platform firmware. Each operating system (and potentially, each 3rd party application which need to communicate with platform firmware) enrolls a public key (KEKpub) into the platform firmware.
1.3.4.1 Enrolling Key Exchange Keys
Key exchange keys are stored in a signature database as described in 1.4 Signature Databases (Db and Dbx). The signature database is stored as an authenticated UEFI variable.
The platform owner enrolls the key exchange keys by either calling SetVariable() as specified in Section 7.2(Variable Services) under UEFI specification 2.3.1 Errata C. with the EFI_VARIABLE_APPEND_WRITE attribute set and the Data parameter containing the new key(s), or by reading the database using GetVariable(), appending the new key exchange key to the existing keys and then writing the database using SetVariable()as specified in Section 7.2(Variable Services) under UEFI specification 2.3.1 Errata C without the EFI_VARIABLE_APPEND_WRITE attribute set.
If the platform is in setup mode, the signature database variable does not need to be signed but the parameters to the SetVariable() call shall still be prepared as specified for authenticated variables in Section 7.2.1. If the platform is in user mode, the signature database must be signed with the current PKpriv
1.3.4.2 Clearing the KEK
It is possible to “clear” (delete) the KEK. Note that if the PK is not installed on the platform, “clear” requests are not required to be signed. If they are signed, then to clear the KEK requires a PK-signed package, and to clear either db or dbx requires a package signed by any entity present in the KEK.
1.3.4.3 Microsoft KEK
The Microsoft KEK is required to enable revocation of bad images by updating the dbx and potentially for updating db to prepare for newer Windows signed images.
Include the Microsoft Corporation KEK CA 2011 in the KEK database, with the following values:
SHA-1 cert hash: 31 59 0b fd 89 c9 d7 4e d0 87 df ac 66 33 4b 39 31 25 4b 30 .
Microsoft will provide the certificate to partners and it can be added either as an EFI_CERT_X509_GUID or an EFI_CERT_RSA2048_GUID type signature.
The Microsoft KEK certificate can be downloaded from: https://go.microsoft.com/fwlink/?LinkId=321185.
1.3.4.4 KEKDefault The platform vendor may provide a default set of Key Exchange Keys in the KEKDefault variable. Please reference UEFI specification section 27.3.3 for more information.
1.3.4.5 OEM/3rd party KEK — adding multiple KEK
Customers and Platform Owners don’t need to have their own KEK. On non-Windows RT PCs the OEM may have additional KEKs to allow additional OEM or a trusted 3rd party control of the db and dbx.
1.3.5 Secure Boot firmware update keyThe Secure firmware update key is used to sign the firmware when it needs to be updated. This key has to have a minimum key strength of RSA-2048. All firmware updates must be signed securely by the OEM, their trusted delegate such as the ODM or IBV (Independent BIOS Vendor), or by a secure signing service.
As per NIST publication 800-147 Field Firmware Update must support all elements of guidelines:
Any update to the firmware flash store must be signed by creator.
Firmware must check signature of the update.
1.3.6 Creation of keys for Secure Firmware Update
The same key will be used to sign all firmware updates since the public half will be residing on the PC. You could also sign the firmware update with a key which chains to Secure Firmware update key.
There could be one key per PC like PK or one per model or one per product line. If there is one key per PC that would mean that millions of unique update packages will need to be generated. Please consider based on resource availability what method would work for you. Having a key per model or product line is a good compromise.
The Secure Firmware Update public key (or its hash to save space) would be stored in some protected storage on the platform – generally protected flash (PC) or one-time-programmable fuses (SOC).
If only the hash of this key is stored (to save space), then the firmware update will include the key, and the first stage of the update process will be verifying that the public key in the update matches the hash stored on the platform.
Capsules are a means by which the OS can pass data to UEFI environment across a reboot. Windows calls the UEFI UpdateCapsule() to deliver system and PC firmware updates. At boot time prior to calling ExitBootServices(),Windows will pass in any new firmware updates found in the Windows Driver Store into UpdateCapsule(). UEFI system firmware can use this process to update system and PC firmware. By leveraging this Windows firmware support an OEM can rely on the same common format and process for updating firmware for both system and PC firmware. Firmware must implement the ACPI ESRT table in order to support UEFI UpdateCapsule() for Windows.
For details on implementing support for the Windows UEFI Firmware Update Platform consult the following documentation: Windows UEFI Firmware Update Platform.
Update capsules can be in memory or on the disk. Windows supports in memory updates.
1.3.6.1 Capsule (Capsule-in-Memory)
Following is the flow of events for an In-memory update capsule to work.
A capsule is put in memory by an application in the OS
Mailbox event is set to inform BIOS of pending update
PC reboots, verifies the capsule image and update is performed by the BIOS
1.3.7 Workflow of a typical firmware update
Download and install the firmware driver.
OS Loader detects and verifies the firmware.
OS Loader passes a binary blob to UEFI.
UEFI performs the firmware update (This process is owned by the silicon vendor).
OS Loader detection completes successfully.
OS finishes booting.
1.4 Signature Databases (Db and Dbx)
1.4.1 Allowed Signature database (db)
The contents of the EFI _IMAGE_SECURITY_DATABASE db control what images are trusted when verifying loaded images. The database may contain multiple certificates, keys, and hashes in order to identify allowed images.
The Microsoft Windows Production PCA 2011 with a SHA-1 Cert Hash of 58 0a 6f 4c c4 e4 b6 69 b9 eb dc 1b 2b 3e 08 7b 80 d0 67 8d must be included in db in order to allow the Windows OS Loader to load. The Windows CA can be downloaded from here: https://go.microsoft.com/fwlink/p/?linkid=321192.
On non-Windows RT PCs the OEM should consider including the Microsoft Corporation UEFI CA 2011 with a SHA-1 Certificate Hash of 46 de f6 3b 5c e6 1c f8 ba 0d e2 e6 63 9c 10 19 d0 ed 14 f3 . Signing UEFI drivers and applications with this certificate will allow UEFI drivers and applications from 3rd parties to run on the PC without requiring additional steps for the user. The UEFI CA can be downloaded from here: https://go.microsoft.com/fwlink/p/?linkid=321194.
On non-Windows RT PCs the OEM may also have additional items in the db to allow other operating systems or OEM-approved UEFI drivers or apps, but these images must not compromise the security of the PC in any way.
1.4.2 DbDefault: The platform vendor may provide a default set of entries for the Signature Database in the dbDefault variable. For more information see section 27.5.3 in the UEFI specification.
1.4.3 Forbidden Signature Database (dbx)
The contents of EFI_IMAGE_SIGNATURE_DATABASE1 dbx must be checked when verifying images before checking db and any matches must prevent the image from executing. The database may contain multiple certificates, keys, and hashes in order to identify forbidden images. The Windows Hardware Certification Requirements state that a dbx must be present, so any dummy value, such as the SHA-256 hash of 0 , may be used as a safe placeholder until such time as Microsoft begins delivering dbx updates. Click Here to download the latest UEFI revocation list from Microsoft.
1.4.4 DbxDefault: The platform vendor may provide a default set of entries for the Signature Database in the dbxDefault variable. For more information see section 27.5.3 in the UEFI specification.
1.5 Keys Required for Secure Boot on all PCs
| Key/db Name | Variable | Owner | Notes |
|---|---|---|---|


