- Change or reset Internet Explorer settings
- Change Internet Explorer settings
- Reset Internet Explorer settings
- If Internet Explorer won’t open, or pages won’t load.
- 4 Ways to Open Internet Options in Windows 10
- 4 ways to open Internet Options in Windows 10:
- Setting and Retrieving Internet Options
- Implementation Steps
- Choosing Internet Options
- Choosing the HINTERNET Handle
- Setting or Retrieving the Options
- Scope of HINTERNET Handle
- Setting Individual Options
- Retrieving Individual Options
- Complete Sample
- Setting Connection Options
- Retrieving Connection Options
- How to change Internet Options in Microsoft Edge
- Quick tip: Change your browser to Opera
- Opera
- How can I change Internet Options in Microsoft Edge?
- Microsoft Edge appearance and startup options
- How can I clear the cache on Microsoft Edge?
- How to sync your Edge data across all Microsoft devices?
- How can I change the download folder in Microsoft Edge?
- How can I customize my address bar and search engine in Edge?
- Run a System Scan to discover potential errors
- How can I manage cookies in Microsoft Edge?
- How can I open the Internet Options?
Change or reset Internet Explorer settings
The new browser recommended by Microsoft is here
Get speed, security, and privacy with the new Microsoft Edge .
Change Internet Explorer settings
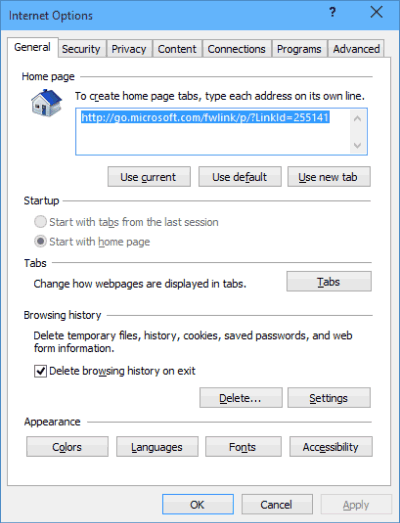
There are many changes you can make to customize your browsing experience in Internet Explorer. To view all settings and options, open Internet Explorer on the desktop, select Tools > Internet options.
Reset Internet Explorer settings
You can reset Internet Explorer settings to what they were when Internet Explorer was first installed on your PC. This is useful for troubleshooting problems that may be caused by settings that were changed after installation. Be aware that this process isn’t reversible, and all previous Internet Explorer settings are lost after reset.
Close all open windows and programs.
Open Internet Explorer, select Tools > Internet options.
Select the Advanced tab.
In the Reset Internet Explorer Settings dialog box, select Reset.
In the box, Are you sure you want to reset all Internet Explorer settings?, select Reset.
When Internet Explorer finishes applying default settings, select Close, and then select OK. Restart your PC to apply changes.
If Internet Explorer won’t open, or pages won’t load.
If Internet Explorer won’t open, or if pages aren’t loading, there may be an add-on that is interfering with the process. To tell whether this issue is with an add-on or not, you can try the following:
Find your processor speed.
Select Start > Settings > System > About.
Under Device specifications, see System type.
Based on your processor speed, choose the appropriate line of code below and copy and paste or type the code into the Search box on the toolbar.
For 32-bit:
«C:\Program Files (x86)\Internet Explorer\iexplore.exe» -extoff
For 64-bit:
«C:\Program Files\Internet Explorer\iexplore.exe» -extoff
Internet Explorer will open and you can find out which add-ons were causing issues. To manage add-ons in Internet Explorer, see Manage add-ons in Internet Explorer 11.
4 Ways to Open Internet Options in Windows 10
The article summarizes four simple methods to open Windows 10 Internet Options (or Internet Properties).
Video guide on how to open Internet Options in Windows 10:
4 ways to open Internet Options in Windows 10:
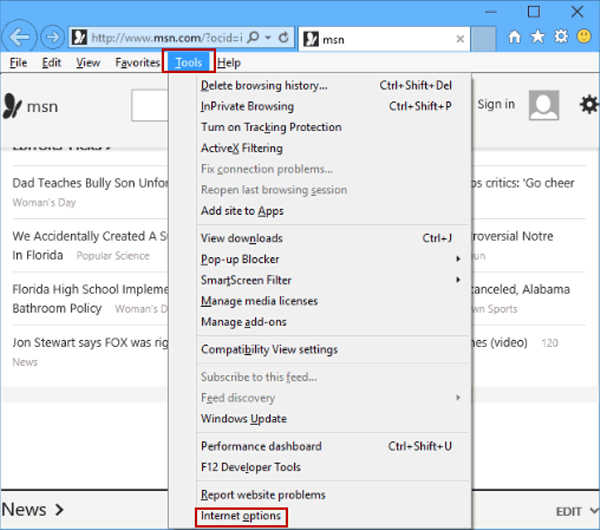
Way 1: Open it in the Tools menu.
In Internet Explorer, click Tools on the Menu bar and choose Internet options in the menu.
Way 2: Access Internet Options via the Tools button.
After opening Internet Explorer, tap the top-right Tools button (i.e. the gear icon) and select Internet options in the list.
Way 3: Open Internet Options using search.
Type internet options in the search box on taskbar and choose Internet Options in the result.

Way 4: Open it in Control Panel.
Enter Control Panel, type internet option in the top-right search box and tap Internet Options in the items.
Setting and Retrieving Internet Options
This topic describes how to set and retrieve Internet options using the InternetSetOption and InternetQueryOption functions.
Internet options can be set on, or retrieved from, a specified HINTERNET handle or the current settings in Microsoft Internet Explorer.
Implementation Steps
To set or retrieve Internet options complete the following:
Choosing Internet Options
Because there are so many Internet options, choosing the right options is important. Many Internet options affect the behavior of the WinINet functions and Internet Explorer:
For example, you can:
- Handle basic server and proxy authentication by setting user names and passwords.
- Set or retrieve the user agent string used by servers to identify the features of the client application or browser.
- Retrieve the handle type of the specified HINTERNET handle.
For more information and a list of the Internet options, see Option Flags.
In Internet Explorer 5 and later, some options can be set or retrieved from a specific Internet connection using the INTERNET_PER_CONN_OPTION_LIST and INTERNET_PER_CONN_OPTION structures. For more information and a list of options that can be set or retrieved from a specific Internet connection, see the dwOptions member of the INTERNET_PER_CONN_OPTION structure.
Choosing the HINTERNET Handle
The HINTERNET handle used to set or retrieve Internet options determines the scope of the operation. All the handles created through this handle will inherit the options set on this handle.
For example, client applications that require a proxy with authentication, probably do not require setting the proxy user name and password every time the application attempts to access an Internet resource. If all requests on a given connection are handled by the same proxy, setting the proxy user name and password on a connection type HINTERNET handle, that is, a handle created by a call to InternetConnect, would allow any calls derived from this HINTERNET handle to use the same proxy user name and password. Setting the proxy user name and password every time an HINTERNET handle is created by HttpOpenRequest would require extra and unnecessary overhead. Be aware that if the application uses a proxy that requires authentication, it should set the proxy credentials on every new connection.
Setting or Retrieving the Options
When you have determined what Internet options and HINTERNET handle to use, retrieve those Internet options. To set or retrieve options, call either InternetQueryOption or InternetSetOption.
Scope of HINTERNET Handle
The HINTERNET handle used to set or retrieve Internet options determines the actions for which the options are valid.
These handles have three levels:
- The root HINTERNET handle (created by a call to InternetOpen) would contain all the Internet options that affect this instance of WinINet.
- HINTERNET handles that connect to a server (created by a call to InternetConnect)
- HINTERNET handles associated with a resource or enumeration of resources on a particular server.
In addition to the various HINTERNET handles, an application can also use NULL to set or retrieve the default values of the Internet options used by Internet Explorer and the WinINet functions. Setting Internet options when using NULL as the handle changes the default values of the options, which are currently stored in the registry. Client applications should not use registry functions to change the default values of the Internet options, because the implementation of how the options are stored can be altered in the future.
The following table lists the type of HINTERNET handles and the scope of the Internet options associated with them.
| Handle Type | Scope |
|---|---|
| NULL | The default option settings for Internet Explorer. |
| INTERNET_HANDLE_TYPE_CONNECT_FTP | The option settings for this connection to an FTP server. These options affect any operations initiated from this HINTERNET handle, such as file downloads. |
| INTERNET_HANDLE_TYPE_CONNECT_GOPHER | The option settings for this connection to a Gopher server. These options affect any operations initiated from this HINTERNET handle, such as file downloads.
|
| INTERNET_HANDLE_TYPE_CONNECT_HTTP | The option settings for this connection to an HTTP server. These options affect any operations initiated from this HINTERNET handle, such as file downloads. |
| INTERNET_HANDLE_TYPE_FILE_REQUEST | The option settings associated with this file request. |
| INTERNET_HANDLE_TYPE_FTP_FILE | The option settings associated with this FTP resource download. |
| INTERNET_HANDLE_TYPE_FTP_FILE_HTML | The option settings associated with this FTP resource download formatted in HTML. |
| INTERNET_HANDLE_TYPE_FTP_FIND | The option settings associated with this search of files on an FTP server. |
| INTERNET_HANDLE_TYPE_FTP_FIND_HTML | The option settings associated with this search of files on an FTP server formatted in HTML. |
| INTERNET_HANDLE_TYPE_GOPHER_FILE | The option settings associated with this Gopher resource download.
|
| INTERNET_HANDLE_TYPE_GOPHER_FILE_HTML | The option settings associated with this Gopher resource download formatted in HTML.
|
| INTERNET_HANDLE_TYPE_GOPHER_FIND | The option settings associated with this search of files on an Gopher server.
|
| INTERNET_HANDLE_TYPE_GOPHER_FIND_HTML | The option settings associated with this search of files on an Gopher server formatted in HTML.
|
| INTERNET_HANDLE_TYPE_HTTP_REQUEST | The option settings associated with this HTTP request. |
| INTERNET_HANDLE_TYPE_INTERNET | The option settings associated with this instance of the WinINet functions. |
Setting Individual Options
After determining the Internet options you want to set and the scope you want affected by these options, setting Internet options is not complicated. All you would need to do is call the InternetSetOption function with desired HINTERNET handle, Internet option flag, and a buffer that contains the information you want set.
The following example shows how to set the proxy user name and password on a specified HINTERNET handle.
Retrieving Individual Options
Internet options can be retrieved using the InternetQueryOption function. To retrieve Internet options:
Determine the buffer size necessary to retrieve the Internet option information.
The buffer size can be determined by using NULL for the address of the buffer and passing it a buffer size of zero.
The value returned by InternetQueryOption is the amount of memory required to retrieve the information, in bytes.
Allocate a memory for the buffer.
Retrieve the data.
Free the memory.
Complete Sample
The following is the complete sample used in the previous section. This sample shows how to retrieve the default user agent string.
Setting Connection Options
In Internet Explorer 5 and later, Internet options can be set for on a specific connection. Previously, all connections shared the same Internet option settings. To set options for a particular connection:
- Create an INTERNET_PER_CONN_OPTION_LIST structure.
- Allocate the memory for the individual Internet options that you want to set for the connection.
- Set the options in INTERNET_PER_CONN_OPTION structures.
- Set the options using InternetSetOption.
The following code example shows how to set proxy data for a LAN connection.
Retrieving Connection Options
In Internet Explorer 5 and later, Internet options can be retrieved from a specific connection. To retrieve options from a particular connection:
- Create a INTERNET_PER_CONN_OPTION_LIST structure.
- Allocate the memory for the individual Internet options to retrieve from the connection.
- Specify the options using INTERNET_PER_CONN_OPTION structures.
- Retrieve the options using InternetQueryOption.
- Utilize the option data.
- Free the memory, allocated to hold the option data, using the GlobalFree function.
WinINet does not support server implementations. In addition, it should not be used from a service. For server implementations or services use Microsoft Windows HTTP Services (WinHTTP).
How to change Internet Options in Microsoft Edge

- Microsoft Edge works a bit differently than Internet Explorer, and therefore we’re going to show you how to change Internet Options in Microsoft Edge.
- Keep in mind that some changes might not be applied to Microsoft Edge or any other third-party browser .
- For the most part, Edge has its own settings, and they are completely separate from the general Internet settings.
- For fine-tuning Edge, we suggest that you visit the advanced settings page in Edge.

- Easy migration: use the Opera assistant to transfer exiting data, such as bookmarks, passwords, etc.
- Optimize resource usage: your RAM memory is used more efficiently than Chrome does
- Enhanced privacy: free and unlimited VPN integrated
- No ads: built-in Ad Blocker speeds up loading of pages and protects against data-mining
- Download Opera
Windows 10 brought new changes, and one of the biggest ones was the introduction of a new browser.
Microsoft Edge works a bit differently than Internet Explorer, and therefore we’re going to show you how to change Internet Options in Microsoft Edge.
Quick tip: Change your browser to Opera

Before starting to change anything in any other browser, why don’t you try to use a browser that can be customized in any way you please and is as easy as to use it.
We’re talking about Opera, a browser that has an add-ons catalog with over 1,000 ways to customize its functionality.
Another advantage in that direction is the fact that you can set your own key combinations for almost any browser action. Beyond this, it’s way faster than the tedious pointing and clicking.

Opera
How can I change Internet Options in Microsoft Edge?
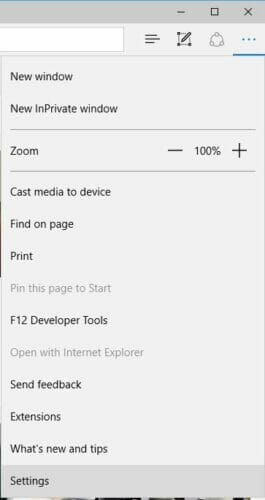
- Click the Menu icon in the top right corner and choose Settings from the menu.

- When the Settings pane opens, the first option that you’ll see is Change my default button. This option allows you to quickly assign Microsoft Edge as the default browser on your PC.
Microsoft Edge is a successor to Internet Explorer, but unlike Internet Explorer, Microsoft Edge is a Universal application, so it works a bit differently.
This makes changing Internet Options on Edge a bit different, but you should still be able to change them.
Most settings that you want to change are available in Internet Options and can be changed from Microsoft Edge.
Note: If Edge is already your default browser, then this option won’t be available to you.
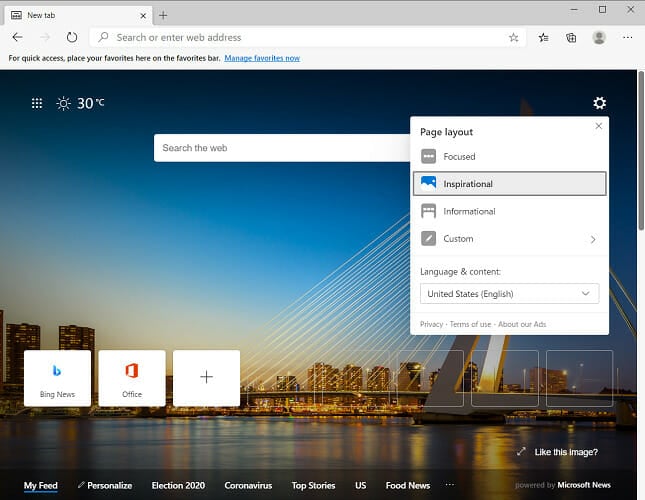
Microsoft Edge appearance and startup options
A quick experience feature from the Appearance menu is that you can choose quickly between dark or light theme for Edge.
You can also change which pages will open the next time you start Edge. You can choose between a regular start page, an empty tab, or specific pages.
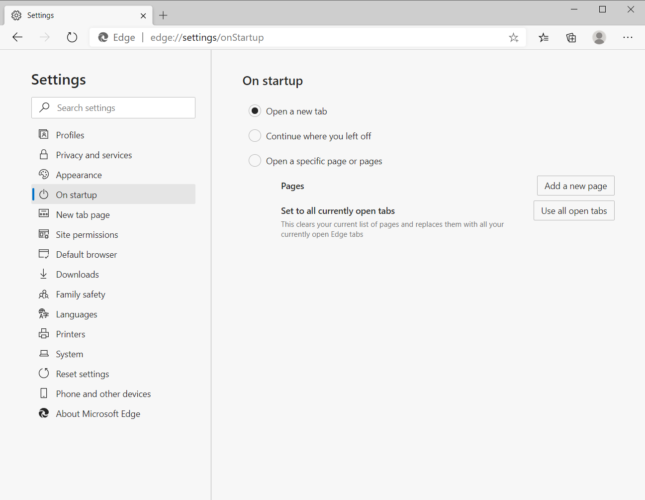
There’s also an option to open previous pages that were open during the last browsing session. This option is great because it allows you to quickly continue browsing where you left off.
The new tab page allows you to change how new tabs will look.
You can choose between 4 options, from a blank tab to a news infused one, or a custom setting where you can practically set your own combination of information.
This Informational option is great if you want to have the latest news quickly accessible.
How can I clear the cache on Microsoft Edge?
Just like all other browsers, Edge stores cache on your computer in order to save certain website settings.
In Edge, there’s an option available that allows you to clear certain parts of the cache. If you want, you can also enable the option to automatically clear the cache whenever you close the browser.
You can find the option by clicking on the Privacy and services option from the left-side menu, then clicking on the Choose what to clear button from the right.
![]()
Note: Another useful option is Send Do Not Track requests that will prevent tracking cookies from being downloaded.
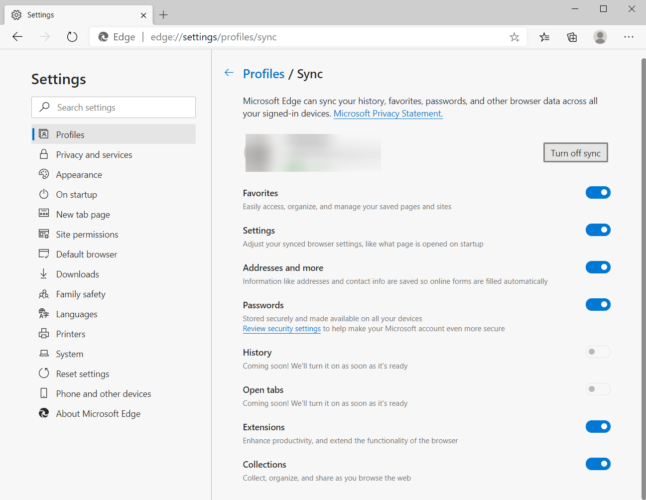
How to sync your Edge data across all Microsoft devices?
Syncing is a big part of Windows 10, and Microsoft Edge allows you to sync your bookmarks and reading list easily, so you can enjoy your favorite websites on any Microsoft device.

It’s easy to enable syncing by clicking on the Profiles option from the left side menu, then clicking on the Sync option from the right.
You will find a self-explanatory menu with all the data that you can sync on all your Microsoft devices including passwords, settings, and favorites.
How can I change the download folder in Microsoft Edge?
You can set a new default download folder by clicking on the Downloads option from the left-side menu, then click on the Change button from the right.
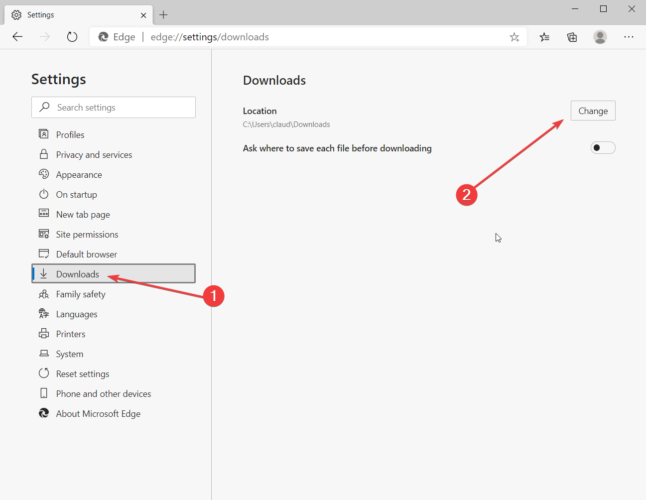
In addition, you can enable the option to choose what to do with each download.
When it comes to privacy and a secure browsing, we recommend a highly reliable VPN tool. While proxy masks your IP, a good VPN also encrypts your traffic and keeps safe all your data as you are surfing the Web. Get Private Internet Access now (77% flash sale) with enhanced security online.
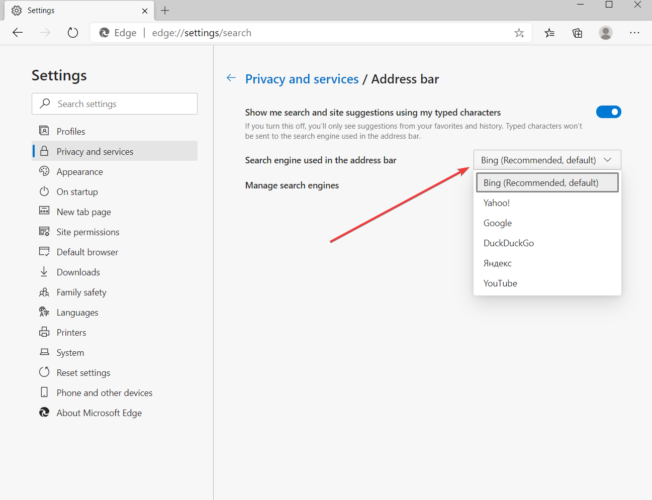
How can I customize my address bar and search engine in Edge?
- Click on Privacy and services from the left-side menu, then click on the Address bar option from the right.
- Click on the box to the right of the search engine option and select the one you prefer. Under this box, there is also an option to add another search engine if the one you’re looking for is not listed.

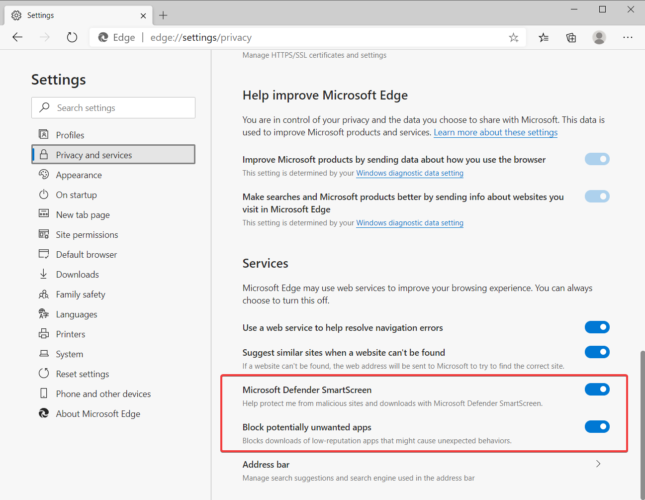
If you’re concerned about malicious websites and downloads, you can also turn on SmartScreen Filter option to protect you from malicious content.
Run a System Scan to discover potential errors


As you can see from the screenshot below, Edge also has a Potentially Unwanted Apps (PUA) blocker that is activated by default.
How can I manage cookies in Microsoft Edge?
You can also manage cookies or block them, but by default, all cookies are allowed to be downloaded.
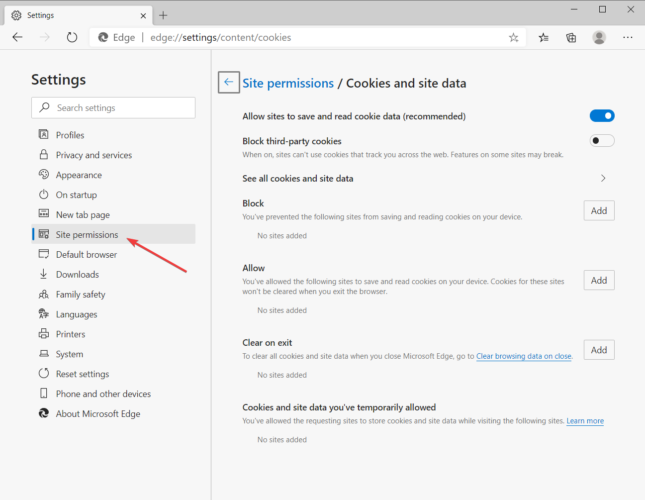
You can find all the settings under Site permissions, then click on Cookies and site data.
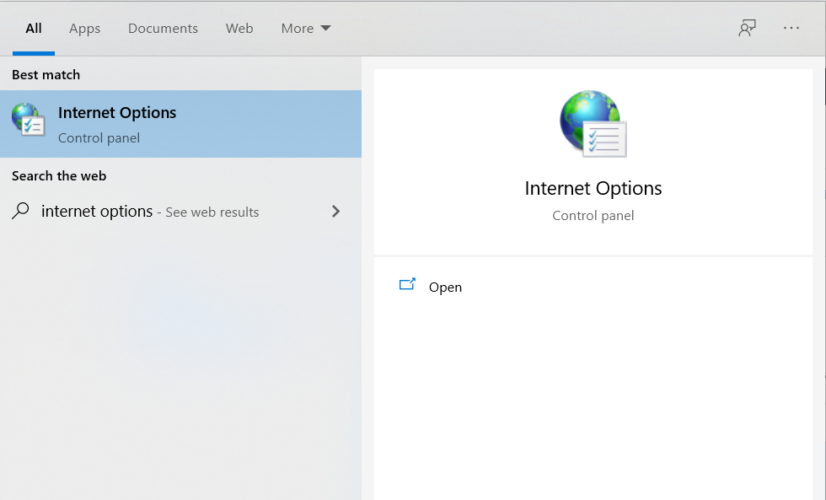
How can I open the Internet Options?
- Press Windows Key + S and enter internet options.
- Select Internet Options from the list of results.
Internet Explorer and many other web browsers can be configured by changing Internet Options settings.
Although Internet Explorer uses all of these settings, other browsers, including Edge, don’t completely rely on Internet Options for configuration.
Before changing Internet Options configuration, keep in mind that some changes might not be applied to Microsoft Edge or any other third-party browser.
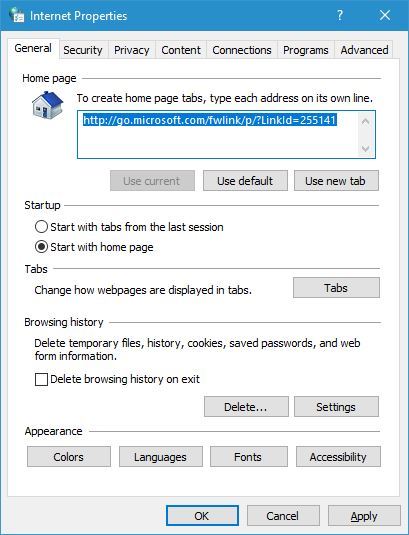
Once you open Internet Options, you’ll see a number of tabs available.
General tab
This option is in charge of startup settings, open tabs, and browsing history
In addition, you can change the appearance of the browser right from here. Most settings in this tab are related to Internet Explorer so they won’t affect Edge or other browsers in any way.
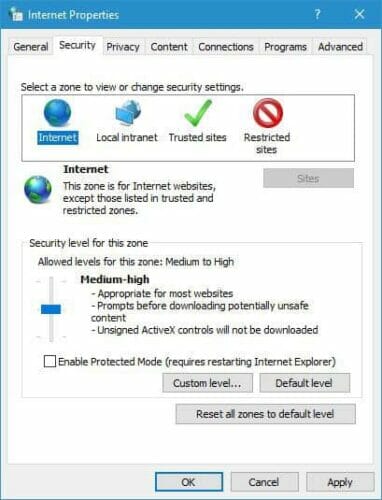
Security tab
Here is where you can change the security settings and create a list of trusted or blocked sites.
Although these settings affect Internet Explorer mostly, it’s possible to change few Microsoft Edge security settings from here.
Privacy tab
This option is for changing your cookies settings or turn on the ability to block pop-ups. This tab is mostly related to Internet Explorer, so it won’t affect Microsoft Edge.
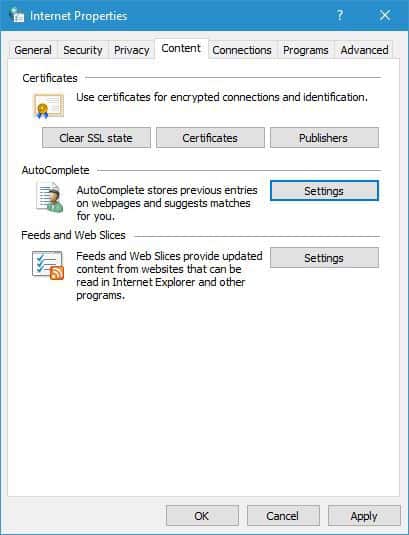
Content tab
The option is in charge of certificates and autocomplete settings. Also, here you will find an option for Feeds and Web Slices. This tab is mostly unrelated to Edge, and it only affects Internet Explorer.
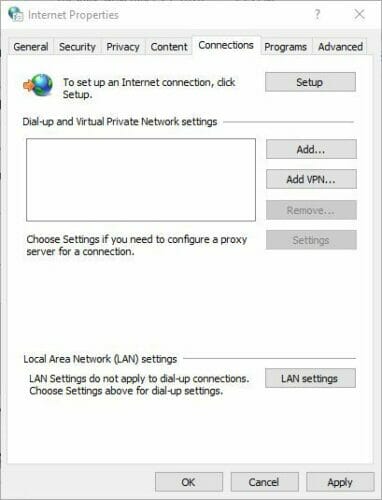
Connections tab
This tab is related to third-party browsers. It allows you to add VPN or use a proxy with your browser. Changes made from the Connections tab affect your entire system including other web browsers such as Microsoft Edge.
Programs tab
Here you will be able to change how you open links and it allows you to manage browser add-ons. These add-ons aren’t related to Edge extensions, and they only affect Internet Explorer.
From this tab, you can also choose a default HTML editor and other default programs, such as email client for example. These are system-wide settings, so they will affect Microsoft Edge and other browsers.
Advanced tab
This option allows you to change all sorts of hidden settings for your browser.
The list of options mostly affects Internet Explorer, but you can also change few Advanced Edge settings.
- Download this PC Repair Tool rated Great on TrustPilot.com (download starts on this page).
- Click Start Scan to find Windows issues that could be causing PC problems.
- Click Repair All to fix issues with Patented Technologies (Exclusive Discount for our readers).
Restoro has been downloaded by 0 readers this month.

If you have any additional questions, feel free to leave them in the comments section below.


