Windows® Setup is the program that installs Windows or upgrades an existing Windows installation. It is also the basis for the following installation and upgrade methods:
Windows Deployment Services
WindowsВ Setup Installation Types
WindowsВ Setup can perform both clean and upgrade installations. However, it does not perform computer-to-computer migrations. Instead, you must use Windows Easy Transfer, the User State Migration Tool (USMT), or another migration tool to move data from a previous installation to the new operating system.
Custom installations. WindowsВ Setup can perform a custom installation, also known as a clean installation, which saves your previous Windows installation but does not migrate your settings. The previous Windows installation will not boot after a clean installation.
Upgrade installations. WindowsВ Setup can perform an installation that retains your settings and preferences while upgrading your operating system.
WindowsВ Setup Process
The WindowsВ Setup program starts and restarts the computer, gathers information, copies files, and creates or adjusts configuration settings. The following table shows the overall process for WindowsВ Setup:
WindowsВ Setup phase
Setup actions
Downlevel (for custom installations and upgrades)
WindowsВ PE (for booting the Windows DVD or booting a custom WindowsВ PE image)
Specify WindowsВ Setup configurations by using either the WindowsВ Setup dialog boxes (interactive) or an answer file (unattended), or a combination of the two. WindowsВ Setup configurations include adding a product key and configuring a disk.
Apply answer file settings in the windowsPE configuration pass to configure the installation behavior and user experience.
Configure the disk.
Copy the Windows image to the disk.
Prepare boot information.
Process answer file settings in the offlineServicing configuration pass. The settings are applied to the Windows image before that Windows image boots. When the computer first boots, any optional components, drivers, updates, or language packs are processed.
Online configuration
Create specific configurations, making the Windows installation unique.
WindowsВ Welcome
Apply answer file settings in the oobeSystem configuration pass.
Step 4. Install and configure the Network Policy Server (NPS)
Applies to: Windows Server 2019, Windows Server (Semi-Annual Channel), Windows Server 2016, Windows Server 2012 R2, Windows 10
In this step, you’ll install Network Policy Server (NPS) for processing of connection requests that are sent by the VPN server:
Perform authorization to verify that the user has permission to connect.
Performing authentication to verify the user’s identity.
Performing accounting to log the aspects of the connection request that you chose when you configured RADIUS accounting in NPS.
The steps in this section allow you to complete the following items:
On the computer or VM that planned for the NPS server, and installed on your organization or corporate network, you can install NPS.
If you already have one or more NPS servers on your network, you do not need to perform NPS Server installation — instead, you can use this topic to update the configuration of an existing NPS server.
You can not install the Network Policy Server service on Windows Server Core.
On the organization/corporate NPS server, you can configure NPS to perform as a RADIUS server that processes the connection requests received from the VPN server.
Install Network Policy Server
In this procedure, you install NPS by using either Windows PowerShell or the Server Manager Add Roles and Features Wizard. NPS is a role service of the Network Policy and Access Services server role.
By default, NPS listens for RADIUS traffic on ports 1812, 1813, 1645, and 1646 on all installed network adapters. When you install NPS, and you enable Windows Firewall with Advanced Security, firewall exceptions for these ports get created automatically for both IPv4 and IPv6 traffic. If your network access servers are configured to send RADIUS traffic over ports other than these defaults, remove the exceptions created in Windows Firewall with Advanced Security during NPS installation, and create exceptions for the ports that you do use for RADIUS traffic.
Procedure for Windows PowerShell:
To perform this procedure by using Windows PowerShell, run Windows PowerShell as Administrator, enter the following cmdlet:
Procedure for Server Manager:
In Server Manager, select Manage, then select Add Roles and Features. The Add Roles and Features Wizard opens.
In Before You Begin, select Next.
The Before You Begin page of the Add Roles and Features Wizard is not displayed if you had previously selected Skip this page by default when the Add Roles and Features Wizard ran.
In Select Installation Type, ensure that Role-Based or feature-based installation is selected, and select Next.
In Select destination server, ensure that Select a server from the server pool is selected.
In Server Pool, ensure that the local computer is selected and select Next.
In Select Server Roles, in Roles, select Network Policy and Access Services. A dialog box opens asking if it should add features required for Network Policy and Access Services.
Select Add Features, then select Next
In Select features, select Next, and in Network Policy and Access Services, review the information provided, then select Next.
In Select role services, select Network Policy Server.
For features required for Network Policy Server, select Add Features, then select Next.
In Confirm installation selections, select Restart the destination server automatically if required.
Select Yes to confirm the selected, and then select Install.
The Installation progress page displays the status during the installation process. When the process completes, the message «Installation succeeded on ComputerName» is displayed, where ComputerName is the name of the computer upon which you installed Network Policy Server.
Select Close.
Configure NPS
After installing NPS, you configure NPS to handle all authentication, authorization, and accounting duties for connection request it receives from the VPN server.
Register the NPS Server in Active Directory
In this procedure, you register the server in Active Directory so that it has permission to access user account information while processing connection requests.
Procedure:
In Server Manager, select Tools, and then select Network Policy Server. The NPS console opens.
In the NPS console, right-click NPS (Local), then select Register server in Active Directory.
The Network Policy Server dialog box opens.
In the Network Policy Server dialog box, select OK twice.
Configure Network Policy Server Accounting
In this procedure, configure Network Policy Server Accounting using one of the following logging types:
Event logging. Used primarily for auditing and troubleshooting connection attempts. You can configure NPS event logging by obtaining the NPS server properties in the NPS console.
Logging user authentication and accounting requests to a local file. Used primarily for connection analysis and billing purposes. Also used as a security investigation tool because it provides you with a method of tracking the activity of a malicious user after an attack. You can configure local file logging using the Accounting Configuration wizard.
Logging user authentication and accounting requests to a Microsoft SQL Server XML-compliant database. Used to allow multiple servers running NPS to have one data source. Also provides the advantages of using a relational database. You can configure SQL Server logging by using the Accounting Configuration wizard.
To configure Network Policy Server Accounting, see Configure Network Policy Server Accounting.
Add the VPN Server as a RADIUS Client
In the Configure the Remote Access Server for Always On VPN section, you installed and configured your VPN server. During VPN server configuration, you added a RADIUS shared secret on the VPN server.
In this procedure, you use the same shared secret text string to configure the VPN server as a RADIUS client in NPS. Use the same text string that you used on the VPN server, or communication between the NPS server and VPN server fails.
When you add a new network access server (VPN server, wireless access point, authenticating switch, or dial-up server) to your network, you must add the server as a RADIUS client in NPS so that NPS is aware of and can communicate with the network access server.
Procedure:
On the NPS server, in the NPS console, double-click RADIUS Clients and Servers.
Right-click RADIUS Clients and select New. The New RADIUS Client dialog box opens.
Verify that the Enable this RADIUS client check box is selected.
In Friendly name, enter a display name for the VPN server.
In Address (IP or DNS), enter the NAS IP address or FQDN.
If you enter the FQDN, select Verify if you want to verify that the name is correct and maps to a valid IP address.
In Shared secret, do:
Ensure that Manual is selected.
Enter the strong text string that you also entered on the VPN server.
Reenter the shared secret in Confirm shared secret.
Select OK. The VPN Server appears in the list of RADIUS clients configured on the NPS server.
Configure NPS as a RADIUS for VPN Connections
In this procedure, you configure NPS as a RADIUS server on your organization network. On the NPS, you must define a policy that allows only users in a specific group to access the Organization/Corporate network through the VPN Server — and then only when using a valid user certificate in a PEAP authentication request.
Procedure:
In the NPS console, in Standard Configuration, ensure that RADIUS server for Dial-Up or VPN Connections is selected.
Select Configure VPN or Dial-Up.
The Configure VPN or Dial-Up wizard opens.
Select Virtual Private Network (VPN) Connections, and select Next.
In Specify Dial-Up or VPN Server, in RADIUS clients, select the name of the VPN Server that you added in the previous step. For example, if your VPN server NetBIOS name is RAS1, select RAS1.
Select Next.
In Configure Authentication Methods, complete the following steps:
Clear the Microsoft Encrypted Authentication version 2 (MS-CHAPv2) check box.
Select the Extensible Authentication Protocol check box to select it.
In Type (based on the method of access and network configuration), select Microsoft: Protected EAP (PEAP), then select Configure.
The Edit Protected EAP Properties dialog box opens.
Select Remove to remove the Secured Password (EAP-MSCHAP v2) EAP type.
Select Add. The Add EAP dialog box opens.
Select Smart Card or other certificate, then select OK.
Select OK to close Edit Protected EAP Properties.
Select Next.
In Specify User Groups, complete the following steps:
Select Add. The Select Users, Computers, Service Accounts, or Groups dialog box opens.
Enter VPN Users, then select OK.
Select Next.
In Specify IP Filters, select Next.
In Specify Encryption Settings, select Next. Do not make any changes.
These settings apply only to Microsoft Point-to-Point Encryption (MPPE) connections, which this scenario doesn’t support.
In Specify a Realm Name, select Next.
Select Finish to close the wizard.
Autoenroll the NPS Server Certificate
In this procedure, you refresh Group Policy on the local NPS server manually. When Group Policy refreshes, if certificate autoenrollment is configured and functioning correctly, the local computer is auto-enrolled a certificate by the certification authority (CA).
Group Policy refreshed automatically when you restart the domain member computer, or when a user logs on to a domain member computer. Also, Group Policy periodically refreshes. By default, this periodic refresh happens every 90 minutes with a randomized offset of up to 30 minutes.
Membership in Administrators, or equivalent, is the minimum required to complete this procedure.
Procedure:
On the NPS, open Windows PowerShell.
At the Windows PowerShell prompt, type gpupdate, and then press ENTER.
Next steps
Step 5. Configure DNS and firewall settings for Always On VPN: In this step, configure DNS and firewall settings for VPN connectivity.
Установка (развертывание) Windows 10 по сети c помощью SCCM и PXE
В этой статье мы рассмотрим, как автоматически развертывать Windows 10 по сети с помощью SCCM (System Center Configuration Manager) и PXE. С помощью данной методики вы можете существенно сократить время на установку ОС рабочих станций и использовать для массового развертывания Windows 10 на новых компьютерах.
Одна из функции SCCM — возможность сетевой установки операционной системы Windows системы на большое количество компьютеров вместе с драйверами, программами, обновлениями. Предполагаем, что у вас уже имеется настроенная инфраструктура SCCM.
Настройка PXE роли на SCCM сервере для сетевой установки Windows
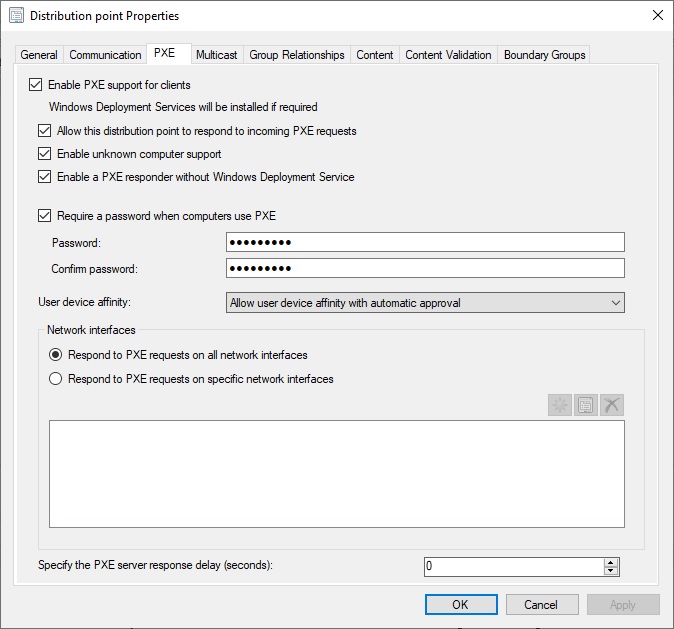
Функционал PXE (Preboot Execution Environment) в современных компьютерах позволяет выполнить сетевую установку операционной системы без применения каких-либо носителей. В SCCM его настройка происходит в окне свойств роли точки распространения (в контекстном меню вам нужно выбрать пункт Properties) и установить флажки:
Enable PXE support for client;
Allow this distribution point to respond to incoming PXE request;
Enable unknown computer support;
Require a password when computers use PXE.
Также желательно выбрать из выпадающего списка Allow user device affinity with automatic approval.
После включения этих настроек на сервере будет установлена роль Windows Deployment Services, интегрированная с SCCM.
Создание настроенного эталонного образа Windows 10
Следующий этап – подготовка эталонного образа с Windows 10, который будет устанавливаться на другие компьютеры. Проще всего взять типовой компьютер, установить на него Windows 10. Установите последние обновления безопасности, отключите ненужные службы, удалите встроенные приложения, установите драйвера. Настройте Windows 10 в соответствии со своими требованиями. Это компьютер не нужно вводить в домен AD.
Создаем загрузочный образ для захвата эталонного образа Windows 10
По умолчанию SCCM содержит образы Windows PE (среда предустановки Windows, это загрузочные файлы Boot image x86.wim и Boot image x64.wim), которые необходимы для настройки операционной системы во время “захвата”.
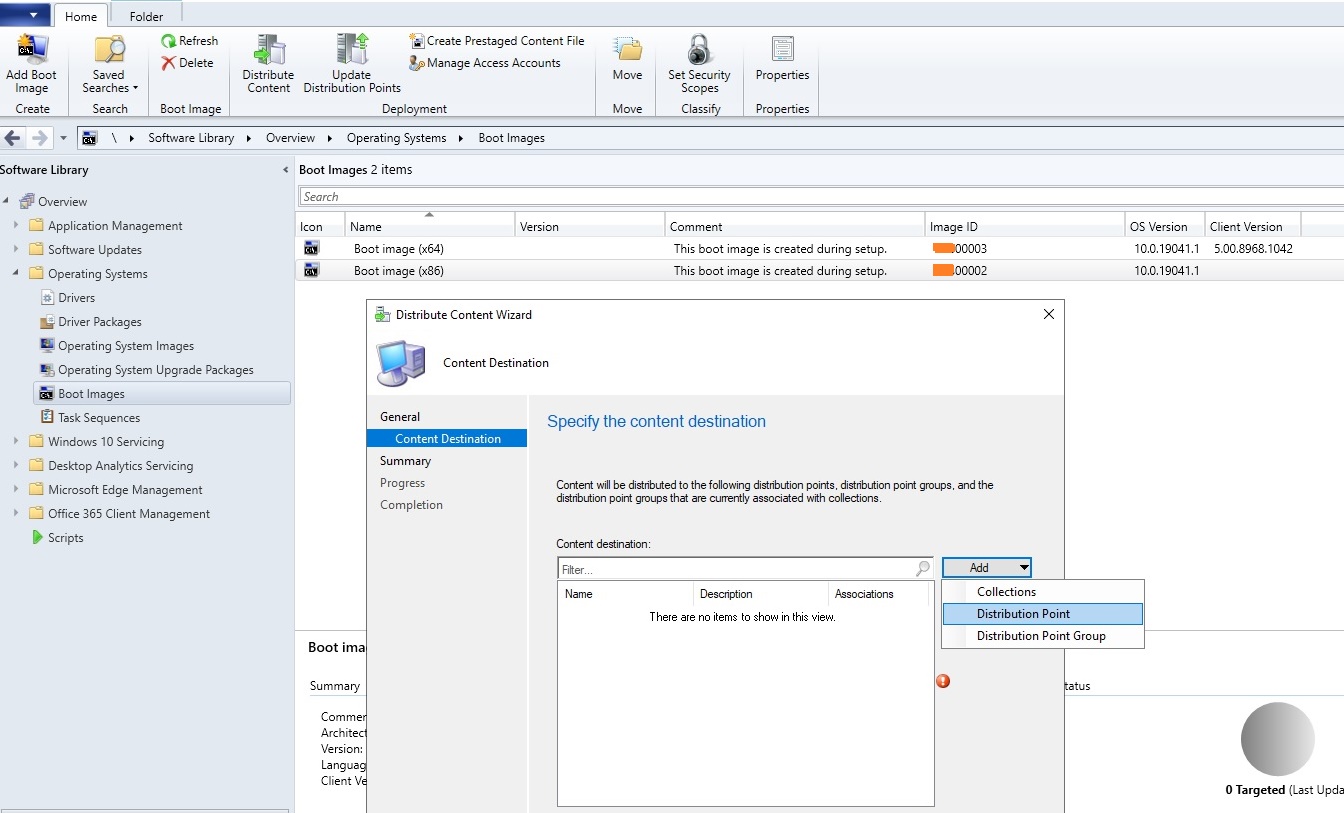
Сначала нужно добавить образ Boot image x64.wim в вашу точку распространения SCCM. Для этого зайдите в Software Library-> Operation System-> Boot Images, в контекстном меню выберите пункт Distribute Content, затем точку распространения и ОК. Цветовой окрас состояния сменится с серого на жёлтый, а по окончанию – на зелёный.
Теперь нужно создать иметь загрузочные файлы для “захвата” эталонной операционной системы по сети. Для их создания перейдите в Software Library-> Operation System -> Task Sequences и в контекстном меню выберите Create Task Sequence Media. В появившемся окне предлагается 4 варианта создания образа:
Stand-alone media — создание автономного образа для установки ОС (локальная установка, без использования сетевой загрузки);
Bootable media – создание загрузочного образа, для распространения которого используя инфраструктура центра конфигураций;
Capture media – создание загрузочного образа для захвата эталонного образа компьютера;
Prestaged media – создание предварительного образа для нового жёсткого диска, который включает образ операционной системы. Используется для старых карт, не поддерживающих PXE загрузку.
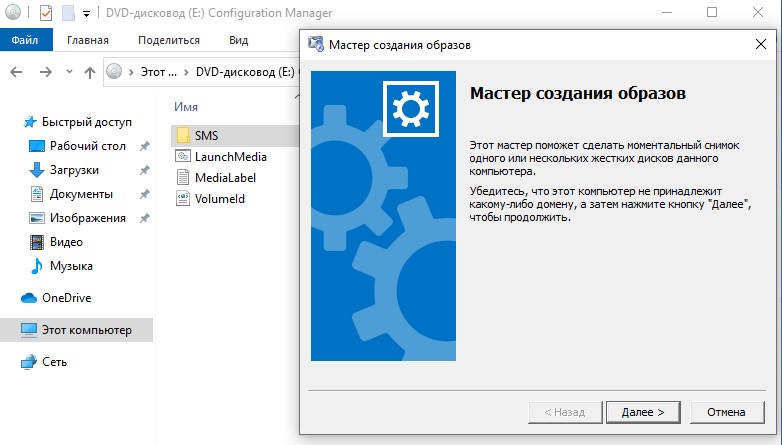
Выберите пункт Capture media, следуйте подсказкам мастера установки. Укажите место сохранения iso-файла, выберите Boot image x64.wim и точку распространения, Next->Next->Close. Процесс длится около 1 минуты.
Далее созданный полученный образ для захвата ОС нужно подключить и запустить на подготовленном ПК (файл LaunchMedia.cmd). Укажите место сохранения полученного образа Windows 10.
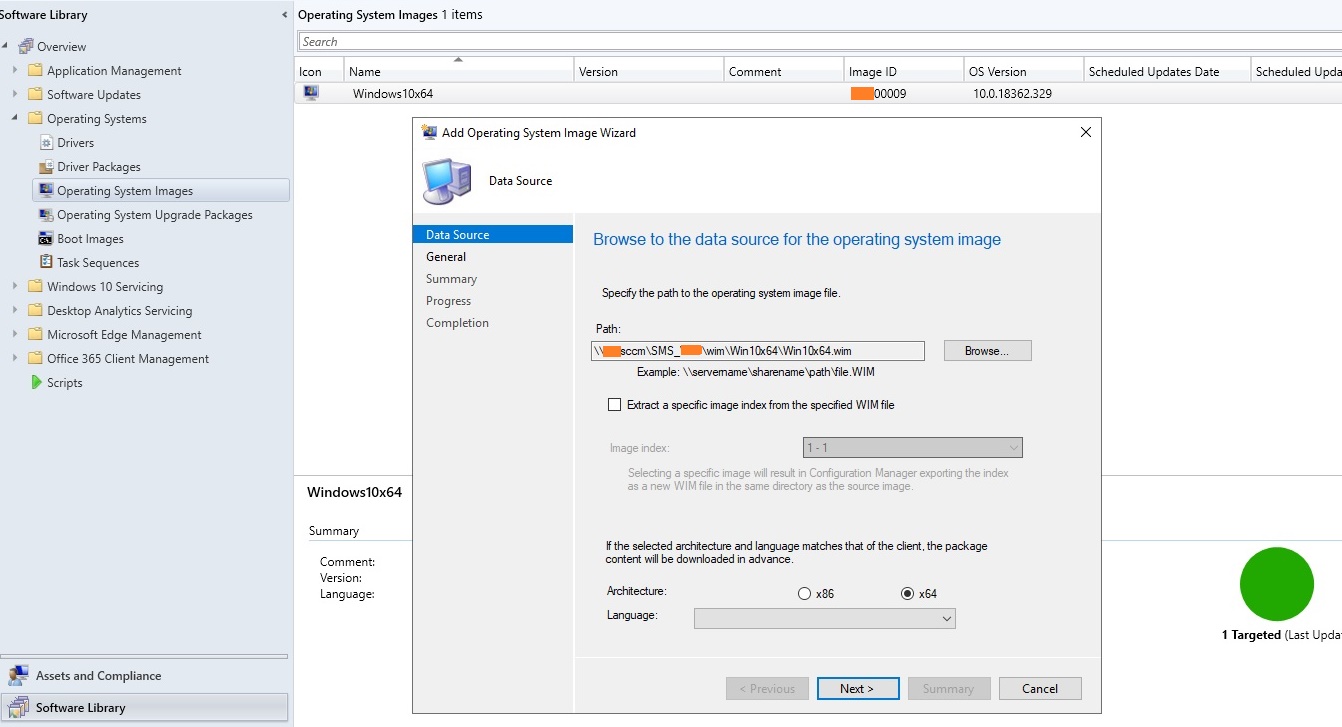
Весь процесс захвата длится примерно 40 минут. По окончании получаете эталонный wim-образ размером примерно 4.5 Гб, который нужно скопировать на сервер SCCM. Далее вам необходимо его добавить в точку распространения. Для этого заходите в Software Library -> Operation Systems -> Operation System Images, в контекстном меню выберите пункт Add Operation System Images, в мастере настроек укажите UNC путь к месту хранения созданного wim-файла с эталонным образом.
В контекстном меню выберите Distribute Content для копирования образа на вашу SCCM Distribution Point.
Создаем последовательность задач (Task Sequence) для сетевой установки Windows
Последовательность задач SCCM (task sequence) обеспечивает пошаговое выполнение команд и действий по установке ОС, ПО, драйверов, обновлений. Для её создания зайдите в Software Library -> Operation System -> Task Sequences и в контекстном меню выберите Create Task Sequence. В появившемся окне мастер предлагает несколько вариантов:
Install an existing image package –создание очереди задач для имеющегося wim образа;
Build and capture a reference operating system image –захват эталонного образа;
Create a new custom task sequence – создание нового пустого задания (настройка выполняется вручную). Отсутствует очередь задач по умолчанию.
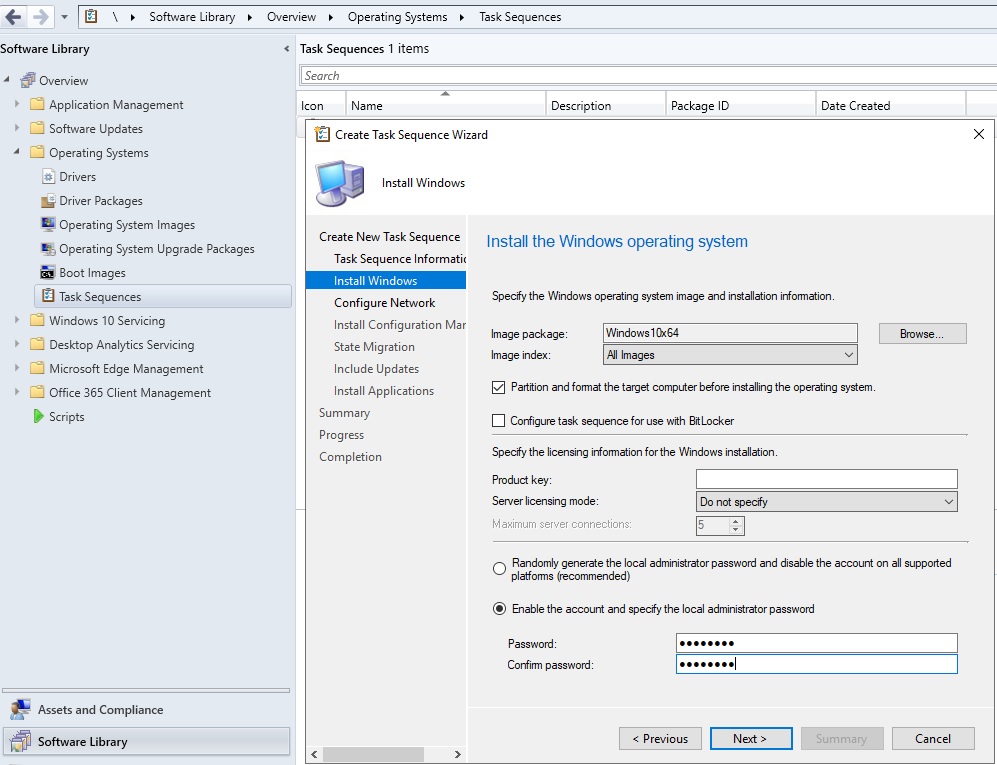
Так как эталонный образ wim образ у вас уже есть, выберите первый пункт. Далее мастер предлагает поэтапно произвести большое количество настроек, но можете указать только минимально необходимые параметры:
Укажите название задачи и выберите загрузочный PXE образ Boot image x64.wim;
Выберите созданный ранее эталонный образ Windows 10;
Установите пароль локального администратора (можно автоматически сменить пароль после добавления компьютера в домен с помощью LAPS);
Настройте параметры автоматического присоединения в домен AD, выбрав домен и OU, в которую нужно поместить новый компьютер;
Выберите пользователя, под которым будет осуществляться добавление в домен;
На шаге State Migration убрать все флажки (Capture user settings and files, Capture network settings, Capture Microsoft Windows settings).
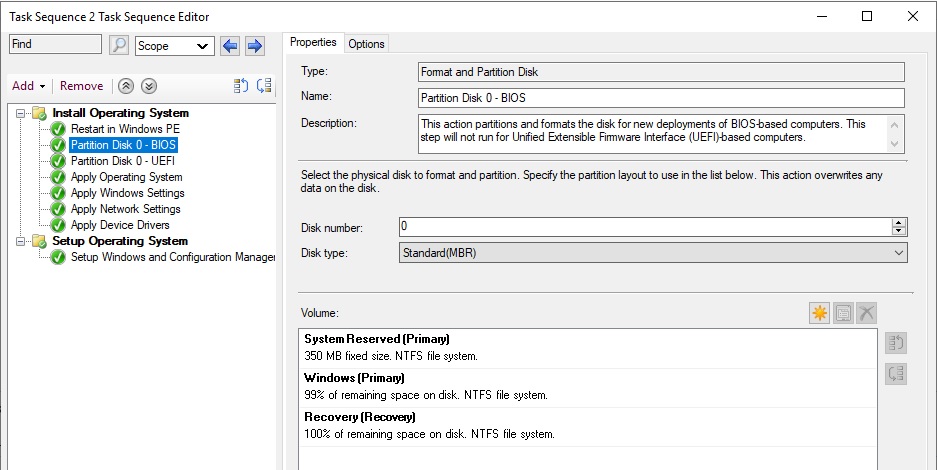
Последовательность задач создана, но она требует от вас корректировки и проверки. Перейдите в режим редактирования Task Sequence, выбрав в контекстном меню пункт Edit.
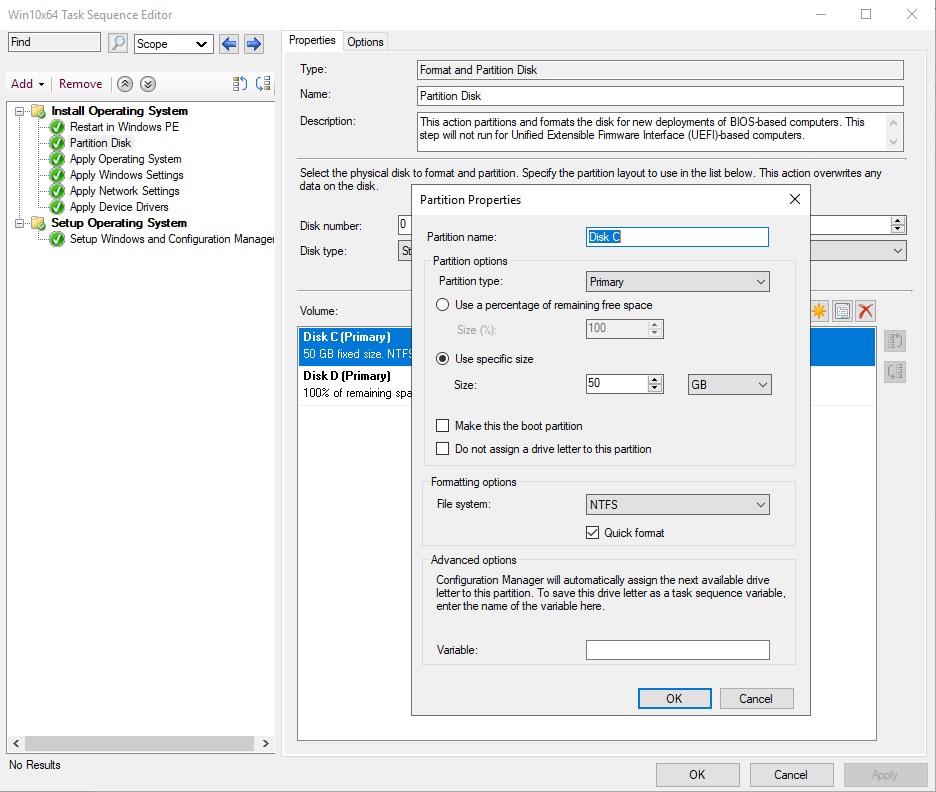
В дереве справа указан список действий, которые автоматически будут выполнены с компьютером при установке Windows 10 по сети. На 2 и 3 шаге указываются параметры разбиения дисков на разделы. На шаге 2 вы можете удалить все разделы жёсткого диска, созданные по умолчанию, если вы их не используете для восстановления Windows. Далее создаёте новый раздел, называете “C:”, выбираете тип Primary, устанавливаете фиксированный размер 50 Гб (или другой объём), выбрав опцию Use specific size. Выберите что диск нужно отформатировать в файловой системе NTFS (флажок Quick format).
Далее создаёте второй диск, называете “D”, выбираете тип Primary. Чтобы он занял все оставшееся неразмеченное пространство выберите опцию Use a percentage of remaining free space, выберите значение 100, файловую систему NTFS и флажок Quick format.
Таким образом у вас будет создан диск С: с фиксированным размером, а всё оставшееся место уйдёт диску D: (если объём жёсткого диска большой, то можно разбить его на большее количество разделов), которые будут отформатированы автоматически.
3й шаг в нашем примере удаляется, т.к. у нас компьютеры с BIOS. Для компьютеров с UEFI – нужно настраивать дисковые разделы именно в 3 пункте.
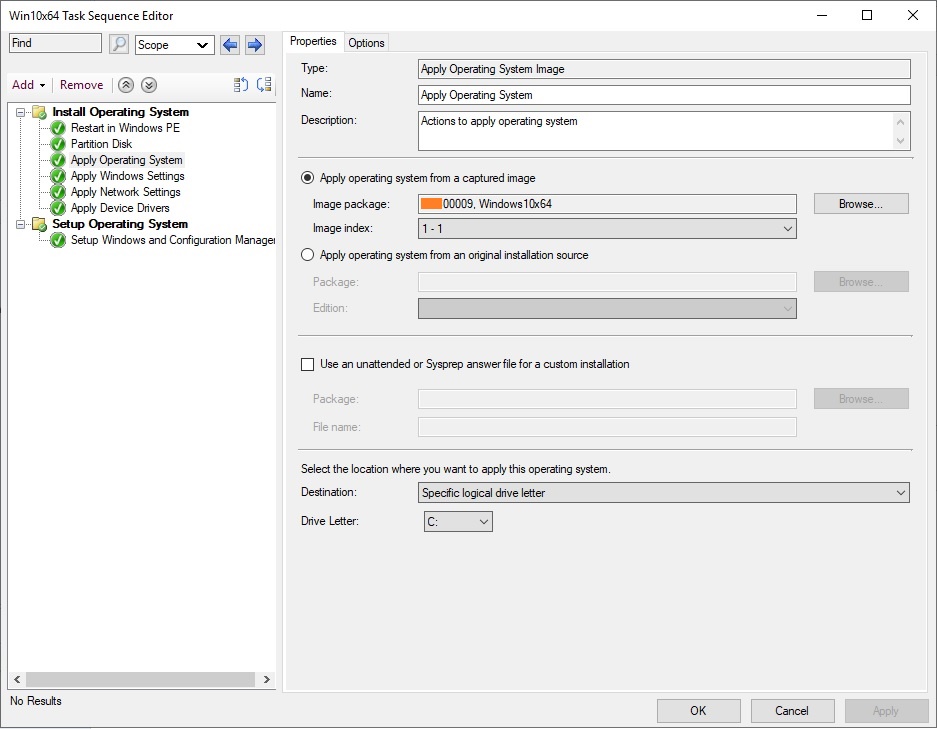
На следующем шаге – Apply Operating System – нужно выбрать раздел для установки операционной системы. Проверяете наличие эталонного образа, а внизу окна выбираете установку Windows на:
Specific disk and partition — конкретный номер диска и номер раздела;
Specific logical drive letter – указанный логический диск;
Logical drive letter stored in a variable —
Например, будет второй пункт и диск С: .
Остальные шаги проверяете на отсутствие ошибок. На шаге Apply Windows Settings нужно указать лицензионный ключ (можно указать ключ KMS активации), пароль администратора и часовой пояс. Корректировка доменных (сетевых) настроек происходит в Apply Network Settings, а Apply Device Drivers позволяет добавить драйвера в установку.
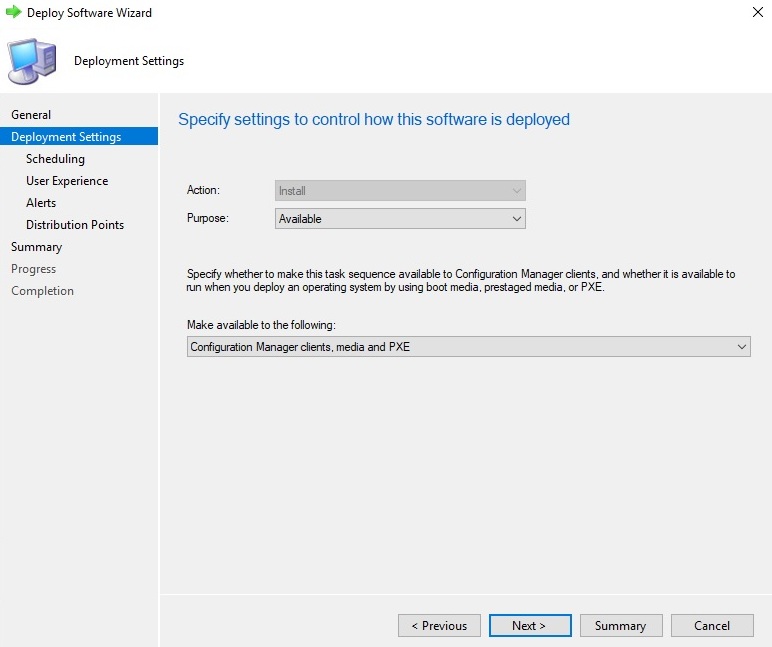
Далее новое задание нужно опубликовать. Для этого в контекстном меню выберите пункт Deploy, на первом шаге мастера выбираете коллекцию устройств All Unknown Computers, на 2м шаге параметру Purpose присваиваете значение Available (Available – доступно для выбора, Required – принудительная установка), в параметре Make available to the following выберите Configuration manager clients, media and PXE, остальные шаги можно оставить по умолчанию.
На этом основные действия по подготовке эталонного образа и настройке SCCM завершены.
Добавление драйверов в загрузочный образ Windows
Рассмотренных выше действий будет достаточно для автоматической установки Windows 10 на новые современные миниатюрные системные блоки или моноблоки. В случае с классическими системниками и внешними сетевыми картами загрузка по сети может не заработать. В этом случае необходимо в загрузочный образ добавить драйвера для используемых моделей сетевых адаперов.
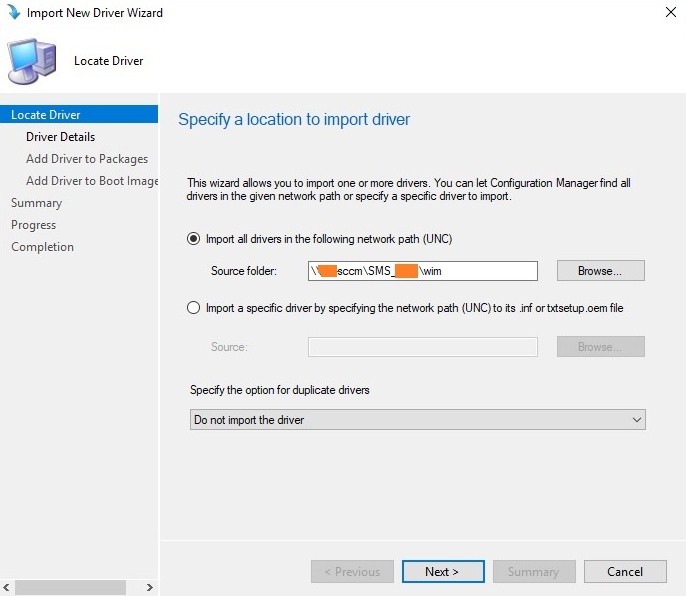
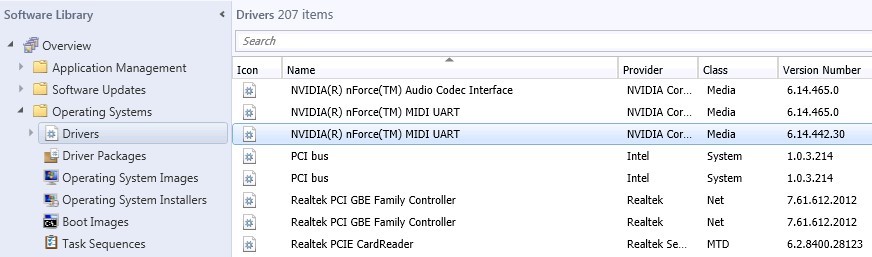
Для добавления драйвера в базу сайта SCCM перейдите в Software Library -> Operation Systems -> Drivers и в контекстном меню выберите Import Driver. Далее мастер поможет заполнить необходимые поля. Нужно UNC путь к каталогу с драйвером и установить для параметра Specify the option for duplicate drivers значение Do not import the driver.
Затем нужно зайти в свойства загрузочного образа Boot image x64.wim и на вкладке Drivers добавить драйвера.
Настройка PXE на компьютерах
На компьютерах, которые вы хотите деплоить по сети нужно включить в BIOS поддержку сетевой загрузки. У разных производителей материнских плат такие настройки будут находится в разных местах и называться по-разному. Скорее всего в названии параметра сетевой загрузки должно быть что-то вроде PXE Boot, Network Boot, Network Card.
Например, активация PXE в UEFI моделях HP Pro 3520 и HP Pro 6300 происходит в разделе Security -> Network Boot установкой параметра Enable.
Теперь для старта всё готово. При начальной загрузке ПК происходит определение его параметров (POST). Затем DHCP сервер назначает IP-адрес сетевой карте. Для начала сетевой установки ОС в течение 5 секунд нужно нажать клавишу F12 (означает PXE-подключение), после чего SCCM копирует на ПК загрузочные файлы (в моделях HP нужно нажимать на F9, возможно дополнительно ещё выбрать пункт Network Controller для загрузки по сети).
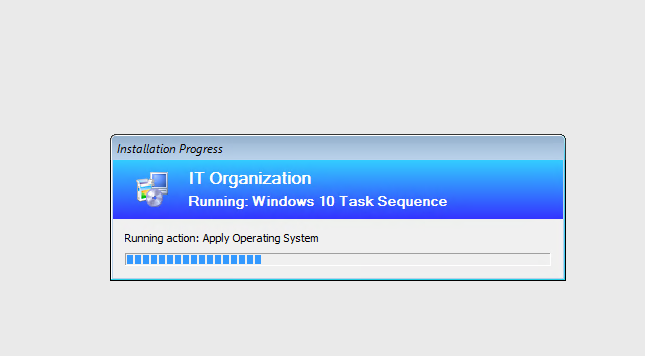
Далее появляется окно для выбора задачи, после чего начинается поэтапное развёртывание операционной системы, то есть выполнение тех действий, которые указаны в вашем Task Sequence. Ход установки отслеживается при помощи индикатора. Примерно за 20 минут ваш эталонный образ Windows 10 будет установлен на новый ПК и компьютер введен в домен. Если одновременно запустить сетевую установка Windows с SCCM на 10-20 компьютерах, время установки может немного увеличиться.
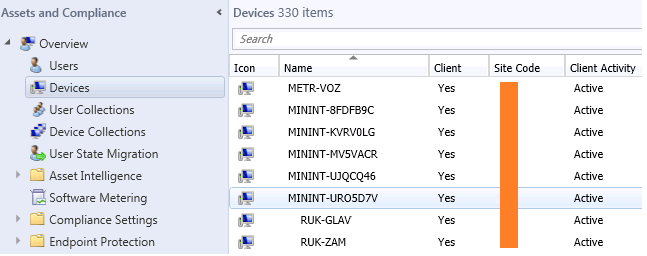
По окончанию установки ОС компьютеру по умолчанию присваивается имя MININT- , например, MININT-5EFG9DR. Это можно увидеть в консоли SCCM в разделе Assets and Compliance -> Devices. Вы можете изменить имя компьютера на более запоминающееся, например, BUH-OLGA. Для этого нужно зайти в Свойства компьютера -> Изменить параметры -> Изменить, указать новое имя компьютера и перезагрузить ПК. Вскоре изменения отобразятся как в DNS, так и в SCCM.
Установка приложений на новый компьютер с помощью SCCM
Следующие этап установка на новый компьютер необходимых приложений. Программы можно устанавливать в виде пакета (Package) или как приложение (Application). Приложения – программы, имеющие установочные файлы с расширениями msi, appx, xap, ipa, apk и прочее. У Application возможностей больше, плюс пользователи тоже могут принимать участие в работе. Package – это специальный контейнер (обёртка), который может включать в себя несколько файлов (дистрибутивов). Используются exe-, vbs-, cmd-, cab-файлы и другие. Он проще в настройках.
Мы не будем подробно описывать особенности развертываний программ в SCCM, т.к. эта получится отдельная большая статья. Для ознакомления вы можете посмотреть пример развертывания Office 2016 с помощью SCCM.
После создания пакетов установки программ, вы можете добавить из в последовательность задачи развертывания Windows 10 (task sequence)/
Здесь создаёте группу Software Install, в меню Add -> Software -> Install Package добавьте созданные пакеты программ.