- Как узнать ключ Windows 10 с помощью командной строки, плюс еще метод с реестром
- Два варианта быстрого поиска ключа продукта Windows 10
- Поиск ключа продукта Windows 10 с помощью командной строки
- Поиск ключа продукта Windows 10 при помощи реестра Windows
- RunOnce Registry Key
- How to recover your Windows product key
- Introduction to Registry Keys for Drivers
- Windows registry information for advanced users
- Description of the registry
- Back up the registry
- Edit the registry
- Use the Windows user interface
- Use Registry Editor
- Use Group Policy
- Use a Registration Entries (.reg) file
- Use Windows Script Host
- Use Windows Management Instrumentation
- Use Console Registry Tool for Windows
- Restore the registry
- Method 1: Restore the registry keys
- Method 2: Restore the whole registry
- References
Как узнать ключ Windows 10 с помощью командной строки, плюс еще метод с реестром
Два варианта быстрого поиска ключа продукта Windows 10

Поиск ключа продукта Windows 10 при необходимости может быть гораздо проще, чем может показаться на первый взгляд. Достаточно ввести быструю команду в командной строке. Дел на несколько минут, но переоценить важность подобного лайфхака сложно. Ведь именно ключ продукта – это то уникальное сочетание цифр и букв, которое используется во время установки программного обеспечения Майкрософт для разблокирования или открытия продукта, без которого обойтись никак нельзя после, скажем, переустановки Виндовс на одной и той же машине.
Ключи продуктов Майкрософт состоят из 25 знаков, обычно разделенных на группы по 5. Не стоит путать с номером продукта, который создается после его установки и используется службой поддержки клиентов корпорации Майкрософт для идентификации продукта при оказании поддержки. Коды продуктов Майкрософт состоят из 20 знаков, обычно разделенных на группы по 4.
Итак, вот как можно найти ключ продукта с помощью реестра Windows.
Поиск ключа продукта Windows 10 с помощью командной строки
Чтобы найти ключ продукта Windows 10 с помощью командной строки, вам нужно будет открыть приложение командной строки с правами администратора. Для этого введите «cmd» в строке поиска Windows:
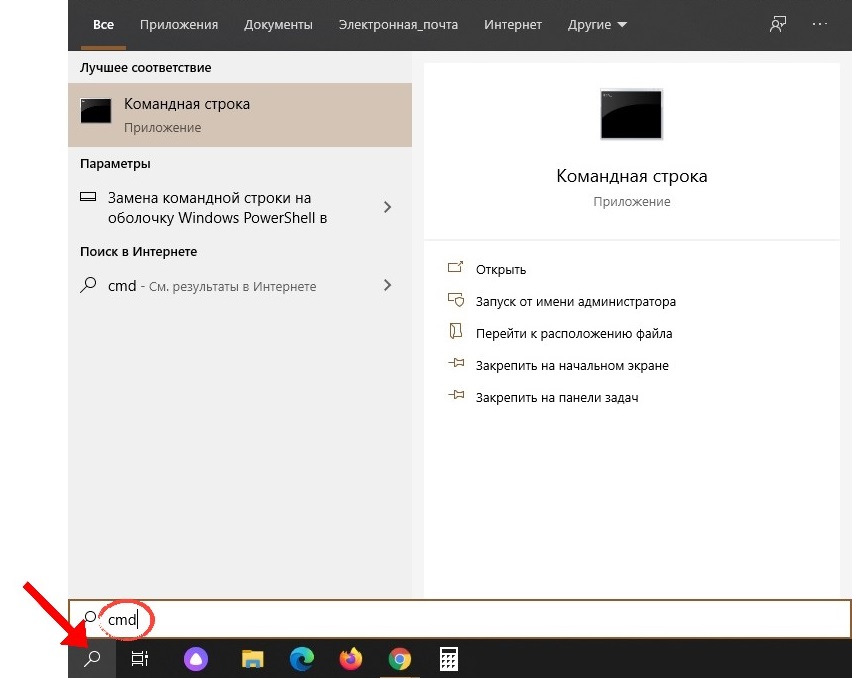
В результатах поиска появится командная строка. Щелкните его правой кнопкой мыши и выберите в появившемся окне пункт «Запуск от имени администратора». При появлении соответствующего запроса введите пароль учетной записи Windows.

После открытия скопируйте и вставьте следующую команду, а затем нажмите клавишу Enter:
wmic path softwarelicensingservice get OA3xOriginalProductKey
Следующей строкой тут же появится 25-значный ключ продукта.

Вот и все, что, собственно, нужно сделать. Этот способ быстр, легок, достаточно записать код команды. Впрочем, есть и вторая, не менее простая методика, при помощи которой можно получить доступ к ключу продукта «Десятки» не менее просто и быстро – через реестр Windows.
Поиск ключа продукта Windows 10 при помощи реестра Windows
Первоначально совет по поиску ключа через реестр Windows был предложен пользователем на форуме Microsoft .

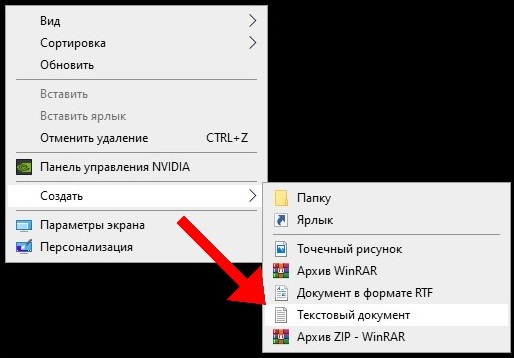
Для начала откройте «Блокнот», щелкнув правой кнопкой мыши в любом месте рабочего стола, наведя курсор мыши на «Создать», а затем выбрав в меню пункт «Текстовый документ».
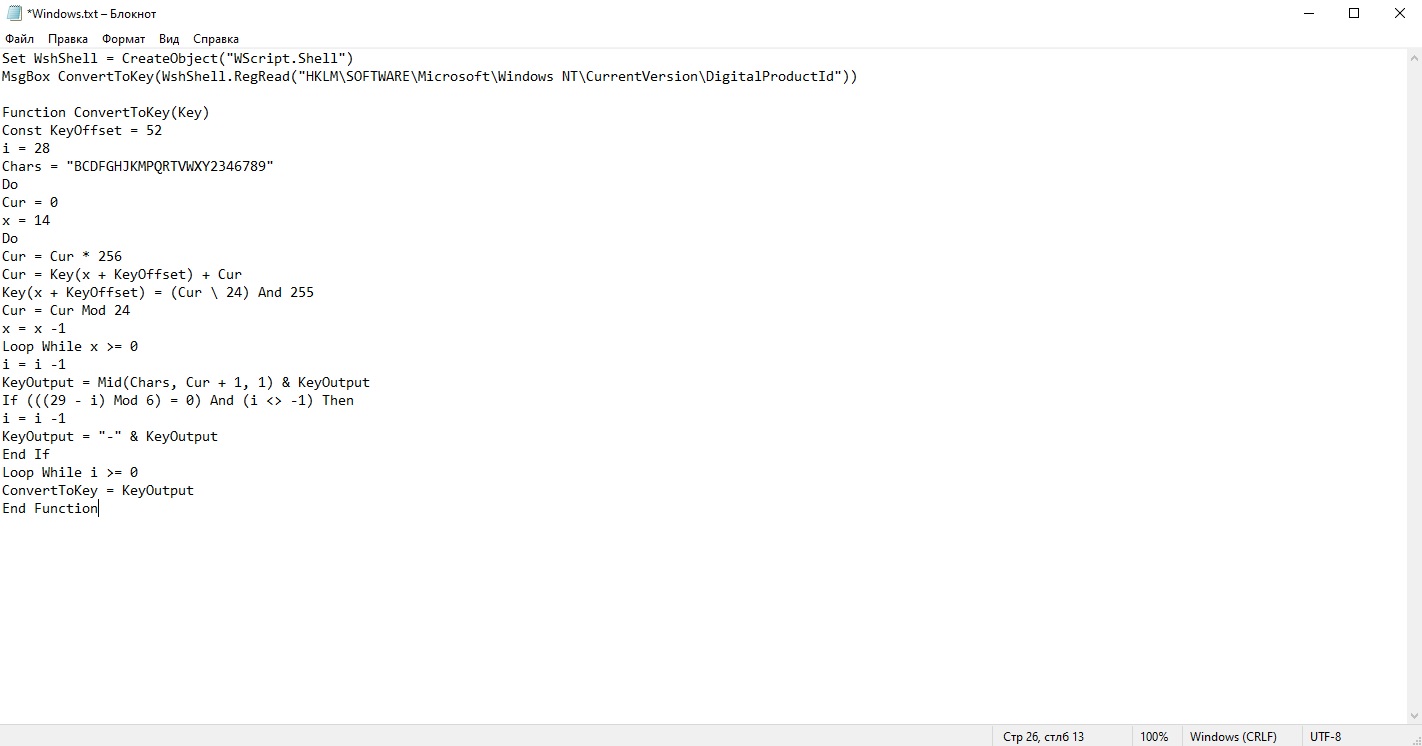
Скопируйте и вставьте этот код в блокнот:
Set WshShell = CreateObject («WScript.Shell»)
MsgBox ConvertToKey (WshShell.RegRead («HKLM\SOFTWARE\Microsoft\Windows NT\CurrentVersion\DigitalProductId»))
Function ConvertToKey (Key)
Const KeyOffset = 52
i = 28
Chars = «BCDFGHJKMPQRTVWXY2346789»
Do
Cur = 0
x = 14
Do
Cur = Cur * 256
Cur = Key (x + KeyOffset) + Cur
Key (x + KeyOffset) = (Cur \ 24) And 255
Cur = Cur Mod 24
x = x -1
Loop While x >= 0
i = i -1
KeyOutput = Mid (Chars, Cur + 1, 1) & KeyOutput
If (((29 — i) Mod 6) = 0) And (i <> -1) Then
i = i -1
KeyOutput = «-» & KeyOutput
End If
Loop While i >= 0
ConvertToKey = KeyOutput
End Function
Далее перейдите на вкладку «Файл» и выберите пункт «Сохранить как».
Установите список типа файла: «Все файлы» и дайте файлу имя. Вы можете использовать любое имя, но расширение должно быть .vbs . Например, назовите файл таким образом: productkey.vbs

После того как вы ввели имя файла, сохраните его.

Теперь вы можете просмотреть ключ продукта Windows 10 в любое время, просто открыв вновь созданный файл.
RunOnce Registry Key
All versions of Windows support a registry key, RunOnce, which can be used to specify commands that the system will execute one time and then delete.
In WindowsВ 8 and WindowsВ 8.1, RunOnce entries for installation of software-only SWENUM devices are processed during device installation. Other RunOnce entries are added to the RunOnce key. These are applied the next time the system processes the RunOnce key. Device installation does not force the system to process RunOnce entries.
In WindowsВ 7 and previous versions, immediately after a device is installed, Windows executes the command stored under the RunOnce key and then removes the key. Additionally, each time the system starts, it executes the command stored under the RunOnce key and then removes the key. Therefore, if you put a command under the RunOnce key, you cannot easily predict when it is executed.
Immediately after a device has been installed, Windows executes the command stored under the RunOnce key and then removes the key. Additionally, each time the system starts, it executes the command stored under the RunOnce key and then removes the key. Therefore, if you put a command under the RunOnce key, you cannot easily predict when it is executed.
For device installations, RunOnce registry keys can be created by using add-registry-sections, which are specified through INF AddReg directives. Each add-registry-section has the following syntax:
reg-root, [subkey], [value-entry-name], [flags], [value]
The registry root (reg-root) and subkey values for the RunOnce registry key are as follows:
HKLM, «Software\Microsoft\Windows\CurrentVersion\RunOnce»
The value-entry-name string is omitted from a RunOnce registry entry. The type of the entry, which is indicated by the Flags value, must be either REG_SZ (Flags value of 0x00000000) or REG_EXPAND_SZ (Flags value of 0x00010000). For an entry of type REG_SZ (the default), the Flags value can be omitted.
The value parameter in a RunOnce key specifies the command to be executed. This parameter is a quoted string that has the following format:
By default, a RunOnce key is deleted after the specified command is executed. You can prefix a RunOnce key value parameter with an exclamation point (!) to defer deletion of the key until after the command runs successfully. Without the exclamation point prefix, if the specified command fails, the RunOnce key will still be deleted and the command will not be executed the next time that the system starts.
Also, by default, the RunOnce keys are ignored when the system is started in Safe Mode. The value parameter of RunOnce keys can be prefixed with an asterisk (*) to force the command to be executed even in Safe Mode.
Consider the following guidelines when you create a value string entry:
Rundll32 can appear either with or without its .exe file name extension.
DllName is the full path of a DLL or executable image. Except for a required terminating comma, the expression must not otherwise contain any commas. If no file name extension is supplied, the default extension is .dll.
EntryPoint is the name of the entry point within the DLL indicated by DllName.
Arguments is an optional substring that contains any arguments that must be passed to the specified DLL.
Exactly one space must separate the EntryPoint string from the Arguments substring.
The following code example shows the add-registry-section entry that stores a command and its arguments under the RunOnce key:
The following rules apply when you use RunOnce registry keys for device installations:
These registry keys must be used only for installations of software-only devices that are enumerated by SWENUM, the software device enumerator.
RunOnce keys must consist only of calls to Rundll32.exe. Otherwise, WHQL will not digitally sign the driver package.
The code to be executed must not prompt for user input.
Server-side installations execute in a system context. For this reason, you must be certain that the code to be executed contains no security vulnerabilities and that file permissions prevent the code from being maliciously modified.
Starting with Windows Vista, the system will not execute the commands specified by the RunOnce keys if a user without administrator privileges is logged on to the system. This could lead to incomplete or corrupted installations following a system restart.
Before the device installation application creates the RunOnce entries, it informs the current user that a user who has administrator privileges must log on after a system restart.
How to recover your Windows product key
Technical Level : Basic
If you are planning to reinstall Windows but you can’t find your product key, this article will show you where and how you can find your product key.
The key could be:
- Printed on a Certificate of Authenticity sticker
- Stored in the Windows Registry
- Embedded in the PC’s UEFI firmware
Note that if you are currently running Windows 10 and wish to reinstall the operating system, you don’t need your product key. After the reinstall, Windows 10 will detect that it has been reinstalled on a previously activated system and will automatically reactivate.
Printed on a Certificate of Authenticity Sticker
If your PC came with Windows 7 or earlier, then your product key will be printed on a COA sticker. This sticker verifies that the computer came with a genuine copy of Windows. You will need to examine your computer to find the sticker. On laptops, it’s usually on the bottom side. On desktops, it could be on the back, sides, or top. It looks something like this:
Embedded in the PC’s UEFI firmware
If you have a newer PC that came with Windows 8 or Windows 10, then your product key likely won’t be on a sticker. Instead, computer manufacturers now embed the key right into the computer’s UEFI firmware. Unlike the COA sticker, the embedded key can’t be smudged off, stolen or erased (easily).
If you want to extract the UEFI key, the process is simple. Open the Start menu, type powershell and then run the program.
Next type the following command in the PowerShell window and hit Enter.
You will be presented with the key in the window.
Stored in the Windows Registry
If your product key isn’t embedded in the firmware or you’re missing your COA sticker, you’re not out of luck as long as you haven’t formatted your computer. You can still recover the key because Windows stores it in the registry. Here is how:
1. Open a new Notepad window
2. Copy and paste the following text into the window
3. Click File > Save As and save the file to your desktop as productkey.vbs. It’s important to include the .vbs extension because this is a Windows Scripting Host file.
4. Close Notepad and double-click the file. Wait a few seconds, and then you will be presented with a popup displaying your product key:
Introduction to Registry Keys for Drivers
Drivers typically use a set of system-defined registry keys to store or access driver-specific or device-specific information. Your driver might access the following registry keys:
Parameters key
The driver’s Parameters key can contain configuration information for your driver and can be accessed by calling WdfDriverOpenParametersRegistryKey. For Kernel-Mode Driver Framework (KMDF) drivers, this key is located in the appropriate Services tree for the driver. For User-Mode Driver Framework (UMDF) drivers, this key is located in the HKLM\SOFTWARE\Microsoft\Windows NT\CurrentVersion\WUDF\Services tree, under the driver’s service name. The subkey for the driver always uses the driver’s service name, even if the driver binary’s file name differs from the service name.
When the system calls your driver’s DriverEntry routine, it passes the driver a path to the driver’s key in the appropriate Services tree. Your driver must pass this path to WdfDriverCreate. Subsequently, the driver can obtain the path by calling WdfDriverGetRegistryPath.
A driver’s software key is also called its driver key. The system stores information about each driver under its software key.
Your driver’s INF file can contain INF AddReg directives that set registry values under the software key using INF DDInstall sections.
When a driver stack informs the Plug and Play (PnP) manager that a device is connected to the system, the PnP manager creates a hardware key for the device. This key is also called a device key. Settings related to the hardware (such as interrupt settings) can be stored here by drivers.
Your driver’s INF file can contain INF AddReg directives that set registry values under the hardware key using INF DDInstall.HW sections.
To determine whether your driver type requires that you store information under specific registry keys, see the sections of this documentation that discuss your driver’s device type by using the table of contents.
For more information about registry keys for drivers, see:
Windows registry information for advanced users
This article describes the Windows registry and provides information about how to edit and back up it.
Original product version: В Windows 10 — all editions, Windows Server 2012 R2
Original KB number: В 256986
Description of the registry
The Microsoft Computer Dictionary, Fifth Edition, defines the registry as:
A central hierarchical database used in Windows 98, Windows CE, Windows NT, and Windows 2000 used to store information that is necessary to configure the system for one or more users, applications, and hardware devices.
The Registry contains information that Windows continually references during operation, such as profiles for each user, the applications installed on the computer and the types of documents that each can create, property sheet settings for folders and application icons, what hardware exists on the system, and the ports that are being used.
The Registry replaces most of the text-based .ini files that are used in Windows 3.x and MS-DOS configuration files, such as the Autoexec.bat and Config.sys. Although the Registry is common to several Windows operating systems, there are some differences among them. A registry hive is a group of keys, subkeys, and values in the registry that has a set of supporting files that contain backups of its data. The supporting files for all hives except HKEY_CURRENT_USER are in the % SystemRoot%\System32\Config folder on Windows NT 4.0, Windows 2000, Windows XP, Windows Server 2003, and Windows Vista. The supporting files for HKEY_CURRENT_USER are in the %SystemRoot%\Profiles\Username folder. The file name extensions of the files in these folders indicate the type of data that they contain. Also, the lack of an extension may sometimes indicate the type of data that they contain.
| Registry hive | Supporting files |
|---|---|
| HKEY_LOCAL_MACHINE\SAM | Sam, Sam.log, Sam.sav |
| HKEY_LOCAL_MACHINE\Security | Security, Security.log, Security.sav |
| HKEY_LOCAL_MACHINE\Software | Software, Software.log, Software.sav |
| HKEY_LOCAL_MACHINE\System | System, System.alt, System.log, System.sav |
| HKEY_CURRENT_CONFIG | System, System.alt, System.log, System.sav, Ntuser.dat, Ntuser.dat.log |
| HKEY_USERS\DEFAULT | Default, Default.log, Default.sav |
In Windows 98, the registry files are named User.dat and System.dat. In Windows Millennium Edition, the registry files are named Classes.dat, User.dat, and System.dat.
Security features in Windows let an administrator control access to registry keys.
The following table lists the predefined keys that are used by the system. The maximum size of a key name is 255 characters.
| Folder/predefined key | Description |
|---|---|
| HKEY_CURRENT_USER | Contains the root of the configuration information for the user who is currently logged on. The user’s folders, screen colors, and Control Panel settings are stored here. This information is associated with the user’s profile. This key is sometimes abbreviated as HKCU. |
| HKEY_USERS | Contains all the actively loaded user profiles on the computer. HKEY_CURRENT_USER is a subkey of HKEY_USERS. HKEY_USERS is sometimes abbreviated as HKU. |
| HKEY_LOCAL_MACHINE | Contains configuration information particular to the computer (for any user). This key is sometimes abbreviated as HKLM. |
| HKEY_CLASSES_ROOT | Is a subkey of HKEY_LOCAL_MACHINE\Software . The information that is stored here makes sure that the correct program opens when you open a file by using Windows Explorer. This key is sometimes abbreviated as HKCR. Starting with Windows 2000, this information is stored under both the HKEY_LOCAL_MACHINE and HKEY_CURRENT_USER keys. The HKEY_LOCAL_MACHINE\Software\Classes key contains default settings that can apply to all users on the local computer. The HKEY_CURRENT_USER\Software\Classes key contains settings that override the default settings and apply only to the interactive user. The HKEY_CLASSES_ROOT key provides a view of the registry that merges the information from these two sources. HKEY_CLASSES_ROOT also provides this merged view for programs that are designed for earlier versions of Windows. To change the settings for the interactive user, changes must be made under HKEY_CURRENT_USER\Software\Classes instead of under HKEY_CLASSES_ROOT. To change the default settings, changes must be made under HKEY_LOCAL_MACHINE\Software\Classes . If you write keys to a key under HKEY_CLASSES_ROOT, the system stores the information under HKEY_LOCAL_MACHINE\Software\Classes . If you write values to a key under HKEY_CLASSES_ROOT, and the key already exists under HKEY_CURRENT_USER\Software\Classes , the system will store the information there instead of under HKEY_LOCAL_MACHINE\Software\Classes . |
| HKEY_CURRENT_CONFIG | Contains information about the hardware profile that is used by the local computer at system startup. |
The registry in 64-bit versions of Windows XP, Windows Server 2003, and Windows Vista is divided into 32-bit and 64-bit keys. Many of the 32-bit keys have the same names as their 64-bit counterparts, and vice versa. The default 64-bit version of Registry Editor that is included with 64-bit versions of Windows XP, Windows Server 2003, and Windows Vista displays the 32-bit keys under the node HKEY_LOCAL_MACHINE\Software\WOW6432Node . For more information about how to view the registry on 64-Bit versions of Windows, see How to view the system registry by using 64-bit versions of Windows.
The following table lists the data types that are currently defined and that are used by Windows. The maximum size of a value name is as follows:
- Windows Server 2003, Windows XP, and Windows Vista: 16,383 characters
- Windows 2000: 260 ANSI characters or 16,383 Unicode characters
- Windows Millennium Edition/Windows 98/Windows 95: 255 characters
Long values (more than 2,048 bytes) must be stored as files with the file names stored in the registry. This helps the registry perform efficiently. The maximum size of a value is as follows:
- Windows NT 4.0/Windows 2000/Windows XP/Windows Server 2003/Windows Vista: Available memory
- Windows Millennium Edition/Windows 98/Windows 95: 16,300 bytes
There is a 64K limit for the total size of all values of a key.
| Name | Data type | Description |
|---|---|---|
| Binary Value | REG_BINARY | Raw binary data. Most hardware component information is stored as binary data and is displayed in Registry Editor in hexadecimal format. |
| DWORD Value | REG_DWORD | Data represented by a number that is 4 bytes long (a 32-bit integer). Many parameters for device drivers and services are this type and are displayed in Registry Editor in binary, hexadecimal, or decimal format. Related values are DWORD_LITTLE_ENDIAN (least significant byte is at the lowest address) and REG_DWORD_BIG_ENDIAN (least significant byte is at the highest address). |
| Expandable String Value | REG_EXPAND_SZ | A variable-length data string. This data type includes variables that are resolved when a program or service uses the data. |
| Multi-String Value | REG_MULTI_SZ | A multiple string. Values that contain lists or multiple values in a form that people can read are generally this type. Entries are separated by spaces, commas, or other marks. |
| String Value | REG_SZ | A fixed-length text string. |
| Binary Value | REG_RESOURCE_LIST | A series of nested arrays that is designed to store a resource list that is used by a hardware device driver or one of the physical devices it controls. This data is detected and written in the \ResourceMap tree by the system and is displayed in Registry Editor in hexadecimal format as a Binary Value. |
| Binary Value | REG_RESOURCE_REQUIREMENTS_LIST | A series of nested arrays that is designed to store a device driver’s list of possible hardware resources the driver or one of the physical devices it controls can use. The system writes a subset of this list in the \ResourceMap tree. This data is detected by the system and is displayed in Registry Editor in hexadecimal format as a Binary Value. |
| Binary Value | REG_FULL_RESOURCE_DESCRIPTOR | A series of nested arrays that is designed to store a resource list that is used by a physical hardware device. This data is detected and written in the \HardwareDescription tree by the system and is displayed in Registry Editor in hexadecimal format as a Binary Value. |
| None | REG_NONE | Data without any particular type. This data is written to the registry by the system or applications and is displayed in Registry Editor in hexadecimal format as a Binary Value |
| Link | REG_LINK | A Unicode string naming a symbolic link. |
| QWORD Value | REG_QWORD | Data represented by a number that is a 64-bit integer. This data is displayed in Registry Editor as a Binary Value and was introduced in Windows 2000. |
Back up the registry
Before you edit the registry, export the keys in the registry that you plan to edit, or back up the whole registry. If a problem occurs, you can then follow the steps in the Restore the registry section to restore the registry to its previous state. To back up the whole registry, use the Backup utility to back up the system state. The system state includes the registry, the COM+ Class Registration Database, and your boot files. For more information about how to use the Backup utility to back up the system state, see the following articles:
Edit the registry
To modify registry data, a program must use the registry functions that are defined in Registry Functions.
Administrators can modify the registry by using Registry Editor (Regedit.exe or Regedt32.exe), Group Policy, System Policy, Registry (.reg) files, or by running scripts such as VisualBasic script files.
Use the Windows user interface
We recommend that you use the Windows user interface to change your system settings instead of manually editing the registry. However, editing the registry may sometimes be the best method to resolve a product issue. If the issue is documented in the Microsoft Knowledge Base, an article with step-by-step instructions to edit the registry for that issue will be available. We recommend that you follow those instructions exactly.
Use Registry Editor
Serious problems might occur if you modify the registry incorrectly by using Registry Editor or by using another method. These problems might require that you reinstall the operating system. Microsoft cannot guarantee that these problems can be solved. Modify the registry at your own risk.
You can use Registry Editor to do the following actions:
- Locate a subtree, key, subkey, or value
- Add a subkey or a value
- Change a value
- Delete a subkey or a value
- Rename a subkey or a value
The navigation area of Registry Editor displays folders. Each folder represents a predefined key on the local computer. When you access the registry of a remote computer, only two predefined keys appear: HKEY_USERS and HKEY_LOCAL_MACHINE.
Use Group Policy
Microsoft Management Console (MMC) hosts administrative tools that you can use to administer networks, computers, services, and other system components. The Group Policy MMC snap-in lets administrators define policy settings that are applied to computers or users. You can implement Group Policy on local computers by using the local Group Policy MMC snap-in, Gpedit.msc. You can implement Group Policy in Active Directory by using the Active Directory Users and Computers MMC snap-in. For more information about how to use Group Policy, see the Help topics in the appropriate Group Policy MMC snap-in.
Use a Registration Entries (.reg) file
Create a Registration Entries (.reg) file that contains the registry changes, and then run the .reg file on the computer where you want to make the changes. You can run the .reg file manually or by using a logon script. For more information, see How to add, modify, or delete registry subkeys and values by using a Registration Entries (.reg) file.
Use Windows Script Host
The Windows Script Host lets you run VBScript and JScript scripts directly in the operating system. You can create VBScript and JScript files that use Windows Script Host methods to delete, to read, and to write registry keys and values. For more information about these methods, visit the following Microsoft Web sites:
Use Windows Management Instrumentation
Windows Management Instrumentation (WMI) is a component of the Microsoft Windows operating system and is the Microsoft implementation of Web-Based Enterprise Management (WBEM). WBEM is an industry initiative to develop a standard technology for accessing management information in an enterprise environment. You can use WMI to automate administrative tasks (such as editing the registry) in an enterprise environment. You can use WMI in scripting languages that have an engine on Windows and that handle Microsoft ActiveX objects. You can also use the WMI Command-Line utility (Wmic.exe) to modify the Windows registry.
Use Console Registry Tool for Windows
You can use the Console Registry Tool for Windows (Reg.exe) to edit the registry. For help with the Reg.exe tool, type reg /? at the Command Prompt, and then click OK.
Restore the registry
To restore the registry, use the appropriate method.
Method 1: Restore the registry keys
To restore registry subkeys that you exported, double-click the Registration Entries (.reg) file that you saved in the Export registry subkeys section. Or, you can restore the whole registry from a backup. For more information about how to restore the whole registry, see the Method 2: Restore the whole registry section later in this article.
Method 2: Restore the whole registry
To restore the whole registry, restore the system state from a backup. For more information about how to restore the system state from a backup, see How to use Backup to protect data and restore files and folders on your computer in Windows XP and Windows Vista.
Backing up the system state also creates updated copies of the registry files in the %SystemRoot%\Repair folder.
References
For more information, visit the following Web sites:
The Windows Server Catalog of Tested Products is a reference for products that have been tested for Windows Server compatibility.
Data Protection Manager (DPM) is a key member of the Microsoft System Center family of management products and is designed to help IT professionals manage their Windows environment. DPM is the new standard for Windows backup and recovery and delivers continuous data protection for Microsoft application and file servers that use seamlessly integrated disk and tape media. For more information about how to back up and restore the registry, see How to back up and restore the registry in Windows XP and Windows Vista.


