- Top 4 Ways to Mount Windows System Image Backup VHD/VHDX File
- About VHD & VHDX
- Way 1. Mount Windows image backup VHD with Disk Management
- Mount VHD/VHDX
- Detach VHD/VHDX
- Way 2. Powershell Mount VHD/VHDX
- Way 3. Mount VHD/VHDX file with Command Prompt
- Way 4. Mount Windows image backup VHD with AOMEI Backupper
- The End
- Download a Windows VHD from Azure
- Optional: Generalize the VM
- Stop the VM
- Alternative: Snapshot the VM disk
- Generate download URL
- Boot to a virtual hard disk: Add a VHDX or VHD to the boot menu
- Prerequisites
- Step 1: Create a VHDX from diskpart
- Step 2: Apply a Windows image to the VHD
- Step 3: Detach the VHD, copy it to a new device, and attach it (optional)
- Step 4: Add a boot entry
Top 4 Ways to Mount Windows System Image Backup VHD/VHDX File
4 ways provided in this article to mount or unmount Windows image backup VHD or VHDX file in Windows 10/8/7 and Servers, just refer to the step-by-step guide to mount VHD/VHDX.

By Cherry  / Last Updated December 16, 2020
About VHD & VHDX
VHD, the short of Virtual Hard Disk, is a file format which represents a virtual hard disk drive. If you create Windows image backup using Backup and Restore, you now get Windows backup to VHD and you will get a WindowsImageBackup folder in the destination, and the path just like:\WindowsImageBackup\computer name\Backup YYYY-MM-DD HHMMSS. And get multiple .VHD files and several .xml files. How many VHD files mean that you have how many disks or partitions.
VHDX (Virtual Hard Disk V2) is the successor format to VHD. Now it is used for disk images instead of VHD. Because there are some difference between VHD and VHDX: capacity limit. VHD is limited up to 2 TB while the VHDX is limited up to 64 TB. You can mount VHDX just like mount VHD.
Sometimes, you have to mount the VHD or VHDX file to access files from the backup, what should you do? There are 4 ways included in this article for you.
Way 1. Mount Windows image backup VHD with Disk Management
Here is the guide to mount and unmount VHD or VHDX file with Disk Management:
Mount VHD/VHDX
Mount Windows image backup with Windows Disk Management listed below.
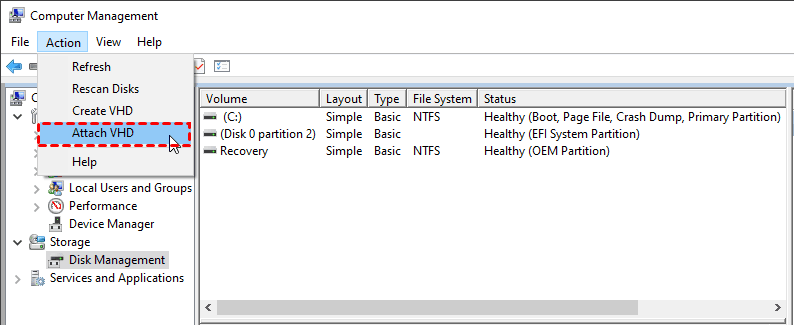
1. Right click This PC -> Manage, select Disk Management, or you can open the Disk Management by pressing Win+X (Win10), select Disk Management.
2. Click Action, select Attach VHD.
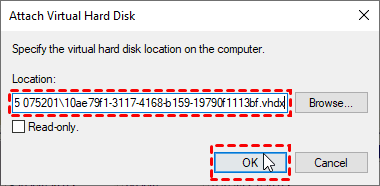
3. Then, locate the Windows system image VHD/VHDX file by clicking Browse and hit OK.
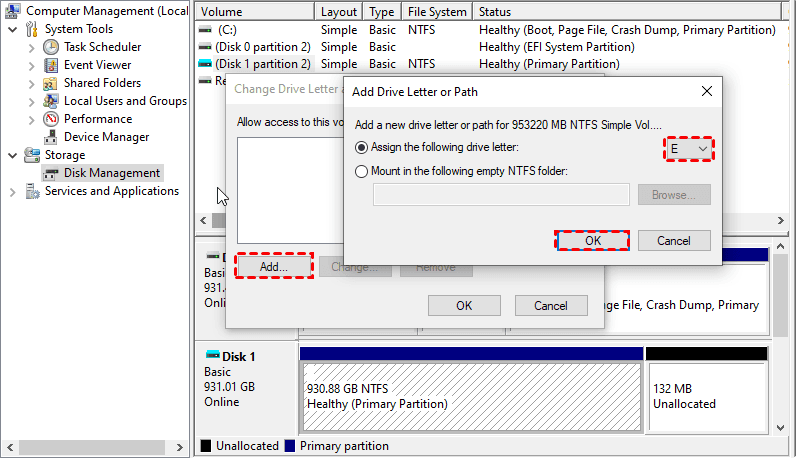
4. After attached, you will find the partitions or disk did not show in File Explorer only visible in Disk Management. Now, you should do is assigning drive letter for the partitions on the mounted disk: Right click the partition > Change Drive Letter and Path. > Add. > Choose a drive letter > OK.
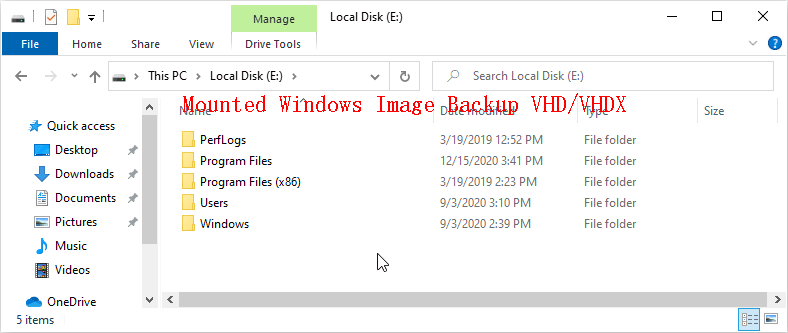
Now, you could browse files, copy files, drag and drop files, recover single or multiple files from your Windows image backup.
Detach VHD/VHDX
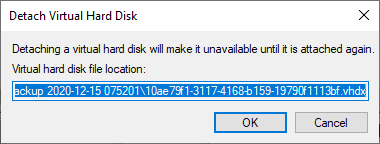
1. In Computer Management, click Action > All Tasks > Detach VHD.
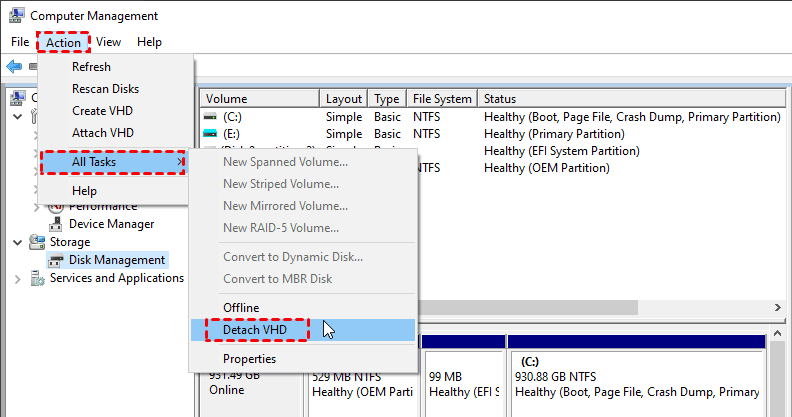
2. And then click OK.
Or you could right click the mounted disk, and select Detach VHD. It will execute the detachment immediately.

Note: Detaching VHD or VHDX is a little difference in Windows 7, please do not check the box of “Delete the virtual hard disk file after removing the disk”, or your system image backup will be deleted.

Way 2. Powershell Mount VHD/VHDX
Besides, you could use the Mount-VHD command to mount one or more Windows image backup VHD or VHDX files in Hyper-V, Windows Server 2012, 2016, 2019.
The syntax of Mount-VHD is listed here:
Mount-VHD [-Path] [-NoDriveLetter] [-ReadOnly] [-SnapshotId ] [-Passthru] [-CimSession ] [-ComputerName ] [-Credential
For example, mount the VHDX file located in \\192.168.0.230\sharefolder\WindowsImageBackup\DESKTOP-EL3UFCG\Backup 2020-12-15 075201\10ae79f1-3117-4168-b159-19790f1113bf.vhdx, please input the command:
Mount-VHD -path \\192.168.0.230\sharefolder\WindowsImageBackup\DESKTOP-EL3UFCG\Backup 2020-12-15 075201\10ae79f1-3117-4168-b159-19790f1113bf.vhdx

Here is the detach VHD or VHDX command:
Dismount-VHD –Path «[location of vhd]»
Dismount-VHD \\192.168.0.230\sharefolder\WindowsImageBackup\DESKTOP-EL3UFCG\Backup 2020-12-15 075201\10ae79f1-3117-4168-b159-19790f1113bf.vhdx
Sometimes, you will get the error: The term ‘Mount-VHD’ is not recognized as the name of a cmdlet, function, script file, or operable program. To fix it, you have to install Hyper-V first.
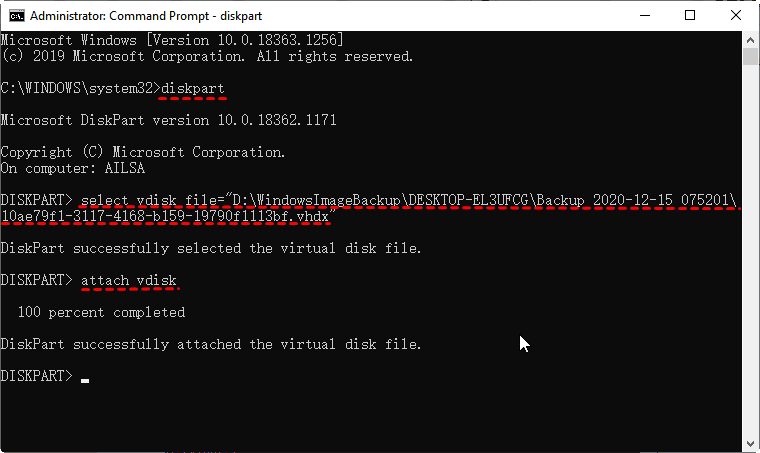
Way 3. Mount VHD/VHDX file with Command Prompt
Run the following commands from an elevated command:
diskpart
select vdisk file=»D:\WindowsImageBackup\DESKTOP-EL3UFCG\Backup 2020-12-15 075201\10ae79f1-3117-4168-b159-19790f1113bf.vhdx»
attach vdisk
And you could unmount the VHD or VHDX file with the command:
diskpart
select vdisk file=»D:\WindowsImageBackup\DESKTOP-EL3UFCG\Backup 2020-12-15 075201\10ae79f1-3117-4168-b159-19790f1113bf.vhdx»
detach vdisk
However, you might encounter the mount VHD error like: Sorry, there was a problem mounting the file. Or you don’t have permission to mount the file. The fix is copy the VHD or VHDX file from one location to another, and mount it.
If you still have problems to mount the VHD or VHDX file, please try the next solution.
Way 4. Mount Windows image backup VHD with AOMEI Backupper
Here will introduce you a much easier way to mount Windows system image to VHD in Windows PCs and Servers. That is using the great third party software AOMEI Backupper Server. It is very simple to use this software to create Windows system image, and mount Windows image for browsing or recovering individual file.
Step 1. Install and launch AOMEI Backupper. To mount Windows system image, here you need to create Windows system image backup first. Select System Backup under Backup tab.

Step 2. Then, choose another local partition as destination place to store system backup image. Click Start Backup.

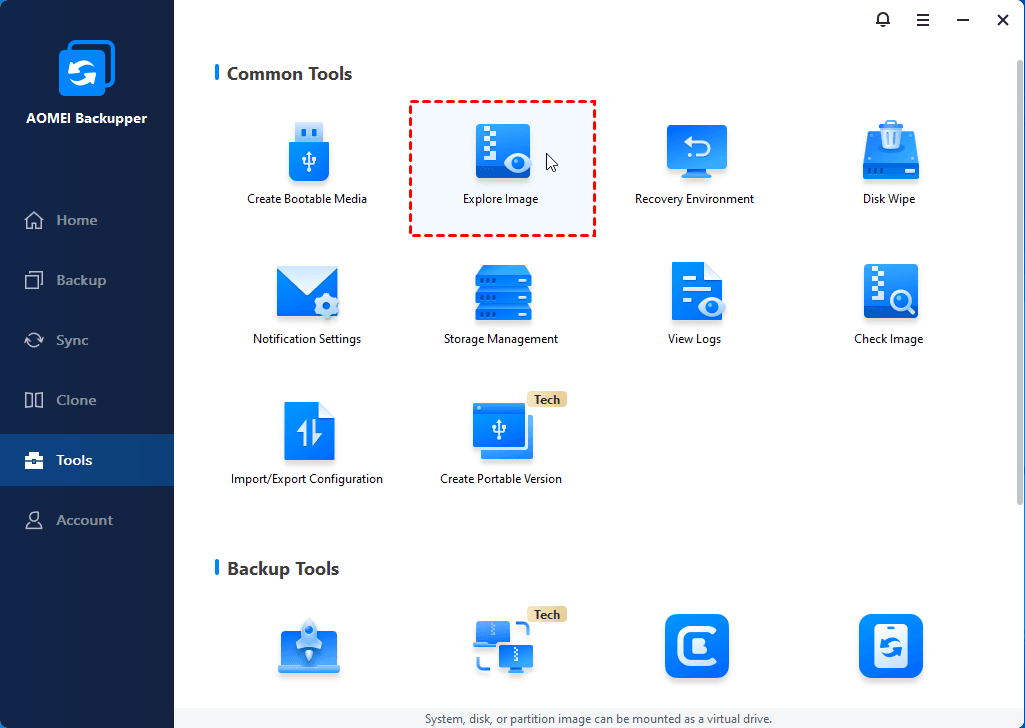
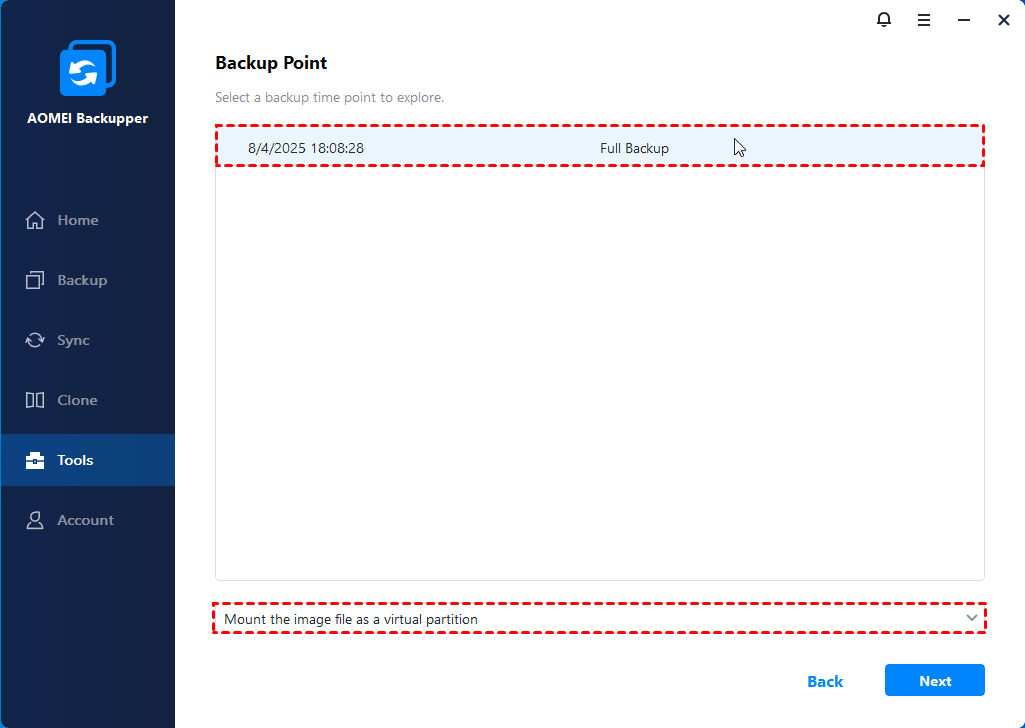
Step 3. If you need to mount Windows system image backup, you can select Explore Image under Tools tab.
Step 4. Then, select a backup image and select a backup point in the list to explore files on VHD. Click Next.
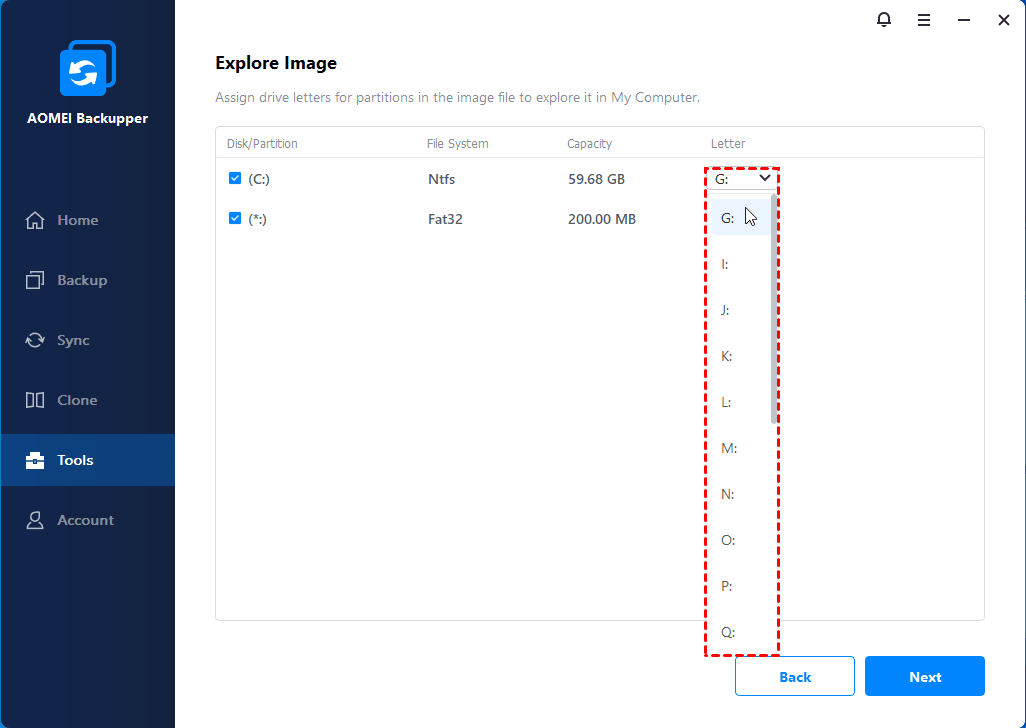
Step 5. Here you could assign drive letters for partitions in the image file to explore it in My Computer. Click Next.
Step 6. Then, wait till the progress reaches 100%. click Finish.
After that, you have already finished the job “mount Windows system image backup”. Then you can access the backup image VHD in Windows Explorer or recover specific files from Windows backup.
Unmount Windows system image backup also simple with AOMEI Backupper. Click Tools > Explore Image > select the drive letter and click Detach. And it will detach the virtual partitions from My Computer.
The End
It’s easy to mount the Windows image backup VHD or VHDX file according to the above steps. And AOMEI Backupper is not only a VHD mount tool but also the VHD viewer that can help Windows users backup and restore easily. Besides, you can use it to import/export configuration file to manage you backup tasks, check image, or merge images. It is convenient for Windows users.
If you want to protect unlimited computers within your company, you can pick AOMEI Backupper Technician Plus. With the inbuilt AOMEI Image Deploy tool, you are also allowed to deploy/restore system image file on server-side computer to multiple client-side computers over network.
Download a Windows VHD from Azure
In this article, you learn how to download a Windows virtual hard disk (VHD) file from Azure using the Azure portal.
Optional: Generalize the VM
If you want to use the VHD as an image to create other VMs, you should use Sysprep to generalize the operating system. Otherwise, you will have to make a copy the disk for each VM you want to create.
To use the VHD as an image to create other VMs, generalize the VM.
- If you haven’t already done so, sign in to the Azure portal.
- Connect to the VM.
- On the VM, open the Command Prompt window as an administrator.
- Change the directory to %windir%\system32\sysprep and run sysprep.exe.
- In the System Preparation Tool dialog box, select Enter System Out-of-Box Experience (OOBE), and make sure that Generalize is selected.
- In Shutdown Options, select Shutdown, and then click OK.
If you don’t want to generalize your current VM, you can still create a generalized image by first making a snapshot of the OS disk, creating a new VM from the snapshot, and then generalizing the copy.
Stop the VM
A VHD can’t be downloaded from Azure if it’s attached to a running VM. If you want to keep the VM running, you can create a snapshot and then download the snapshot.
- On the Hub menu in the Azure portal, click Virtual Machines.
- Select the VM from the list.
- On the blade for the VM, click Stop.
Alternative: Snapshot the VM disk
Take a snapshot of the disk to download.
- Select the VM in the portal.
- Select Disks in the left menu and then select the disk you want to snapshot. The details of the disk will be displayed.
- Select Create Snapshot from the menu at the top of the page. The Create snapshot page will open.
- In Name, type a name for the snapshot.
- For Snapshot type, select Full or Incremental.
- When you are done, select Review + create.
Your snapshot will be created shortly, and may then be used to download or create another VM from.
If you don’t stop the VM first, the snapshot will not be clean. The snapshot will be in the same state as if the VM had been power cycled or crashed at the point in time when the snapshot was made. While usually safe, it could cause problems if the running applications running a the time were not crash resistant.
This method is only recommended for VMs with a single OS disk. VMs with one or more data disks should be stopped before download or before creating a snapshot for the OS disk and each data disk.
Generate download URL
To download the VHD file, you need to generate a shared access signature (SAS) URL. When the URL is generated, an expiration time is assigned to the URL.
- On the page for the VM, click Disks in the left menu.
- Select the operating system disk for the VM.
- On the page for the disk, select Disk Export from the left menu.
- The default expiration time of the URL is 3600 seconds (one hour). You may need to increase this for Windows OS disks or large data disks. 36000 seconds (10 hours) is usually sufficient.
- Click Generate URL.
The expiration time is increased from the default to provide enough time to download the large VHD file for a Windows Server operating system. Large VHDs can take up to several hours to download depending on your connection and the size of the VM.
Boot to a virtual hard disk: Add a VHDX or VHD to the boot menu
Native Boot allows you to create a virtual hard disk (VHDX), install Windows to it, and then boot it up, either on your PC side-by-side with your existing installation, or on a new device.
A native-boot VHDX can be used as the running operating system on designated hardware without any other parent operating system. This differs from a scenario where a VHDX is connected to a virtual machine on a computer that has a parent operating system.
Native boot for WindowsВ 10 requires the .vhdx format, not the .vhd format.
VHDXs can be applied to PCs or devices that have no other installations of Windows, without a virtual machine or hypervisor. (A hypervisor is a layer of software under the operating system that runs virtual computers.) This enables greater flexibility in workload distribution because a single set of tools can be used to manage images for virtual machines and designated hardware.
You can also deploy the VHDX to a PC that already has Windows installed on it, and use a boot menu to select between the existing version of Windows, or the version on the VHD.
To learn more about using VHDXs in an enterprise environment, see Understanding Virtual Hard Disks with Native Boot.
Prerequisites
A technician PC with the Windows Assessment and Deployment Kit (WindowsВ ADK) tools installed on it.
A generalized WindowsВ image (.WIM file). To learn more, see Sysprep (Generalize) a Windows installation.
A bootable WindowsВ PE drive. To learn more, see WinPE: Create USB Bootable drive.
A destination PC or device on which to install the VHDX. This device requires 30В gigabytes (GB) or more of free disk space. You can install the VHDX to a device already running other operating system installations, or as the only operating system on a device.
Step 1: Create a VHDX from diskpart
On the technician PC:
From the Command Prompt, open Diskpart.
Create and prepare a new VHDX. In this example, we create a 25 GB fixed-type VHDX.
Attach the VHDX. This adds the VHDX as a disk to the storage controller on the host.
Create a partition for the Windows files, format it, and assign it a drive letter. This drive letter will appear in File Explorer.
Step 2: Apply a Windows image to the VHD
On your technician PC, apply a generalized Windows image to the primary partition of the VHDX that you created and attached in Step 1.
Step 3: Detach the VHD, copy it to a new device, and attach it (optional)
You can deploy the VHDX to a device that already has a copy of Windows installed on it, or you can clean and prepare the destination PC’s hard drive to use the VHD.
Detach the VHDX and save it to a network share or storage drive
Use diskpart to detach the virtual disk from your technician PC.
Copy the VHDX to a network share or removable storage drive. The following maps a drive letter to a network share, creates a directory for the VHD, and then copies the VHD.
Clean and prepare a new device for native boot
On your destination PC:
Use your bootable WinPE key to boot the destination PC to WinPE.
Clean and prepare the destination PC’s hard drive. Create a system partition (S), and a main partition (M) where the VHDX will be stored.
Connect to the network drive or storage location where you copied the VHDX in step 3.2.
Copy the VHDX from the network drive or storage location to the destination PC’s main partition.
Attach the VHDX
While still booted into WinPE, attach your VHDX to the destination PC.
Identify the attached VHDX’s volume letter. (Optional: Change it to another letter that makes more sense, for example V, and leave the diskpart command line open for the next step).
Step 4: Add a boot entry
From your destination PC, open Diskpart (if necessary) and identify the drive letters of the VHDX and the system partition, for example, V and S.
Add a boot entry to the device. You can add multiple VHDX files using this method.
Remove the Windows PE USB key.
Restart the destination PC.
If there’s only one boot entry, the device immediately boots to Windows. If there’s more than one boot entry, you’ll see a boot menu where you can choose between the available versions of Windows on the device.


