- Description of Windows Identity Foundation
- Introduction
- System requirements
- Supported languages
- Download information
- More information
- Windows operating system upgrade information
- Technical revisions
- Настройка сервера управления удостоверениями: Windows Server 2016 или 2019 Set up an identity management server: Windows Server 2016 or 2019
- Присоединение Windows Server 2016 к своему домену Join Windows Server 2016 to your domain
- Настройка политики безопасности сервера Configure the server security policy
- Необходимое программное обеспечение Software prerequisites
- По необходимости измените систему аутентификации на IIS в Windows Change the IIS Windows Authentication mode if needed
- Set up an identity management server: Windows Server 2016 or 2019
- Join Windows Server 2016 to your domain
- Configure the server security policy
- Software prerequisites
- Change the IIS Windows Authentication mode if needed
Description of Windows Identity Foundation
This article provides information about Windows Identity Foundation.
Original product version: В Windows 7 Service Pack 1, Windows Server 2012 R2
Original KB number: В 974405
Introduction
Windows Identity Foundation (WIF) is a new extension to the Microsoft .NET Framework that makes it easy for developers to enable advanced identity capabilities in the .NET Framework applications. Based on interoperable, standard protocols, Windows Identity Foundation and the claims-based identity model can be used to enable single sign-on (SSO), personalization, federation, strong authentication, identity delegation, and other identity capabilities in ASP.NET and Windows Communication Foundation (WCF) applications that run on-premises or in the cloud.
System requirements
Windows Identity Foundation requires that one of the following operating systems be installed:
- Windows 7 (32-bit or 64-bit)
- Windows Server 2008 R2 (64-bit)
- Windows Server 2008 together with Service Pack 2 (32-bit or 64-bit)
- Windows Vista together with Service Pack 2 (32-bit or 64-bit)
- Windows Server 2003 together with Service Pack 2 (32-bit or 64-bit)
- Windows Server 2003 R2 (32-bit or 64-bit)
Windows Identity Foundation requires the following to be installed:
- The Microsoft .NET Framework 3.5 together with Service Pack 1
Supported languages
Windows Identity Foundation is supported in the following languages:
Download information
The following files are available for download from the Microsoft Download Center.
| Package name | Supported operating system | Platform | Download file size |
|---|---|---|---|
| Windows6.1-KB974405-x64.msu | Windows 7 and Windows Server 2008 R2 | x64 | 965 KB |
| Windows6.1-KB974405-x86.msu | Windows 7 | x86 | 858 KB |
| Windows6.0-KB974405-x64.msu | Windows Vista SP2 and Windows Server 2008 SP2 | x64 | 969 KB |
| Windows6.0-KB974405-x86.msu | Windows Vista SP2 and Windows Server 2008 SP2 | x86 | 861 KB |
| Windows5.2-KB974405-x64.exe | Windows Server 2003 SP2 | x64 | 1.2 MB |
| Windows5.2-KB974405-x86.exe | Windows Server 2003 SP2 | x86 | 1.2 MB |
For more information about how to download Microsoft support files, click the following article number to view the article in the Microsoft Knowledge Base:
119591 How to obtain Microsoft support files from online services
Microsoft scanned this file for viruses. Microsoft used the most current virus-detection software that was available on the date that the file was posted. The file is stored on security-enhanced servers that help prevent any unauthorized changes to the file.
More information
For more information about technical details and white papers, go to the following Microsoft websites:
Microsoft Security Response Center
Windows operating system upgrade information
If you have Windows Identity Foundation installed on Windows Server 2008 or on Windows Server 2003, Windows Identity Foundation will be automatically uninstalled when you upgrade your Windows operating system to Windows Server 2008 R2. You have to install the Windows Identity Foundation installation package for Windows Server 2008 R2 after your Windows operating system upgrade.
If you have Windows Identity Foundation installed on Windows Server 2003, Windows Identity Foundation will remain on the upgraded operating system when you upgrade your Windows operating system to Windows Server 2008. We recommend that you uninstall the Windows Identity Foundation before you upgrade your Windows operating system and then reinstall Windows Identity Foundation for Windows Server 2008. You can use the following command to silently uninstall Windows Identity Foundation on Windows Server 2003: %windir%\\$NtUninstallKB974405$\\spuninst\\spuninst.exe /quiet .
If an error occurs when you run this command, we recommend that you uninstall Windows Identity Foundation by using Programs and Features in Control Panel.
Technical revisions
The following table lists significant technical revisions to this article.
Настройка сервера управления удостоверениями: Windows Server 2016 или 2019 Set up an identity management server: Windows Server 2016 or 2019
Процедура настройки Windows Server 2019 такая же, как и для Windows Server 2016. Windows Server 2019 setup procedure does not differ from Windows Server 2016 setup procedure.
В этом пошаговом руководстве используются примеры имен и значений для компании Contoso. This walkthrough uses sample names and values from a company called Contoso. Замените их своими значениями. Replace these with your own. Пример. For example:
- Имя контроллера домена — corpdc Domain controller name — corpdc
- Имя домена — contoso. Domain name — contoso
- Имя сервера службы MIM — corpservice MIM Service Server name — corpservice
- Имя сервера синхронизации MIM — corpsync MIM Sync Server name — corpsync
- Имя SQL Server — corpsql SQL Server name — corpsql
- Пароль — Pass@word1 Password — Pass@word1
Присоединение Windows Server 2016 к своему домену Join Windows Server 2016 to your domain
Создайте машину Windows Server 2016 с ОЗУ от 8 до 12 ГБ. Start with a Windows Server 2016 machine, with a minimum of 8-12GB of RAM. При установке выберите версию сервера «Windows Server 2016 Standard/Datacenter (сервер с графическим интерфейсом пользователя) x64». When installing specify «Windows Server 2016 Standard/Datacenter (Server with a GUI) x64» edition.
Войдите на новый компьютер от имени администратора. Log into the new computer as its administrator.
С помощью панели управления назначьте компьютеру статический IP-адрес в сети. Using the Control Panel, give the computer a static IP address on the network. Настройте ее сетевой интерфейс на отправку запросов DNS по IP-адресу контроллера домена, упомянутого ранее, и задайте имя компьютера CORPSERVICE. Configure that network interface to send DNS queries to the IP address of the domain controller in the previous step, and set the computer name to CORPSERVICE. Для выполнения этой операции потребуется перезагрузить сервер. This operation will require a server restart.
Откройте панель управления и присоедините компьютер к домену contoso.com , настроенному на предыдущем шаге. Open the Control Panel and join the computer to the domain that you configured in the last step, contoso.com. В ходе выполнения этой операции потребуется указать имя пользователя и учетные данные администратора домена, например Contoso\Administrator. This operation includes providing the username and credentials of a domain administrator such as Contoso\Administrator. Когда появится приветствие, закройте диалоговое окно и снова перезагрузите сервер. After the welcome message appears, close the dialog box and restart this server again.
Войдите на компьютер CORPSERVICE с помощью доменной учетной записи с правами администратора локального компьютера, такой как Contoso\MIMINSTALL. Sign in to the computer CORPSERVICE as a domain account with local machine administrator such as Contoso\MIMINSTALL.
Откройте окно PowerShell от имени администратора и введите следующую команду, чтобы обновить компьютер согласно параметрам групповой политики. Launch a PowerShell window as administrator and type the following command to update the computer with the group policy settings.
Не позже чем через минуту обновление будет завершено с сообщением «Обновление политики для компьютера успешно завершено». After no more than a minute, it will complete with the message «Computer Policy update has completed successfully.»
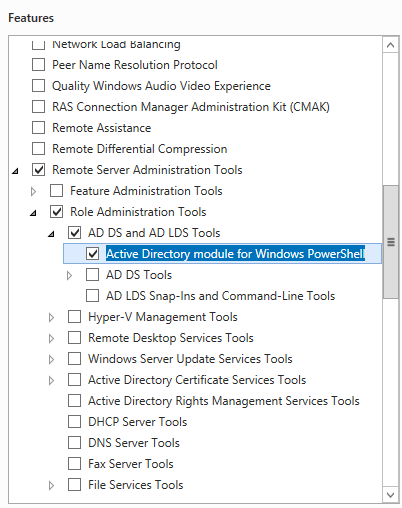
Добавьте роли Веб-сервер (IIS и Сервер приложений , компоненты .NET Framework 3.5, 4.0 и 4.5, а также модуль Active Directory для Windows PowerShell. Add the Web Server (IIS) and Application Server roles, the .NET Framework 3.5, 4.0, and 4.5 features, and the Active Directory module for Windows PowerShell.

В PowerShell введите следующие команды: In PowerShell, type the following commands. Обратите внимание, что может потребоваться указать другое расположение исходных файлов для компонентов .NET Framework 3.5. Note that it may be necessary to specify a different location for the source files for .NET Framework 3.5 features. Эти компоненты обычно отсутствуют при установке Windows Server, но доступны в папке параллельного размещения (SxS), находящейся в папке sources на установочном диске ОС, например «*d:\Sources\SxS*». These features are typically not present when Windows Server installs, but are available in the side-by-side (SxS) folder on the OS install disk sources folder, e.g., “*d:\Sources\SxS*”.
Настройка политики безопасности сервера Configure the server security policy
Настройте политику безопасности сервера так, чтобы новые учетные записи могли работать как службы. Set up the server security policy to allow the newly-created accounts to run as services.
В зависимости от типа конфигурации сервера как автономного (все в одном) или распределенного, необходимо только добавить компьютер на основе роли компьютера-члена домена, такой как сервер синхронизации. Depending on your configuration, single server(all-in-one) or distributed servers you only need to add, based on role of the member machine, like synchronization server.
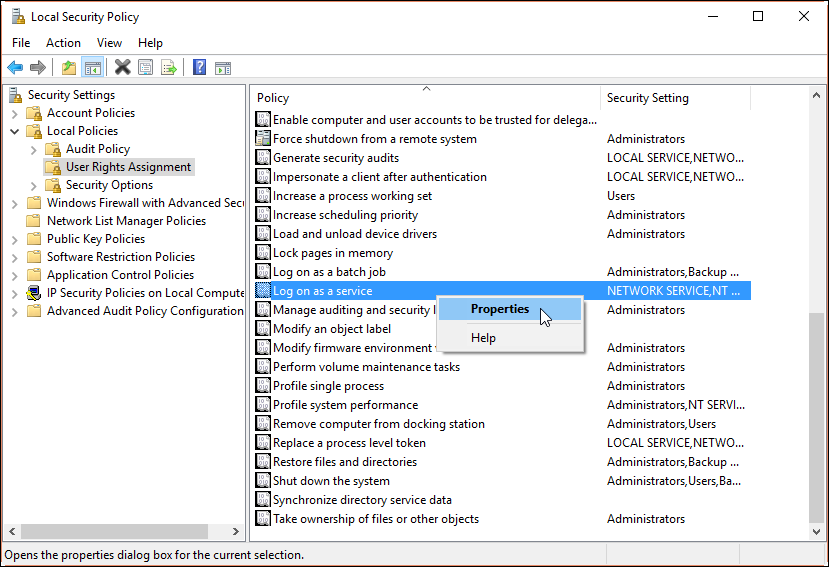
Запуск программы локальной политики безопасности Launch the Local Security Policy program
Перейдите в раздел Локальные политики > Предоставление прав пользователям. Navigate to Local Policies > User Rights Assignment.
В области сведений щелкните правой кнопкой мыши команду Вход в качестве службы и выберите пункт Свойства. On the details pane, right-click on Log on as a service , and select Properties.

Нажмите кнопку добавить пользователя или группу , и в текстовом поле введите следующие данные на основе роли contoso\MIMSync; contoso\MIMMA; contoso\MIMService; contoso\SharePoint; contoso\SqlServer; contoso\MIMSSPR , нажмите кнопку проверить имена , а затем нажмите кнопку ОК. Click Add User or Group , and in the text box type following based on role contoso\MIMSync; contoso\MIMMA; contoso\MIMService; contoso\SharePoint; contoso\SqlServer; contoso\MIMSSPR , click Check Names , and click OK.
Нажмите кнопку ОК , чтобы закрыть окно свойств Вход в качестве службы. Click OK to close the Log on as a service Properties window.
В области сведений щелкните правой кнопкой мыши команду Отказать в доступе к этому компьютеру из сети и выберите пункт Свойства. On the details pane, right-click on Deny access to this computer from the network , and select Properties.>
Щелкните Добавить пользователя или группу , после чего введите contoso\MIMSync; contoso\MIMService в текстовом поле и нажмите кнопку ОК. Click Add User or Group , and in the text box type contoso\MIMSync; contoso\MIMService and click OK.
Нажмите кнопку ОК , чтобы закрыть окно свойств Отказать в доступе к этому компьютеру из сети. Click OK to close the Deny access to this computer from the network Properties window.
В области сведений щелкните правой кнопкой мыши команду Запретить локальный вход и выберите пункт Свойства. On the details pane, right-click on Deny log on locally , and select Properties.
Щелкните Добавить пользователя или группу , после чего введите contoso\MIMSync; contoso\MIMService в текстовом поле и нажмите кнопку ОК. Click Add User or Group , and in the text box type contoso\MIMSync; contoso\MIMService and click OK.
Нажмите ОК , чтобы закрыть окно свойств Запретить локальный вход. Click OK to close the Deny log on locally Properties window.
Закройте окно «Локальная политика безопасности». Close the Local Security Policy window.
Необходимое программное обеспечение Software prerequisites
Перед установкой компонентов MIM 2016 с пакетом обновления 2 (SP2) убедитесь, что установлены все необходимые компоненты программного обеспечения: Before installing MIM 2016 SP2 components please make sure you install all software prerequisites:
Установите .NET Framework 4.6. Install .NET Framework 4.6.
На сервере, где будет размещена служба синхронизации MIM, для этой службы нужно установить SQL Server Native Client. On the server that will host MIM Synchronization Service, MIM Synchronization Service requires SQL Server Native Client.
На сервере, где будет размещена служба MIM, нужно установить .NET Framework 3.5. On the server that will host MIM Service, MIM Service requires .NET Framework 3.5.
Если используется TLS 1.2 или режим FIPS, ознакомьтесь со статьей Planning MIM 2016 SP2 in TLS 1.2 or FIPS-mode environments (Планирование использования MIM 2016 с пакетом обновления 2 в среде TLS 1.2 или среде с режимом FIPS). Optionally, if using TLS 1.2 or FIPS mode, see MIM 2016 SP2 in «TLS 1.2 only» or FIPS-mode environments.
По необходимости измените систему аутентификации на IIS в Windows Change the IIS Windows Authentication mode if needed
Откройте окно PowerShell. Open a PowerShell window.
Остановите службы IIS с помощью команды iisreset /STOP. Stop IIS with the command iisreset /STOP
Set up an identity management server: Windows Server 2016 or 2019
Windows Server 2019 setup procedure does not differ from Windows Server 2016 setup procedure.
This walkthrough uses sample names and values from a company called Contoso. Replace these with your own. For example:
- Domain controller name — corpdc
- Domain name — contoso
- MIM Service Server name — corpservice
- MIM Sync Server name — corpsync
- SQL Server name — corpsql
- Password — Pass@word1
Join Windows Server 2016 to your domain
Start with a Windows Server 2016 machine, with a minimum of 8-12GB of RAM. When installing specify «Windows Server 2016 Standard/Datacenter (Server with a GUI) x64» edition.
Log into the new computer as its administrator.
Using the Control Panel, give the computer a static IP address on the network. Configure that network interface to send DNS queries to the IP address of the domain controller in the previous step, and set the computer name to CORPSERVICE. This operation will require a server restart.
Open the Control Panel and join the computer to the domain that you configured in the last step, contoso.com. This operation includes providing the username and credentials of a domain administrator such as Contoso\Administrator. After the welcome message appears, close the dialog box and restart this server again.
Sign in to the computer CORPSERVICE as a domain account with local machine administrator such as Contoso\MIMINSTALL.
Launch a PowerShell window as administrator and type the following command to update the computer with the group policy settings.
After no more than a minute, it will complete with the message «Computer Policy update has completed successfully.»
Add the Web Server (IIS) and Application Server roles, the .NET Framework 3.5, 4.0, and 4.5 features, and the Active Directory module for Windows PowerShell.
In PowerShell, type the following commands. Note that it may be necessary to specify a different location for the source files for .NET Framework 3.5 features. These features are typically not present when Windows Server installs, but are available in the side-by-side (SxS) folder on the OS install disk sources folder, e.g., “*d:\Sources\SxS*”.
Configure the server security policy
Set up the server security policy to allow the newly-created accounts to run as services.
Depending on your configuration, single server(all-in-one) or distributed servers you only need to add, based on role of the member machine, like synchronization server.
Launch the Local Security Policy program
Navigate to Local Policies > User Rights Assignment.
On the details pane, right-click on Log on as a service, and select Properties.
Click Add User or Group, and in the text box type following based on role contoso\MIMSync; contoso\MIMMA; contoso\MIMService; contoso\SharePoint; contoso\SqlServer; contoso\MIMSSPR , click Check Names, and click OK.
Click OK to close the Log on as a service Properties window.
On the details pane, right-click on Deny access to this computer from the network, and select Properties.>
Click Add User or Group, and in the text box type contoso\MIMSync; contoso\MIMService and click OK.
Click OK to close the Deny access to this computer from the network Properties window.
On the details pane, right-click on Deny log on locally, and select Properties.
Click Add User or Group, and in the text box type contoso\MIMSync; contoso\MIMService and click OK.
Click OK to close the Deny log on locally Properties window.
Close the Local Security Policy window.
Software prerequisites
Before installing MIM 2016 SP2 components please make sure you install all software prerequisites:
Install .NET Framework 4.6.
On the server that will host MIM Synchronization Service, MIM Synchronization Service requires SQL Server Native Client.
On the server that will host MIM Service, MIM Service requires .NET Framework 3.5.
Change the IIS Windows Authentication mode if needed
Open a PowerShell window.
Stop IIS with the command iisreset /STOP


