- Optimize Windows for better performance
- Try the Performance troubleshooter
- Delete programs you never use
- Limit how many programs run at startup
- Defragment your hard disk
- Clean up your hard disk
- Run fewer programs at the same time
- Turn off visual effects
- Restart regularly
- Add more memory
- Check for viruses and spyware
- Check your computer’s speed
- Change the size of virtual memory
- Using SteamVR with Windows Mixed Reality
- Get your PC ready
- Set up Windows Mixed Reality for SteamVR
- Play SteamVR games
- Using Motion Controllers with SteamVR
- Changing the resolution
- Using multiple headsets
- Preview programs
- Windows Mixed Reality for SteamVR Beta
- SteamVR Beta
- Windows Insider Program
- Enabling motion reprojection for SteamVR Apps
- Sharing feedback on SteamVR
Optimize Windows for better performance
Here are some tips to help you optimize Windows 7 for faster performance.
Try the Performance troubleshooter
The first thing that you can try is the Performance troubleshooter, which can automatically find and fix problems. The Performance troubleshooter checks issues that might slow down your computer’s performance, such as how many users are currently logged on to the computer and whether multiple programs are running at the same time.
Open the Performance troubleshooter by clicking the Start  button, and then clicking Control Panel. In the search box, type troubleshooter, and then click Troubleshooting. Under System and Security, click Check for performance issues.
Delete programs you never use
Many PC manufacturers pack new computers with programs you didn’t order and might not want. These often include trial editions and limited-edition versions of programs that software companies hope you’ll try, find useful, and then pay to upgrade to full versions or newer versions. If you decide you don’t want them, keeping the software on your computer might slow it down by using precious memory, disk space, and processing power.
It’s a good idea to uninstall all the programs you don’t plan to use. This should include both manufacturer-installed software and software you installed yourself but don’t want any more—especially utility programs designed to help manage and tune your computer’s hardware and software. Utility programs such as virus scanners, disk cleaners, and backup tools often run automatically at startup, quietly chugging along in the background where you can’t see them. Many people have no idea they’re even running.
Even if your PC is older, it might contain manufacturer-installed programs that you never noticed or have since forgotten about. It’s never too late to remove these and get rid of the clutter and wasted system resources. Maybe you thought you might use the software someday, but never did. Uninstall it and see if your PC runs faster.
Limit how many programs run at startup
Many programs are designed to start automatically when Windows starts. Software manufacturers often set their programs to open in the background, where you can’t see them running, so they’ll open right away when you click their icons. That’s helpful for programs you use a lot, but for programs you rarely or never use, this wastes precious memory and slows down the time it takes Windows to finish starting up.
Decide for yourself if you want a program to run at startup.
But how can you tell what programs run automatically at startup? Sometimes this is obvious, because the program adds an icon to the notification area on the taskbar, where you can see it running. Look there to see if there are any programs running that you don’t want to start automatically. Point to each icon to see the program name. Be sure to click the Show hidden icons button so you don’t miss any icons.
Even after you check the notification area, you might still miss some programs that run automatically at startup. AutoRuns for Windows, a free tool that you can download from the Microsoft website, shows you all of the programs and processes that run when you start Windows. You can stop a program from running automatically when Windows starts by opening the AutoRuns for Windows program, and then by clearing the check box next to the name of the program you want to stop. AutoRuns for Windows is designed for advanced users.
Defragment your hard disk
Fragmentation makes your hard disk do extra work that can slow down your computer. Disk Defragmenter rearranges fragmented data so your hard disk can work more efficiently. Disk Defragmenter runs on a schedule, but you can also defragment your hard disk manually.
Clean up your hard disk
Unnecessary files on your hard disk take up disk space and can slow down your computer. Disk Cleanup removes temporary files, empties the Recycle Bin, and removes a variety of system files and other items that you no longer need.
Run fewer programs at the same time
Sometimes changing your computing behavior can have a big impact on your PC’s performance. If you’re the type of computer user who likes to keep eight programs and a dozen browser windows open at once—all while sending instant messages to your friends—don’t be surprised if your PC bogs down. Keeping a lot of e‑mail messages open can also use up memory.
If you find your PC slowing down, ask yourself if you really need to keep all your programs and windows open at once. Find a better way to remind yourself to reply to e‑mail messages rather than keeping all of them open.
Make sure you’re only running one antivirus program. Running more than one antivirus program can also slow down your computer. Fortunately, if you’re running more than one antivirus program, Action Center notifies you and can help you fix the problem.
Turn off visual effects
If Windows is running slowly, you can speed it up by disabling some of its visual effects. It comes down to appearance versus performance. Would you rather have Windows run faster or look prettier? If your PC is fast enough, you don’t have to make this tradeoff, but if your computer is just barely powerful enough for Windows 7, it can be useful to scale back on the visual bells and whistles.
You can choose which visual effects to turn off, one by one, or you can let Windows choose for you. There are 20 visual effects you can control, such as the transparent glass look, the way menus open or close, and whether shadows are displayed.
To adjust all visual effects for best performance:
Open Performance Information and Tools by clicking the Start button, and then clicking Control Panel. In the search box, type Performance Information and Tools, and then, in the list of results, click Performance Information and Tools.
Click Adjust visual effects . If you’re prompted for an administrator password or confirmation, type the password or provide confirmation.
Click the Visual Effects tab, click Adjust for best performance, and then click OK. (For a less drastic option, select Let Windows choose what’s best for my computer.)
Restart regularly
This tip is simple. Restart your PC at least once a week, especially if you use it a lot. Restarting a PC is a good way to clear out its memory and ensure that any errant processes and services that started running get shut down.
Restarting closes all the software running on your PC—not only the programs you see running on the taskbar, but also dozens of services that might have been started by various programs and never stopped. Restarting can fix mysterious performance problems when the exact cause is hard to pinpoint.
If you keep so many programs, e‑mail messages, and websites open that you think restarting is a hassle, that’s probably a sign you should restart your PC. The more things you have open and the longer you keep them running, the greater the chances your PC will bog down and eventually run low on memory.
Add more memory
This isn’t a guide to buying hardware that will speed up your computer. But no discussion of how to make Windows run faster would be complete without mentioning that you should consider adding more random access memory (RAM) to your PC.
If a computer running Windows 7 seems too slow, it’s usually because the PC doesn’t have enough RAM. The best way to speed it up is to add more.
Windows 7 can run on a PC with 1 gigabyte (GB) of RAM, but it runs better with 2 GB. For optimal performance, boost that to 3 GB or more.
Another option is to boost the amount of memory by using Windows ReadyBoost. This feature allows you to use the storage space on some removable media devices, such as USB flash drives, to speed up your computer. It’s easier to plug a flash drive into a USB port than to open your PC case and plug memory modules into its motherboard.
Check for viruses and spyware
If your PC is running slowly, it’s possible that it’s infected with a virus or spyware. This is not as common as the other problems, but it’s something to consider. Before you worry too much, check your PC using antispyware and antivirus programs.
A common symptom of a virus is a much slower-than-normal computer performance. Other signs include unexpected messages that pop up on your PC, programs that start automatically, or the sound of your hard disk constantly working.
Spyware is a type of program that’s installed, usually without your knowledge, to watch your activity on the Internet. You can check for spyware with Windows Defender or other antispyware programs.
The best way to deal with viruses is to prevent them in the first place. Always run antivirus software and keep it up to date. Even if you take such precautions, however, it’s possible for your PC to become infected.
Check your computer’s speed
If you try these tips and your computer is still too slow, you might need a new PC or some hardware upgrades, such as a new hard disk or faster video card. There’s no need to guess the speed of your computer, however. Windows provides a way to check and rate your PC’s speed with a tool called the Windows Experience Index.
The Windows Experience Index rates your computer on five key components and gives you a number for each, as well as an overall base score. This base score is only as good as your worst-performing component subscore. Base scores currently range from 1 to 7.9. If your PC is rated lower than 2 or 3, it might be time to consider a new PC, depending on what tasks you want to do with your computer.
Change the size of virtual memory
If you receive warnings that your virtual memory is low, you’ll need to increase the minimum size of your paging file. Windows sets the initial minimum size of the paging file equal to the amount of random access memory (RAM) installed on your computer, and the maximum size equal to three times the amount of RAM installed on your computer. If you see warnings at these recommended levels, then increase the minimum and maximum sizes.
Open System by clicking the Start button , right-clicking Computer, and then clicking Properties.
In the left pane, click Advanced system settings . If you’re prompted for an administrator password or confirmation, type the password or provide confirmation.
On the Advanced tab, under Performance, click Settings.
Click the Advanced tab, and then, under Virtual memory, click Change.
Clear the Automatically manage paging file size for all drives check box.
Under Drive [Volume Label], click the drive that contains the paging file you want to change.
Click Custom size, type a new size in megabytes in the Initial size (MB) or Maximum size (MB) box, click Set, and then click OK.
Note: Increases in size usually don’t require a restart for the changes to take effect, but if you decrease the size, you’ll need to restart your computer. We recommend that you don’t disable or delete the paging file.
Using SteamVR with Windows Mixed Reality
Windows Mixed Reality for SteamVR allows users to run SteamVR experiences on Windows Mixed Reality immersive headsets. After installing the Windows Mixed Reality for SteamVR, users can launch their favorite SteamVR applications from their desktop or Steam library and play them directly on their Windows headset.
Get your PC ready
- Make sure you have no pending updates: Select Start > Settings > Update & Security > Windows Update. If updates are available, select Install now. If no updates are available, select Check for updates, and then install any new ones.
- PC requirements vary for the apps and content on Steam. See the minimum requirements per title. A PC with a GTX 1070 graphics card (or equivalent) and an IntelВ® Coreв„ў i7 processor should offer a good experience for a broad range of titles.
- Set up up Windows Mixed Reality if you haven’t already.
Set up Windows Mixed Reality for SteamVR
- Download and install SteamVR.
- When ready, start SteamVR. The SteamVR Tutorial should start automatically.
Note: For advanced troubleshooting of your SteamVR setup, make sure you have the following software components installed:
- Install Steam and login or create a new account.
- Install SteamVR. With your headset plugged in, launch Steam and you should see a dialog prompting you to install SteamVR. Follow the prompts on the dialog to install it. * If you don’t see the popup, install SteamVR by navigating to the Tools section of your library. Locate SteamVR in the list and then right-click and select Install Game.
- Install Windows Mixed Reality for SteamVR.
Play SteamVR games
- Connect your headset to your PC and turn on your motion controllers.
- Once the Windows Mixed Reality home has loaded and your controllers are visible, open the Steam app on your desktop.
- Use the Steam app to launch a SteamVR game from your Steam library.
Tip: To launch SteamVR games without taking off your headset, use the Desktop app (Start > Desktop) to view and interact with your PC desktop inside Windows Mixed Reality.
Using Motion Controllers with SteamVR
You’ll use your motion controllers differently in different games. Here are a few basics to help you get started:
- To open the Steam dashboard, press straight down on the left or right thumbstick.
- To exit a SteamVR game and return to the Windows Mixed Reality home, press the Windows button.
Changing the resolution
You can adjust the Application Resolution slider in the SteamVR -> Settings -> Applications window at any time if you’d like to play games at a higher resolution. **When using a higher resolution multiplier you can expect the game to put more strain on your PC. If you increase the multiplier and see degraded performance, readjust the slider to the default level and restart the game to ensure that the change takes effect.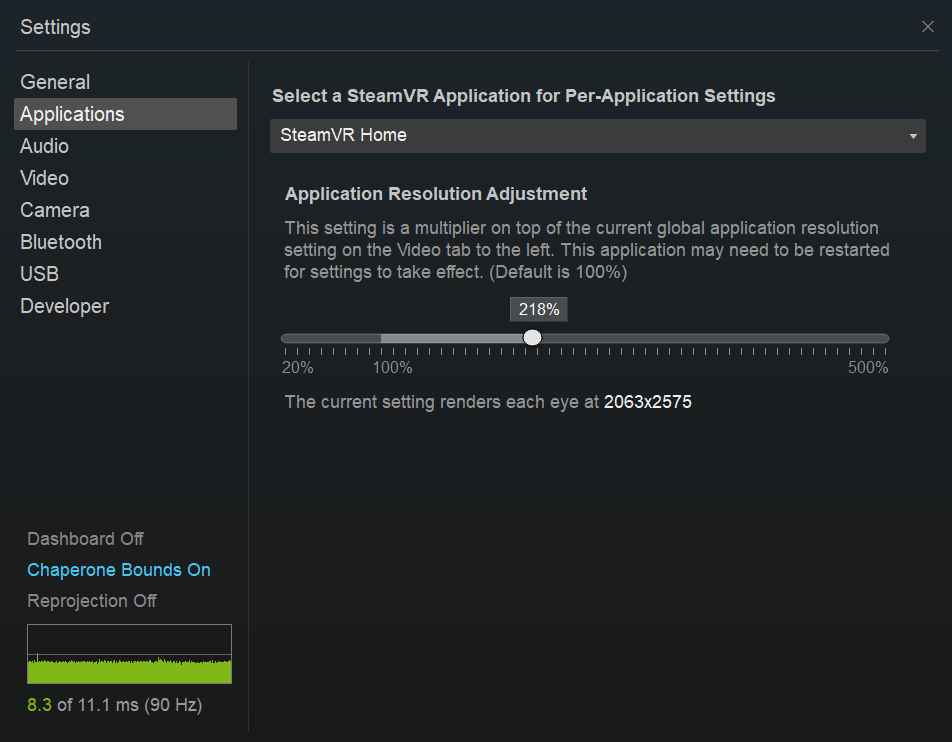
Using multiple headsets
If you’re a VR enthusiast, you might regularly use more than one VR headset on the same PC. If that’s the case note that when a Windows Mixed Reality headset is plugged in, SteamVR games will always launch to the Windows Mixed Reality headset. If you’d like to launch SteamVR games on another headset make sure to first unplug the Windows Mixed Reality headset before continuing.
Preview programs
We release regular updates to improve the performance, reliability, and overall experience of using SteamVR on Windows Mixed Reality immersive headsets. While none of these preview programs are required, we encourage you to join them if you would like to get updates sooner and more frequently (and give us feedback on those updates!).
Windows Mixed Reality for SteamVR Beta
Windows Mixed Reality for SteamVR is the component you install from the Steam Store that enables SteamVR to work with your Windows Mixed Reality headset. We publish updates to this «bridge» regularly and Steam installs them automatically.
If you want to get updates more frequently, we encourage you to join our public Beta. Updates go to our Beta audience first, and we use their feedback to make sure the updates are high quality before publishing them to all users. If you’re not in our Beta program, you’ll eventually get all of the same fixes and features, but after they’ve been tested by our Beta users.
- In Steam, use the drop-down under the Library menu to filter to Software.
- In the list, right-click Windows Mixed Reality for SteamVR and select Properties.
- Select the Betas tab.
- Opt in to «beta — public beta» and select Close to confirm. The beta access code field should be left blank.
SteamVR Beta
SteamVR is built and released by Valve and is common across all SteamVR headsets. It follows a similar model of releasing updates to Beta members before publishing to all users.
- In Steam, use the drop-down under the Library menu to filter to Tools.
- In the list, right-click SteamVR and select Properties.
- Select the Betas tab.
- Opt in to «beta — public beta» and select Close to confirm. The beta access code field should be left blank.


Windows Insider Program
Windows Mixed Reality is a part of Windows 10. Many fixes and features that affect SteamVR users come with the Windows OS. If you want to try the latest Windows 10 preview builds, we encourage you to join the Windows Insider Program.
Enabling motion reprojection for SteamVR Apps
Windows Mixed Reality for SteamVR has an experimental motion reprojection feature to make 90 FPS reprojection more smooth.
When motion reprojection is enabled, all Steam VR games will render nominally at ВЅ frame rate (45 fps instead of 90 FPS) while Windows Mixed Reality for SteamVR uses motion vectors generated by the GPU to extrapolate the next frame. For SteamVR games that reliably hit 60 FPS+ on a given PC, this should result in a solid 90 FPS experience with occasional artifacts while maintaining a comfortable experience.
The available motion reprojection modes are as follows:
- SteamVR per-app setting: Allows you to control motion reprojection through the SteamVR Settings UI. You can then open SteamVR Settings, go to Video > Per-Application Video Settings, and select an option for «Motion Smoothing.»
- Auto: Enables motion reprojection to turn on automatically when a game is rendering too slowly to maintain 90 FPS. When a game begins to maintain 90 FPS or starts rendering at less than 45 FPS, motion reprojection will turn off. Asynchronous rotational reprojection is enabled always.
- Motion Vector: Forces the application to always run at half-framerate with motion vector reprojection.
- None: Disables motion reprojection.
Expected Visual Artifacts
- When using an application resolution greater than 150%, you may experience blurring. When using motion reprojection, we recommend using a value less than 150%.
- Sharp contrast edges or text, especially on in-game HUDs or menus, may look temporarily warped or distorted because of disocclusion.
- SteamVR Home and many other games that don’t reliably hit 50-60 FPS on your PC will continue to have a poor experience with this mode.
- Some games have been reported to run at 50% speed or with increased latency (lag). Report these games through the Windows Feedback Hub instructions below.
Initially we have experimental support for recent generation NVidia GPUs. We’re continuing to iterate and improve our motion reprojection support on more GPUs, and we’re eager to hear your feedback.
Supported GPUs: Nvidia GeForce GTX1060, AMD RX470 or better, with Windows Mixed Reality compatible graphics drivers installed.
To enable motion reprojection:
- Make sure you’ve opted into the Windows Mixed Reality for SteamVR Beta using the instructions above.
- Open the SteamVR dashboard.
- Select the button on the left side with the Windows Mixed Reality logo to open Windows Mixed Reality for SteamVR Settings.
- In the UI that pops up, select the Graphics tab.
- Select «Auto» for «Default SteamVR app motion reprojection mode» to enable automatic motion reprojection.

Motion Reprojection Indicator
The motion reprojection indicator helps diagnose issues with the experimental automatic motion reprojection feature. When set to true, you’ll see an indicator in the top-left of your headset display during automatic motion reprojection. The color and position of this indicator corresponds to the current motion reprojection mode — see the diagram below for examples.
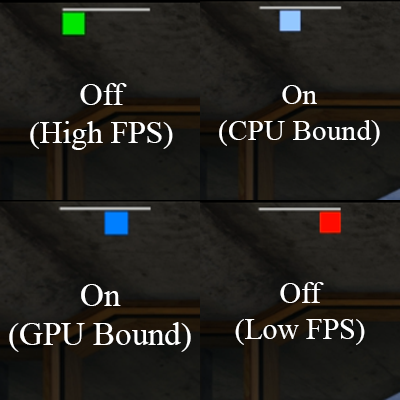
Green = motion reprojection is off because the application can render at full framerate.
Cyan = motion reprojection is on because the application is cpu bound.
Blue = motion reprojection is on because the application is gpu bound.
Red = motion reprojection is off because the application is running at less than half framerate; try reducing super sampling if enabled.
Green + Cyan + Blue = motion reprojection is in half-framerate mode or the application requested motion reprojection.
Sharing feedback on SteamVR
Your feedback is invaluable when it comes to improving the Windows Mixed Reality SteamVR experience. Submit all feedback and bugs through the Windows Feedback Hub. Follow these suggestions to help us get the most from your feedback:
- In Feedback Hub, indicate that you’re reporting a new Problem in the «What kind of feedback is it?» section at the top.
- Select the Mixed Reality category and the Apps subcategory.
- Put the word «SteamVR» in the problem summary. That helps us find your feedback.
- Describe what SteamVR game or application you were using when you come across the issue.
- Consider attaching a SteamVR System Report to your feedback. This provides more logs that can help us diagnose your problem.
- On the SteamVR Window (the small windows that shows your controller status) select on the title to open the menu.
- Select «Create System Report».
- Save to File.
- Attach the generated file to your Feedback Hub entry directly.
- If your feedback is about SteamVR performance, collect a Mixed Reality Performance trace:
- Select the Recreate my Problem button.
- In the drop-down next to «include data about», select Mixed Reality Performance.
- Make sure the game is running and select Start Capture.
- Spend a few seconds playing the game to capture the trace. Don’t capture the trace for more than 10-15 seconds, or it will be too large to submit.
- Select Stop Capture.
- Select Submit once you’ve completed the rest of the fields.
If you have questions or comments to share, you can also reach us on our Steam forum.


