- Windows forms with entity framework
- 6.3В Tutorial: Using an Entity Framework Entity as a Windows Forms Data Source
- Creating a New Windows Forms Application
- Adding an Entity Data Model
- Adding a New Data Source
- Using the Data Source in a Windows Form
- Adding Code to Populate the Data Grid View
- Adding Code to Save Changes to the Database
- Databinding with WinForms
- Pre-Requisites
- Create the Application
- Install the Entity Framework NuGet package
- Implementing IListSource for Collections
- Define a Model
- Option 1: Define a Model using Code First
- Option 2: Define a model using Database First
- Create an Existing Database
- Reverse Engineer Model
- Additional Steps in Visual Studio 2010
- Updating code generation for data binding
- Lazy Loading
- Bind Object to Controls
- Add the Code that Handles Data Interaction
- Test the Windows Forms Application
Windows forms with entity framework
MySQL Connector/NET Developer Guide
6.3В Tutorial: Using an Entity Framework Entity as a Windows Forms Data Source
This tutorial describes how to create a Windows Forms Data Source from an Entity in an Entity Data Model using Microsoft Visual Studio. The steps are:
To perform the steps in this tutorial, first install the world database sample, which you may download from the MySQL Documentation page. You can also find details on how to install the database on the same page.
Creating a New Windows Forms Application
The first step is to create a new Windows Forms application.
In Visual Studio, select File , New , and then Project from the main menu.
Choose the Windows Forms Application installed template. Click OK . The solution is created.
To acquire the latest Entity Framework assembly for MySQL, download the NuGet package. Alternatively, use the MySQL Application Configuration tool provided by MySQL for Visual Studio 1.2.9 (or higher) to acquire the latest package and coordinate the configuration. For more information about using the tool, see Entity Framework.
Adding an Entity Data Model
To add an Entity Data Model to your solution, do the following:
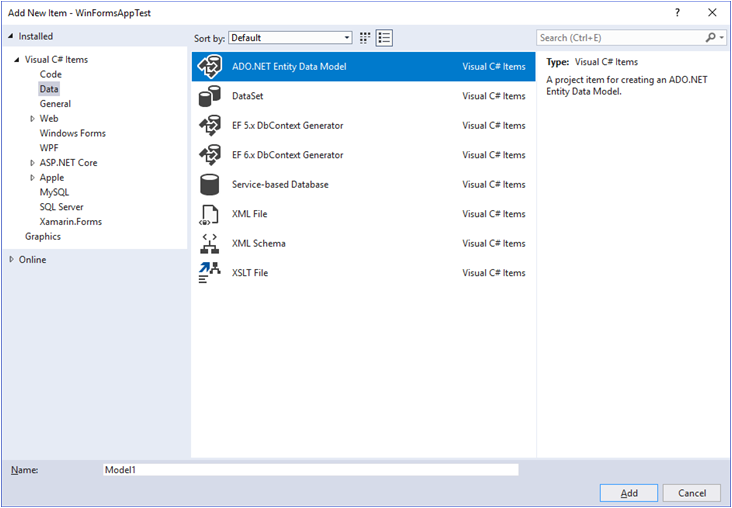
In the Solution Explorer, right-click your application and select Add and then New Item . From Visual Studio installed templates , select ADO.NET Entity Data Model (see the figure that follows). Click Add .
FigureВ 6.11В Add Entity Data Model
You will now see the Entity Data Model Wizard. You will use the wizard to generate the Entity Data Model from the world database sample. Select the icon EF Designer from database (or Generate from database in older versions of Visual Studio). Click Next .
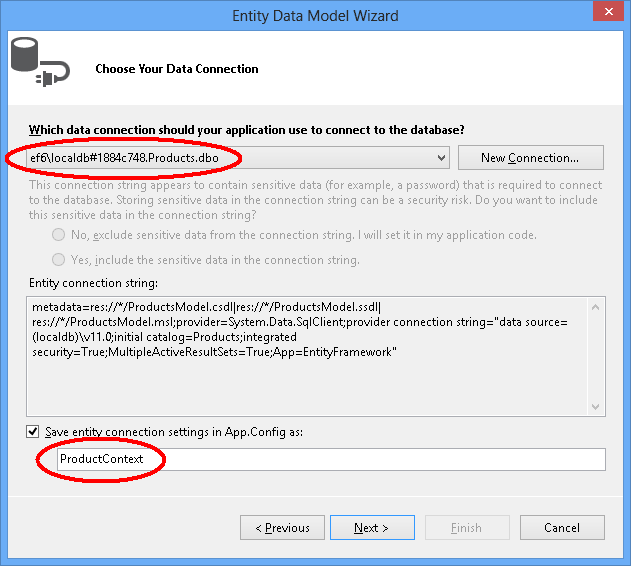
You can now select the localhost(world) connection you made earlier to the database. Select the following items:
Yes, include the sensitive data in the connection string.
Save entity connection settings in App.config as:
If you have not already done so, you can create the new connection at this time by clicking New Connection (see the figure that follows). For additional instructions on creating a connection to a database see Making a Connection.
FigureВ 6.12В Entity Data Model Wizard — Connection
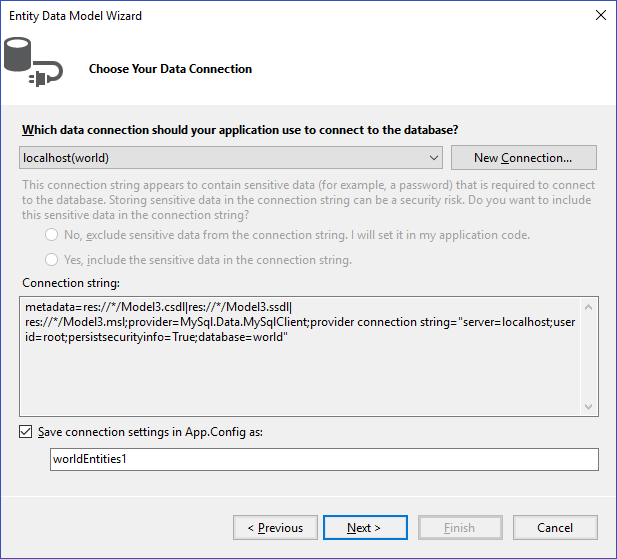
Make a note of the entity connection settings to be used in App.Config , as these will be used later to write the necessary control code. Click Next .
The Entity Data Model Wizard connects to the database.
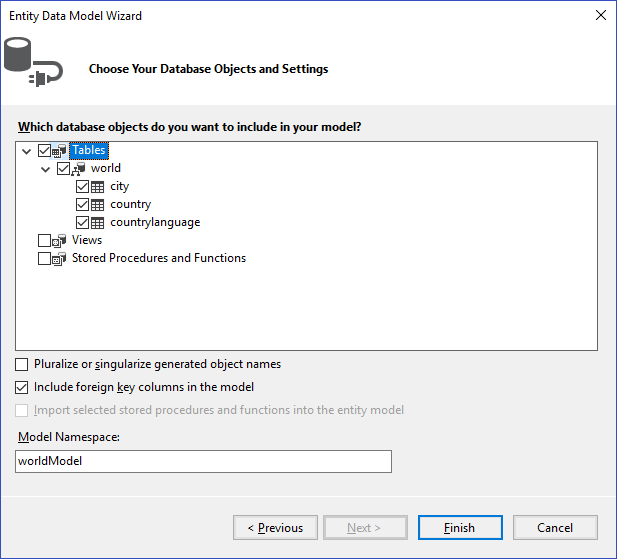
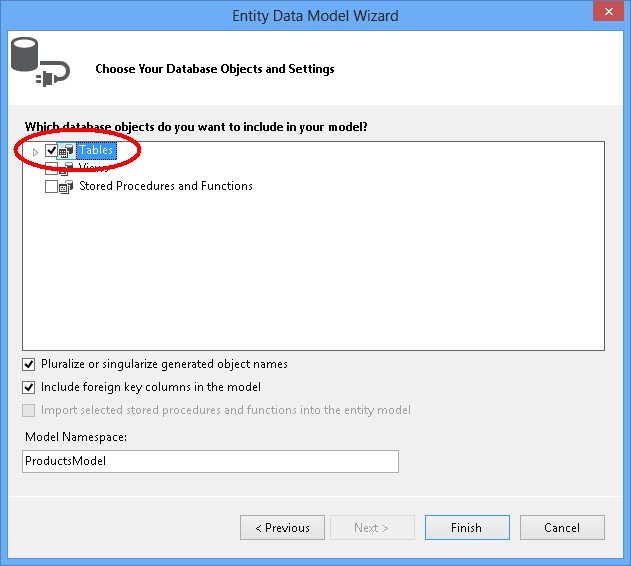
As the next figure shows, you are then presented with a tree structure of the database. From here you can select the object you would like to include in your model. If you also created Views and Stored Routines, these items will be displayed along with any tables. In this example you just need to select the tables. Click Finish to create the model and exit the wizard.
FigureВ 6.13В Entity Data Model Wizard — Objects and Settings
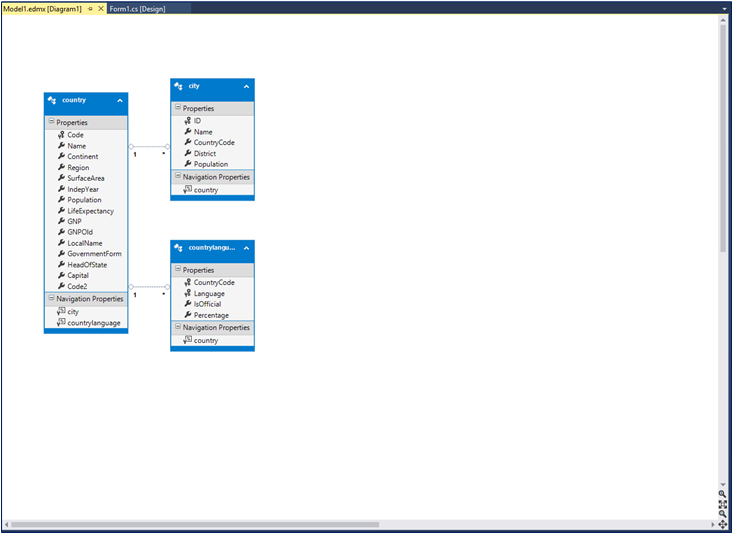
Visual Studio generates a model with three tables (city, country, and countrylanguage) and then display it, as the following figure shows.
FigureВ 6.14В Entity Data Model Diagram
From the Visual Studio main menu, select Build and then Build Solution to ensure that everything compiles correctly so far.
Adding a New Data Source
You will now add a new Data Source to your project and see how it can be used to read and write to the database.
From the Visual Studio main menu select Data and then Add New Data Source . You will be presented with the Data Source Configuration Wizard.
Select the Object icon. Click Next .
Select the object to bind to. Expand the tree as the next figure shows.
In this tutorial, you will select the city table. After the city table has been selected click Next .
FigureВ 6.15В Data Source Configuration Wizard
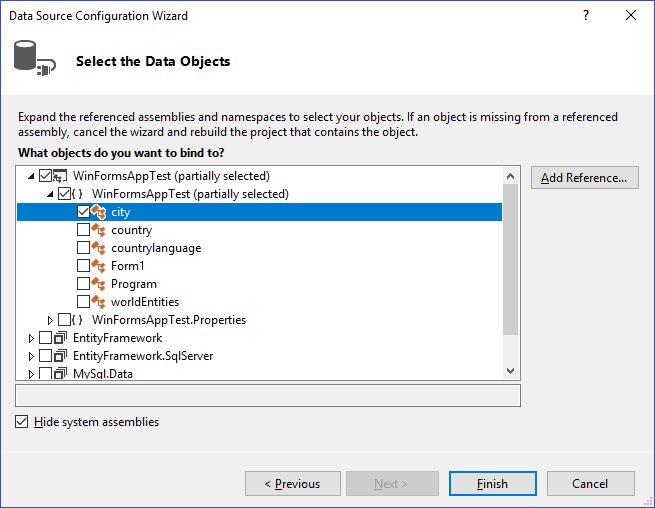
The wizard will confirm that the city object is to be added. Click Finish .
The city object will now appear in the Data Sources panel. If the Data Sources panel is not displayed, select Data and then Show Data Sources from the Visual Studio main menu. The docked panel will then be displayed.
Using the Data Source in a Windows Form
This step describes how to use the Data Source in a Windows Form.
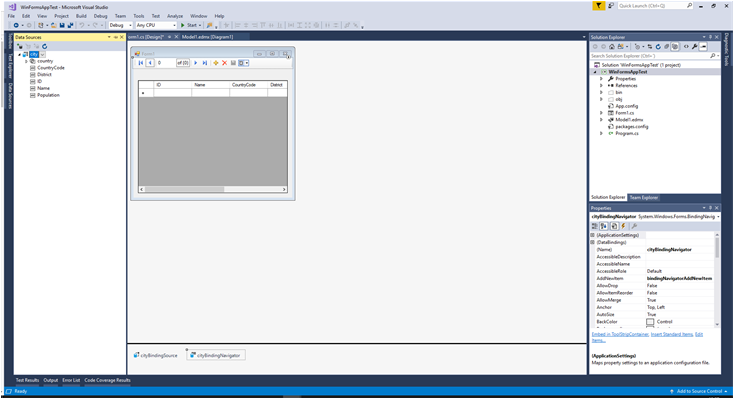
In the Data Sources panel select the Data Source you just created and drag and drop it onto the Form Designer. By default, the Data Source object will be added as a Data Grid View control as the following figure shows.
The Data Grid View control is bound to cityBindingSource , and the Navigator control is bound to cityBindingNavigator .
FigureВ 6.16В Data Form Designer
Save and rebuild the solution before continuing.
Adding Code to Populate the Data Grid View
You are now ready to add code to ensure that the Data Grid View control will be populated with data from the city database table.
Double-click the form to access its code.
Add the following code to instantiate the Entity Data Model EntityContainer object and retrieve data from the database to populate the control.
Save and rebuild the solution.
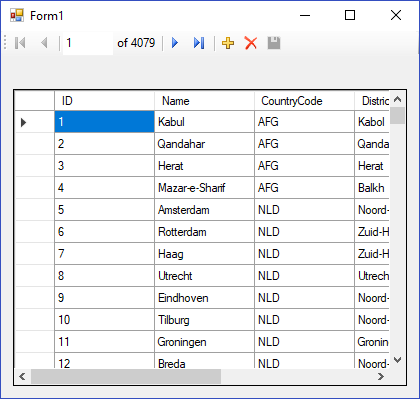
Run the solution. Confirm that the grid is populated (see the next figure for an example) and that you can navigate the database.
FigureВ 6.17В The Populated Grid Control
Adding Code to Save Changes to the Database
This step explains how to add code that enables you to save changes to the database.
The Binding source component ensures that changes made in the Data Grid View control are also made to the Entity classes bound to it. However, that data needs to be saved back from the entities to the database itself. This can be achieved by the enabling of the Save button in the Navigator control, and the addition of some code.
In the Form Designer, click the save icon in the form toolbar and confirm that its Enabled property is set to True .
Double-click the save icon in the form toolbar to display its code.
Add the following (or similar) code to ensure that data is saved to the database when a user clicks the save button in the application.
When the code has been added, save the solution and then rebuild it. Run the application and verify that changes made in the grid are saved.
Databinding with WinForms
This step-by-step walkthrough shows how to bind POCO types to Window Forms (WinForms) controls in a “master-detail» form. The application uses Entity Framework to populate objects with data from the database, track changes, and persist data to the database.
The model defines two types that participate in one-to-many relationship: Category (principal\master) and Product (dependent\detail). Then, the Visual Studio tools are used to bind the types defined in the model to the WinForms controls. The WinForms data-binding framework enables navigation between related objects: selecting rows in the master view causes the detail view to update with the corresponding child data.
The screen shots and code listings in this walkthrough are taken from Visual Studio 2013 but you can complete this walkthrough with Visual Studio 2012 or Visual Studio 2010.
Pre-Requisites
You need to have Visual Studio 2013, Visual Studio 2012 or Visual Studio 2010 installed to complete this walkthrough.
If you are using Visual Studio 2010, you also have to install NuGet. For more information, see Installing NuGet.
Create the Application
- Open Visual Studio
- File -> New -> Project….
- Select Windows in the left pane and Windows FormsApplication in the right pane
- Enter WinFormswithEFSample as the name
- Select OK
Install the Entity Framework NuGet package
- In Solution Explorer, right-click on the WinFormswithEFSample project
- Select Manage NuGet Packages…
- In the Manage NuGet Packages dialog, Select the Online tab and choose the EntityFramework package
- Click Install
In addition to the EntityFramework assembly a reference to System.ComponentModel.DataAnnotations is also added. If the project has a reference to System.Data.Entity, then it will be removed when the EntityFramework package is installed. The System.Data.Entity assembly is no longer used for Entity Framework 6 applications.
Implementing IListSource for Collections
Collection properties must implement the IListSource interface to enable two-way data binding with sorting when using Windows Forms. To do this we are going to extend ObservableCollection to add IListSource functionality.
- Add an ObservableListSource class to the project:
- Right-click on the project name
- Select Add -> New Item
- Select Class and enter ObservableListSource for the class name
- Replace the code generated by default with the following code:
This class enables two-way data binding as well as sorting. The class derives from ObservableCollection and adds an explicit implementation of IListSource. The GetList() method of IListSource is implemented to return an IBindingList implementation that stays in sync with the ObservableCollection. The IBindingList implementation generated by ToBindingList supports sorting. The ToBindingList extension method is defined in the EntityFramework assembly.
Define a Model
In this walkthrough you can chose to implement a model using Code First or the EF Designer. Complete one of the two following sections.
Option 1: Define a Model using Code First
This section shows how to create a model and its associated database using Code First. Skip to the next section (Option 2: Define a model using Database First) if you would rather use Database First to reverse engineer your model from a database using the EF designer
When using Code First development you usually begin by writing .NET Framework classes that define your conceptual (domain) model.
- Add a new Product class to project
- Replace the code generated by default with the following code:
- Add a Category class to the project.
- Replace the code generated by default with the following code:
In addition to defining entities, you need to define a class that derives from DbContext and exposes DbSet properties. The DbSet properties let the context know which types you want to include in the model. The DbContext and DbSet types are defined in the EntityFramework assembly.
An instance of the DbContext derived type manages the entity objects during run time, which includes populating objects with data from a database, change tracking, and persisting data to the database.
- Add a new ProductContext class to the project.
- Replace the code generated by default with the following code:
Compile the project.
Option 2: Define a model using Database First
This section shows how to use Database First to reverse engineer your model from a database using the EF designer. If you completed the previous section (Option 1: Define a model using Code First), then skip this section and go straight to the Lazy Loading section.
Create an Existing Database
Typically when you are targeting an existing database it will already be created, but for this walkthrough we need to create a database to access.
The database server that is installed with Visual Studio is different depending on the version of Visual Studio you have installed:
- If you are using Visual Studio 2010 you’ll be creating a SQL Express database.
- If you are using Visual Studio 2012 then you’ll be creating a LocalDB database.
Let’s go ahead and generate the database.
View -> Server Explorer
Right click on Data Connections -> Add Connection…
If you haven’t connected to a database from Server Explorer before you’ll need to select Microsoft SQL Server as the data source
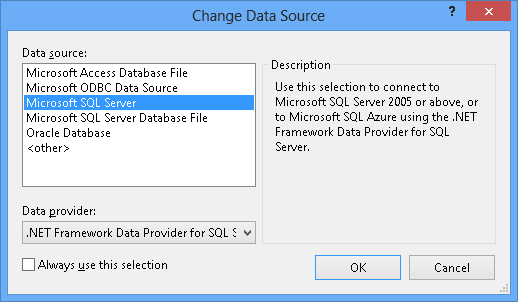
Connect to either LocalDB or SQL Express, depending on which one you have installed, and enter Products as the database name
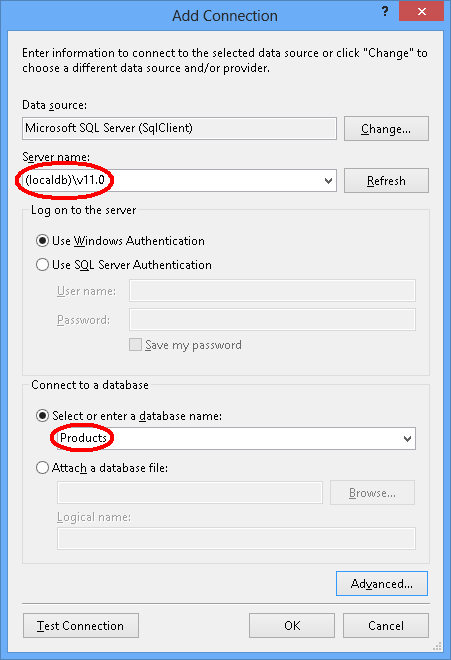
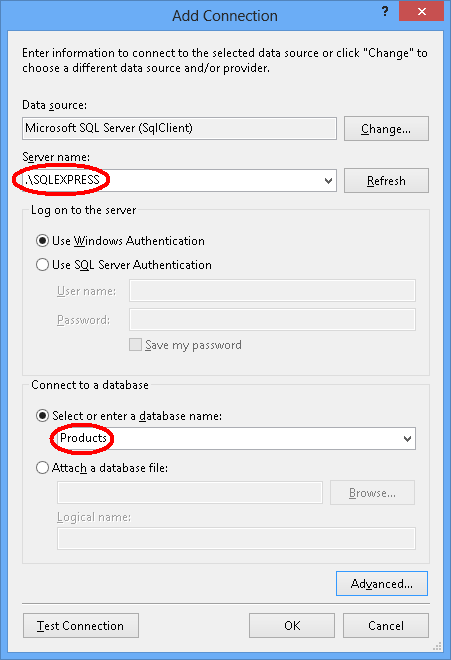
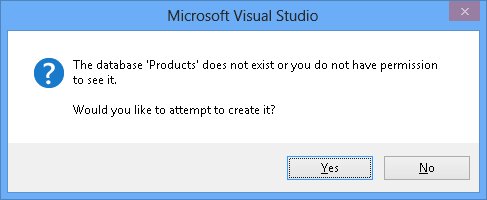
Select OK and you will be asked if you want to create a new database, select Yes
The new database will now appear in Server Explorer, right-click on it and select New Query
Copy the following SQL into the new query, then right-click on the query and select Execute
Reverse Engineer Model
We’re going to make use of Entity Framework Designer, which is included as part of Visual Studio, to create our model.
Project -> Add New Item…
Select Data from the left menu and then ADO.NET Entity Data Model
Enter ProductModel as the name and click OK
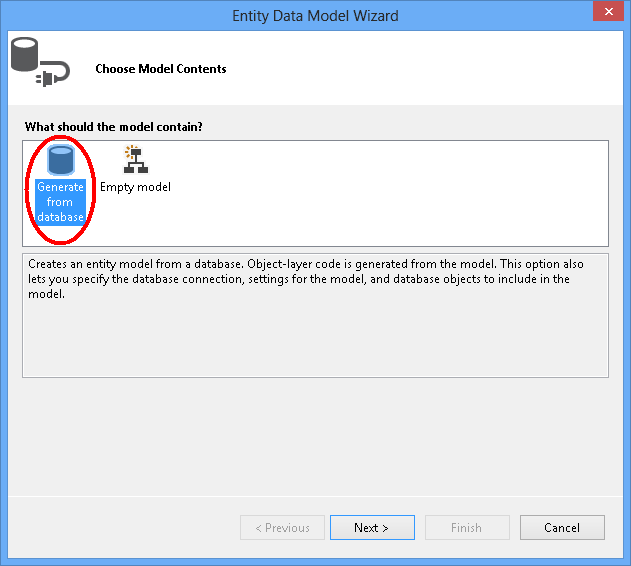
This launches the Entity Data Model Wizard
Select Generate from Database and click Next
Select the connection to the database you created in the first section, enter ProductContext as the name of the connection string and click Next
Click the checkbox next to вЂTables’ to import all tables and click вЂFinish’
Once the reverse engineer process completes the new model is added to your project and opened up for you to view in the Entity Framework Designer. An App.config file has also been added to your project with the connection details for the database.
Additional Steps in Visual Studio 2010
If you are working in Visual Studio 2010 then you will need to update the EF designer to use EF6 code generation.
- Right-click on an empty spot of your model in the EF Designer and select Add Code Generation Item…
- Select Online Templates from the left menu and search for DbContext
- Select the EF 6.x DbContext Generator for C#, enter ProductsModel as the name and click Add
Updating code generation for data binding
EF generates code from your model using T4 templates. The templates shipped with Visual Studio or downloaded from the Visual Studio gallery are intended for general purpose use. This means that the entities generated from these templates have simple ICollection properties. However, when doing data binding it is desirable to have collection properties that implement IListSource. This is why we created the ObservableListSource class above and we are now going to modify the templates to make use of this class.
Open the Solution Explorer and find ProductModel.edmx file
Find the ProductModel.tt file which will be nested under the ProductModel.edmx file
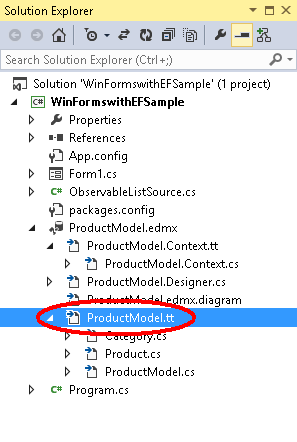
Double-click on the ProductModel.tt file to open it in the Visual Studio editor
Find and replace the two occurrences of “ICollection” with “ObservableListSource”. These are located at approximately lines 296 and 484.
Find and replace the first occurrence of “HashSet” with “ObservableListSource”. This occurrence is located at approximately line 50. Do not replace the second occurrence of HashSet found later in the code.
Save the ProductModel.tt file. This should cause the code for entities to be regenerated. If the code does not regenerate automatically, then right click on ProductModel.tt and choose “Run Custom Tool”.
If you now open the Category.cs file (which is nested under ProductModel.tt) then you should see that the Products collection has the type ObservableListSource
Compile the project.
Lazy Loading
The Products property on the Category class and Category property on the Product class are navigation properties. In Entity Framework, navigation properties provide a way to navigate a relationship between two entity types.
EF gives you an option of loading related entities from the database automatically the first time you access the navigation property. With this type of loading (called lazy loading), be aware that the first time you access each navigation property a separate query will be executed against the database if the contents are not already in the context.
When using POCO entity types, EF achieves lazy loading by creating instances of derived proxy types during runtime and then overriding virtual properties in your classes to add the loading hook. To get lazy loading of related objects, you must declare navigation property getters as public and virtual (Overridable in Visual Basic), and you class must not be sealed (NotOverridable in Visual Basic). When using Database First navigation properties are automatically made virtual to enable lazy loading. In the Code First section we chose to make the navigation properties virtual for the same reason
Bind Object to Controls
Add the classes that are defined in the model as data sources for this WinForms application.
From the main menu, select Project -> Add New Data Source … (in Visual Studio 2010, you need to select Data -> Add New Data Source…)
In the Choose a Data Source Type window, select Object and click Next
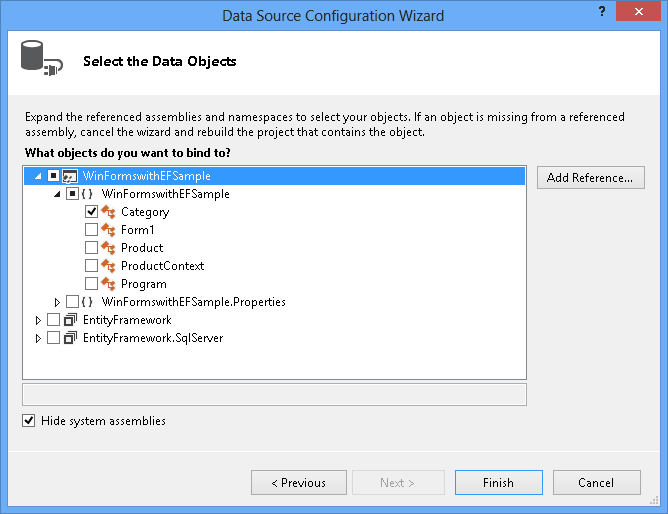
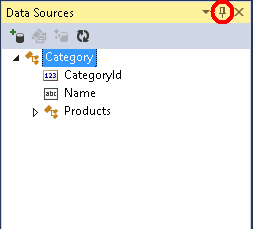
In the Select the Data Objects dialog, unfold the WinFormswithEFSample two times and select Category There is no need to select the Product data source, because we will get to it through the Product’s property on the Category data source.
Click Finish. If the Data Sources window is not showing up, select View -> Other Windows-> Data Sources
Press the pin icon, so the Data Sources window does not auto hide. You may need to hit the refresh button if the window was already visible.
In Solution Explorer, double-click the Form1.cs file to open the main form in designer.
Select the Category data source and drag it on the form. By default, a new DataGridView (categoryDataGridView) and Navigation toolbar controls are added to the designer. These controls are bound to the BindingSource (categoryBindingSource) and Binding Navigator (categoryBindingNavigator) components that are created as well.
Edit the columns on the categoryDataGridView. We want to set the CategoryId column to read-only. The value for the CategoryId property is generated by the database after we save the data.
- Right-click the DataGridView control and select Edit Columns…
- Select the CategoryId column and set ReadOnly to True
- Press OK
Select Products from under the Category data source and drag it on the form. The productDataGridView and productBindingSource are added to the form.
Edit the columns on the productDataGridView. We want to hide the CategoryId and Category columns and set ProductId to read-only. The value for the ProductId property is generated by the database after we save the data.
- Right-click the DataGridView control and select Edit Columns. .
- Select the ProductId column and set ReadOnly to True.
- Select the CategoryId column and press the Remove button. Do the same with the Category column.
- Press OK.
So far, we associated our DataGridView controls with BindingSource components in the designer. In the next section we will add code to the code behind to set categoryBindingSource.DataSource to the collection of entities that are currently tracked by DbContext. When we dragged-and-dropped Products from under the Category, the WinForms took care of setting up the productsBindingSource.DataSource property to categoryBindingSource and productsBindingSource.DataMember property to Products. Because of this binding, only the products that belong to the currently selected Category will be displayed in the productDataGridView.
Enable the Save button on the Navigation toolbar by clicking the right mouse button and selecting Enabled.
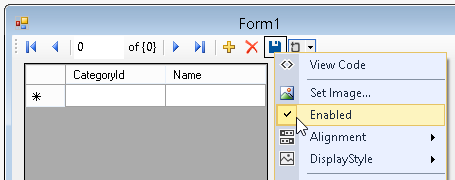
Add the event handler for the save button by double-clicking on the button. This will add the event handler and bring you to the code behind for the form. The code for the categoryBindingNavigatorSaveItem_Click event handler will be added in the next section.
Add the Code that Handles Data Interaction
We’ll now add the code to use the ProductContext to perform data access. Update the code for the main form window as shown below.
The code declares a long-running instance of ProductContext. The ProductContext object is used to query and save data to the database. The Dispose() method on the ProductContext instance is then called from the overridden OnClosing method. The code comments provide details about what the code does.
Test the Windows Forms Application
Compile and run the application and you can test out the functionality.

After saving the store generated keys are shown on the screen.


