- Use the System File Checker tool to repair missing or corrupted system files
- Run the System File Checker tool (SFC.exe)
- More Information
- Windows 10 Sync Center Not Working — Fix or Replace It
- Situations to Sync Center Windows 10 not working
- HowВ toВ fix Windows 10 Sync Center not working? (7 solutions)
- # Fix Enable offline files greyed out
- # Solve Windows 10 always available offline missing
- # Windows folder redirection offline files not syncing — fixed
- # Offline files service cannot be activated in Windows — Solved
- # Files do not sync — how to fix?
- How to sync files with third-party file sync software?
- Conclusion
Use the System File Checker tool to repair missing or corrupted system files
If some Windows functions aren’t working or Windows crashes, use the System File Checker to scan Windows and restore your files.
Though the steps below might look complicated at first glance, just follow them in order, step-by-step, and we’ll try to get you back on track.
Run the System File Checker tool (SFC.exe)
To do this, follow these steps:
Open an elevated command prompt. To do this, do the following as your appropriate:
If you are running Windows 10, Windows 8.1 or Windows 8, first run the inbox Deployment Image Servicing and Management (DISM) tool prior to running the System File Checker. (If you are running Windows 7 or Windows Vista, skip to Step 3.)
Type the following command, and then press Enter. It may take several minutes for the command operation to be completed.
DISM.exe /Online /Cleanup-image /Restorehealth
Important: When you run this command, DISM uses Windows Update to provide the files that are required to fix corruptions. However, if your Windows Update client is already broken, use a running Windows installation as the repair source, or use a Windows side-by-side folder from a network share or from a removable media, such as the Windows DVD, as the source of the files. To do this, run the following command instead:
DISM.exe /Online /Cleanup-Image /RestoreHealth /Source: C:\RepairSource\Windows /LimitAccess
Note: Replace the C:\RepairSource\Windows placeholder with the location of your repair source. For more information about using the DISM tool to repair Windows, reference Repair a Windows Image.
At the command prompt, type the following command, and then press ENTER:
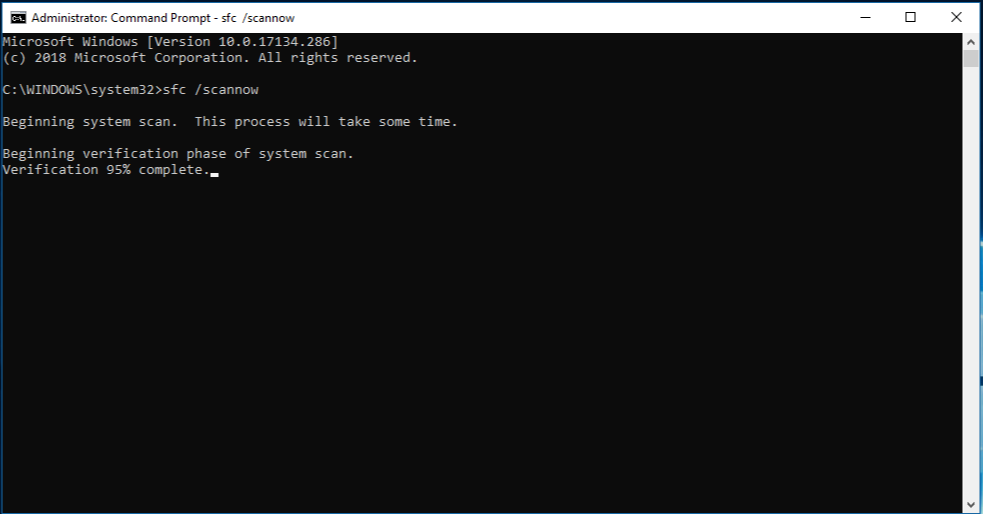
The sfc /scannow command will scan all protected system files, and replace corrupted files with a cached copy that is located in a compressed folder at %WinDir%\System32\dllcache.
The %WinDir% placeholder represents the Windows operating system folder. For example, C:\Windows.
Note Do not close this Command Prompt window until the verification is 100% complete. The scan results will be shown after this process is finished.
After the process is finished, you may receive one of the following messages:
Windows Resource Protection did not find any integrity violations.
This means that you do not have any missing or corrupted system files.
Windows Resource Protection could not perform the requested operation.
To resolve this problem, perform the System File Checker scan in safe mode, and make sure that the PendingDeletes and PendingRenames folders exist under %WinDir%\WinSxS\Temp.
Windows Resource Protection found corrupt files and successfully repaired them. Details are included in the CBS.Log %WinDir%\Logs\CBS\CBS.log.
To view the detail information about the system file scan and restoration, go to How to view details of the System File Checker process.
Windows Resource Protection found corrupt files but was unable to fix some of them. Details are included in the CBS.Log %WinDir%\Logs\CBS\CBS.log.
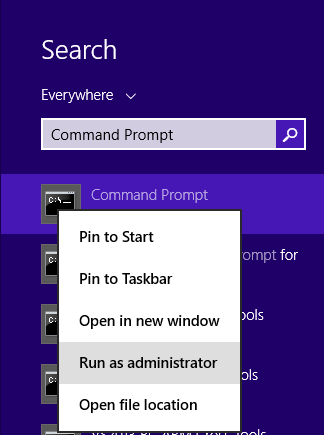
Swipe in from the right edge of the screen, and then tap Search. Or, if you are using a mouse, point to the lower-right corner of the screen, and then click Search. Type Command Prompt in the Search box, right-click Command Prompt, and then click Run as administrator. If you are prompted for an administrator password or for a confirmation, type the password, or click Allow.
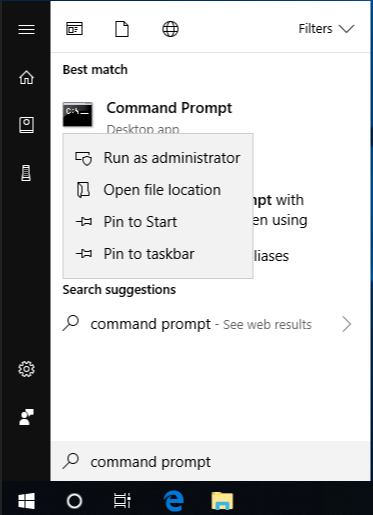
To do this, click Start, type Command Prompt or cmd in the Search box, right-click Command Prompt, and then click Run as administrator. If you are prompted for an administrator password or for a confirmation, type the password, or click Allow.
More Information
To view the details that included in the CBS.Log file, you can copy the information to the Sfcdetails.txt file by using the Findstr command, and then view the details in the Sfcdetails.txt. To do this, follow these steps:
Open an elevated command prompt as described in the previous step 1.
At the command prompt, type the following command, and then press ENTER:
Note The Sfcdetails.txt file contains details from every time that the System File Checker tool has been run on the computer. The file includes information about files that were not repaired by the System File Checker tool. Verify the date and time entries to determine the problem files that were found the last time that you ran the System File Checker tool.
Open the Sfcdetails.txt file from your desktop.
The Sfcdetails.txt file uses the following format:
Date/Time SFC detail The following sample log file contains an entry for a file that could not be repaired: 2007-01-12 12:10:42, Info CSI 00000008 [SR] Cannot repair member file [l:34<17>]»Accessibility.dll» of Accessibility, Version = 6.0.6000.16386, pA = PROCESSOR_ARCHITECTURE_MSIL (8), Culture neutral, VersionScope neutral, PublicKeyToken =
How to manually replace a corrupted system file with a known good copy of the file
After you determine which system file was corrupted and could not be repaired through the detail information in the Sfcdetails.txt file, find where the corrupted file located, and then manually replace the corrupted file with a known good copy of the file. To do this, follow these steps:
Note You may be able to get a known good copy of the system file from another computer that is running the same version of Windows with your computer. You may perform a System File Checker process on that computer to make sure the system file that you intend to copy is a good copy.
Take administrative ownership of the corrupted system file. To do this, at an elevated command prompt, copy and then paste (or type) the following command, and then press ENTER:
takeown /f Path_And_File_Name Note The Path_And_File_Name placeholder represents the path and the file name of the corrupted file. For example, type takeown /f C:\windows\system32\jscript.dll. 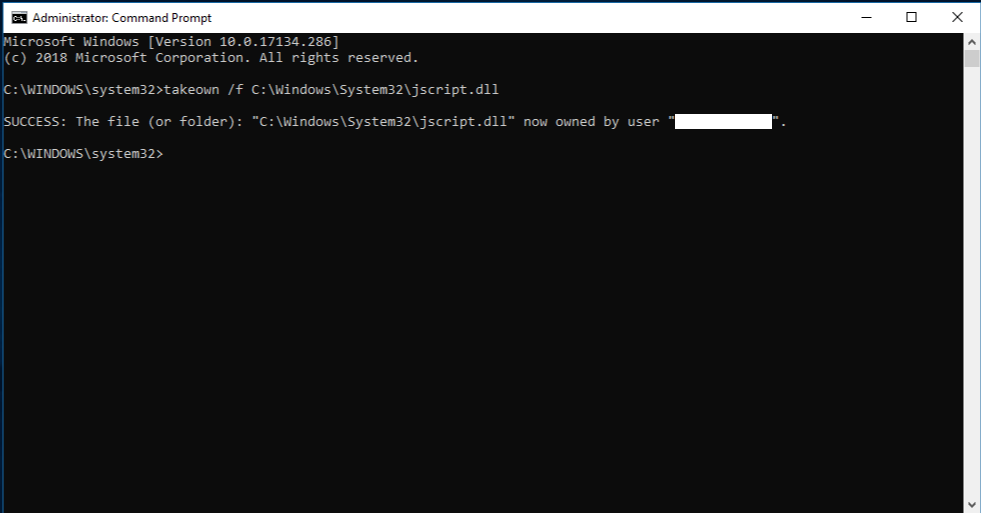
Grant administrators full access to the corrupted system file. To do this, copy and paste (or type) the following command, and then press ENTER:
icacls Path_And_File_Name /GRANT ADMINISTRATORS:F Note The Path_And_File_Name placeholder represents the path and the file name of the corrupted file. For example, type icacls C:\windows\system32\jscript.dll /grant administrators:F.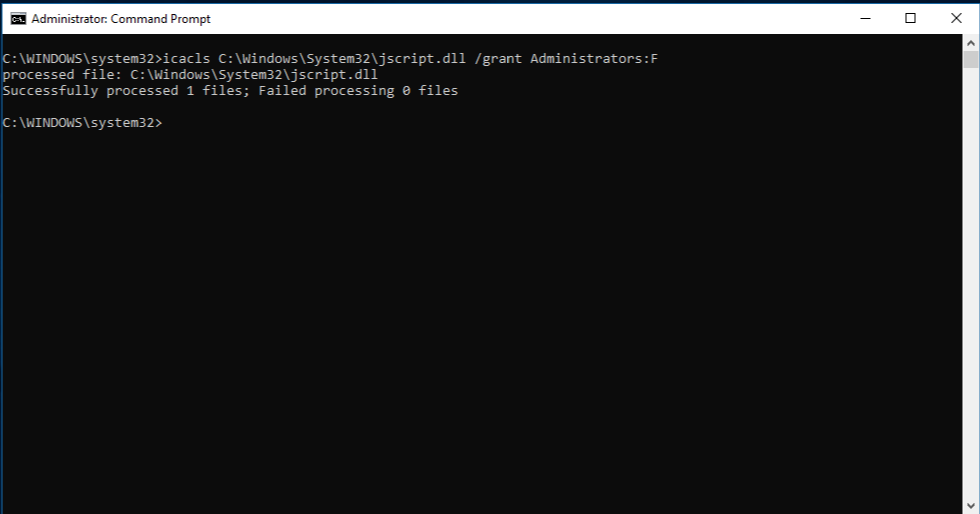
Replace the corrupted system file with a known good copy of the file. To do this, copy and paste (or type) the following command, and then press ENTER:
Copy Source_File Destination Note The Source_File placeholder represents the path and file name of the known good copy of the file on your computer, and the Destination placeholder represents the path and file name of the corrupted file. For example, type copy E:\temp\jscript.dll C:\windows\system32\jscript.dll.
If the steps above don’t work, you may need to reinstall Windows. For more info, see Windows 10 recovery options.
Windows 10 Sync Center Not Working — Fix or Replace It
You will learn to fix “Windows 10 Sync Center not working” by 7 different solutions, or sync files with a third-party file sync software — AOMEI Backupper.

By Ivy  / Last Updated March 16, 2021
Content of this article:
Situations to Sync Center Windows 10 not working
Do you sync files with Windows 10 Sync Center? If you sync offline files with Sync Center in home version, you may encounter Sync Center not working in Windows 10. The offline files feature is only available in the Pro, Enterprise, Education edition. It’s the simplest reasons. Besides, I will list the possible situations in the following.
Enable offline files greyed out.
Windows 10 always available offline missing.
Windows 10 folder redirection offline files not syncing.
Offline files service cannot be activated Windows.
Files do not sync.
HowВ toВ fix Windows 10 Sync Center not working? (7 solutions)
Before you start any operation, you need toВ create aВ disk backupВ for your computer. Some of the following operations may lead to data loss. In addition to fix «Windows 10 Sync Center not woking» issues, you can use a reliable sync software as replacement. It’s much simple and easy-to-use.
# Fix Enable offline files greyed out
To fix this problem, you can choose to enable Opportunistic Locking or reinitialize the offline files cache
Solution 1. Enable Opportunistic Locking
Step 1. Press Win + R to summon the Run window, type regedit.exe in the box and then click OK.
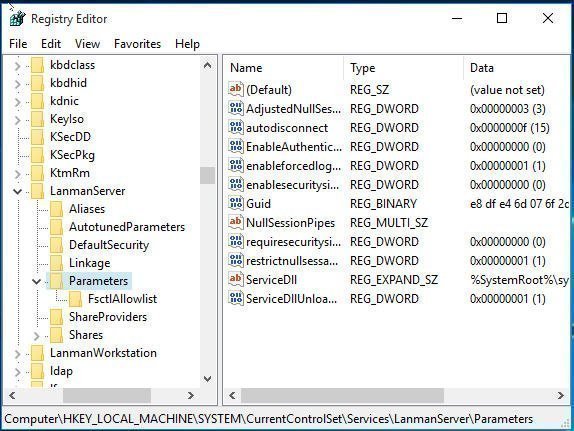
Step 2. Navigate to following registry subkey and Create a new REG_DWORD titled EnableOplocks and set it to 1.
HKEY_Local_Machine\SYSTEM\CurrentControlSet\Services\LanmanServer\Parameters\
Step 3.Navigate to following registry subkey and Create a new REG_DWORD titled OplocksDisabled and set it to 0.
HKEY_Local_Machine\SYSTEM\CurrentControlSet\Services\MRXsmb\Parameters\
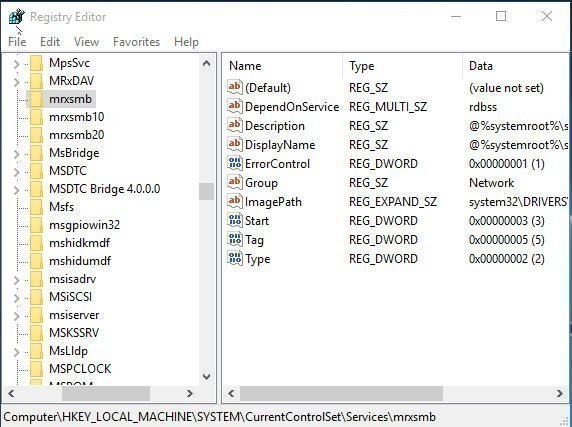
NOTE: Create a new key titled Parameters if it does not exist under MRXsmb
Step 4.Exit Registry Editor and Restart the computer
Solution 2. Reinitialize the Offline Files Cache
Step 1. Click Start, type registry in the Start Search box, and then press Enter. If you are prompted for an administrator password or a confirmation, type the password or click Continue.
Step 2. Navigate to the following registry subkey, then right-click it, select New and Key from the context menu, type Parameters in the key box.
HKEY_LOCAL_MACHINE\System\CurrentControlSet\Services\CSC
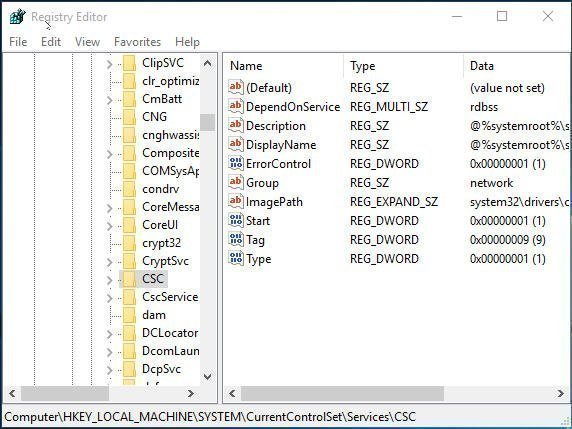
Step 3.В Right-click Parameters, selectВ NewВ andВ DWORD (32-bit) Value,В then typeВ FormatDatabaseВ in the box.
Step 4.В Right-click FormatDatabase, hitВ ModifyВ and typeВ 1 in the Value data box, then press OKВ to exit this window.
Step 5.В Exit Registry Editor, and then restart the computer.
# Solve Windows 10 always available offline missing
Solution 1. Do not use D-link network storage device.
If you use a network storage device which does not support offline files, Windows 10 always available offline will not appear on the context menu. D-link is one of the network storage devices which does not support offline files. If this is the case, you can choose to use a different storage device.
Solution 2. Remove Credential on your computer.
If you check Remember my credentials when you connect to a NAS storage device, Windows 10 always available offline will miss.
To fix it, you can follow the steps below.
Step 1.В TypeВ Credential ManagerВ in the search box and select it.
Step 2.В ClickВ Windows Credentials under theВ Manage your credentialВ tab, select the credential for you host and ChooseВ RemoveВ option to delete the credential.
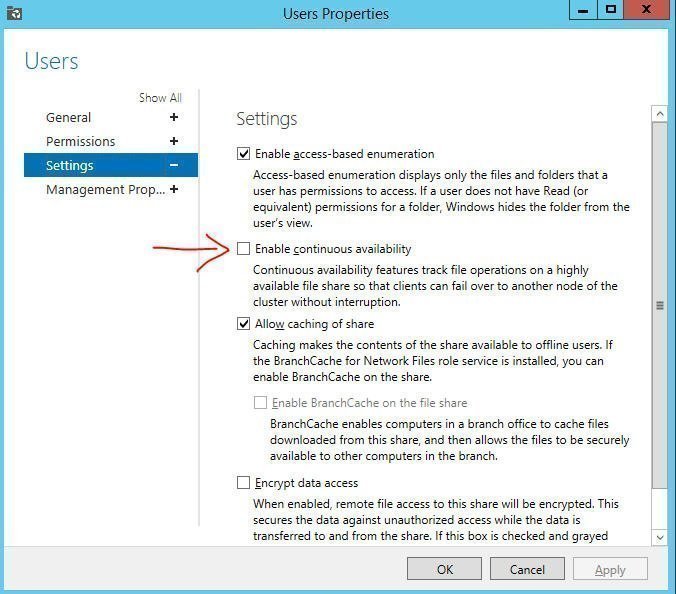
# Windows folder redirection offline files not syncing — fixed
If your network share enable continuous availability, then no users can make any shared folders available offline, not even manually and not just limited to redirected folders.
To make files available offline, you should uncheck Enable Continuous availability.
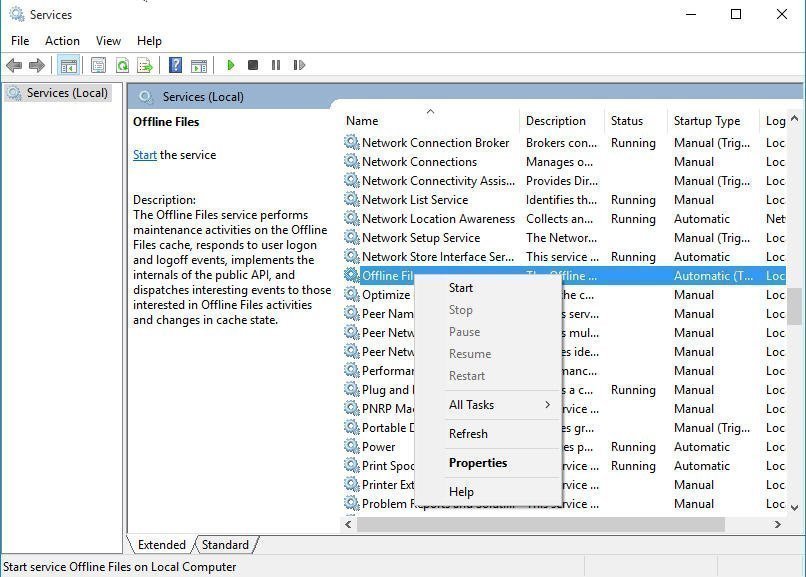
# Offline files service cannot be activated in Windows — Solved
Step 1. Type Control panel in the search box and choose it.
Step 2. Click drop-down menu at the right side of View by option and choose Small icons, then select Administrative tools and Services option.
Step 3. Find Offline Files service, right-click it and choose Start.
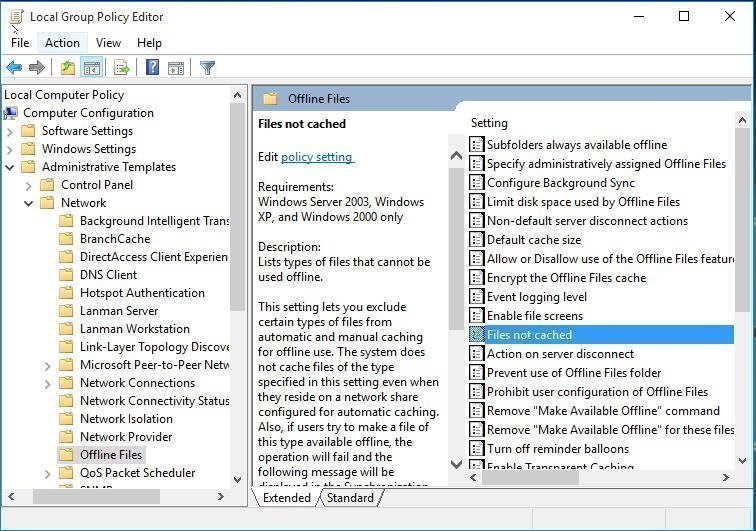
# Files do not sync — how to fix?
In Group Policy, there are some files cannot be synced by default. These files are always with file extension like.mdb, .ldb, .mdw, .mde, .db.
To sync these files, you can disable offline files not cached with GPO. The detailed steps are below.В
Step 1. Type group policy in the search box and choose Edit Group Policy.
Step 2. Find the following Group Policy setting in Local Group Policy Editor, right-click it and select Edit from its context menu, then disable the file extension.
Computer Configuration\Administrative Templates\Network\Offline Files\Files not cached
That’s all the solutions for «Windows Sync Center not syncing». Maybe, you have successfully fixed it. Even If not, you still don’t have to worry too much, because you can try another file sync software likeВ AOMEI BackupperВ Professional to sync files, whether the purpose is to easily access files on the server computer or just for backup.
How to sync files with third-party file sync software?
Here you will use AOMEI Backupper Professional to sync files in Windows 10/8/7/XP/Vista. If you want to access files on the server computer, you need to ensure that they are on the same LAN. If you just want to make an exact copy for disaster recovery, you can choose toВ sync files/folders to network drive, cloud drive, NAS, external hard drive, USB, etc, so you can stay away from the computer failures, such as, system crash, hard disk collapse, virus attack, and more.
There are four file sync solutions that can be in line with your different needs. Please stay for a while and read them carefully.В
>> Basic Sync: This feature will sync changed data from the source directory to the destination directory, but not sync files the other way around.
>>В Real-Time Sync: This feature will monitor changes in real-time and sync them immediately when detected, including the newly added files, modified files, andВ deleted files.
>>В Mirror-Sync: This feature will keep files in the target directory are exactly the same as source directory. The newly added files in the destination directory will be deleted and the changes will be overwritten finally.
>>В Two-Way Sync: This feature will track changes and reflect them in both source directory and destination directory.В
Now follow the detailed steps below to sync files with AOMEI Backupper Professional. If you want to synchronize files in server 2003/2008(R2)/2012(R2)/2016(R2)/2019, you could tryВ AOMEI Backupper Server.В
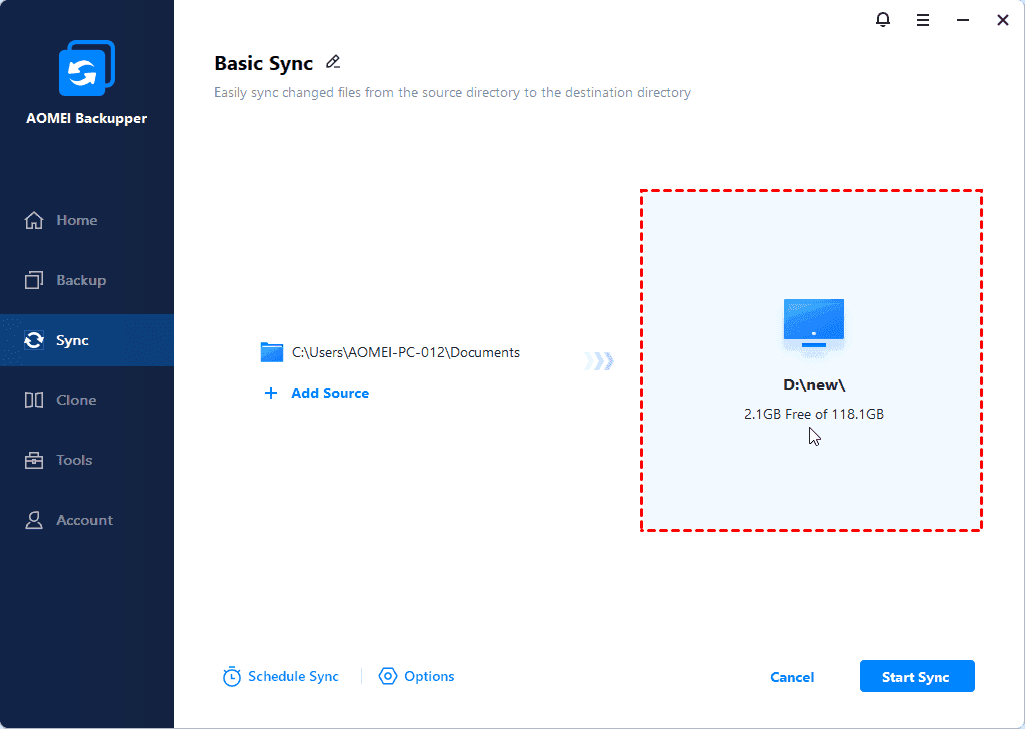
Step 1.В Download file sync software — AOMEI BackupperВ Professional and install it. Then, launch this software, click «Sync» and «Basic Sync» subsequently.

Step 2. Click В Add Folder > Share/NAS > Add Network Location subsequently and then select files or folder you want to sync to your computer.
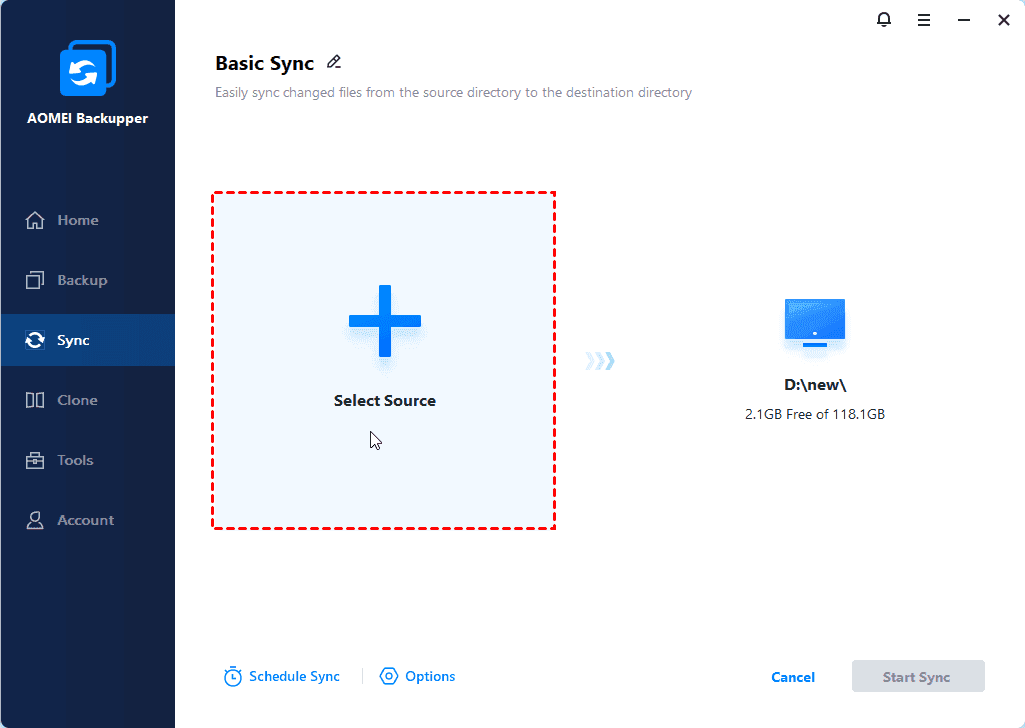
Step 3. Click on the seccond box and select a local path to save the network files or folders. At last, click «Start Sync» to begin the synchronization process.
Notes:
• The basic sync feature doesВ not sync the deleted files automatically unless you tick «Sync the deletions in source directory to destination» in the «Options» feature.
• Don’t modify the source folder name, otherwise the sync task will be interrupted.
• You are not allowed to sync files over 4GB to partition with FAT32 file system.
Tips:В
• If you need to sync a large amount of files, you can enable normal or high compression level in the «Options» feafture. Also, you can clearly distinguish this task from others by making a comment.
• If you want track changes continuously, it’s suggested to enable daily/weekly/monthly schedule sync. Also, you can sync files at a specific event with «Event trigger» or automatically sync files to USB drive when it’s plugged in with «USB plug in» feature.
Conclusion
«Windows 10 Sync Center not working» is a big headache for most users, but in this article you can choose to fix this issue with given solutions or replace it with a third-party file sync software — AOMEI Backupper Professional. It can also not only help you sync network files to local computer, but also sync files to external storage for disaster recovery.В
In addition, it’s still a professional backup and restore software that can be used to protect your computer or the data on it through file backup, system backup, disk backup, incremental & differential backup, USB plug in, system restore, create bootable media etc. Just download this software to explore it yourself.


