- Windows file has been damaged
- Windows failed to start. A recent hardware or software change might be the cause.
- How to Repair Corrupted and Damaged System files in Windows 7?
- When your Windows 7 system files get corrupted and damaged, you can check out this page to learn how to repair it.
- How to Repair Windows 7 Corrupt System Files
- How to Repair and Recover Windows 7 with Bootable Media
- Your Safe & Reliable Windows 7 Recovery Software
- Дамба: проблема с загрузкой windows 7 — Дамба
- проблема с загрузкой windows 7 выручайте!
- #1 3H@X@Pb
- #2 Sanara
- #3 KS-10
- Startup Repair Infinite Loop: Fix for Windows Vista, 7, 8, 8.1
- About “Startup Repair in Infinite Loop”
- Symptom 1: Computer attempts to enter Startup Repair continuously
- Causes of this error
- Cause #1: Damaged or corrupted BCD settings
- Cause #2: Corrupted boot partition
- Cause #3: Blue Screen of Death on reboot
- Guaranteed Fix: Use Easy Recovery Essentials
- Fixes for Infinite Loop of Startup Repair on Windows Vista, 7
- Fix #1: Run chkdsk on the boot volume
- Fix #2: Disable Automatic Restart
- Fix #3: Manually attempt to rebuild the BCD
- Fixes for Automatic Repair Loop in Windows 8
- Fix #1: Boot into Safe Mode
- Fix #2: Run bootrec
- Fix #3: Run chkdsk
- Fix #4: System Restore
- More Information
- Linked Entries
- Support Links
- Applicable Systems
Windows file has been damaged

Ирина Цыбина запись закреплена
После неудачного автообновления windows 7 (пиратка) перестала загружаться. прервалась либо перекрылась
при обычной загрузке выдаёт windows error recorvery
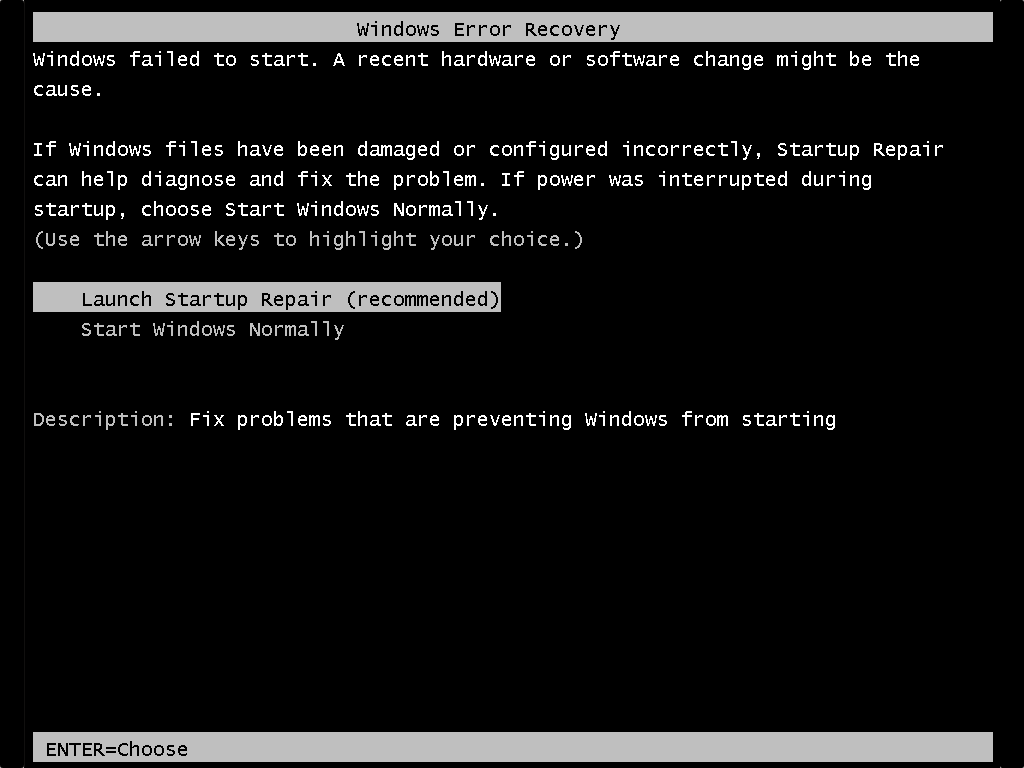
Windows Error Recovery
Windows failed to start. A recent hardware or software change might be the cause.
If windows files have been damaged or configured incorrectly, startup repair can help diagnose and fix the problem. If power was interrupted during startup, chose start windows normally.
Launch Startup repair (recommended)
подготовка автоматического восстановления
загрузка файлов
3сек и чёрный экран
Start Windows Normally
Starting Windows
бесконечно долго и безрезультатно
F8
Advanced boot options
Repair Your Computer
Safe mode
Safe mode with networking
Safe mode with command prompt
Loading windows files останавливается на
Loaded: \windows\system32\ambakdrv.sys
Через F2 кинает на Диспечер загрузки Windows
жму Esc на Boot menu, Sats CD и USB игнорирует, перекидывает на
поновой на
Windows Error Recovery
Windows failed to start. A recent hardware or software change might be the cause.
If windows files have been damaged or configured incorrectly, startup repair can help diagnose and fix the problem. If power was interrupted during startup, chose start windows normally.
Launch Startup repair (recommended)
подготовка автоматического восстановления
загрузка файлов
3сек и чёрный экран
Start Windows Normally
Starting Windows
бесконечно долго и безрезультатно
Windows failed to start. A recent hardware or software change might be the cause.
Thank you for posting the issue on the Microsoft Community.
I understand that you have issues with starting up the computer. I would definitely help you in fixing this issue.
Let us start with couple of questions:
1. Have you made any changes on your computer prior to the issue?
2. Do you have any external Hard disc connected to the computer?
Perform the following troubleshooting methods:
Boot the computer in Last Known Good Configuration and then check if you are able to boot.
Refer to the link “ Using Last Known Good Configuration ” to know how to boot the computer in Last Known good configuration.
If that doesn’t work, then perform “Startup Repair” from Windows Recovery Environment and then check if you are able to boot.
Refer to the link “ What are the system recovery options in Windows 7? ” to know how to perform Startup Repair from Windows Recovery Environment.
If that doesn’t work, then perform “System Restore” from Windows Recovery Environment and then check if you are able to boot.
Refer to the link “ What are the system recovery options in Windows 7? ” to know how to perform System Restore from Windows Recovery Environment.
I hope this helps you to fix the issue. If the issue persists or you have any other issues with Windows, please do post it in Microsoft Community. We would be happy to help you.
How to Repair Corrupted and Damaged System files in Windows 7?
When your Windows 7 system files get corrupted and damaged, you can check out this page to learn how to repair it.

David Darlington
Dec 21, 2020 • Filed to: Windows Computer Solutions • Proven solutions
Is your Windows 7 system not working in an ideal way? Don’t worry – there are plenty of ways to repair corrupted or damaged system files in Windows 7. ByВ taking the assistance of Command Prompt, you can make it work in a trouble-free manner. In this guide, we will provide a step by step solution to teach how to repair corrupted and damaged system files in Windows 7. In addition to that, we will also provide the solution onВ how to recover corrupted filesВ as well.
How to Repair Windows 7 Corrupt System Files
Even though Windows 7 is not as advanced as Windows 10 when it comes to system repair, there are still a few options to repair its corrupt files. For instance, you can go to Command Prompt and learn how to repair corrupted and damaged system files in Windows 7. All you need to do is follow these steps:
- To commence with, go to the Start Menu and look for Command Prompt by typing «cmd». Once the icon of Command Prompt would appear, right-click it and launch it as an administrator.
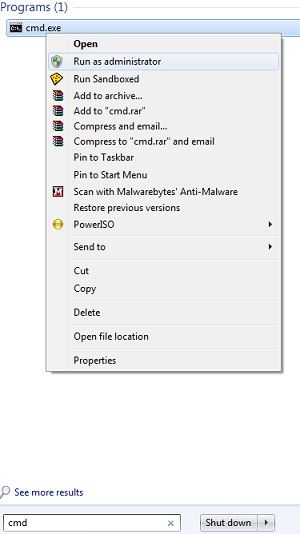
You might have to provide the account password of the administrator as well (if not logged in as an admin already). Once Command Prompt is launched successfully, provide the command «SFC /SCANNOW» and press Enter.
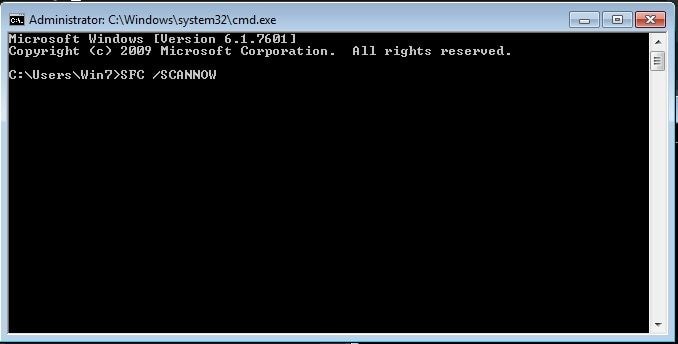
The SFC or the System File Checker command will perform the needed operations to check for any damaged or corrupted Windows file. This might take a while, so you need to wait until the process is completed.

Once it is done, you can view the results. For instance, you can know what files were corrupted and fixed by the SFC command.
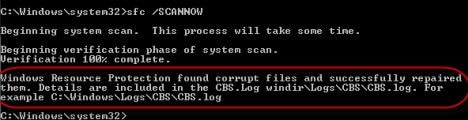
In this way, you can learn how to repair corrupted and damaged system files in Windows 7 automatically. If you have installed any theme on your system, then it will revert it to the default explorer as well. Additionally, while the system is checking for a corrupted file, you should not close the explorer or restart your system in between. This might cause some unwanted damage to your system instead.
How to Repair and Recover Windows 7 with Bootable Media
By following the above-mentioned tutorial, you would be able to learn how to repair corrupted and damaged system files in Windows 7. Nevertheless, it is observed that at times the SFC feature doesn’t yield the desired results. Also, you might not be able to access your content on your Windows system. In this case, you can useВ RecoveritВ Pro. Being one of the oldest and most trusted data recovery tools, it can easily retrieve your lost or deleted content. The latest Pro version has tons of advanced features as well onВ operating system crash recovery.

Your Safe & Reliable Windows 7 Recovery Software
- Recover lost or deleted files, photos, audio, music, emails from hard disk effectively, safely and completely.
- Supports data recovery from recycle bin, hard drive, memory card, flash drive, digital camera, and camcorders.
- Supports to recover data for sudden deletion, formatting, hard drive corruption, virus attack, system crash under different situations.
Download and install Recoverit on your computer, get a blank USB drive, and connect to the computer. Launch Recoverit and follow the next steps to recover Windows 7 data.
Recover your lost or inaccessible content
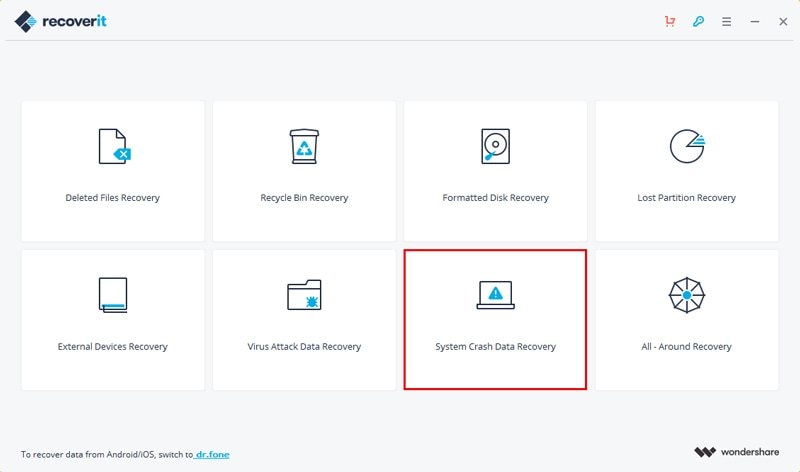
Step 1: Select the system crash data recovery mode
To recover your data from a non-working system, you need to create a bootable media at first. If your system is malfunctioning or corrupted, then you can install Recoverit Pro on another working Windows computer.
- Launch Recoverit, please select the «System Crash Data Recovery» mode.
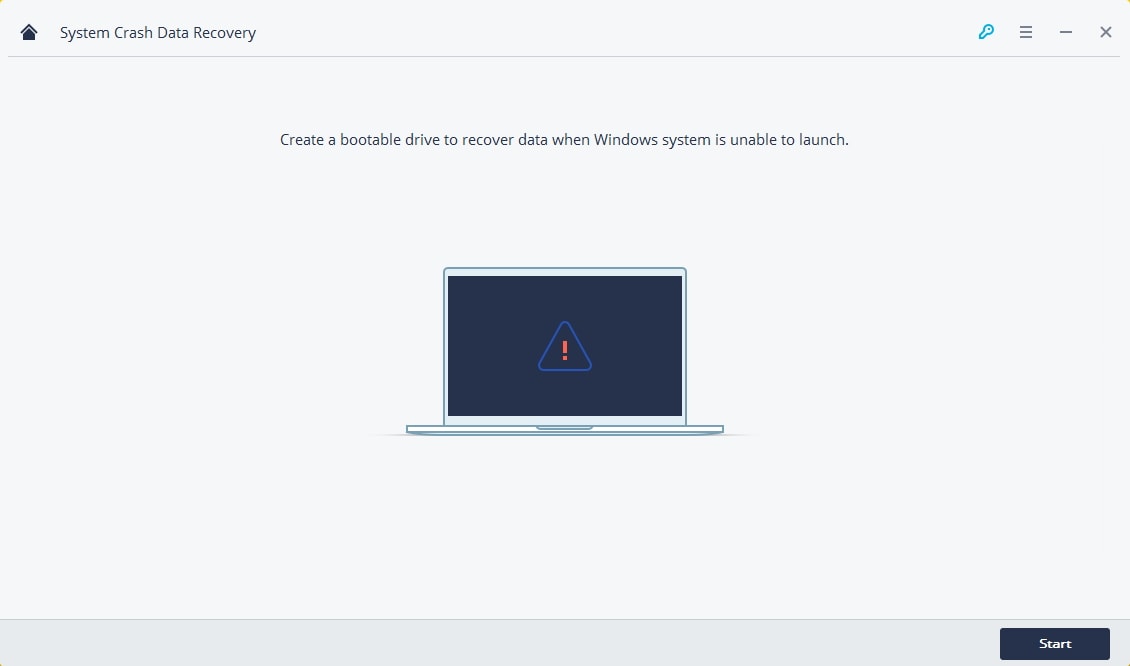
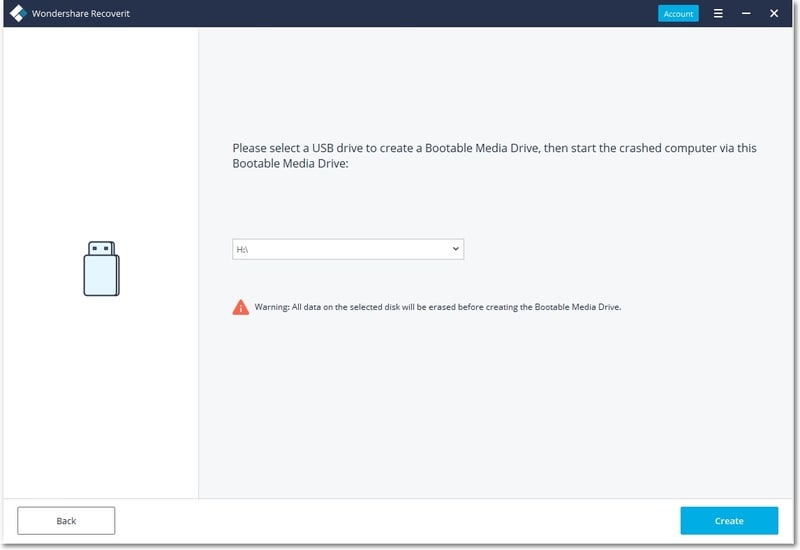
- Select a mode to create a bootable drive. You can select a USB bootable drive or CD/DVD bootable drive and click the «Create» button to start.
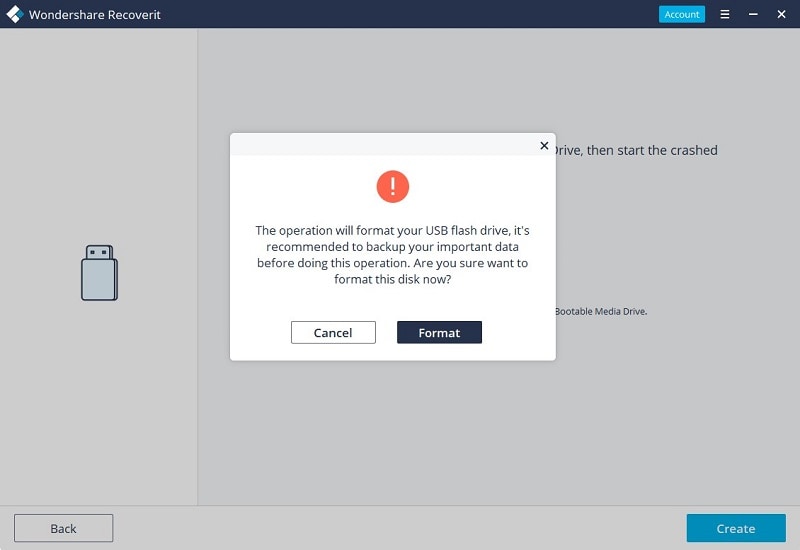
- Once you choose to create USB bootable drive an alert message about formatting USB flash drive will pop up. Make sure you have backup your important data before formatting the USB flash drive to create a bootable drive. Click the «Format now» button to confirm.
Step 2: Recover Windows 7 with Bootable Media
After create a bootable drive, you can copy data from Windows 7 and recover data from Windows 7 hard disk. But sometimes you will need to change the computer boot sequence, restart the computer, and entry the BIOS with the function key F12, or you can check the full solution toВ set the computer to boot from a USB drive.
Дамба: проблема с загрузкой windows 7 — Дамба
- Дамба
- >Ресурсы МеждуNet’а
- >Софт-Club
- Правила форума
- Просмотр новых публикаций


проблема с загрузкой windows 7 выручайте!
#1 3H@X@Pb
 3H@X@Pb
- Завсегдатай


- Группа: Пользователь
- Сообщений: 520
- Регистрация: 27 января 08
#2 Sanara
- Завсегдатай

- Группа: Пользователь
- Сообщений: 172
- Регистрация: 23 мая 10
#3 KS-10
- Завсегдатай

- Группа: Пользователь
- Сообщений: 433
- Регистрация: 23 октября 08
Ну запусти этот Startup Repair, там есть такой пункт на выбор, если я тебя понял.
Startup Repair Infinite Loop: Fix for Windows Vista, 7, 8, 8.1
Get the fix for the infinite Startup Repair loop error for the following Windows versions: Windows Vista, Windows 7, Windows 8 or Windows 8.1.
This error prevents you from accessing anything on your computer and presents an endless loop of loading Startup Repair without end.
About “Startup Repair in Infinite Loop”
The following information on this error has been compiled by NeoSmart Technologies, based on the information gathered and reported by our global network of engineers, developers, and technicians or partner organizations.
Symptom 1: Computer attempts to enter Startup Repair continuously
Every time the PC is restarted, before Windows begins to load a message is displayed indicating that “Windows failed to start,” and offering an option to “Launch Startup Repair (recommended)” from a variation of the Advanced Boot Options menu as shown below:
Startup Repair will then either fail to load, launch but fail to repair, or run and claim repairs have been executed — however your PC will continue to attempt to endlessly start Startup Repair each boot.
On Windows 8 and Windows 8.1 this is called Automatic Repair:
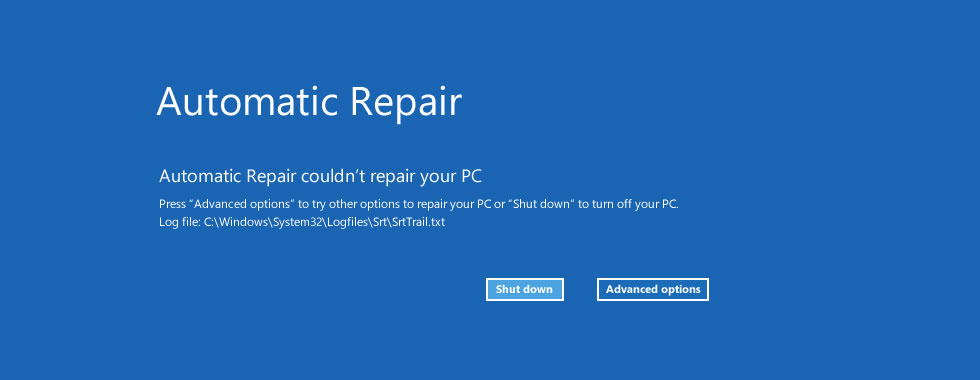
The Log file path can be different.
Causes of this error
This error has been known to occur as a result of one or more of the following:
Cause #1: Damaged or corrupted BCD settings
Bootsector viruses and other malware that targets the bootloader or the booting chain can cause errors in the bootloader settings and state that result in an infinite loop of Startup Repair.
The virus may then block Startup Repair from either launching or carrying out its repairs successfully. A failed Windows Update or Automatic Update can also sometimes leave the Boot Configuration Data (BCD) in an inconsistent or non-working state.
Cause #2: Corrupted boot partition
On Windows 7 and above, Windows by default creates a separate 100 MiB NTFS partition at the start of the drive, reserved for core bootloader files and BCD configuration.
An unsafe shutdown, sudden power loss, hard disk failure, or a blue screen of death during writes to the boot partition can leave your system in an inconsistent state, unable to boot and infinitely cycling into the Startup Repair.
Cause #3: Blue Screen of Death on reboot
It is possible that every other time Windows attempts to boot, a BSOD occurs.
Recent versions of Windows are configured to hide this fact from the user and silently reboot.
(In the experience of the researchers at NeoSmart Technologies, there is almost never a good reason for doing this. Microsoft is hoping that a reboot will fix your PC and so Windows decides to hide the blue screen and reboot, endlessly and in vain.
A much more intelligent solution would be for Windows to keep track of whether or not this blue screen resulted in a silent and automatic reboot last time, and if so, show it so the user can see what’s going on.)
A BSOD during boot up will trigger a version of the Advanced Boot Options menu to be shown on next reboot prompting the user to select “Repair Your Computer,” ultimately causing the endless loop of Startup Repair.
Guaranteed Fix: Use Easy Recovery Essentials
Easy Recovery Essentials is guaranteed to fix the “endless repair computer loop” error automatically using its built-in Automated Repair option. EasyRE is currently available for Windows XP, Vista, 7 and 8 and can be downloaded and created on any PC.
- Download Easy Recovery Essentials. Make sure to note your Windows version (XP, Vista, 7 or 8) before you download EasyRE. This guide can help you identify what version of Windows you have installed.
- Burn the image. Follow these instructions on how to burn the bootable ISO image very carefully, as making a bootable CD can be tricky! Alternatively, these instructions explain how to create a bootable EasyRE recovery USB stick/drive.
- Boot up your PC from the Easy Recovery Essentials CD or USB you created.
- Once EasyRE is running, choose the “Automated Repair” option and click Continue .

Choose “Automated Repair” in Easy Recovery Essentials

Choose the drive associated with the Windows installation you’re trying to repair.

Easy Recovery Essentials searches for errors and makes corrections to the selected Windows installation.

Windows, booting up successfully.
You can download Easy Recovery Essentials from here.
Fixes for Infinite Loop of Startup Repair on Windows Vista, 7
Windows Setup CD/DVD Required!
Some of the solutions below require the use of the Microsoft Windows setup CD or DVD. If your PC did not come with a Windows installation disc or if you no longer have your Windows setup media, you can use Easy Recovery Essentials for Windows instead. EasyRE will automatically find and fix many problems, and can also be used to solve this problem with the directions below.
Fix #1: Run chkdsk on the boot volume
The command line chkdsk tool ships with Windows and can be used to check (and sometimes repair) your drives for filesystem corruption. More information about how chkdsk operates and how it works can be found in our knowledgebase. The following steps will launch the command line option from Startup Repair on the Windows setup disc and use the chkdsk utility.
Unable to boot into the Windows setup CD?
See our guide on setting up a PC to boot from the CD or DVD for troubleshooting and more detailed instructions.
- Insert your Windows installation DVD into your PC’s CD-ROM drive,
- Fully power down your PC, and make sure it has fully shut off,
- Power up your PC,
- Press any key when you see “Press any key to boot from CD or DVD..”
- Click the link titled “Repair your computer” in the bottom-lefthand corner, after first selecting your language and keyboard options.
- Wait for Startup Repair to scan your PC for Windows installations, then select your install from the list it shows:
- Choose “Command Prompt” from the list of available recovery options to begin:


Once the command prompt is launched, enter the following to use the System File Checker to check your installation for corrupted, invalid, or deleted system files. If the previous page showed that your Windows installation has a drive letter other than C:\, make sure to use that below!
chkdsk will begin scanning your drive for problems, fixing them if it is able to, and reporting its progress when done.
Fix #2: Disable Automatic Restart
This option lets you get the exact and complete error message accompanying the Blue Screen of Death by disabling the Automatic Restart option of Windows. Note: this will not fix the boot error you are experiencing in and of itself, but should provide more information that may prove critical in solving the underlying problem.
The option to disable automatic restart on system failure is available from the Advanced Boot Options menu at startup. The instructions below will trigger this behavior, more detailed instructions on disabling automatic restart on system failure are also available in our knowledgebase.
- Restart your computer
- Wait for your BIOS to complete POST (the screen with your manufacturer logo and/or system information)
- Quickly begin tapping F8 repeatedly, until you see the list of boot options
- Choose “Disable automatic restart on system failure”
- Press Enter and wait for your PC to boot.
Fix #3: Manually attempt to rebuild the BCD
Problems booting up Windows can often be traced back to errors in the bootloader installation or configuration. Rebuilding your PC’s master boot record (MBR), partition bootsectors, and boot configuration data (BCD) can fix various problems with the BOOTMGR bootloader.
You can rebuild the BCD using bootrec.exe , a tool built found in the Windows Recovery Environment. Follow these steps:
- Insert your Windows installation DVD into your PC’s CD-ROM drive,
- Fully power down your PC, and make sure it has fully shut off,
- Power up your PC,
- Press any key when you see “Press any key to boot from CD or DVD..”
- Click the link titled “Repair your computer” in the bottom-lefthand corner, after first selecting your language and keyboard options.
- Wait for Startup Repair to scan your PC for Windows installations, then select your install from the list it shows:
- Choose “Command Prompt” from the list of available recovery options to begin:
- Once the command line has launched, type in the following commands in the Command Prompt and hit Enter after each command:
Unable to boot into the Windows setup CD?
See our guide on setting up a PC to boot from the CD or DVD for troubleshooting and more detailed instructions.
BCD not getting rebuilt?
There is an entire entry in our wiki dedicated to advanced manual repair of the bootloader that can also be followed, if necessary.
Fixes for Automatic Repair Loop in Windows 8
Windows Setup CD/DVD Required!
Some of the solutions below require the use of the Microsoft Windows setup CD or DVD. If your PC did not come with a Windows installation disc or if you no longer have your Windows setup media, you can use Easy Recovery Essentials for Windows instead. EasyRE will automatically find and fix many problems, and can also be used to solve this problem with the directions below.
Fix #1: Boot into Safe Mode
Often booting into Safe Mode and uninstall recently install device drivers or software may fix the Automatic Repair loop error.
To boot into Safe Mode of a Windows 8 or 8.1 system, you need to have the original DVD or USB. If you don’t have it, go to Fix with Easy Recovery Essentials.
- Insert the disc and reboot the system
- Press any key to boot from the DVD
- Choose your keyboard layout
- Click Repair your computer at the Install now screen

If booting your system in Safe Mode doesn’t solve the error, go to Fix #2: Run bootrec.
Fix #2: Run bootrec
Running the bootrec utility to rebuild the BCD might fix the error. To run bootrec.exe on Windows 8 or 8.1, follow these steps:
- Insert the original Windows 8/8.1 install DVD or USB
If you don’t have the installation DVD or USB, go to Fix Automatic Repair Loop with Easy Recovery Essentials.
Click Repair your computer
Fix #3: Run chkdsk
The chkdsk utility might fix the Automatic Repair Loop on Windows 8 and Windows 8.1 systems
To access it, follow the same steps as the Fix #2: Run bootrec to reach Command Prompt:
- Click Troubleshoot > Advanced options > Command Prompt
- When Command Prompt loads, type these commands:
- Press Enter
Fix #4: System Restore
To access System Restore, follow the same steps as Fix #2: Run bootrec to reach the Advanced Options screen:
- Click Troubleshoot
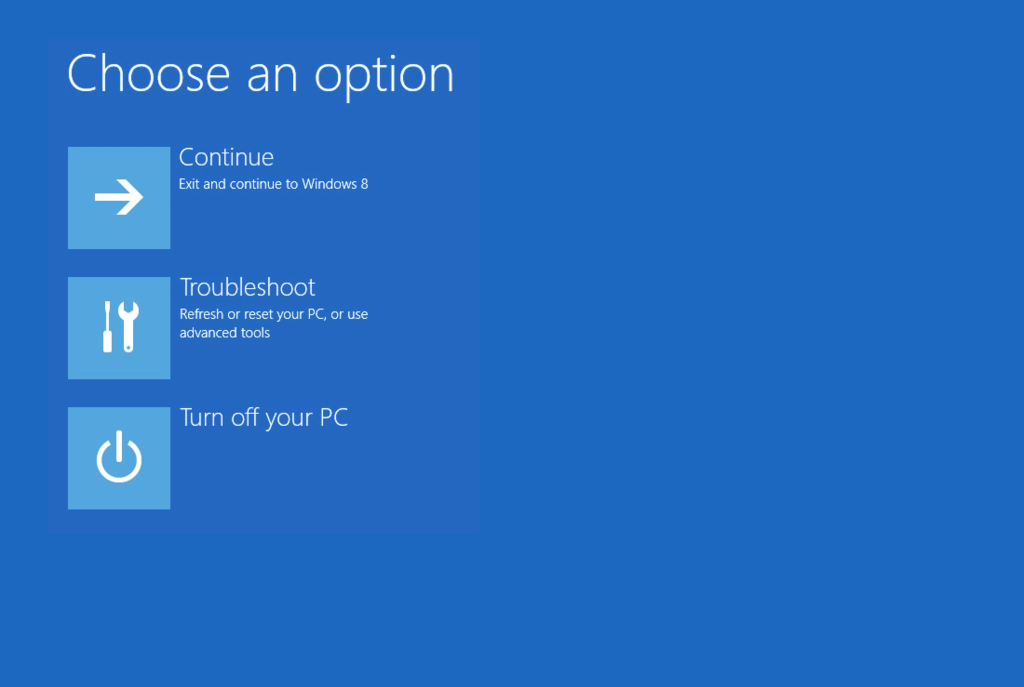
Troubleshoot in Windows 8 recovery options screen
More Information
Linked Entries
Support Links
It’s an easy-to-use and automated diagnostics disk. It’s available for Windows 8, Windows 7 and Windows Vista. It’s also available for Windows XP and Windows Server.
Read more at Windows Recovery Disks.
Applicable Systems
This Windows-related knowledgebase article applies to the following operating systems:
- Windows Vista (all editions)
- Windows 7 (all editions)
- Windows 8 (all editions)
- Windows 8.1 (all editions)
- Windows Server 2008 (all editions)
- Windows Server 2012 (all editions)


