- Change your password in Mail for Windows 10
- Stay connected and on schedule
- Update a password
- How To Update Or Change Email Password In Windows 10 Mail
- Update or change account password for Outlook.com, MSN, Live, and Hotmail accounts
- Update email account password for Gmail, Yahoo! and others
- Change the email address or phone number for your Microsoft account
Change your password in Mail for Windows 10
Stay connected and on schedule
You can be organized, on time, and buttoned up with Outlook — your life organizer.
Once you’ve set up your account in Mail for Windows 10, you don’t have to enter your password every time you open the app. If the password for your email account expires or you change it for security purposes, you may need to update your password in the Mail app.
Update a password
If you’ve changed your password with your email provider, you can update the stored password in Mail for Windows 10.
Choose Settings > Manage Accounts, and then choose the account you need to update.
If you selected an Outlook.com account, you can change or update your password by choosing Change account settings. Mail for Windows 10 will take you to a webpage for your account where you can change your password. After you update the password on the webpage, Mail for Windows 10 will receive that change automatically.
For all other accounts, after you update your password with your email provider, you can update the password in the Account Settings dialog box and then choose Save.
If your password has expired or you think your account has been compromised, you’ll need to change your password with your email service provider—€for example, Gmail or iCloud—€before you update the password in the Account Settings dialog box.
If Mail for Windows 10 won’t accept your new password, make sure Caps Lock is turned off, and then reenter your password.
How To Update Or Change Email Password In Windows 10 Mail
Last Updated on March 10, 2020 by admin 12 Comments
The Mail app is the default email client in Windows 10. The Mail app not only supports webmail accounts from Microsoft but also supports popular email services like Gmail and Yahoo.
Most users change their email account passwords once in a while for security reasons. When you change your email account password, you also need to update your new password in Windows 10 Mail to continue to send and receive new messages.

In this guide, we will see how to update your email account password in Windows 10 Mail app.
Complete the given below instructions to edit, update or change your email account password in Windows 10 Mail app.
Method 1 – Update account password for Outlook.com, Hotmail, MSN, and Live accounts
Method 2 – Update account password for Gmail & Yahoo Mail
Method 1 of 2
Update or change account password for Outlook.com, MSN, Live, and Hotmail accounts
Step 1: Launch the Mail app.
Step 2: Once the Mail app is launched, click on the Settings icon. The Settings or gear icon typically appears in the left-pane.

Step 3: Clicking the Settings or Gear icon will open the Settings pane. Here, click Manage accounts to open Manage account section.

Step 4: Click on the email account you want to edit, update, or change the password for. You have multiple email accounts added to the Mail app, please make sure you’re clicking on the correct email account.

Step 5: Clicking on the email account will open the account settings dialog. Click the option labeled Change account settings.

When you click Change account settings, if you’re using Outlook.com, Live, Hotmail, or MSN accounts, Windows 10 Mail will open a webpage for your account where you can change your password.
Step 6: Once your account page is opened in a web browser, click Change password link.

Step 7: If you’re asked to enter your email account password, enter the same.
Step 8: When you see the following Protect your account screen, enter your linked email account that you used while creating or updating your email account to receive the security code which is required to verify your identity. If you have linked your contact number, you might be able to choose that to receive the security code.

Click Send code button to receive the security code.
Step 9: Enter the security code before clicking the Submit button.

Step 10: Finally, enter your current password, enter your new password, re-enter your new password, and then click the Save button.

Step 11: You will see the following screen. You may now close the browser. The Mail app will automatically receive the new or updated password.
Method 2 of 2
Update email account password for Gmail, Yahoo! and others
Step 1: Open the Mail app and then click Settings or Gear icon to open Settings pane.

Step 2: Click Manage Accounts to view all email accounts.

Step 3: Click on your Gmail, Yahoo Mail, or another email account you want to update the password for.

Step 4: Click the Change account settings option, update the password, and then click the Save button to save the updated password. That’s all!
Change the email address or phone number for your Microsoft account
Your Microsoft account lets you manage Microsoft services and subscriptions, like Xbox Live, Outlook.com, OneDrive, Skype, and Windows 10, from a single account.
You can add up to 10 email addresses or phone numbers to your Microsoft account. Email addresses and phone numbers that are associated with your Microsoft account are called aliases and they use the same contacts, online storage, subscriptions, and account settings. Each alias lets you sign in to all your Windows 10 devices and services that use the Microsoft account.
Your aliases share a single password, and you can send and receive email with each. Your primary alias will be the username you use to sign in to your account, the username that appears on your Windows 10 devices, and how you show up to recipients in email.
You can make changes to the email addresses or phone numbers (aliases) that are associated with your Microsoft account. Here are some reasons you might want to make changes:
You want to add or remove an email address or phone number.
You want to use a different email address or phone number to sign in.
You want a different username to appear on your Windows 10 devices.
You want an email address you can give to other companies or other people that can’t be used to sign in to your account or access your info.
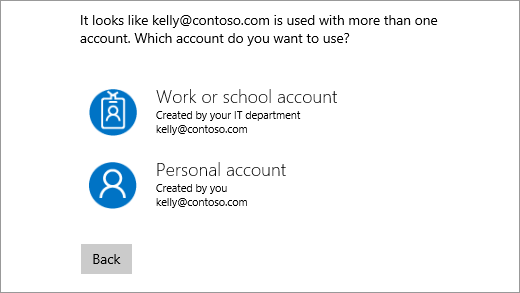
You received the “Which account do you want to use” message at sign-in.
If you’re trying to change your Outlook email account or change your email password, see Add or remove an email alias in Outlook.com or Change or update your email password.
To learn how to change which account sends email in Outlook.com, see Add your other email accounts to Outlook.com.
If you have questions about your email account, see Get help with Outlook.com.
The following sections provide the steps that you need to change the email address or phone number for your Microsoft account. Select the one that best fits your scenario.
To add a new email address or phone number as an alias:
Sign in to Manage how you sign in to Microsoft with your Microsoft account. If you’re having issues signing in to your Microsoft account, go to Microsoft account help.
Note: You may be prompted to enter your Microsoft account password, or to enter a code sent to the email address or phone number listed in your account’s security information. By providing this info to us, we know the request is coming from you.
Under the Account aliases section, select either Add email or Add phone number.
If you selected Add a phone number, go to step 5. If you selected Add email, choose whether to add:
A new email address. Select Create a new email address and add it as an alias, and then follow the instructions.
A non-Microsoft email address (such as an @gmail.com or @yahoo.com email address). Select Add an existing email address as a Microsoft account alias, and then select Add alias.
After you’ve added the email address, you’ll be asked to verify that you’re the account owner:
Select Verify next to the new alias. A message is sent to the account for verification.
After you receive the message, select the included link to confirm that you own the account.
If you selected Add a phone number, follow these steps:
Select your country from the list.
Enter the phone number you want to use, and then select Next.
When you add a new phone number, we’ll send a text message to that number to verify it. Enter the code from the text message, and then select Next.
You can use any email address or phone number you’ve listed as a username to sign in to your Microsoft account. If you want to sign in with a specific one or change the one you’re signing in with, here’s how:
Sign in to Manage how you sign in to Microsoft with your Microsoft account. If you’re having issues signing in to your Microsoft account, go to Microsoft account help.
Note: You may be prompted to enter your Microsoft account password, or to enter a code sent to the email address or phone number listed in your account’s security information. By providing this info to us, we know the request is coming from you.
If you want to use an existing email address or phone number, go to step 6. If you’re adding a new email address or phone number, go to step 3.
If you selected Add a phone number, go to step 5. If you selected Add email, choose whether to add:
A new email address. Select Create a new email address and add it as an alias, and then follow the instructions.
A non-Microsoft email address (such as an @gmail.com or @yahoo.com email address). Select Add an existing email address as a Microsoft account alias, and then select Add alias.
After you’ve added the email address, you’ll be asked to verify that you’re the account owner:
Select Verify next to the new alias. A message is sent to the account for verification.
After you receive the message, select the included link to confirm that you own the account.
If you selected Add a phone number, follow these steps:
Select your country from the list.
Enter the phone number you want to use, and then select Next.
When you add a new phone number, we’ll send a text message to that number to verify it. Enter the code in the text message, and then select Next.
Under Sign-in preferences, select Change sign-in preferences.
Either select the check boxes next to the aliases you want to use to sign in, or clear the check boxes for the aliases that you don’t want to use to sign in, and then select Save.
To change the username that appears on your Windows 10 devices, like your Xbox or Surface, change your primary alias.
Note: If you want to change how your name appears for your Microsoft account, use the steps on the How to change your Microsoft account display name page.
Sign in to Manage how you sign in to Microsoft with your Microsoft account. If you’re having issues signing in to your Microsoft account, go to Microsoft account help.
Note: You may be prompted to enter your Microsoft account password, or to enter a code sent to the email address or phone number listed in your account’s security information. By providing this info to us, we know the request is coming from you.
Select Your info, and then select Manage how you sign in to Microsoft.
Under the Account aliases section, select Make primary next to the alias you want to appear on your Windows 10 devices.
Just because you aren’t using an email account or phone number anymore doesn’t mean you have to remove it from your list of aliases. However, if you want to remove it, here’s how.
If you remove an alias that’s an email address from a Microsoft domain (like @hotmail.com, @live.com, @outlook.com, or @msn.com), the email is permanently deleted from our systems and can no longer be used to send or receive emails, nor can it be transferred to a different account. Microsoft also doesn’t recycle email addresses, which means the alias can’t be reclaimed later.
BEFORE YOU DELETE—Make sure you review the following before you delete an alias:
If you want to remove an email address from a non-Microsoft domain (like @gmail.com), then it usually becomes immediately available and can be added as an alias on another Microsoft account. NOTE: This removal doesn’t trigger a deletion of the email across our systems. You can learn more about how to control your personal data in the Microsoft Privacy Statement.
Save any info that you want from this alias before you remove it.
If you’re removing a primary alias, you’ll need to choose another primary alias before it can be removed. Nothing associated with a deleted alias will transfer to your new primary alias. So if you use the primary account to sign in to any other Microsoft services, you won’t be able to sign in to any of them after deleting the account.
Sign in to Manage how you sign in to Microsoft with your Microsoft account. If you’re having issues signing in to your Microsoft account, go to Microsoft account help.
Note: You may be prompted to enter your Microsoft account password, or to enter a code sent to the email address or phone number listed in your account’s security information. By providing this info to us, we know the request is coming from you.
Select Your info, and then select Manage how you sign in to Microsoft.
Make sure you have one verified option that you can continue to use. If you only have one option and you plan to remove it, add a new phone or email.
Under the Account aliases section, select Remove next to the email address or phone number you want to remove.
If you received the «Which account do you want to use?» message when you sign in, it means you have two accounts with Microsoft that use the same email address:
To stop receiving this message, use the steps in the “I want to use a different email address or phone number to sign in” section on this page to change the email address that you use to sign in to your Microsoft account. Doing this changes the way you sign in to your account, but it won’t affect any of the data associated with it.
Aliases can’t be moved from one Microsoft account to another.
If you remove your alias from the account it’s on today, it will be deleted from our systems and isn’t recoverable, so you’ll no longer be able to use it to send or receive emails.
Microsoft doesn’t recycle aliases once they are deleted. This means it won’t be available again as an alias or new account to you or anyone else at a later time.


