- File | Symbol File Path
- Symbol Search Path Dialog Box
- Browse For Folder Dialog Box
- Additional Information
- Резервная копия (экспорт) драйверов и их восстановление с помощью PowerShell в Windows 10 и 8.1
- Экспорт драйверов с помощью командлета Export-WindowsDriver
- Бэкап драйверов с помощью DISM
- Используем утилиту PNPUtil для создания резервную копии установленных драйверов
- Восстановление драйверов из резервной копии
- File path formats on Windows systems
- Traditional DOS paths
- UNC paths
- DOS device paths
- Example: Ways to refer to the same file
- Path normalization
- Identify the path
- Handle legacy devices
- Apply the current directory
- Canonicalize separators
- Evaluate relative components
- Trim characters
- Skip normalization
- Case and the Windows file system
File | Symbol File Path
Click Symbol File Path on the File menu to display, set, or append to the symbol path.
This command is equivalent to pressing CTRL+S.
Symbol Search Path Dialog Box
When you click Symbol File Path, the Symbol Search Path dialog box appears. This dialog box displays the current symbol path. If the Symbol path box is blank, there is no current symbol path.
You can enter a new path or edit the old path. If you want to search more than one directory, separate the directory names with semicolons.
Click OK to save changes, or click Cancel to discard changes.
If you select the Reload check box, the debugger will reload all loaded symbols and images after you click OK. The Reload command is equivalent to using the .reload (Reload Module) command.
You can also click Browse to open the Browse For Folder dialog box.
Browse For Folder Dialog Box
In the Browse For Folder dialog box, you can browse through the folders on your computer or your network. You can also click the Make New Folder button to create a new folder. If you right-click a file or folder in this dialog box, a standard Windows shortcut menu appears.
Click OK to append the selected folder to the symbol path and return to the Symbol Search Path dialog box.
Additional Information
For more information and for other ways to change the symbol path, see Symbol Path.
Резервная копия (экспорт) драйверов и их восстановление с помощью PowerShell в Windows 10 и 8.1
После переустановки или чистой установки Windows пользователь сталкивается с необходимостью установки актуальных версий драйверов для устройств, установленных в компьютере. Сразу после переустановки системы пользователю приходится вручную качать драйвера с сайта производителя или использовать различные драйвер-паки (в комплекте с которыми как правило идет разный мусор и рекламное ПО). Однако есть более простой способ переустановки драйверов в Windows. Не все знают, что перед переустановкой Windows вы можете создать резервную копию всех драйверов, установленных в системе. В дальнейшем с помощью резервной копии вы сможете быстро установить все необходимые драйвера уже в чистой системе.
В этой статье мы покажем вам основные способы создания бэкапа (резервной копии) всех драйверов, установленных в Windows и способы восстановления драйверов из бэкапа без использования сторонних инструментов.
Экспорт драйверов с помощью командлета Export-WindowsDriver
В Windows 8.1 Update 1 появился новый Powershell командлет Export-WindowsDriver, позволяющий экспортировать все установленные в системе сторонние драйвера (имеются в виду не родные драйвера Microsoft) напрямую из хранилища драйверов (Driver Store). Во всех версиях Windows 10 командлет Export-WindowsDriver уже имеется в системе. Данный командлет позволят существенно облегчить и ускорить процесс переустановки Windows, т.к. раньше для создания резервной копии драйверов, установленных в системе, приходилось использовать стороннее ПО, например, DoubleDriver, DriverMax и пр.
Итак, чтобы в Windows 10 или 8.1 непосредственно в установленной системе извлечь из текущего образа все установленные драйвера сторонних производителей, откройте консоль PowerShell с правами администратора и выполните команду:
Export-WindowsDriver –Online -Destination c:\drivers
Если нужно извлечь драйвера из офлайн образа Windows, смонтированного, например, в каталог c:\win_image, команда должна выглядеть так.
Export-WindowsDriver -Path c:\win_image -Destination c:\drivers
После запуска командлета на экране появится информация о всех экспортируемых драйверах, которые не являются частью ОС.

В результате выполнения команды PowerShell вы получите каталог с резервной копией всех драйверов, установленных в Windows. Каждый драйвер и все связанные с ним файлы сохраняется в собственный каталог, который называется по имени inf-файла драйвера. 
В каждом каталоге присутствуют все файлы, необходимый для установки драйвера в системе (не только inf файлы, но и все связанные sys, dll, exe и другие типы файлов). Командлет Export-WindowsDriver строит список файлов, которые необходимы для установки драйвера в соответствии со списком файлов, указанных в секции CopyFiles inf-файла драйвера.

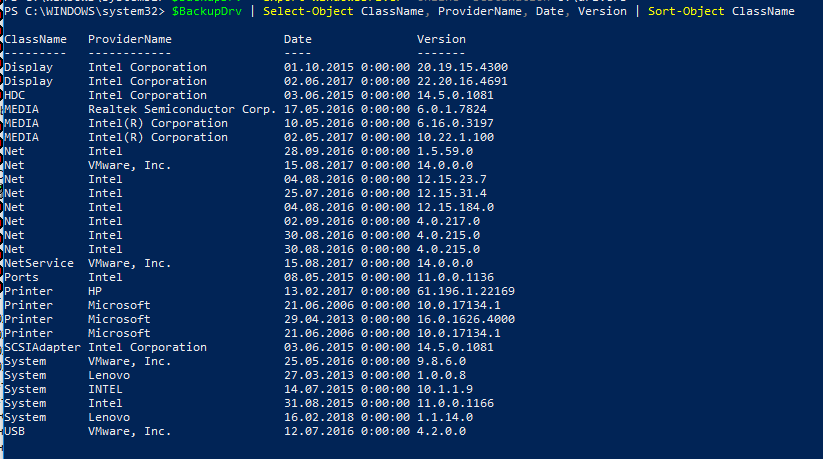
Чтобы отобразить список всех экспортируемых драйверов в удобном виде с указанием класса, производителя и версии драйвера, осуществим экспорт драйверов двумя командами:
$BackupDrv = Export-WindowsDriver -Online -Destination c:\drivers
После чего отобразим результаты выполнения команды в табличной форме:
$BackupDrv | Select-Object ClassName, ProviderName, Date, Version | Sort-Object ClassName
Как вы видите, в получившейся таблице указан класс драйвера, производитель, версия и дата.
Вы можете выгрузить информацию об экспортированных драйверах в CSV файл:
$BackupDrv| Select-Object ClassName, ProviderName, Date, Version |Export-Csv c:\ps\drivers_list.txt
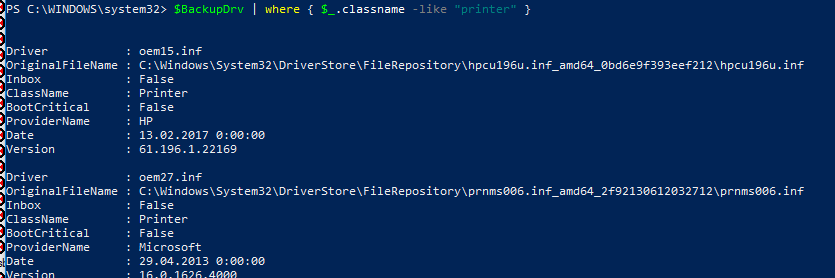
Можно вывести список драйверов определенного класса устройств с помощью атрибута класса ClassName. Например, чтобы вывести только драйвера принтеров, выполните команду:
Чтобы вывести список драйверов определенного производителя, воспользуйтесь командой:
Бэкап драйверов с помощью DISM
Утилита DISM также предоставляет возможность как создания резервной копии драйверов, так и их импорта в образ Windows.
Чтобы экспортировать все драйвера в каталог C:\Drivers, откройте командную строку с правами администратора и выполните команду:
dism /online /export-driver /destination:C:\Drivers
Экспорт 1 из 27 — oem0.inf: Пакет драйверов успешно экспортирован.

Как вы видите, в нашем примере утилита DISM успешно экспортировала в указанный каталог 27 драйверов.
Используем утилиту PNPUtil для создания резервную копии установленных драйверов
В состав всех версий Windows, начиная c Windows 7, входит утилита PNPUtil, которая обычно используется для добавления или удаления драйверов в Windows (ранее мы показывали как удалить старые версии драйверов из хранилища драйверов Windows для экономии места на диске).
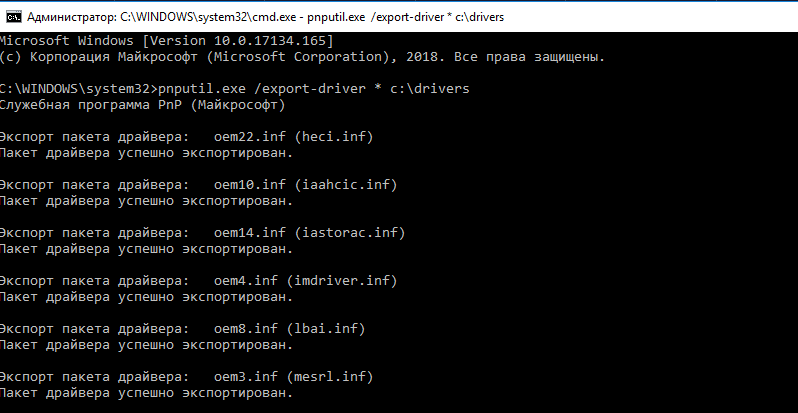
Откройте командную строку с повышенными правами и выполните команду:
pnputil.exe /export-driver * c:\drivers
Драйвера из получившегося каталога с драйверами можно распространить на другие системы вручную с помощью PowerShell или DISM (Как интегрировать драйвера в образ Windows), или автоматизировано с помощью скриптов на основе PNPUtil, DISM, PowerShell, MDT, SCCM и т.п.
Восстановление драйверов из резервной копии
После переустановки системы вы можете использовать каталог с резервной копией драйверов для установки в чистой системе.
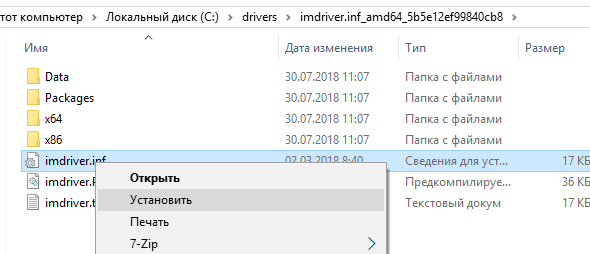
Вы можете установить конкретный драйвер, щелкнув правой кнопкой по INF файлу и выбрав пункт меню «Установить».
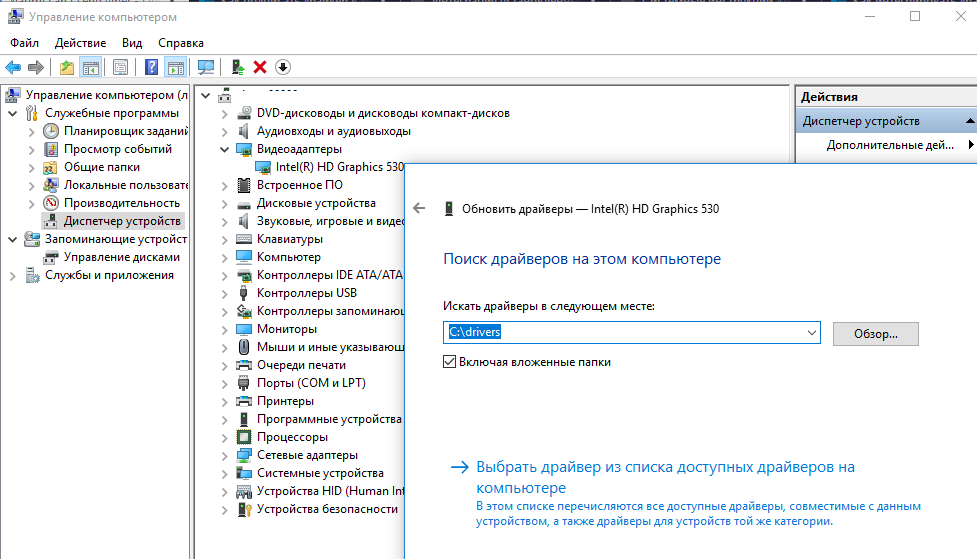
Также можно установить драйвер конкретного устройства через диспетчер оборудования. В диспетчере устройств выберите устройство, драйвер которого вы хотите заменить, выберите пункт «Обновить драйвер» -> «Выполнить поиск драйверов на этом компьютере». Укажите путь к каталогу с резервной копией драйверов. Чтобы автоматически просканировать на подходящие драйвера все вложенные папки, выберите соответствующую опцию.
Однако есть более простой способ установки сразу всех драйверов, которые присутствуют в резервной копии. Для этого воспользуйтесь следующим PowerShell скриптом:
$driver_inf_files = Get-ChildItem -Path «C:\Drivers\» -Filter «*.inf» -Recurse -File
foreach($driver_inf_file in $driver_inf_files)<
$driver_inf_file.FullName
pnputil.exe -i -a «$driver_inf_file.FullName»
>
Данный PoSh скрипт последовательно обходит все папки в указанном каталоге, ищет все inf файлы и устанавливает драйвера в хранилище драйверов с помощью утилиты PNPUtil.
Также можно импортировать все драйвера из каталога с резервной копией в образ Windows с помощью параметра Add-Driver утилиты DISM:
DISM /online /Add-Driver /Driver:C:\Drivers /Recurse
Можно добавить драйвер как в онлайн, так и в офлайн образ Windows (см. пример Интеграция драйверов USB 3.0 в дистрибутив Windows 7).
Итак, в этой статье мы рассмотрели разные способы экспорт и импорта драйверов в Windows. Также мы познакомились с новым командлетом Export-WindowsDriver в Windows 10 и Windows 8.1 Update 1, позволяющим создать резервную копию всех сторонних драйверов, установленные в системе, и экспортировать их в отдельную папку.
File path formats on Windows systems
Members of many of the types in the System.IO namespace include a path parameter that lets you specify an absolute or relative path to a file system resource. This path is then passed to Windows file system APIs. This topic discusses the formats for file paths that you can use on Windows systems.
Traditional DOS paths
A standard DOS path can consist of three components:
- A volume or drive letter followed by the volume separator ( : ).
- A directory name. The directory separator character separates subdirectories within the nested directory hierarchy.
- An optional filename. The directory separator character separates the file path and the filename.
If all three components are present, the path is absolute. If no volume or drive letter is specified and the directory name begins with the directory separator character, the path is relative from the root of the current drive. Otherwise, the path is relative to the current directory. The following table shows some possible directory and file paths.
| Path | Description |
|---|---|
| C:\Documents\Newsletters\Summer2018.pdf | An absolute file path from the root of drive C: . |
| \Program Files\Custom Utilities\StringFinder.exe | An absolute path from the root of the current drive. |
| 2018\January.xlsx | A relative path to a file in a subdirectory of the current directory. |
| ..\Publications\TravelBrochure.pdf | A relative path to file in a directory that is a peer of the current directory. |
| C:\Projects\apilibrary\apilibrary.sln | An absolute path to a file from the root of drive C: . |
| C:Projects\apilibrary\apilibrary.sln | A relative path from the current directory of the C: drive. |
Note the difference between the last two paths. Both specify the optional volume specifier ( C: in both cases), but the first begins with the root of the specified volume, whereas the second does not. As result, the first is an absolute path from the root directory of drive C: , whereas the second is a relative path from the current directory of drive C: . Use of the second form when the first is intended is a common source of bugs that involve Windows file paths.
You can determine whether a file path is fully qualified (that is, it the path is independent of the current directory and does not change when the current directory changes) by calling the Path.IsPathFullyQualified method. Note that such a path can include relative directory segments ( . and .. ) and still be fully qualified if the resolved path always points to the same location.
The following example illustrates the difference between absolute and relative paths. It assumes that the directory D:\FY2018\ exists, and that you haven’t set any current directory for D:\ from the command prompt before running the example.
If you would like to see code comments translated to languages other than English, let us know in this GitHub discussion issue.
UNC paths
Universal naming convention (UNC) paths, which are used to access network resources, have the following format:
- A server or host name, which is prefaced by \\ . The server name can be a NetBIOS machine name or an IP/FQDN address (IPv4 as well as v6 are supported).
- A share name, which is separated from the host name by \ . Together, the server and share name make up the volume.
- A directory name. The directory separator character separates subdirectories within the nested directory hierarchy.
- An optional filename. The directory separator character separates the file path and the filename.
The following are some examples of UNC paths:
| Path | Description |
|---|---|
| \\system07\C$\ | The root directory of the C: drive on system07 . |
| \\Server2\Share\Test\Foo.txt | The Foo.txt file in the Test directory of the \\Server2\Share volume. |
UNC paths must always be fully qualified. They can include relative directory segments ( . and .. ), but these must be part of a fully qualified path. You can use relative paths only by mapping a UNC path to a drive letter.
DOS device paths
The Windows operating system has a unified object model that points to all resources, including files. These object paths are accessible from the console window and are exposed to the Win32 layer through a special folder of symbolic links that legacy DOS and UNC paths are mapped to. This special folder is accessed via the DOS device path syntax, which is one of:
In addition to identifying a drive by its drive letter, you can identify a volume by using its volume GUID. This takes the form:
DOS device path syntax is supported on .NET implementations running on Windows starting with .NET Core 1.1 and .NET Framework 4.6.2.
The DOS device path consists of the following components:
The device path specifier ( \\.\ or \\?\ ), which identifies the path as a DOS device path.
The \\?\ is supported in all versions of .NET Core and .NET 5+ and in .NET Framework starting with version 4.6.2.
A symbolic link to the «real» device object (C: in the case of a drive name, or Volume
The first segment of the DOS device path after the device path specifier identifies the volume or drive. (For example, \\?\C:\ and \\.\BootPartition\ .)
There is a specific link for UNCs that is called, not surprisingly, UNC . For example:
For device UNCs, the server/share portion forms the volume. For example, in \\?\server1\e:\utilities\\filecomparer\ , the server/share portion is server1\utilities . This is significant when calling a method such as Path.GetFullPath(String, String) with relative directory segments; it is never possible to navigate past the volume.
DOS device paths are fully qualified by definition. Relative directory segments ( . and .. ) are not allowed. Current directories never enter into their usage.
Example: Ways to refer to the same file
The following example illustrates some of the ways in which you can refer to a file when using the APIs in the System.IO namespace. The example instantiates a FileInfo object and uses its Name and Length properties to display the filename and the length of the file.
Path normalization
Almost all paths passed to Windows APIs are normalized. During normalization, Windows performs the following steps:
- Identifies the path.
- Applies the current directory to partially qualified (relative) paths.
- Canonicalizes component and directory separators.
- Evaluates relative directory components ( . for the current directory and .. for the parent directory).
- Trims certain characters.
This normalization happens implicitly, but you can do it explicitly by calling the Path.GetFullPath method, which wraps a call to the GetFullPathName() function. You can also call the Windows GetFullPathName() function directly using P/Invoke.
Identify the path
The first step in path normalization is identifying the type of path. Paths fall into one of a few categories:
- They are device paths; that is, they begin with two separators and a question mark or period ( \\? or \\. ).
- They are UNC paths; that is, they begin with two separators without a question mark or period.
- They are fully qualified DOS paths; that is, they begin with a drive letter, a volume separator, and a component separator ( C:\ ).
- They designate a legacy device ( CON , LPT1 ).
- They are relative to the root of the current drive; that is, they begin with a single component separator ( \ ).
- They are relative to the current directory of a specified drive; that is, they begin with a drive letter, a volume separator, and no component separator ( C: ).
- They are relative to the current directory; that is, they begin with anything else ( temp\testfile.txt ).
The type of the path determines whether or not a current directory is applied in some way. It also determines what the «root» of the path is.
Handle legacy devices
If the path is a legacy DOS device such as CON , COM1 , or LPT1 , it is converted into a device path by prepending \\.\ and returned.
A path that begins with a legacy device name is always interpreted as a legacy device by the Path.GetFullPath(String) method. For example, the DOS device path for CON.TXT is \\.\CON , and the DOS device path for COM1.TXT\file1.txt is \\.\COM1 .
Apply the current directory
If a path isn’t fully qualified, Windows applies the current directory to it. UNCs and device paths do not have the current directory applied. Neither does a full drive with separator C:\ .
If the path starts with a single component separator, the drive from the current directory is applied. For example, if the file path is \utilities and the current directory is C:\temp\ , normalization produces C:\utilities .
If the path starts with a drive letter, volume separator, and no component separator, the last current directory set from the command shell for the specified drive is applied. If the last current directory was not set, the drive alone is applied. For example, if the file path is D:sources , the current directory is C:\Documents\ , and the last current directory on drive D: was D:\sources\ , the result is D:\sources\sources . These «drive relative» paths are a common source of program and script logic errors. Assuming that a path beginning with a letter and a colon isn’t relative is obviously not correct.
If the path starts with something other than a separator, the current drive and current directory are applied. For example, if the path is filecompare and the current directory is C:\utilities\ , the result is C:\utilities\filecompare\ .
Relative paths are dangerous in multithreaded applications (that is, most applications) because the current directory is a per-process setting. Any thread can change the current directory at any time. Starting with .NET Core 2.1, you can call the Path.GetFullPath(String, String) method to get an absolute path from a relative path and the base path (the current directory) that you want to resolve it against.
Canonicalize separators
All forward slashes ( / ) are converted into the standard Windows separator, the back slash ( \ ). If they are present, a series of slashes that follow the first two slashes are collapsed into a single slash.
Evaluate relative components
As the path is processed, any components or segments that are composed of a single or a double period ( . or .. ) are evaluated:
For a single period, the current segment is removed, since it refers to the current directory.
For a double period, the current segment and the parent segment are removed, since the double period refers to the parent directory.
Parent directories are only removed if they aren’t past the root of the path. The root of the path depends on the type of path. It is the drive ( C:\ ) for DOS paths, the server/share for UNCs ( \\Server\Share ), and the device path prefix for device paths ( \\?\ or \\.\ ).
Trim characters
Along with the runs of separators and relative segments removed earlier, some additional characters are removed during normalization:
If a segment ends in a single period, that period is removed. (A segment of a single or double period is normalized in the previous step. A segment of three or more periods is not normalized and is actually a valid file/directory name.)
If the path doesn’t end in a separator, all trailing periods and spaces (U+0020) are removed. If the last segment is simply a single or double period, it falls under the relative components rule above.
This rule means that you can create a directory name with a trailing space by adding a trailing separator after the space.
You should never create a directory or filename with a trailing space. Trailing spaces can make it difficult or impossible to access a directory, and applications commonly fail when attempting to handle directories or files whose names include trailing spaces.
Skip normalization
Normally, any path passed to a Windows API is (effectively) passed to the GetFullPathName function and normalized. There is one important exception: a device path that begins with a question mark instead of a period. Unless the path starts exactly with \\?\ (note the use of the canonical backslash), it is normalized.
Why would you want to skip normalization? There are three major reasons:
To get access to paths that are normally unavailable but are legal. A file or directory called hidden. , for example, is impossible to access in any other way.
To improve performance by skipping normalization if you’ve already normalized.
On .NET Framework only, to skip the MAX_PATH check for path length to allow for paths that are greater than 259 characters. Most APIs allow this, with some exceptions.
.NET Core and .NET 5+ handles long paths implicitly and does not perform a MAX_PATH check. The MAX_PATH check applies only to .NET Framework.
Skipping normalization and max path checks is the only difference between the two device path syntaxes; they are otherwise identical. Be careful with skipping normalization, since you can easily create paths that are difficult for «normal» applications to deal with.
Paths that start with \\?\ are still normalized if you explicitly pass them to the GetFullPathName function.
You can pass paths of more than MAX_PATH characters to GetFullPathName without \\?\ . It supports arbitrary length paths up to the maximum string size that Windows can handle.
Case and the Windows file system
A peculiarity of the Windows file system that non-Windows users and developers find confusing is that path and directory names are case-insensitive. That is, directory and file names reflect the casing of the strings used when they are created. For example, the method call


