- Low Disk Space Warning
- How to fix Windows 10 low disk space issue
- 1. Symptom of low disk space in Windows 10
- Why Windows 10 runs low disk space on C drive
- How to fix low disk space issue in Windows 10
- ① Clean up disk to remove junk files
- ② Enlarge C: drive
- ③ Remove junk files automatically
- ④ Change location for new files
- FIX: Disk Space Problems in Recent Windows 10 Builds
- How to fix low disk space issues in Windows 10 Insider builds
- Alternative methods when running low on disk space
- How to free up disk space in Windows
Low Disk Space Warning
Technical Level : Intermediate
Summary
Modifying the ‘Low Disk Space Warning’ is the same as in the noted 2013 KB, although, in Windows 10 the active registry entry/key location changes from behind HKEY_CURRENT_USER to behind HKEY_LOCAL_MACHINE.
Details
To disable — Low Disk Space Warning
NoLowDiskSpaceChecks (DWORD 1)
Before Win10 the registry key is behind HKEY_CURRENT_USER
HKEY_CURRENT_USER\Software\Microsoft\Windows\CurrentVersion\Policies\Explorer
After Win10 the registry key is behind HKEY_LOCAL_MACHINE
HKEY_LOCAL_MACHINE\Software\Microsoft\Windows\CurrentVersion\Policies\Explorer
The procedure is the same as in the 2013 KB article referenced below , although, in Windows 10 the active registry entry/key location changes.
How to disable the low disk space warning messages (Before Win10) :
To disable these balloon messages follow the steps below:
1. Open the Registry Editor by clicking on Start -> Run and running REGEDIT .
2. Navigate to the following location:
HKEY_CURRENT_USER\Software\Microsoft\ Windows\CurrentVersion\Policies\Explorer
3. Right-click in the blank area of the right-hand pane of the Registry Editor and create a new DWORD Value by selecting New -> DWORD Value.
5. Double-click on the new DWORD value and assign it a value of 1.
6. Close the Registry Editor and restart the computer.
How to disable the low disk space warning messages (Win10) :
To disable these balloon messages follow the steps below:
1. Open the Registry Editor by clicking on Start -> Run and running REGEDIT .
2. Navigate to the following location:
HKEY_LOCAL_MACHINE\Software\Microsoft\Windows\CurrentVersion\Policies\Explorer
3. Right-click in the blank area of the right-hand pane of the Registry Editor and create a new DWORD Value by selecting New -> DWORD ( 32-Bit) Value.
4. Name this new DWORD (32-Bit) Value: NoLowDiskSpaceChecks
5. Double-click on the new DWORD [REG_DWORD] (32-Bit) Value and assign it a ‘Decimal or Hexadecimal’ value of 1.
6. Close the Registry Editor and restart the computer.
This screen shot is from a Win10 (x64) clean installed Acer Aspire R7-571, with 100% of the small internal SSD used for ReadyBoost, and ‘NoLowDiskSpaceChecks’ enabled .
How to fix Windows 10 low disk space issue
by James, Updated on: August 24, 2020
Low disk space issue is very common in Windows 10 especially after installing Updates in system C drive. Few people know how to solve this problem efficiently. In this article, I’ll explain why C drive runs low on disk space and how to fix Windows 10 Low Disk Space issue with detailed steps.
1. Symptom of low disk space in Windows 10
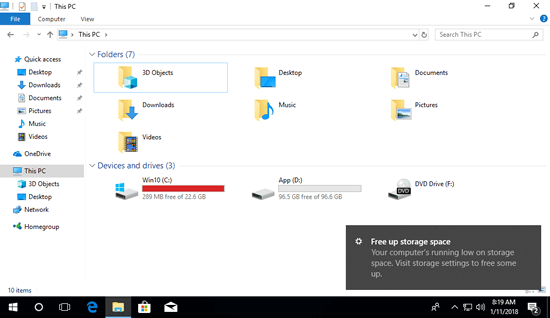
When any hard drive partition becomes full and the free storage space is less than 10%, C drive will be shown as red instead of the default blue bar in File Explorer. which is to alert people fixing this low disk issue as fast as possible.

When C drive is showing red, you’ll suffer from computer performance down. It may stuck when you do some operations, or reboot unexpectedly. In this situation, if Windows 10 download and install Updates, C drive may be full immediately.
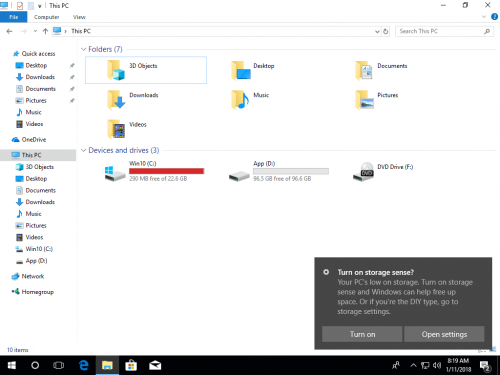
When free space reach the threshold, Windows 10 will pop up an notification on bottom right and ask you to turn on storage sense — «Your PC’s low on storage. Turn on storage sense and Windows can help free up space.»
If free space is keep running low, Windows 10 will pop up another notification with message «Your computer’s running low on storage space. Visit storage settings to free some up».

Why Windows 10 runs low disk space on C drive
Windows 10 low storage space maybe caused by 3 kinds of reasons including:
- Virus attack
- Display incorrectly
- Filling up with junk files
If the computer was attacked by some particular virus, large amount of files will be copied or generated. If C drive has plenty of free space but it becomes full in a short time, you’d better run your anti-virus software to scan.
In previous Windows Vista and Windows 7, some people feedback such issue that C drive usage percentage is showing incorrect, but in Windows 10 this problem seems to be solved, however, it is still a possible reason.
The most possible reason is that C drive is filling up by many types of junk and unnecessary files. Windows 10 download Updates frequently. Temporary, log, hibernation, backup, Internet browser cache also eat up free space quickly. Furthermore, many people install applications to system partition C by default. The more you installed, the less free space left. Many applications for Games, Projects, Videos and Photograph will output very large files. If you do not pay attention, C drive is running low on space very quickly even if you create it very large.
How to fix low disk space issue in Windows 10
After searching by Google, you’ll find many similar articles, some articles even provides over 10 methods. Of course you may try all of them, but to fix Windows 10 low disk space issue fast and efficiently, complete following 4 steps:
① Clean up disk to remove junk files
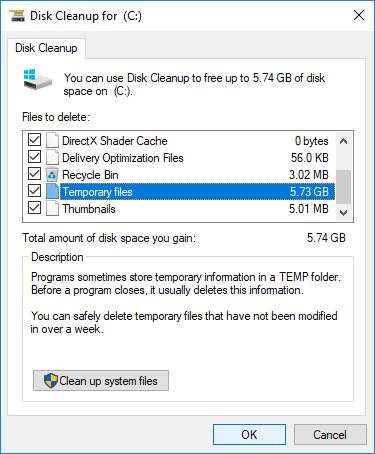
When the low disk space notification pops up, you may turn on storage sense and click the «Free up storage space» windows to reclaim disk space, or run the standalone Disk Cleanup utility.
How to fix low disk space issue with Windows 10 Disk Cleanup tool:
- Press Windows and R together on your keyboard, input cleanmgr and press Enter .
- Select C: or other drive that is running low.
- Click the check-boxes of the files that you want to delete and click OK.
- Repeat to Clean up system files.
This step is useful to the computers that never or have not free up space for a long time. By doing this, you may reclaim several gigabyte of free space.
However, free space may be eaten up quickly by new generated junk files. If you cannot get over 10GB free space or if C drive was created small, you’d better enlarge C drive add more free space from other partition.
② Enlarge C: drive
The hard disk drives are allocated while installing Windows or by OEM manufacturer, but you can change partition size with some tools. Shrink other data partition to release free space and add into C drive. In this way, there will be more free space in C drive, Operating System, programs and anything else keep the same with before. This step is very important to the computer that use SSD and C drive was created small. Otherwise, you may encounter the low disk space issue on Windows 10 computer again and again.
Better than other tools, NIUBI Partition Editor has unique 1-Second Rollback, Virtual Mode and Cancel-at-well technologies to protect system and data. It has free edition for Windows 10/8/7/Vista/XP home computer users.
Download NIUBI Partition Editor Free Edition and follow the steps to add more free space to C: drive from other volumes.
If your disk partition structure is different, follow the full solution to increase C drive space free space. Besides resizing and extending disk partitions, this free partition manager helps you move, merge, copy, convert, defrag, wipe, hide partitions and scan bad sectors and much more.
③ Remove junk files automatically
Better that all previous versions, Windows 10 has the ability to remove junk files automatically. So, it can keep you C drive always clean.
Firstly, you need to enable this service:
- Press Windows and X on keyboard, then Settings
- Go to System >Storage
- Switch Off to On under Storage Sense on the right side.
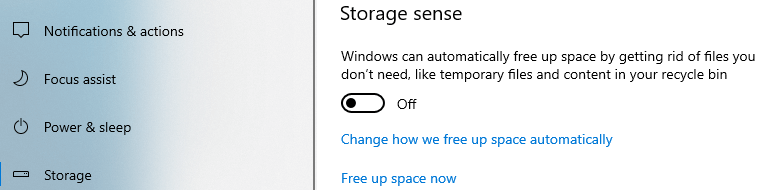
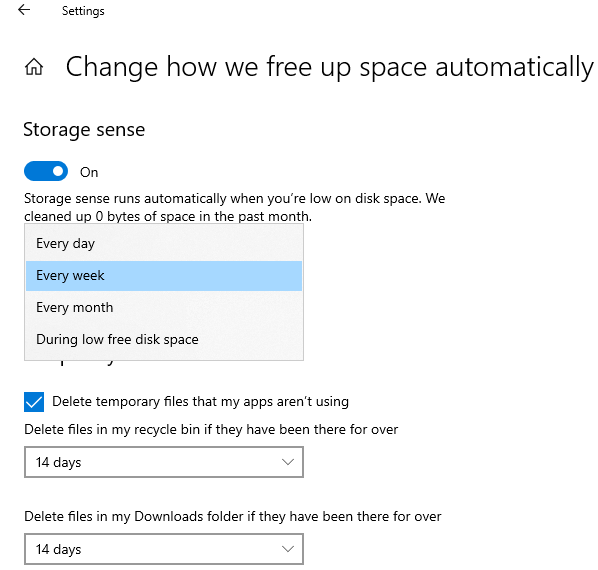
Then click Change how we free up space automatically below it.
You have several options:
- Select from the list to free up disk space when this partition is running low or every day/week/month.
- Then you can select whether delete temporary files automatically.
- Select from the drop-down list to delete files in Recycle Bin and Downloads folder if they have been there for over 1/14/30/60 days.
④ Change location for new files
Some types of files such as apps, documents, music, pictures, and videos are not junk but could use large amount of free space.
As another wonderful feature, Windows 10 can save new files of these types to other partition.
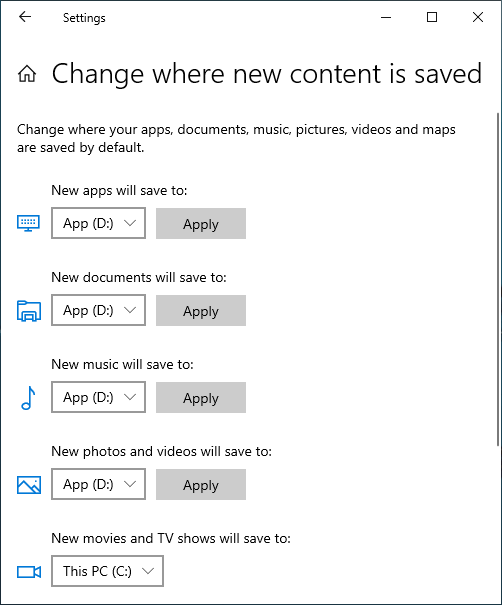
- Press Windows and X on keyboard, then click Settings
- Click System>Storage.
- Click Change where new content is saved under More storage settings.
- Click the drop-down list to select new location and click Apply.
After finishing the 4 steps above, you can fix low disk space issue on Windows 10 computer completely.
FIX: Disk Space Problems in Recent Windows 10 Builds

By default, Windows 10 Technical Preview builds take 16GB of disk space. But what if your new build requires much more space than the previous build? In that case, you’re facing a bug, and this issue needs to be solved.
Over-sized installation of recent builds could cause various problems. For example, you won’t be able to install it due to insufficient disk space. Or it will take much more time to install than it should, some users report that it took them up to hours to install the new build.
The cause of disk space and installation time problems is a bug in recent builds of Windows 10 Technical Preview. In some cases, this bug is causing setup to download all available language packs during the installation of new builds of Windows 10 Technical Preview. Besides disk space and installation time problems, this bug could also make a few unexpected and unwanted folders appear on your desktop or in File Explorer.
How to fix low disk space issues in Windows 10 Insider builds
Additional language packs take 2.5GB of disk space. So in order to solve this issue, free up 2.5GB of space, install the latest build and uninstall unnecessary language packs. To uninstall unnecessary Windows 10 Technical Preview language packs from your computer, do the following:
- Go to Search and type cmd
- Open Command Prompt as Administrator
- Type the following command and press Enter: Lpksetup /u
- It will show you the list of all language packs installed on your computer, just select the unwanted language packs and uninstall them
You probably noticed that Windows 10 Technical Preview is full of bugs and errors, and this disk space error is just one of many. But this is just a technical preview of the system, so we should expect the final version to be much more stable and bug-less.
Alternative methods when running low on disk space
The latest Windows 10 versions are more stable and you shouldn’t face so many bugs as in the previous releases. But, in case you need some free space, you can try the following steps.
1. Delete junk files using Storage Sense
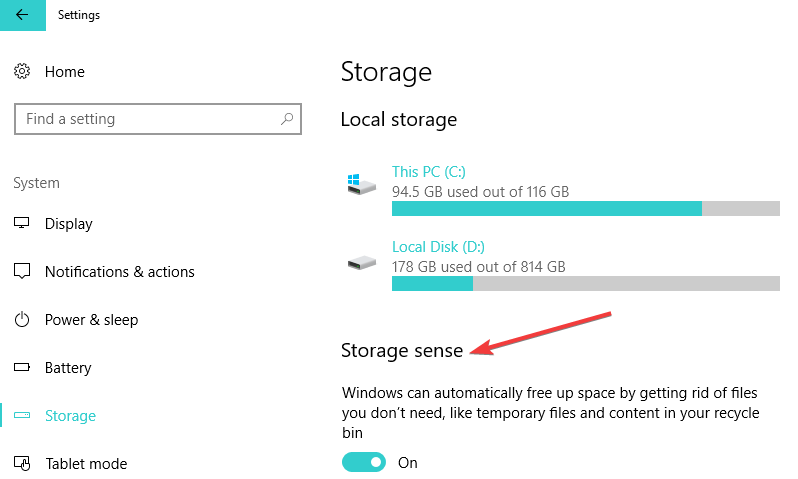
You can delete junk files by opening the Settings tab > System > Storage > click on “Change how we free up space automatically”.
2. Remove temporary files using Disk Cleanup
In order to remove the temporary files, open the Setting tab > System > Storage > “Free up space now” link.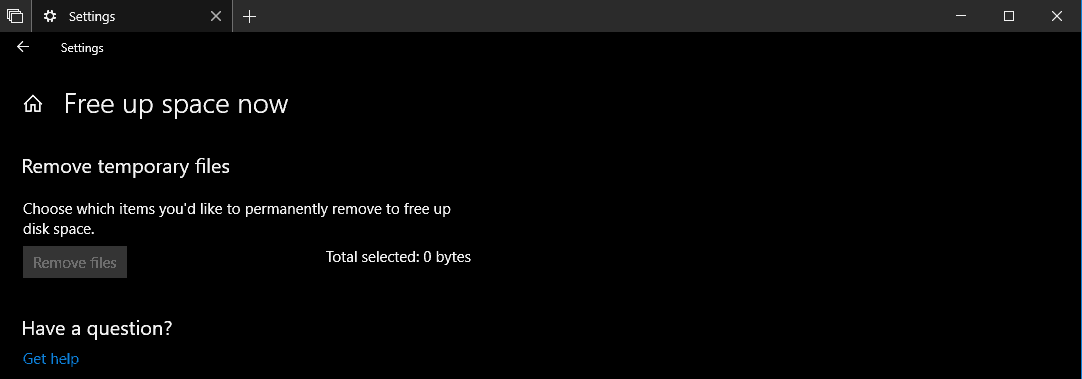
3. Uninstall apps and games you don’t need
Just click on Setting tab > Apps > App s& Features. From there you can select and uninstall what you need.
4. Disable Hibernation on Windows 10
If you want to disable Hibernation, click on Start > open Command Promp (Run as Administrator). You need to type in “powercfg /hibernate off“. That’s all.
5. Copy files, apps, games to an external hard drive.
We hope these quick solutions helped you fix your disk space issues.
RELATED STORIES TO CHECK OUT
How to free up disk space in Windows
Technical Level : Basic
If you have been using your computer for a while, you will notice your storage device (hard disk or SSD) will begin losing space over time. Factors for this includes the data we store on the drive such as our documents, photos, music, videos and other files. Limited space is especially an issue if you are using a Ultrabook which often comes with a low capacity SSD drive. There are some common work arounds for this which includes archiving older files to an external hard disk. For some persons though, this is not an option. So whats eating up that space and how can I free it up to get back some of it? Lets find out.
Instructions for this article can be applies to Windows Vista and later versions.
Windows over time will accumulate data outside of the normal types of data we store. This can include things like copies of Windows Updates, memory dump files used to diagnose and troubleshoot error messages, temporary internet files for web pages we often visit and Windows Upgrade files, commonly used to assist with installing updates for Windows. Sometimes we don’t need this type of information and removing it can free up precious disk space inaddition to improving overall system performace.
Computer Explorer displaying the amount of disk space available
The above screenshot displays amount disk space I have remaining on my system drive.
Windows setup checking for available disk space.
Having enough disk space is especially important if you are performing task such as upgrading to the new Windows 10. It is one of the the first things Windows setup checks before it starts copying files. Large programs too will often require that you have enough disk space available.
Launch Disk Cleanup, the quickest way is this:
Press Windows key + R then type: cleanmgr.exe
Windows 7/Vista/XP > Start > All Programs > Accessories > System Tools > Disk Cleanup
Windows 8/8.1/10 > Windows key + S > type disk cleanup > hit Enter on your keyboard
Windows 10 > Start > All Apps > Windows Accessories > System Tools > Disk Cleanup
Once Disk cleanup opens, select the drive where Windows is installed if its not already.
Windows will scan your hard disk for files it can clean up.
Note some of these files too can include older installations of Windows. For example, if you upgraded from Windows 7 to Windows 10 a copy will be kept at the root of the hard disk in a folder called Windows.old. Please becareful though, this folder can actually be useful if you need to go back to your previous version of Windows for whatever reason. So be mindful before deleting it. Removing it though can significantly free up disk space.
After Disk Cleanup is finished scanning, you will see the Disk Cleanup window. This window provides a list of areas of the system you can clean up safely. Before we start cleaning up the system, you will notice appears on the window called Clean up system files. Clean it and the Disk Cleanup will run a thorough check of the system again to include every file that can be removed.
| Location/Type | Description | Safe to Delete |
| Downloaded Program Files | Downloaded Program Files are ActiveX controls and Java applets downloaded automatically from the Internet when you view certain pages. They are temporarily stored in the Downloaded Program Files folder on your hard disk. | YES |
| Temporary Internet Files | The Temporary Internet Files folder contains webpages stored on your hard disk for quick viewing. Your personalized settings for webpages will be left intact. Personally, I suggest you keep this if you are on a slow connection and need the basic elements of web pages you often visit to load faster. | Keep It |
| Offline Webpages | Offline pages are webpages that are stored on your computer so you can view them without being connected to the Internet. If you delete these pages now, you can still view your favorites offline later by synchronizing them. Your personalized settings for webpages will be left intact. I also recommend you leave this alone since you might be on a slow connection and need quick access to a webpage with some specific content. | Keep It |
| Recycle Bin | The Recycle Bin contains files you have deleted from your computer. These files are not permanently removed until you empty the Recycle Bin. Sometimes you might inadvertently delete a file that you didn’t intend to delete permanently, so before you empty the contents of the Recycle Bin, do a thorough check before. | YES |
| Temporary files | Programs sometimes store temporary information in the TEMP folder. Before a program closes., it usually deletes this information. You can safely delete files that have not been modified in over a week. You can view the contents of the temp directory and see if there is anything in there you might need. Open the Run Command (Windows key + R), type in %temp% > hit OK. Sometimes program installers for common applets are stored there that you can use to reinstall such as Adobe Flash for instance if you don’t want to redownload it every time. | YES |
| Thumbnails | Windows keeps a copy of all your picture, video, and document thumbnails so they can be displayed quickly when you open a folder. If you delete these thumbnails, they will be automatically recreated as needed. I don’t see any problems deleting it if its gonna be recreated, but deleting it sometimes can correct problems with previews of photos and videos. | YES |
| Debug Dump Files | When your computer experiences a system hang because of a poorly written application or device driver, Windows intelligently creates a log of what happened. This log can be used along with other logs such as System error memory dump files to help diagnose the problem when sent to Microsoft or the developer for review. | Keep It |
| System error memory dump files | Similar to the Debug Dump files, memory error dumps happen when poorly written drivers or applications crash. It is very handy for utilities built into Windows such as Troubleshooters which help in diagnosing problems that occur in Windows. | Keep It |
The most common locations are Temporary files, Temporary Internet Files, Recycle Bin to name a few. Other not so common locations include the Thumbnail Cache which stores previews of your images allowing you load them faster when you open the Pictures Library or Windows Live Photo Gallery. This I do not recommend you delete for obvious purposes. Lets dig a little deeper. Disk Cleanup provides a list of areas where you can free up disk space and gain additional speed in some cases.
In addition to these common locations, Windows will also store information related to Error reporting and solution checking, leave these for diagnosis that can help resolve issues with applications or devices. Also, if you do an upgrade from Windows Vista or clean install, Windows 7 might store information related to servicing which are logs used to assist the installation of the operating system. Once you have checked these locations for clean up, click the OK button and these locations will be cleaned out.
As I noted earlier, the Windows.old folder is basically a backup of your old installation of Windows, which you can use to reinstall Windows if you decide to return to your previous installation. Also, its used as a last resort in case you didn’t backup your files and need to recover personal files and settings. The Windows.old folder can use up a considerable amount of your hard disk space. Its normally stored at the root of your hard disk where Windows 7 is installed. Before you delete it, make sure you check through the directories and ensure that everything migrated successfully to your current version of Windows.
Once you have determined what to remove, click OK then click the Delete Files button to begin.
Click Yes if you are ok with the action that will be taken.
System Restore – System Restore keeps a large collection of System Restore Points in addition to storing them in your System Images of Windows 7 . A friend had recently upgraded to Windows 10 and he asked me why he was low on hard disk space. He had a 320 GB drive and only had about 70 GBs of free disk space left after doing a disk cleanup. It was then I discovered that System Protection had been configured to use about 200 GBs of disk space to keep System Restore Points.
Configuring System Protection settings
To configure System Protection, click Start, type: System Protection, hit Enter. Under Protection Settings, click the Configure button. A dialog will appear with various settings for configuring Restoration and Disk space usage. Under the Disk space usage tab, you will see the current amount of space in use by System Restore while the Max usage displays the amount allocated. Use the Max usage knob to configure how much disk space you want to allocate to System Protection. In the above screenshot, you will see that I am using 21.05 GBs for Restore Points, while I have allocated 22.36 GBs of disk space for System Protection. You also have the option of deleting all Restore Points which stores System settings and previous versions of files. I suggest you leave this, since you will be able to individually restore changes to files you are working on. So for instance, if you edited an image and would like to restore it to a previous version or original version of the file.
Resources:
How to: Rollback to a previous version of Windows from Windows 10


