- cleanmgr cleanmgr
- Синтаксис Syntax
- Параметры Parameters
- Варианты Options
- Примеры Examples
- Use Disk Cleanup in Windows 10 for unnecessary files, how to?
- The Disk Cleanup Manager in Windows 10 is an easy way to remove unnecessary files from your Windows-10 PC or Notebook!
- 1.) . Run the Disk Cleanup Manager in Windows 10! 2.) . Remove Programs and Features, System Restore and Shadow Copies!
- 1.) Run the Disk Cleanup Manager in Windows 10!
- 2.) Remove Programs and Features, System Restore and Shadow Copies!
- Disk Space Cleanup Manager has stopped working
- Replies (6)
cleanmgr cleanmgr
Область применения: Windows Server 2019, Windows Server 2016, Windows Server 2012, Windows Server 2008 R2, Windows Server (половина ежегодного канала) Applies to: Windows Server 2019, Windows Server 2016, Windows Server 2012, Windows Server 2008 R2, Windows Server (Semi-Annual Channel)
Удаляет ненужные файлы с жесткого диска компьютера. Clears unnecessary files from your computer’s hard disk. С помощью параметров командной строки можно указать, что cleanmgr очищает временные файлы, файлы Интернета, скачанные и перезапускают файлы bin. You can use command-line options to specify that Cleanmgr cleans up Temp files, Internet files, downloaded files, and Recycle Bin files. Затем можно запланировать выполнение задачи в определенное время с помощью средства запланированные задания . You can then schedule the task to run at a specific time by using the Scheduled Tasks tool.
Синтаксис Syntax
Параметры Parameters
| Параметр Parameter | Описание Description |
|---|---|
| /d /d | Указывает диск, на котором должна быть очищена Очистка диска. Specifies the drive that you want Disk Cleanup to clean. |
Примечание. Параметр /d не используется с /sagerun:n . NOTE: The /d option is not utilized with /sagerun:n .
Варианты Options
Параметры для файлов, которые можно указать для очистки диска с помощью команды /sageset и /сажерун , включают: The options for the files that you can specify for Disk Cleanup by using /sageset and /sagerun include:
Временные файлы установки — это файлы, созданные программой установки, которая больше не выполняется. Temporary Setup Files — These are files that were created by a Setup program that is no longer running.
Загруженные файлы программы — Скачанные программные файлы — это элементы ActiveX и Java-программы, загружаемые автоматически из Интернета при просмотре определенных страниц. Downloaded Program Files — Downloaded program files are ActiveX controls and Java programs that are downloaded automatically from the Internet when you view certain pages. Эти файлы временно хранятся в папке downloaded Program Files на жестком диске. These files are temporarily stored in the Downloaded Program Files folder on the hard disk. Этот параметр включает кнопку «просмотреть файлы», чтобы просмотреть файлы до их удаления. This option includes a View Files button so that you can see the files before Disk Cleanup removes them. При нажатии кнопки открывается папка Program Files К:\виннт\довнлоадед. The button opens the C:\Winnt\Downloaded Program Files folder.
Временные файлы Интернета . папка временных файлов Интернета содержит веб-страницы, которые хранятся на жестком диске для быстрого просмотра. Temporary Internet Files — The Temporary Internet Files folder contains Web pages that are stored on your hard disk for quick viewing. Программа очистки диска удаляет эти страницы, но оставляет личные настройки веб-страниц без изменений. Disk Cleanup removes these page but leaves your personalized settings for Web pages intact. Этот параметр также включает кнопку «Просмотреть файлы», которая открывает папку «C:\Documents and Сеттингс\усернаме\локал Сеттингс\темпорари Internet Files\Content.IE5». This option also includes a View Files button, which opens the C:\Documents and Settings\Username\Local Settings\Temporary Internet Files\Content.IE5 folder.
Старые файлы chkdsk . когда chkdsk проверяет диск на наличие ошибок, CHKDSK может сохранять потерянные фрагменты файлов в виде файлов в корневой папке на диске. Old Chkdsk Files — When Chkdsk checks a disk for errors, Chkdsk might save lost file fragments as files in the root folder on the disk. Эти файлы не нужны. These files are unnecessary.
Корзина — в корзине содержатся файлы, удаленные с компьютера. Recycle Bin — The Recycle Bin contains files that you have deleted from the computer. Эти файлы не удаляются окончательно, пока корзина не будет очищена. These files are not permanently removed until you empty the Recycle Bin. Этот параметр включает кнопку «Просмотреть файлы», которая открывает корзину. This option includes a View Files button that opens the Recycle Bin.
Примечание. Корзина может отображаться на нескольких дисках, например, не только в% SystemRoot%. Note: A Recycle Bin may appear in more than one drive, for example, not just in %SystemRoot%.
Временные файлы — программы иногда хранят временные данные во временной папке. Temporary Files — Programs sometimes store temporary information in a Temp folder. Перед завершением работы программы эта информация обычно удаляется. Before a program quits, the program usually deletes this information. Вы можете безопасно удалить временные файлы, которые не были изменены в течение прошлой недели. You can safely delete temporary files that have not been modified within the last week.
Временные автономные файлы — временные автономные файлы — это локальные копии недавно использованных сетевых файлов. Temporary Offline Files — Temporary offline files are local copies of recently used network files. Эти файлы кэшируются автоматически, поэтому их можно использовать после отключения от сети. These files are automatically cached so that you can use them after you disconnect from the network. Кнопка Просмотреть файлы открывает папку автономные файлы. A View Files button opens the Offline Files folder.
Автономные файлы — автономные файлы — это локальные копии сетевых файлов, которые должны быть доступны в автономном режиме, чтобы их можно было использовать после отключения от сети. Offline Files — Offline files are local copies of network files that you specifically want to have available offline so that you can use them after you disconnect from the network. Кнопка Просмотреть файлы открывает папку автономные файлы. A View Files button opens the Offline Files folder.
Сжатие старых файлов — Windows может сжимать файлы, которые не использовались недавно. Compress Old Files — Windows can compress files that you have not used recently. Сжатие файлов экономит место на диске, но вы по-прежнему можете использовать эти файлы. Compressing files saves disk space, but you can still use the files. Файлы не удаляются. No files are deleted. Поскольку файлы сжимаются по разным тарифам, отображаемый объем дискового пространства будет приблизительным. Because files are compressed at different rates, the displayed amount of disk space that you will gain is approximate. Кнопка Параметры позволяет указать число дней ожидания перед тем, как программа очистки диска будет сжимать неиспользуемый файл. An Options button permits you to specify the number of days to wait before Disk Cleanup compresses an unused file.
Файлы каталога для индексатора содержимого . Служба индексирования ускоряет и улучшает поиск файлов, сохраняя индекс файлов на диске. Catalog Files for the Content Indexer — The Indexing service speeds up and improves file searches by maintaining an index of the files that are on the disk. Эти файлы каталога остаются из предыдущей операции индексирования и могут быть удалены безопасно. These Catalog files remain from a previous indexing operation and can be deleted safely.
Примечание. Файл каталога может отображаться на нескольких дисках, например, не только в %SystemRoot% . Note: Catalog File may appear in more than one drive, for example, not just in %SystemRoot% .
При указании очистки диска, содержащего установку Windows, все эти параметры доступны на вкладке Очистка диска . Если указать любой другой диск, на вкладке Очистка диска будут доступны только Корзина и файлы каталога для параметров индекса содержимого. If you specify cleaning up the drive that contains the Windows installation, all of these options are available on the Disk Cleanup tab. If you specify any other drive, only the Recycle Bin and the Catalog files for content index options are available on the Disk Cleanup tab.
Примеры Examples
Чтобы запустить приложение «Очистка диска», чтобы можно было использовать его диалоговое окно для указания параметров для дальнейшего использования, сохраните параметры в набор 1, введите следующую команду: To run the Disk Cleanup app so that you can use its dialog box to specify options for use later, saving the settings to the set 1, type the following:
Чтобы запустить очистку диска и включить параметры, указанные с помощью команды cleanmgr/sageset: 1, введите: To run Disk Cleanup and include the options that you specified with the cleanmgr /sageset:1 command, type:
Для запуска cleanmgr /sageset:1 и cleanmgr /sagerun:1 совместного выполнения введите: To run cleanmgr /sageset:1 and cleanmgr /sagerun:1 together, type:
Use Disk Cleanup in Windows 10 for unnecessary files, how to?
The Disk Cleanup Manager in Windows 10 is an easy way to remove unnecessary files from your Windows-10 PC or Notebook!
Content, Tip, the Solution for: how do i clean window 10 unneeded files!
1.) . Run the Disk Cleanup Manager in Windows 10!
2.) . Remove Programs and Features, System Restore and Shadow Copies!
1.) Run the Disk Cleanup Manager in Windows 10!
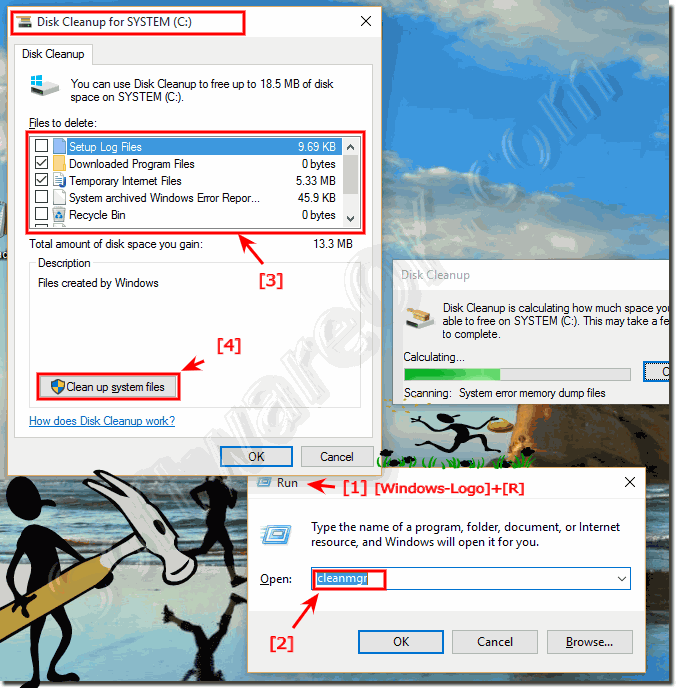
To start the Disk Cleanup Manager is the fastest way via the command cleanmgr from the Windows-10 Run Dialog (Keyboard shortcut Windows-Logo+R) And select unnecessary files (. see Image-1 Arrow 1 to 3)
For more clean options click the Button «Clean up system files» (. see Image-1 Arrow-4)
. read more info
| (Image-1) Run Disk Cleanup Manager in Windows-10! |
 |

2.) Remove Programs and Features, System Restore and Shadow Copies!
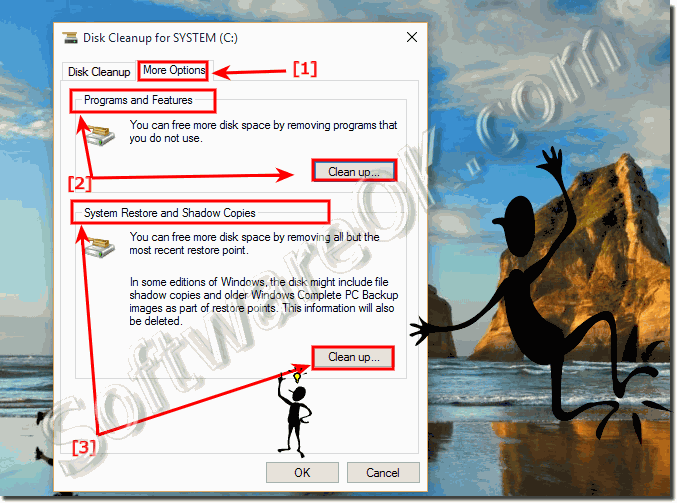
When you click the Button «Clean up system files» in The Windows-10 Disk Cleanup Manager (. see Image-1 Arrow-4)
yo can see the tab More!
The Disk Cleanup will calculating how much space you will be able to free on SYSTEM (C:). This may take a few minutes to complete.
Now, your can see the Tab «More Options» with Clean Up. button for «Programs and Features» plus
«System Restore and Shadow Copies» (. see Image-2 Arrow-1)
| (Image-2) Windows-10 remove System Restore and Shadow Copies! |
 |
If you want to reduce the number of unnecessary Windows-10 files on your hard disk to free up disk space and help your computer run faster, use Disk Cleanup. It removes temporary files, empties the Recycle Bin, and removes a variety of system files and other items that you no longer need. For more information about deleting files from the Recycle Bin, see Permanently delete files from the Recycle Bin.
Disk Space Cleanup Manager has stopped working
Replies (6)
Also get CCleaner — free and configurable
http://www.ccleaner.com/
Just to be sure no corruption is involved run SFC and Checkdisk (chkdsk)
Start — type this in Search Box -> COMMAND find at top and RIGHT CLICK — RUN AS ADMIN
Enter this at the prompt — sfc /scannow
How to analyze the log file entries that the Microsoft Windows Resource Checker (SFC.exe) program
generates in Windows Vista cbs.log
http://support.microsoft.com/kb/928228
This is the way to run CheckDisk (chkdsk) at startup.
Hope this helps.
Rob — Bicycle — Mark Twain said it right.
2 people found this reply helpful
Was this reply helpful?
Sorry this didn’t help.
Great! Thanks for your feedback.
How satisfied are you with this reply?
Thanks for your feedback, it helps us improve the site.
How satisfied are you with this reply?
Thanks for your feedback.
«Disk Space Cleanup Manager has stopped working » ahows up whenever I run disk cleanup.
4 people found this reply helpful
Was this reply helpful?
Sorry this didn’t help.
Great! Thanks for your feedback.
How satisfied are you with this reply?
Thanks for your feedback, it helps us improve the site.
How satisfied are you with this reply?
Thanks for your feedback.
![]()
«Disk Space Cleanup Manager has stopped working » ahows up whenever I run disk cleanup.
l want to cleanning my computer
Follow these steps to clean up your Computer and get it running correctly:
Go to your Laptop/Computer Manufacturer’s website > Drivers and Downloads Section > Key in your Model number > Look for latest Vista Drivers for it > Download/install them.
“ Optimise Windows for better Performance”
“ Delete files using Disk Cleanup”
The More Options tab is available when you choose to clean files from all users on the computer. This tab includes two additional ways to free even more disk space:
Programs and Features: Uninstall unwanted Programs.
System restore and Shadow Copies: Delete all but the most recent Restore Point
Above is what you should do as part of normal Computer maintenance.
Besides using an anti-virus, also scan for Malware/spyware:
Malwarebytes is as the name says, a Malware Remover!
Download the Free Version from the link above.
Download, install, update and scan once a fortnight..
How to use Malwarebytes after it is installed and Updated:
1. Open Malwarebytes > Click on the Update Tab across the top> get the latest updates.
2. On the Scanner tab, make sure the Perform full scan option is selected and then click on the Scan button to start scanning your computer
3. MBAM will now start scanning your computer for malware. This process can take quite a while.
4. When the scan is finished a message box will appear
5. You should click on the OK button to close the message box and continue with the Malwareremoval process.
6 . You will now be back at the main Scanner screen. At this point you should click on the Show Results button.
7. A screen displaying all the malware that the program found will be shown
8. You should now click on the Remove Selected button to remove all the listed malware. MBAM will now delete all of the files and registry keys and add them to the programs quarantine. When removing the files, MBAM may require a reboot in order to remove some of them. If it displays a message stating that it needs to reboot, please allow it to do so. Once your computer has rebooted, and you are logged in, please continue with the rest of the steps.
9. When MBAM has finished removing the malware, it will open the scan log and display it in Notepad. Review the log as desired, and then close the Notepad window.
10. You can now exit the MBAM program.
Run the Vista System File Checker Tool:
1. Open a Command Window in Administrator mode:
* click Start
* click All Programs , then Accessories
* right click on the Command Prompt option,
* on the drop down menu which appears, click on the Run as Administrator option.
* If you haven’t disabled User Account Control (and you shouldn’t!) you will be asked for authorisation. Click the Continue button if you are the administrator or insert the administrator password.
2. Start the System File Checker
* In the Command Prompt window, type: sfc /scannow ,
* press Enter.
* You’ll see “the system scan will begin”.
The scan may take some time and windows will repair/replace any corrupt or missing files. You will be asked to insert your Vista DVD if it’s needed.
Close the Command Prompt Window when the job is finished.
One caveat: you need a Windows DVD to enable SFC to make more than minor repairs.
“How to analyze the log file entries that the Microsoft Windows Resource Checker (SFC.exe) program generates in Windows Vista”
If SFC finds serious errors it can not fix, you may have to do a Vista Repair Upgrade Install.
If you do not have a Microsoft Vista DVD, borrow one from a friend.
Read this Tutorial on how to do a Repair Install:


