- You need administrator permission to delete folder [GUIDE]
- How do I get administrator permission to delete folders?
- 1. Take ownership of the folder
- 2. Use third party software
- Install BitRaser
- Unable to delete file — Windows 10, Permissions Issue?
- 1 Answer 1
- Need permission to delete folder after Windows 10 upgrade
- Replies (46)
- when I try to delete some folders, an error message pops up saying «You require permission from SYSTEM to make changes to this file».
You need administrator permission to delete folder [GUIDE]

- Sometimes, Windows 10 can be overzealous when it comes to security and privacy features.
- If your OS insists you need to provide administrator permission to delete folders, here are some quick fixes to apply.
- Perhaps it’s a good old access denied warning that prevents you from erasing your files? We got you covered as well — check out this File Deletion Guide.
- Don’t be shy to explore our Windows 10 Troubleshooting Hub as well.

- Download Restoro PC Repair Tool that comes with Patented Technologies (patent available here).
- Click Start Scan to find Windows issues that could be causing PC problems.
- Click Repair All to fix issues affecting your computer’s security and performance
- Restoro has been downloaded by 0 readers this month.
The error You’ll need to provide administrator permission to delete this folder appears mostly due to the security and privacy features of the Windows 10 operating system.
Some actions require users to provide administrator permission to delete, copy or even rename files or change settings. Such permission prevents unauthorized users but also external sources like scripts from accessing system data.
Many Windows users have reported that they have seen this error. So do not worry, in this article you will find some valuable solutions to solve your problem.
How do I get administrator permission to delete folders?
- Take ownership of the folder
- Use third party software
- Disable User Account Control
- Activate the built-in Administrator account
- Use SFC
- Use Safe Mode
1. Take ownership of the folder
This is the easiest method and may suit most of the people in solving this error. In order to do this, you need to:
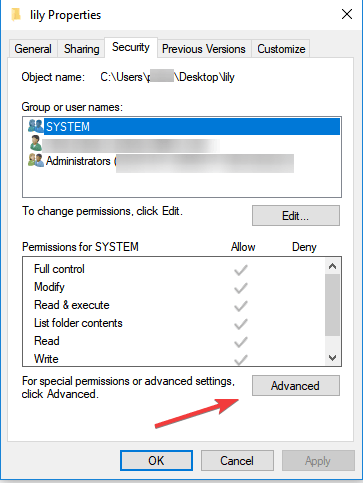
- Navigate to the folder you want to delete, right-click it and select Properties
- Select the Security tab and click the Advanced button

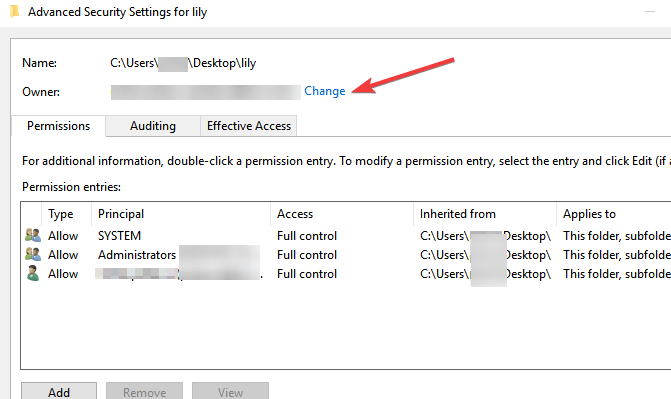
- Click on Change located at the front of the Owner file and click on the Advanced button
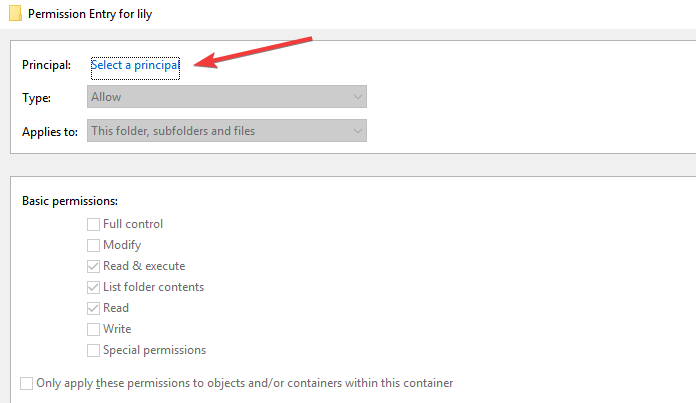
- In the Select user or group page, click on Advanced in order to select which accounts are available
- Click on Find Now and then select the user to whom you wish to transfer the ownership to
- Right click on the folder and click on Properties
- Navigate to the Security tab and click on Advanced
- Under the Permission tab, click on Add and then click on Select a Principal in order to add your account
- Click on Advanced and then click on the Find Now button to list all the accounts to whom permission can be granted
- Locate your account from the list and click on Ok and save changes

2. Use third party software
You can always try to use third-party software to delete a file in order to delete corrupted files that Windows cannot delete.
Install BitRaser

One particular software with excellent file erasure capabilities that is both scalable and manageable is BitRaser.
By securely erasing confidential data from all devices (running on Windows and Mac as well), servers, and partitions, this privacy safeguarding software meets all your media sanitization requirements.
Using it is as simple as a breeze too: all you need to do is download the .EXE file, install the tool, select the items you want to erase and Delete.
Any data beyond the scope of recovery can permanently be removed with these simple steps starting from files and folders that require permission from administrators to make changes, to app traces and browsing history.
Let’s quickly look at its key features:
Unable to delete file — Windows 10, Permissions Issue?
Windows 10 Version 1909 Have VS Code installed at C:\Users \AppData\Local\Programs\Microsoft VS Code\
Trying to open VS Code fails, trying to run the installer says it can’t override code.exe
Security says it cannot display the current owner and clicking «continue» brings me to a message «You do not have permission to view or edit this object’s permission settings.»

But Powershell shows I am the only one with user and access (and my account is a local admin):

Trying to remove via Powershell seems to give a RemoveFileSSystemItemIOError:

Any ideas or assistance would be greatly appreciated.
1 Answer 1
I keep this function around to resolve access issues to files or folders that I run across, assuming that I am a member of the local administrator’s group.
Ok yeah, the function name is cheesy, but beyond that it works really well. It runs some C# code to setup a [TokenManipulator] class (code I picked up on the web, but forgot to record where from. If it’s your code please send me a link to the source so I can give you credit!). That allows us to take ownership. Then once we’re owners of the file we make sure the local Administrators group has Full Access, and that there’s no Deny rules for the local Administrators group. Beyond that you should be able to do whatever you want with the file or folder you run it against.
Usage: Run the code below to load the script into your session. Then you can either pipe strings into it like this:
Or you can run it normally against a string or array of strings:
Need permission to delete folder after Windows 10 upgrade
since I upgraded my lynx tablet to windows 10 I am unable to delete files. I need space for new data so its really annoying. I am logged in with my Microsoft account and yet it tells me I must get my own permission to delete the file.
This is ridiculous what am I supposed to do?
windows 10 administrator permissions- Original Title
Replies (46)
* Please try a lower page number.
* Please enter only numbers.
* Please try a lower page number.
* Please enter only numbers.
![]()
Thank you for posting in Community.
We understand your concern and we will provide the assistance required to help you resolve the issue.
As per the information that you have provided, I would like to inform that during the upgrade process there might be few system files that may have been corrupted. To rectify this, I suggest that you follow the steps below and check if it helps.
Give Permission to the folder/drive that you are facing the issue with.
- In Windows Explorer, right-click the file or folder you want to work with.
From the pop-up menu, select Properties, and then in the Properties dialog box click the Security tab.
In the Name list box, select the user, contact, computer, or group whose permissions you want to view. If the permissions are dimmed, it means the permissions are inherited from a parent object.
Turn off UAC (User Account Control)
Before you can do anything, you must turn off the UAC, or you will be locked out of the following steps.
1) Start -> Settings -> Control Panel -> User Accounts
2) Click «Change User Account Control Settings»
3) Move slider all the way down to «Never Notify»
4) Reboot
2) Take Ownership
Yes take ownership. Even though you are logged on as an Administrator, you can’t change files that don’t belong to you. The Program Files folder is set to the Trusted Installer group and the Administrator doesn’t have the rights to change anything. So now we have to claim all the files and folders.
1) Open Windows Explorer
2) R-Click on Program Files -> Properties -> Security Tab
3) Click Advanced -> Owner
4) Click Edit
5) Select Administrators -> Put a checkmark in Replace owner on subcontainers & objects -> Apply
6) Wait a while.
7) When it finishes, Click OK on all boxes to close everything
3) Fix Permissions
Now that you own the files, you have to give yourself permission to modify them
1) R-Click on Program Files -> Properties -> Security Tab
2) Click Advanced -> Change Permission
3) Select Administrators (any entry) -> Edit
4) Change the Apply To drop down box to This Folder, Subfolder & Files
5) Put check in Full Control under Allow column -> OK -> Apply
6) Wait some more.
7) When it finishes, the dialog boxes may hide behind the Explorer window. Minimize it and click OK on all the the dialog boxes
when I try to delete some folders, an error message pops up saying «You require permission from SYSTEM to make changes to this file».
original title: Require permission from SYSTEM
I decided to do a clean install of the latest Windows 7 RC last night, and today went through and started to delete some programs from a seperate hard drive so I could reinstall them clean. However when I try to delete some folders, an error message pops up saying «You require permission from SYSTEM to make changes to this file». I am using an administrator account, but I simply can not delete the file. I’ve tried going in and changing the owner to either my account or Administrators, close it, change the Security permissions to allow me to have Full Control, and then I can finally delete it. The problem is, I have to do this for every file one by one in the folder, and I’m wondering if there’s an easier way to go about this, or if I can access this SYSTEM user and simply delete them all from there. Thanks for the help.
You can change the permissions for folders (and subdirectories) by right clicking on the parent folder, choose Properties, go to the Security tab, click Advanced, go to the Owner tab, click Edit, select the new owner and check the Replace owner on subcontainers and objects and press Apply.
Let us know if this helps.
David
Microsoft Answers Support Engineer
Visit our Microsoft Answers Feedback Forum and let us know what you think.
85 people found this reply helpful
Was this reply helpful?
Sorry this didn’t help.
Great! Thanks for your feedback.
How satisfied are you with this reply?
Thanks for your feedback, it helps us improve the site.
How satisfied are you with this reply?
Thanks for your feedback.
Not trying to resurrect old threads, but I’m gonna reply anyways since this thread came on top of the search results list when I searched for «you require permission from SYSTEM»; hopefully this’ll help everybody.
Note: here, ‘folder’ as a subject refers to the folder that you want to delete.
Step 1: Get access to the built-in administrator account, which you can do by following these steps:
a. Go to Control Panel > System and Security > Administrative Tools
b. On the left panel, go to Local Users and Groups > Users; you should now see a list of users on your computer
c. Right-click the Administrator account which shows up in the list and go to Properties
d. Uncheck ‘Account is Disabled’ and confirm by pressing OK
Step 2: Log on to your newly-enabled administrator account
Step 3: Now we begin setting-up the security settings that will allow you to delete that folder that was (perhaps) once owned by SYSTEM:
I’ll make an assumption that you want to delete a folder and all its sub-folders along
a. Right-click the folder
b. Go to the Security tab on the top
c. Click the Advanced button that’s at the bottom
Step 4: The first part of setting-up the security settings is to set the owner of the folder:
a. Go to the Owner tab on the top
b. Click the Edit button that’s at the bottom
c. There should be a list of accounts to pick from to change ownership to, this is located under the label ‘Change owner to:’
d. The entry ‘Administrator (YOURCOMPUTERNAME\Administrator)’ should be there; if not then we have to add it into the list:
— Click the ‘Other users or groups. ‘ button that’s at the bottom
— Under the label ‘Enter the object name to select (examples):’, there should be a text field that you can type in; type in ‘Administrator’ (without the quotes of course)
— Click the ‘Check Names’ button that’s on the right; ‘Administrator (YOURCOMPUTERNAME\Administrator)’ should now be there _by itself_; well if not, then you have to delete the line which does not represent the administrator account you’re in right now
— Confirm by pressing OK; it’ll now appear on the list of accounts you can select from
e. Now select ‘Administrator (YOURCOMPUTERNAME\Administrator)’ from that list
f. Check ‘Replace owner on subcontainers and objects’ to propagate our change
g. Press OK to confirm; a message should now pop-up, indicating that you have to re-open Properties. Do so by pressing on all the OK buttons you see
Step 5: Now that we’ve set the owner of the folder, we’re still not done. There’s one key step left which is to remove inheritable permissions:
a. Repeat step 3 to get to re-open Properties and get to ‘Advanced Security Settings’
b. Go to the Permissions tab on the top
c. Click the ‘Change Permissions’ button that’s at the bottom
d. At the bottom, there should be 2 checkboxes:
— ‘Include inheritable permissions from this object’s parent’: Un-check this; when you do so, you’ll get a warning about parent settings not being able to propagate. Select ‘Add’
— ‘Replace all child object permissions with inheritable permissions from this object’: Check-this
e. Confirm by pressing OK. Windows will warn you again this time; hit OK
f. Confirm again by pressing OK; now you should arrive at Properties again
Now you should not have any warnings about SYSTEM not giving you permission while trying to perform actions on that folder.
All the checkboxes for changing permissions on accounts (Properties > Security > Edit) should now be enabled, and you can tinker around with it.


