- Как создать файл определенного размера в Windows
- Содержание
- Создать файл с помощью командной строки
- Создать файл с помощью PowerShell
- Создать пустой файл заданного размера
- Создать непустой файл заданного размера
- Создать несколько файлов заданного размера
- Create a File of Specific Size in Windows 10
- About Sergey Tkachenko
- Create Fake File in Window PC in Any Size and Any Format
- 4 ways to create random dummy files with a specific size in Windows
- 1. Create a dummy file with the fsutil command
- 2. Create a random dummy file with Dummy File Creator
- 3. Create a random dummy file with Disk Tools
- 4. Create a random dummy file with PowerShell
- Which method do you find easiest?
Как создать файл определенного размера в Windows
Иногда для тестирования какой-то системы (взаимодействия программ, электронная почта, фильтры), требуется создать файл определенного размера. ОС Windows имеет два стандартных инструмента для создания файла произвольного размера.
Содержание
Создать файл с помощью командной строки
Для создания файла заданного размера с помощью командной строки Windows используйте команду fsutil. Размер файла для этой команды указывается в байтах.
Создать файл TestFile.txt размером 1 МБ:
Если при создании файла в указанном размещении вы получаете «Ошибка: Отказано в доступе» — запустите командную строку от имени администратора.
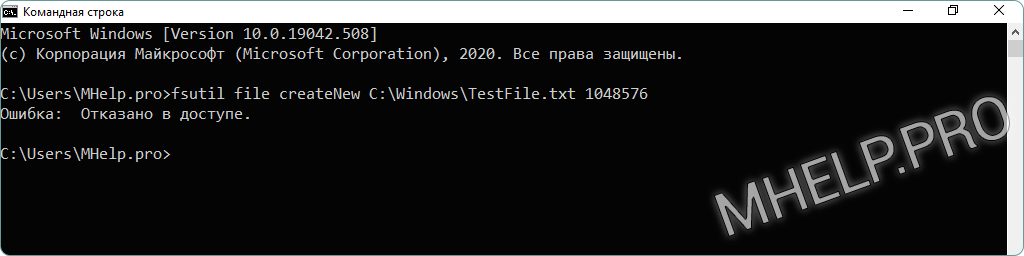 Ошибка: Отказано в доступе при создании файла
Создать файл с помощью PowerShell
Создать пустой файл заданного размера
Для создания файла определенного размера с Windows PowerShell используйте последовательность команд (размер файла указывается в: Kb, Mb, Gb):
Windows PowerShell создаст пустой файл (заполненный символами NULL), выбранного размера.
Если при создании файла в указанном размещении вы получаете ошибка: «New-Object : Исключение при вызове «.ctor» с «3» аргументами: «Отказано в доступе по пути …» — запустите Windows PowerShell от имени администратора.
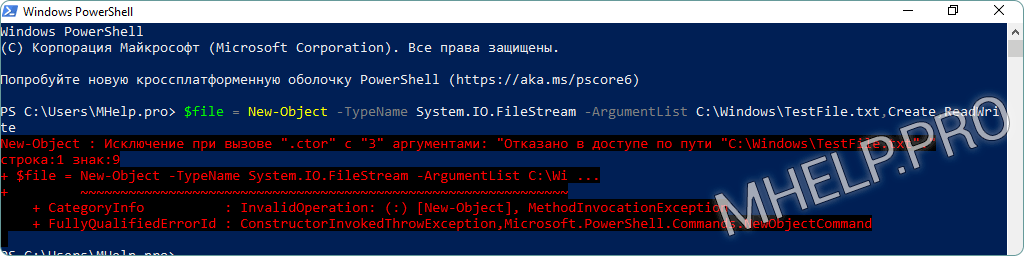 Ошибка: «Отказано в доступе по пути» при создании файла
Создать непустой файл заданного размера
Для создания не пустого файла (случайное содержимое) размером 1 Мб, выполните команды Windows PowerShell:
Скорость создания файла будет зависеть о указанного размера файла и характеристик вашего компьютера.
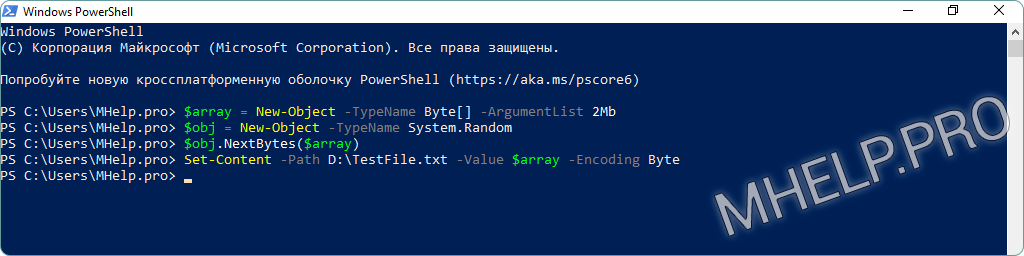 Создание непустого файла произвольного размера используя Windows PowerShell
Создать несколько файлов заданного размера
Создать 5 непустых файлов (случайное содержимое) размером 1Мб, используя Windows PowerShell:
Скорость создания файлов будет зависеть от указанного размера файлов и характеристик вашего компьютера.
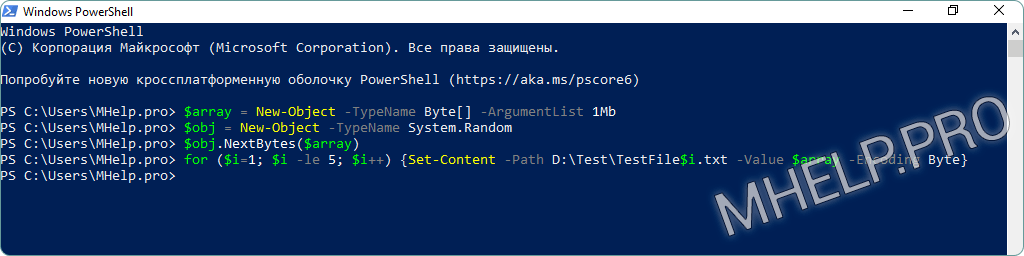 Создание нескольких файлов произвольного размера используя Windows PowerShell
🟢 Как создать файл определенного размера, обсуждалось в этой статье. Теперь вы можете создавать файл или несколько файлов произвольного размера, для тестирования программ или сервисов. Однако, если вы столкнетесь с каким-то проблемами, не стесняйтесь написать в комментариях. Я постараюсь помочь.
Create a File of Specific Size in Windows 10
Sometimes you need to create a file of specific size for testing purposes. While you can try to create just a text file with some app like Notepad, it is very inconvenient when you need to create a huge file or many files at once. Here is a better solution.
Windows comes with a special console tool, fsutil. Fsutil targets advanced users and system administrators. Some that I think may be of interest are discussed. It performs tasks that are related to file allocation table (FAT) and NTFS file systems, such as managing reparse points, managing sparse files, or dismounting a volume. If it is used without parameters, Fsutil displays a list of supported subcommands. The tool is available in Windows starting in Windows XP.
You must be logged on as an administrator or a member of the Administrators group to use Fsutil. It may be necessary to enable the WSL feature to get full fsutil functionality.
One of the fsutil parameters is «file». It contains a set of subcommands which can be used to find a file by user name (if Disk Quotas are enabled), to query allocated ranges for a file, to set a file’s short name, to set a file’s valid data length, to set zero data for a file, to create a new file.
In our case, we need to use the fsutil app as follows.
To create a file of specific size in Windows 10, do the following.
- Open an elevated command prompt.
- Type or copy-paste the following command:
- Substitute the portion with the actual file name.
- Substitute with the desired file size in BYTES.
The following command will create the file winaero.bin with size of 4 kilobytes under the location c:\data.
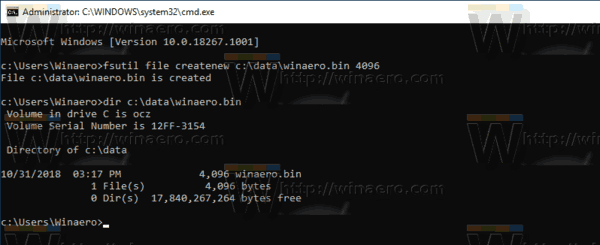
Tip: Do not forget to wrap around the path to your file with quotes if it contains spaces.
See the following articles to learn more on how you can use the fsutil app:
Winaero greatly relies on your support. You can help the site keep bringing you interesting and useful content and software by using these options:
Share this post
About Sergey Tkachenko
Sergey Tkachenko is a software developer from Russia who started Winaero back in 2011. On this blog, Sergey is writing about everything connected to Microsoft, Windows and popular software. Follow him on Telegram, Twitter, and YouTube.
Create Fake File in Window PC in Any Size and Any Format

In Windows PC, there are many commands and Hidden features that we don’t know. In this post, I tell you How can you make a fake file of any size in any format. From this Windows Trick, you can make fake music file, documents file, movie file, audio file in any size whatever you want.

![]()
Benefits of this Tricks:
1. You can make any type of file at any size in just seconds.
2. Troll your friends.
3. Fill any empty Pendrive in just seconds.
So how this work
This Window trick work on Windows Command names FSUTIL.
Fsutil is command line utility, this command provides some technical information of disk drives.
Create Fake File at any Size and any format without any software in Windows
1. Press windows button and type cmd, Select cmd.ex and right click on it Run as administrator.
2. Type fustil command and see below for example.
fsutil file create new C:spyboy.mp4 500000000
change “spyboy” with your file name
change”.mp4″ with your file extension
change “50000000” with your file size
If you want to create the fake file with this command utility helps you. This is one of the best fake file creators for windows. With this trick, you can also create a fake android app.
4 ways to create random dummy files with a specific size in Windows
While most regular users might have issues understanding the need to create random dummy files of a specific size, geeks, software developers, and power users know why such files can come in handy sometimes. You can use dummy files to figure out if there are any bad sectors on your hard drive, to test network speed, or to ensure that files on your computer or device are deleted beyond recovery. Regardless of your reasons, here are four ways to create such files in any modern version of Windows:
1. Create a dummy file with the fsutil command
All Windows versions since Vista include an executable named fsutil.exe. In Windows 10, you can find it in the “C:WindowsSystem32” folder.
Fsutil.exe is a powerful tool for managing partitions and volumes. Among many other things, you can also use it to quickly create dummy files of any size from the Command Prompt.
There are a lot of ways to launch the Command Prompt, but we prefer to enter “cmd” in our taskbar’s search field, and then to click or tap on Command Prompt. If you intend to create random dummy files in a protected system folder (like your C: drive), press “Run as administrator” instead.
Once the Command Prompt is open, type in fsutil and hit Enter to see a list of commands supported by this tool. There are many parameters that you can use. This only gives you a taste of what fsutil.exe can do. You can find complete information about its capabilities in its official documentation on TechNet.
There are two commands you can enter in the Command Prompt to create a dummy file:
- fsutil file createnew filenamesize
- fsutil file createnew pathfilename size
Replace filename with the name you want for the dummy file. You can choose to add an extension or not, as this does not affect the process. Replace size with the size you want your dummy file to have. The size is measured in bytes. It might be easier to use an online converter to help you define the size you prefer.
The difference between the two commands is that the second one allows you to specify exactly where your file is stored, by replacing path with a location of your choice on your device.
Now that we got over the theory part, let’s see how this works in practice. We first created a file called myfile.exe with a size of 10MB or 10485760 bytes. To create it, we entered the following command: fsutil file createnew myfile.exe 10485760
As seen above, if you use the first command and do not specify a path, the file is created in your user profile folder. In our case, it was stored at C:UsersDiana Ann Roe. We then created another 2MB file, this time using a specific path and no extension. We entered: fsutil file createnew D:myfile 2097152
One aspect to note is that the files created with fsutil.exe are empty. There’s no content inside.
2. Create a random dummy file with Dummy File Creator
If you want dummy files with random content, or if you are uncomfortable with the Command Prompt, then you should consider using third-party apps. A free and easy to use tool is the Dummy File Creator.
You can choose between the installer and an archive. We recommend you to get the archive and extract it somewhere on your computer. Then, run the Dummy.exe file. If you want to generate files on your system drive (C:), right-click or press-and-hold and select “Run as administrator,“ or the program returns an error when it tries to create your files.
While in need of a makeover, the interface of this program is straightforward. The Mode section lets you choose whether you want to generate one file or more. Use the Browse button to get to the location where you want to create the file(s) and type in the name (and extension, if you want one). Next, specify the File Size and check the “Random file content (non-compressible)” box if you want your file(s) to have random content. Then, click or tap Create.
A progress bar keeps you updated while your file is being created.
As soon as the program finishes writing, you get a notification informing you that your file was created.
This tool is obviously easier to use than fsutil.exe, and it also comes with several advantages, like creating more files at the same time and the option to add random file content.
3. Create a random dummy file with Disk Tools
Another free alternative that provides more customization options is the Disk tools toolkit. As the name implies, this is a suite of small free disk-related tools. One of these tools is the File Generator. Download and run CubicDesign_tools.exe. When you try to access it, Windows Defender SmartScreen pops up, telling you that it prevented an unrecognized app from starting. Click or tap on More info and choose Run anyway. Click or tap Install and wait for the app to unpack. Once the extraction is complete, File Explorer takes you to the newly created folder called Tahionic tools package. Out of all the files included in this suite, open Disk Tools.exe, from the System & security folder.
Also in dire need of a makeover, the Disk Tools opens at the File generator tab, which is the one we need to create dummy files.
The four sections in this tab help you customize your dummy file(s):
- Number of files – Set the number of generated files.
- File size – Set the file size or choose one of the suggested sizes on the right.
- File name – Set the file name and location. Select Pattern to enter a custom name (and, optionally, an extension)
- File content – Set the file content. Select “Fill the files with this content” to customize the text in your file and to unlock the option to “Make file unique,“ which comes in handy when you create multiple files, and you don’t want generated files with identical content.
When you are done setting things up, click or tap Create. A beep signals that the dummy file was created, and, at the bottom of the tab, the program also lets you know the time it took to generate the file. It is possible for the program to beep and announce it has generated the dummy file, but the file is not at the specified location. This can happen if you are running Disk Tools without administrator permissions and you are trying to create files on your system drive (C:). To create files anywhere on your Windows computer or device, make sure to open the program as administrator.
What we liked about this app is that, although it looks a bit cluttered, it provides excellent configuration options, and you have a say when it comes to file content. The option to generate unique files is also a nice touch.
4. Create a random dummy file with PowerShell
You can also create a dummy file using PowerShell from Windows. While we detailed all the ways you can open this app in a previous tutorial, we find it easiest to type in “powershell” in the taskbar’s search field, and then to click or tap on Windows PowerShell. However, if you plan to create random dummy files on your system drive (C:), make sure to select “Run as Administrator” from the options on the right when you open it.
The PowerShell app launches, waiting for you to type commands and run them.
To create a dummy file, you need to enter the following one-line command:
$out = new-object byte[] size; (new-object Random).NextBytes($out); [IO.File]::WriteAllBytes(‘pathfilename‘, $out)
Replace size with the size your dummy file should have, in bytes. You can use an online converter if you need help defining the size you prefer. Replace path with the location where you want to create the dummy file. Replace filename with the name you want for the dummy file. Add a file extension if you want to, as this has no impact on the process. Let’s illustrate this with an example to make it clearer:
We decided to create a file called mypowerfile.txt with a size of 1MB (or 1048576 bytes) on the D: partition. To create it, we entered the following command: $out = new-object byte[] 1048576; (new-object Random).NextBytes($out); [IO.File]::WriteAllBytes(‘D:mypowerfile.txt’, $out)
Although PowerShell does not offer real-time feedback (unless you made an error writing the command), like the other apps we went over, you can tell it is done creating the file when it is ready for another command. If you go to the specified location, you can see that the dummy file has been created.
Similar to using fsutil in the Command Prompt, you can leave out the path and the file is created in your user profile folder. We used the same command as above, leaving out the path entirely: $out = new-object byte[] 1048576; (new-object Random).NextBytes($out); [IO.File]::WriteAllBytes(‘mypowerfile.txt’, $out)
Without a path, the new dummy file is stored by default at C:UsersYourUserNamemypowerfile.exe, as seen below. As opposed to fsutil, PowerShell lets you create dummy files with random content. If you compare two files, created using the same command, you can see that they have different content.
Out of all the options above, PowerShell is the most complicated, both because of the complexity of its commands and the absence of confirmation when your dummy file is generated. However, power users might prefer it to the other options.
TIP: When using the PowerShell commands above, you can add a parameter that makes the console provide feedback, while creating dummy files. However, keep in mind that this makes the command unnecessarily long, as you have to insert the following one-liner:
$out = new-object byte[] 1048576; (new-object Random).NextBytes($out); [IO.File]::WriteAllBytes(‘mypowerfile.txt’, $out); if ($out -ne $null)
Which method do you find easiest?
We searched the pits of the internet and downloaded one too many suspicious files in order to bring you this tutorial. Before you close it, please let us know which of these methods do you prefer? Also, if you know other ways to create dummy files in Windows, don’t hesitate to share them in the comments below and we promise to check them out.


