- How to View Windows 10 Crash Logs and Error Logs (2021 Updated) [Partition Magic]
- Summary :
- Quick Navigation :
- Method 1. View Windows 10 Crash Logs with Event Viewer
- Method 2. View Windows 10 Crash Log with Reliability Monitor
- Conclusion
- Выполняю установку, настройку, сопровождение серверов. Для уточнения деталей используйте форму обратной связи
- Windows 10 Home Crash Log Location
How to View Windows 10 Crash Logs and Error Logs (2021 Updated) [Partition Magic]
By Irene | Follow | Last Updated January 05, 2021
Summary :
When you computer crashes, a crash log will be generated, which can help you analyze the causes of the crash. But, do you know how to view Windows 10 crash logs and error logs? If you don’t know, don’t worry. This article from MiniTool will show you how to view Windows 10 crash log with two methods.
Quick Navigation :
Method 1. View Windows 10 Crash Logs with Event Viewer
To view Windows 10 crash logs, you can make use of the built-in tool Event Viewer, which keeps a log of application and system messages, errors, warnings, etc. You can follow the steps below to check Windows crash logs Windows 10 with Event Viewer.
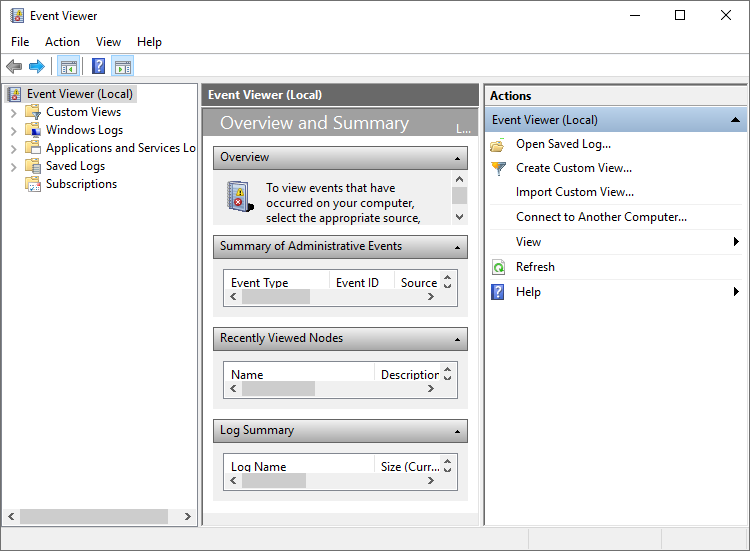
Step 1. Type Event Viewer in the Windows 10 Cortana search box. Then right click the best match Event Viewer and choose Run as Administrator.
Step 2. Here is the main interface of Event Viewer. On the left side of the window, you can view all the Logs according to the category. To view Windows 10 crash logs such as the logs of blue screen error, just click on Windows Logs.
Step 3. Then choose System under Windows Logs.
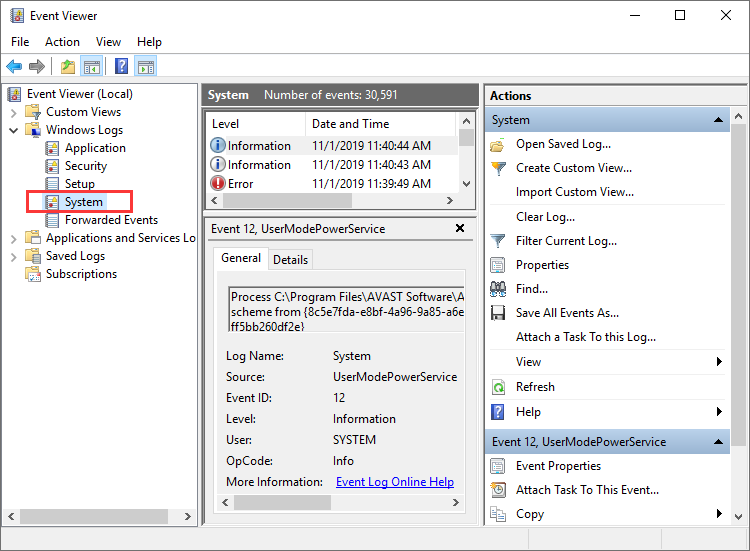
Step 4. Find and click Error on the event list. Then you can view the detailed crash log information shown up in the bottom of the window.

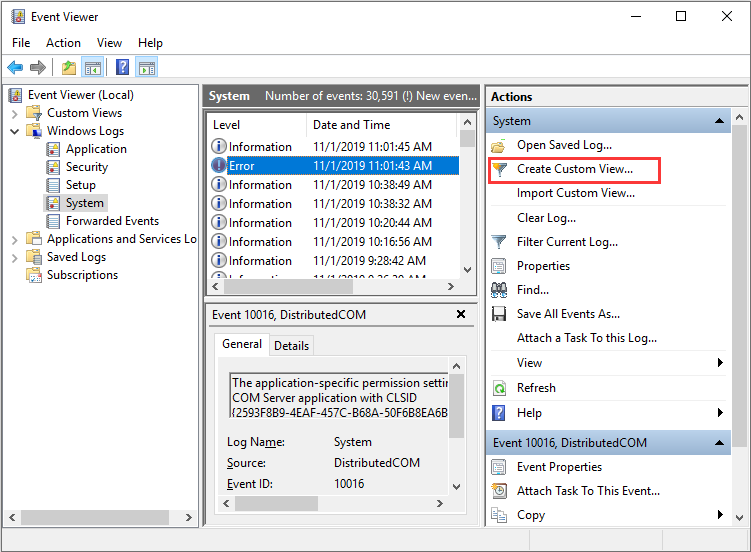
You can also create a custom view so you can view the crash logs more quickly. Here are steps on how to create a custom view.
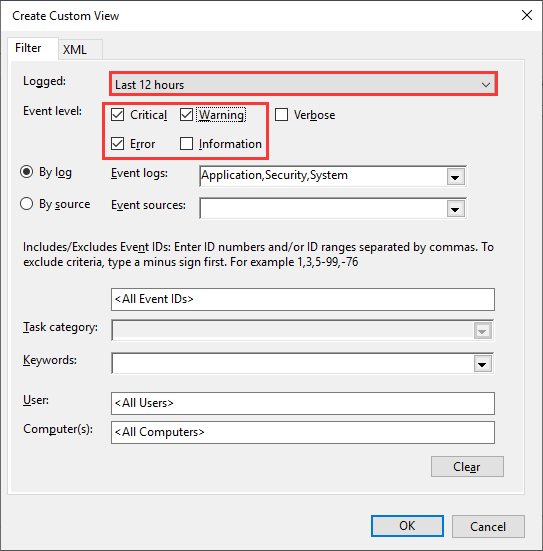
Step 1. Click on Create a Custom View on the right window. As you click on Create Custom View, a new window will pop up.
Step 2. Choose a time period you want to view. Then check the boxes next Critical, Warning and Error in the Event levels section.
Step 3. Select the By log option. Then click the drop-down menu next to Event logs, and then select Application, Security and System.
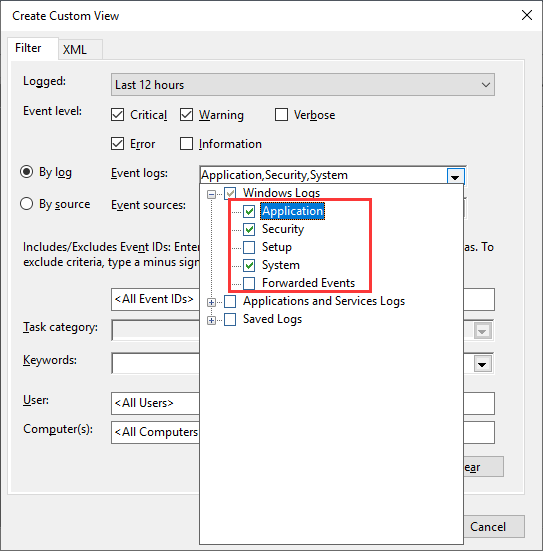
Step 4. Then click OK to save the settings.
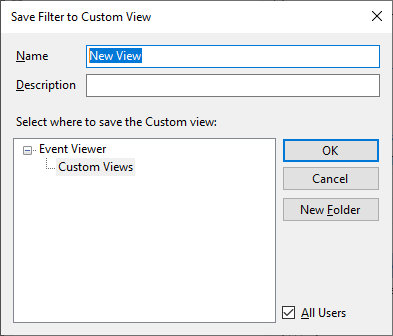
Step 5. Name this custom view and then click OK to start to view the Windows 10 crash log.
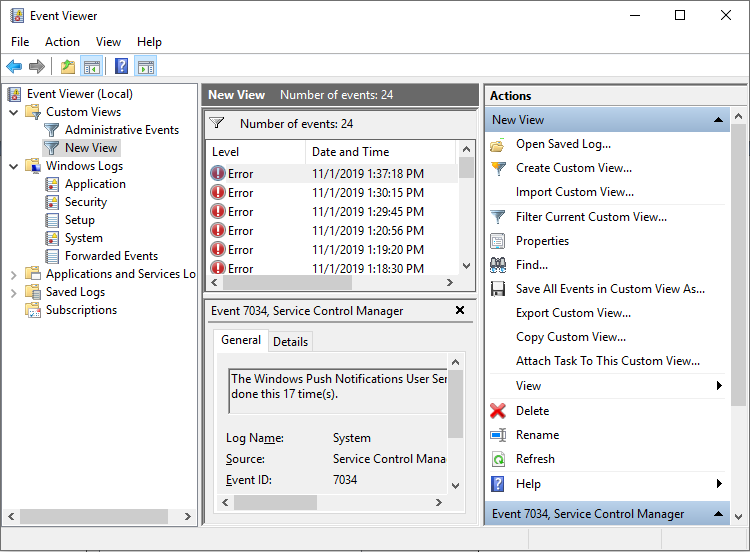
Step 6. Then you can view all the Windows 10 crash logs during the tome period you select.
Windows Reliability Monitor also enables you to view recent system and application crashes. Here’s how to check Windows 10 crash logs with Reliability Monitor.

As a game lover, you may run into computer crashes when playing games. This article offers some solutions to this issue.
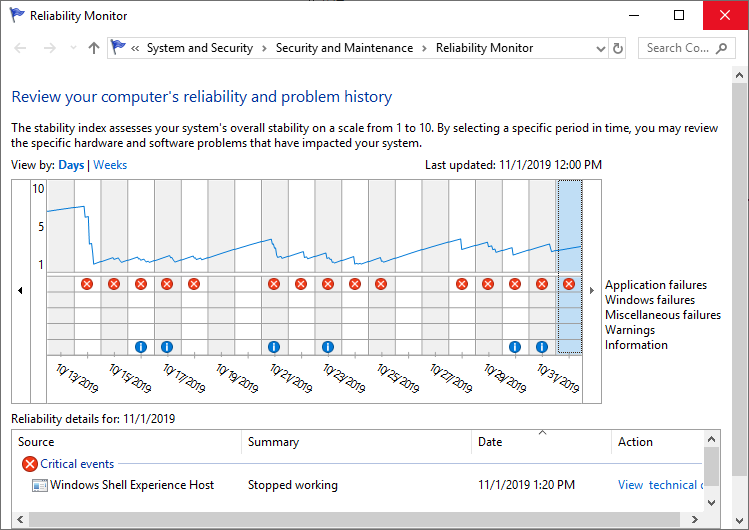
Method 2. View Windows 10 Crash Log with Reliability Monitor
Step 1. Type reliability in the Windows 10 Cortana search box. Then click the best match View reliability history.
Step 2. From the main interface, you can see that the Reliability Monitor window is arranged by dates. If Windows crashes or freezes, you will see a red circle with an «X» representing the failure, as shown below.
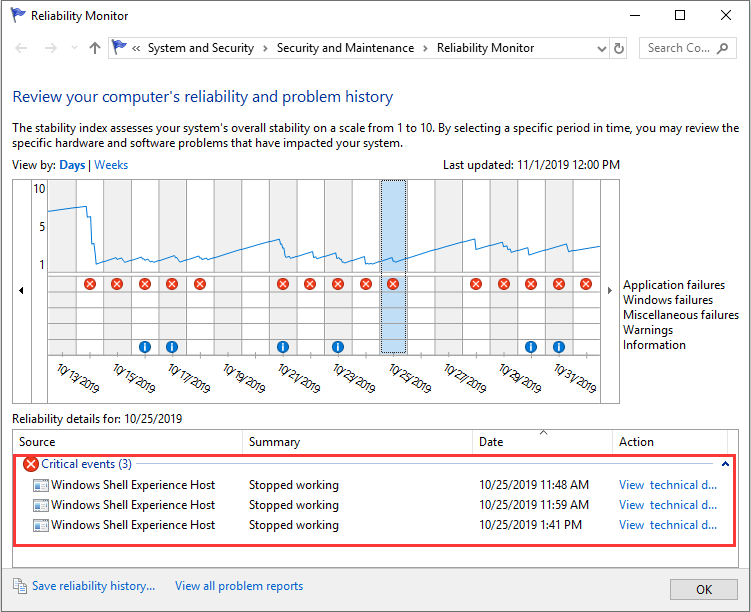
Step 3. If you want to view a certain day’s crash log, just click that day’s column and more detailed information will be displayed at the bottom. You can also double click one of the listed events to open a new window with more information.
Conclusion
Event viewer and Reliability Monitor are all good for you to check Windows 10 crash logs. Choose a tool you like and you can get all the Windows crash log information.
Выполняю установку, настройку, сопровождение серверов. Для уточнения деталей используйте форму обратной связи
При падении приложения оно создаёт core-файл, который можно проанализировать. За создание core файлов отвечает утилита coreadm. С её помощью можно указать, где будут лежать core-файлы, для каких типов создавать core-файлы и т.д.
Важно понимать, что core dump файлы системы и процессов отличаются, и их нужно анализировать по разному.
coreadm
Данная команда введённая без параметров выведет текущие настройки:
Для того, что бы начать использовать coreadm установим путь, где будут храниться наши core-файлы:
#coreadm -g /var/cores/core.%f.%p
Далее выберем то, что хотим что бы попадало в core-файл:
#coreadm -G content
Возможные значения для content (оставлю без перевода, что бы не терялся смысл):
— ctf: CTF type information sections for loaded object files
— data: Writable private file mappings — dism: DISM mappings
— heap: Process heap
— ism: ISM mappings
— rodata: Read-only private file mappings
— shanon: Anonymous shared mappings
— shfile: Shared mappings that are backed by files
— shm: System V shared memory
— stack: Process stack
— symtab: Symbol table sections for loaded object files
— text: Readable and executable private file mappings
Либо просто указать all что бы попадало всё.
Есть ещё опции -e/-d которые означают включить/выключить определённые параметры.
Напомню, что coreadm управляется через SMF сервис svc:/system/coreadm:default. Так же можно отметить, что все изменения сохраняются в файле /etc/coreadm.conf
Правда частенько системные администраторы отключают создание core-файлов для процессов
coreadm -d process
так как они могут генерить большие объёмы данных.
При отлавливании багов лучше всего включать создание всех
Отдельно хочется отметить команду
которая позволит регистрировать в логах появление core-файлов
dumpadm
Данная команда управляет параметрами системного crash dump’a. Управляется она тоже через SMF — svc:/system/dumpadm:default и работает через устройство /dev/dump. Команда без параметров выведет текущие настройки:
savecore/gcore
Эта утилита служит для сохранения core dump файлов. Ею очень удобно сбрасывать в дамп текущее состояние системы:
# savecore -L
dumping to /dev/zvol/dsk/rpool/dump, offset 65536, content: kernel
0:03 100% done
100% done: 128815 pages dumped, dump succeeded
savecore: System dump time: Fri Apr 27 19:46:16 2012
savecore: Saving compressed system crash dump in /var/crash/vmdump.1
savecore: Decompress the crash dump with
‘savecore -vf /var/crash/vmdump.1’
# gcore $$
gcore: core.2770 dumped
Для того, чтобы проанализировать дамп, можно восстановить его в привычном виде:
# savecore -vf /var/crash/vmdump.1
savecore: System dump time: Fri Apr 27 19:46:16 2012
savecore: saving system crash dump in /var/crash/
Constructing namelist /var/crash/unix.1
Constructing corefile /var/crash/vmcore.1
0:12 100% done: 128815 of 128815 pages saved
3481 (2%) zero pages were not written
0:12 dump decompress is done
Анализ core dump-файлов.
Для анализа можно использовать отладчик mdb. Вот небольшой пример использования
# /usr/bin/mdb -k unix.0
Loading modules: [ unix krtld genunix ip nfs ipc ptm ]
> ::status
debugging crash dump /dev/mem (64-bit) from ozlo
operating system: 5.10 Generic sun4v
> ::system
set ufs_ninode=0x9c40 [0t40000]
set ncsize=0x4e20 [0t20000]
set pt_cnt=0x400 [0t1024]
Очень хорошо анализ core dump файлов описаны здесь
http://solaristhings.blogspot.com/2006/08/dont-be-afraid-of-mdb.html
http://kristof.willen.be/node/1100
http://www.c0t0d0s0.org/archives/4391-Less-known-Solaris-Features-About-crashes-and-cores.html
http://www.cuddletech.com/blog/pivot/entry.php?id=965
http://www.cuddletech.com/blog/pivot/entry.php?id=966
http://eteck.blogspot.com/2012/04/solaris-crash-dump-anylysis.html
Анализ core файлов.
Небольшой пример анализа core файла:
$ ./a.out
Segmentation Fault(coredump)
$ /usr/proc/bin/pstack ./core
core ‘./core’ of 19305: ./a.out
000108c4 main (1, ffbef5cc, ffbef5d4, 20800, 0, 0) + 1c
00010880 _start (0, 0, 0, 0, 0, 0) + b8
Очень удобно анализировать через gdb, но он не входит в базовую систему и его придётся доставлять отдельно.
#gdb /usr/php54/sbin/php-fpm ./core.php-fpm.23922
.
Reading symbols from /lib/amd64/libelf.so.1. done.
Loaded symbols for /lib/64/libelf.so.1
Reading symbols from /usr/lib/security/amd64/pkcs11_kernel.so.1. done.
Loaded symbols for /usr/lib/security/64/pkcs11_kernel.so.1
Reading symbols from /lib/amd64/ld.so.1. done.
Loaded symbols for /lib/amd64/ld.so.1
Core was generated by `/usr/php54/sbin/php-fpm -y /usr/php54/etc/php-fpm.conf’.
Program terminated with signal 11, Segmentation fault.
[New process 89458 ]
#0 0x000000000093f2eb in zend_fetch_var_address_helper_SPEC_CONST_VAR ()
(gdb) bt
#0 0x000000000093f2eb in zend_fetch_var_address_helper_SPEC_CONST_VAR ()
#1 0x0000000000938c81 in execute ()
#2 0xfffffd7f923747b7 in xdebug_execute () from /usr/php54/lib/php/extensions/no-debug-non-zts-20100525/xdebug.so
#3 0x00000000009394c7 in zend_do_fcall_common_helper_SPEC ()
#4 0x0000000000938c81 in execute ()
#5 0xfffffd7f923747b7 in xdebug_execute () from /usr/php54/lib/php/extensions/no-debug-non-zts-20100525/xdebug.so
#6 0x00000000008fa118 in zend_call_function ()
#7 0x00000000009222b1 in zend_call_method ()
#8 0x00000000007d0672 in zif_spl_autoload_call ()
#9 0x00000000008fa080 in zend_call_function ()
#10 0x00000000008fa8d4 in zend_lookup_class_ex ()
#11 0x000000000091170f in zend_is_callable_check_class ()
#12 0x0000000000912811 in zend_is_callable_ex ()
#13 0x00000000008f9605 in zend_call_function ()
#14 0x00000000008f93f3 in call_user_function_ex ()
#15 0x00000000008f92e7 in call_user_function ()
#16 0x00000000007c16d4 in ps_call_handler ()
#17 0x00000000007c1c0a in ps_write_user ()
#18 0x00000000007b8edf in php_session_save_current_state ()
#19 0x00000000007be9e8 in zm_deactivate_session ()
#20 0x0000000000910c1a in zend_deactivate_modules ()
#21 0x0000000000898073 in php_request_shutdown ()
#22 0x00000000009859b1 in main ()
(gdb) where
#0 0x000000000093f2eb in zend_fetch_var_address_helper_SPEC_CONST_VAR ()
#1 0x0000000000938c81 in execute ()
#2 0xfffffd7f923747b7 in xdebug_execute () from /usr/php54/lib/php/extensions/no-debug-non-zts-20100525/xdebug.so
#3 0x00000000009394c7 in zend_do_fcall_common_helper_SPEC ()
#4 0x0000000000938c81 in execute ()
#5 0xfffffd7f923747b7 in xdebug_execute () from /usr/php54/lib/php/extensions/no-debug-non-zts-20100525/xdebug.so
#6 0x00000000008fa118 in zend_call_function ()
#7 0x00000000009222b1 in zend_call_method ()
#8 0x00000000007d0672 in zif_spl_autoload_call ()
#9 0x00000000008fa080 in zend_call_function ()
#10 0x00000000008fa8d4 in zend_lookup_class_ex ()
#11 0x000000000091170f in zend_is_callable_check_class ()
#12 0x0000000000912811 in zend_is_callable_ex ()
#13 0x00000000008f9605 in zend_call_function ()
#14 0x00000000008f93f3 in call_user_function_ex ()
#15 0x00000000008f92e7 in call_user_function ()
#16 0x00000000007c16d4 in ps_call_handler ()
#17 0x00000000007c1c0a in ps_write_user ()
#18 0x00000000007b8edf in php_session_save_current_state ()
#19 0x00000000007be9e8 in zm_deactivate_session ()
#20 0x0000000000910c1a in zend_deactivate_modules ()
#21 0x0000000000898073 in php_request_shutdown ()
#22 0x00000000009859b1 in main ()
Очень удобно так же запустить программу через gdb:
Windows 10 Home Crash Log Location
![]()
Thank you for keeping us posted.
We appreciate the time and effort you have put in to resolve the issue. I would like to assist you with further information from here.
Before proceeding as an initial recommendation, please check for the amount of hard disk space remaining, as the available free space is also responsible for Windows to run at optimal level of performance. Additionally, also check if similar issues persist with other user accounts as well (if any).
Now please follow the below methods and check for the results.
Method 1
- Place the computer in a Clean Boot state and check if there are any third party applications to be causing the slow down.
1. To disable all non-Microsoft services consult the article called Clean Boot.
Note: After troubleshooting, refer to this section «How to reset the computer to start normally after clean boot troubleshooting»
Disclaimer: A clean boot is performed to start Windows by using a minimal set of drivers and startup programs. This helps eliminate software conflicts that occur when you install a program or an update or when you run a program in Windows. You may also troubleshoot or determine what conflict is causing the problem by performing a clean boot. You must log on to the computer as an administrator to be able to perform a clean boot. Your computer may temporarily lose some functionality when you perform a clean boot. When you start the computer normally, the functionality returns. However, you may receive the original error message, or experience the original behavior if the problem still exists. If the computer is connected to a network, network policy settings may prevent you from following these steps.
(Applies to Windows 10 as well)
- Try Autorun and disable any start-up programs you don’t need.
Method 2
I suggest you to run the System Maintenance troubleshooter. and see if it helps.
Follow the below steps:
1. Type troubleshooting in the search bar.
2. Select Troubleshooting.
3. Select View all on the top left corner.
4. Click on System Maintenance.
5. Follow the on-screen instructions to run the troubleshooter.
Hope the above information is helpful. If you need further assistance, please do let us know and we would be happy to help you further.


