- Copy Folders and Subfolders using XCopy Command or Easier Way
- What is Xcopy command?
- Can I copy folders and subfolders using Xcopy command?
- Copy folders and subfolders using Xcopy command in Windows 7/8/10
- Situation 1. copy folders and subfolders and contents
- Situation 2. copy folders and subfolders without files
- Situation 3. copy folders and subfolders with NTFS and Share permission
- Easier way to copy files or folders in Windows 7/8/10
- Step by Step guide to copy folders files or folders via AOMEI Backupper
- Verdict
- Recover personal files from the Windows.old Folder such as Documents Pictures and Windows Live Mail Emails in Windows 10
- copying all contents of folder to another folder using batch file?
- 12 Answers 12
Copy Folders and Subfolders using XCopy Command or Easier Way
You will learn to use XCopy command to copy folders and subfolders for different requirements, not just files. Also, an easier way is prepared. Learn them first and then pick one per your needs.

By Nicky  / Last Updated April 7, 2021
What is Xcopy command?
Xcopy is a command that can copy files, directories, and even entire drives from one location to another. It is an advanced version of the copy command that it has additional switches to specify both the source and the destination in detail. And it is useful in particular when copying files from CDROM to a hard drive because it will remove the read-only attribute automatically.
The Xcopy command is available in most current operating systems such as Windows 10, Windows 8, Windows 7, Windows XP, Windows Vista and Windows 98. The Xcopy command is also DOS command available in MS-DOS.
Can I copy folders and subfolders using Xcopy command?
“I have a folder with a lot of subfolders and files in them. Now, I want to copy the folder to another location, but I don’t want to recreate directory structures. Can I use Xcopy command to copy the directory structure of the folder and subfolders to another location?”
As we know, recreating directory structures can be a tedious and error-prone thing, especially if using the right-click method to create multiple structures and folders. So, you may want to copy folders and subfolders by Xcopy command directly. If you don’t know how to achieve it via Xcopy, keep reading to learn the detailed steps.
Copy folders and subfolders using Xcopy command in Windows 7/8/10
To move folders and subfolders in cmd, the most used command syntax would be:
xcopy [source] [destination] [options]
And there are plenty of options and switches for different demands. You can copy folders and subfolders including or excluding files from one location to another location by following the steps in different situations.
Situation 1. copy folders and subfolders and contents
1. Click Start and type cmd in the search box. Right-click Command Prompt from the list and select Run as administrator.
2. Now, when you’re in the command prompt, you can type Xcopy command as below to copy folders and subfolders including contents. For example, you want to copy “test” folder and its subfolders on C drive to D drive, type Xcopy command as:
Xcopy C:\test D:\test /E /H /C /I

/E – Copy subdirectories, including any empty ones.
/H — Copy files with hidden and system file attributes
/C — Continue copying even if an error occurs.
/I — If in doubt, always assume the destination is a folder. e.g. when the destination does not exist.
Xcopy will not copy open files.
Xcopy doesn’t display any progress or completed operations information when executed.
Remember that for folders with spaces in the name or folders larger than 8 characters in length, it is a good idea to put quotation marks around the path as in the figure above or you may get an error.
Situation 2. copy folders and subfolders without files
You can open the Command Prompt according to the steps shown above. Then, type the Xcopy command as below to copy folders and subfolders without files:
Xcopy Source Destination /T /E
/T — Copy the subdirectory structure, but not the files.
/E — Copy subdirectories, including any empty ones.
Situation 3. copy folders and subfolders with NTFS and Share permission
Sometimes, you may need to transfer the NTFS and Share permission together with your folders. Once the Command Prompt is open, you can then type the following command to copy all files and folders and retain its NTFS and Share permissions.
Xcopy Source Destination /O /X /E /H /K
/E — Copy folders and subfolders, including empty ones.
/H — Copy hidden and system files also.
/K — Copy attributes. Typically, Xcopy resets read-only attributes.
/O — Copy file ownership and ACL information.
/X — Copy file audit settings (implies /O).
Actually, there are many syntaxes for the Xcopy command, and you should use different syntaxes for different situations. Under most circumstances, you need to use several syntaxes at the same time. But if one syntax is used incorrectly, the Xcopy command may refuse to work, even worse, you may lose files. Therefore, you must be very careful when using the Xcopy command.
In fact, most users are not familiar with the use of the command line, and you may be confused with a large number of syntaxes. Therefore, you can copy folders and files in an easier way using a third-party migration tool like AOMEI Backupper Standard.
Easier way to copy files or folders in Windows 7/8/10
AOMEI Backupper Standard is a free and reliable backup software for Windows Vista/XP/7/8/10. It allows you to backup folders/files to different places like internal hard drive, external hard drive, USB drive, network and so on. This software has a clear interface and user-friendly design, so, you can figure it out quickly even for the first time.
In addition, this software has many useful features. For example, it supports scheduled backup, which can help you automatically backup folders/files in Daily, Weekly, Monthly, and Event-triggerВ mode. Furthermore, Full backup and Incremental backup are also supported. You can set incremental backup to save both your storage disk space and backup time.
Step by Step guide to copy folders files or folders via AOMEI Backupper
1.В Download AOMEI Backupper Standard, install and launch it.
2. Click Backup and File Backup subsequently.

3. Click Add File or Add Folder to choose the files or folders you want to backup and then click OK.

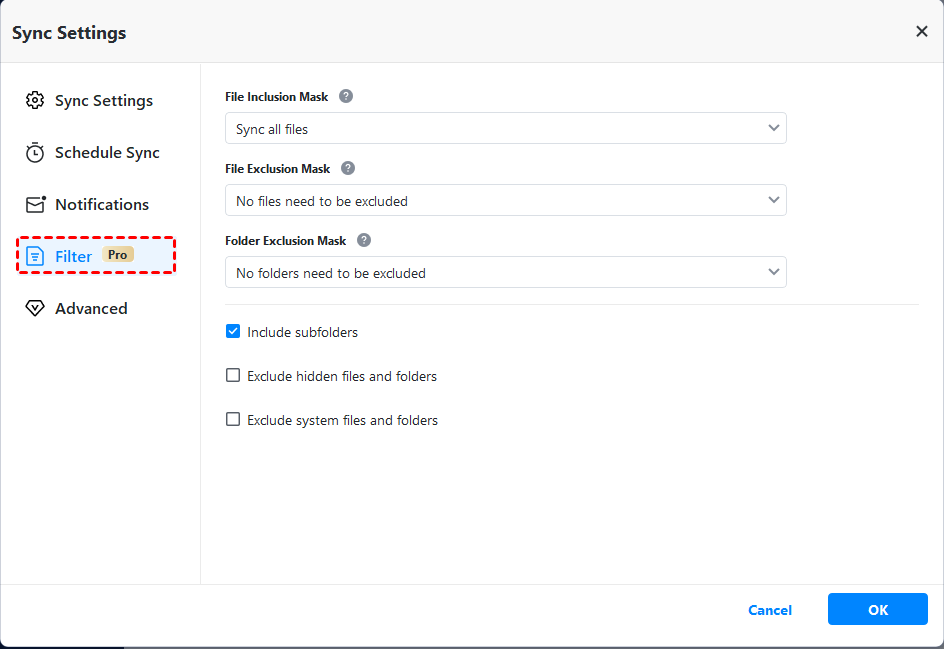
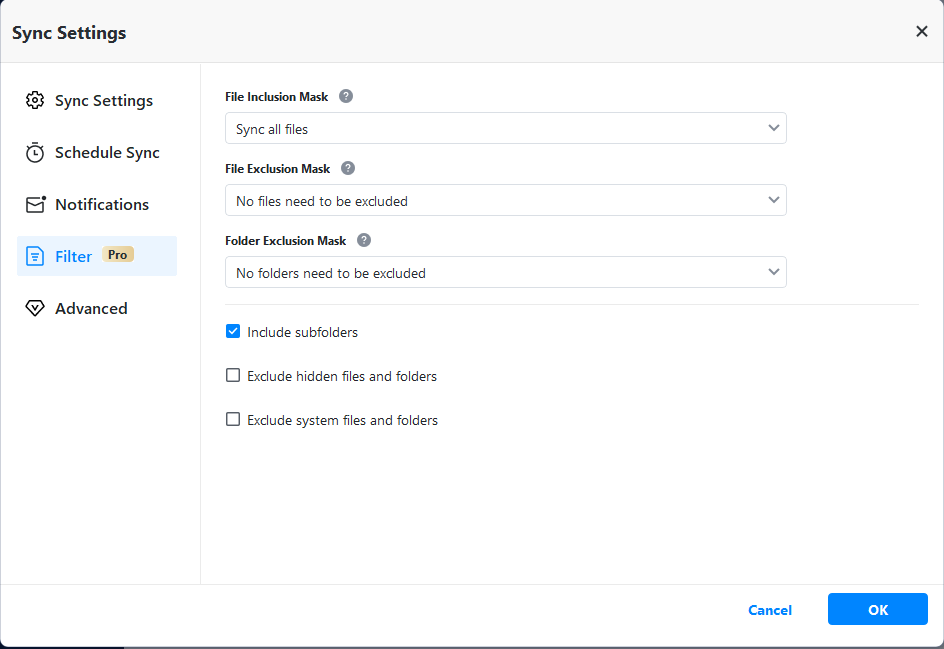
вњЋ Note: After clicking Add Folder, you can open Filter Settings to set file inclusion/exclusion mask. This function can help you backup files with specific file extension, you can upgrade to paid versions to enjoy it.
4. Select the destination path you want to copy files to. Internal hard drive, connected external hard drive, Cloud drive, shared folder, and NAS are available.

5. (Optional) Click Schedule to set a Daily/Weekly/Monthly under General tab, or select Full and Incremental backup under Advanced tab. Then, click Start Backup.

Verdict
You can copyВ foldersВ andВ subfolders using Xcopy command by the steps shown above. However, many users say that copying failed due to Xcopy not working sometimes, or Xcopy does not copy all files. And in some cases, Xcopy halts because of “Insufficient Memory” error or invalid number of parameters.В
Therefore, using AOMEI Backupper to copy folders or files is a more reliable and convenient method. With only a few clicks, you can copy folders or files to your destination, and its useful features like incremental backup, USB plug in, etc. bring you much convenience.
Moreover, AOMEI Backupper Standard designs for Windows XP/Vista/7/8/10 only, if you are a Windows Server user, you can try another version–AOMEI Backupper Server.
Recover personal files from the Windows.old Folder such as Documents Pictures and Windows Live Mail Emails in Windows 10
Technical Level : Intermediate
If you performed a custom install of Windows 10 intentionally or not and you are looking for your personal files after Windows is installed, then you might need to recover them manually. A custom install is similar to a clean install, but instead of wiping the hard disk clean, your previous Windows installation is moved to a folder called Windows.old. Windows.old is an archive of your old Windows installation. It is created by setup for a number of reasons depending on how the upgrade was initiated, including recovery of personal data or to facilitate the rollback to that previous version of Windows if you performed an in place upgrade. A custom install is sometimes initiated by booting from the Windows 10 install media (DVD or USB thumbdrive) or if you start the installation from within a previous running version of Windows at the desktop then select the option ‘Keep Nothing’. In this article, we take a look at how to recover your files if they are still there.
To recover your personal files, click Start > File Explorer
Click This PC
Open the system drive where Windows 10 is installed represented by the Windows logo.
Open the folder Windows.old
Open the Users folder
Open your old account folder which should contain your files. In my case, its Andre.
Open each personal folder which will contain your files.
Press Control + A or click Select All then click Copy or Cut
Launch a new File Explorer window (press Windows key + E or click Start > File Explorer) then navigate to the respective personal folder (Documents, Pictures, Music, Videos) then paste the files there.
Repeat the same steps for other folders containing files such as Music, Pictures, Videos and Downloads.
Import your Windows Live Mail messages from the Windows.old folder
Windows 10 comes built in with a new Mail app which is incompatible with older mail desktop apps such as Windows Live Mail and Outlook Express. This means, you won’t be able to import email messages into it from other mail programs. If you were previously running one of those mail programs, you will need to download then install the latest version which is Windows Live Mail 2012. It is included with the Windows Essentials 2012 suite which you can download for free at the following link.
Once you have downloaded Windows Essentials 2012, proceed to install it. You will need to ensure the .NET Framework 3.5 is installed, the Windows Essentials 2012 setup program will guide you through the installation.
Enable Show Hidden Files and Folders
Click Start > File Explorer > This PC > click the View tab then click Options
Click View tab again then select the Show hidden files, folders and drives radio box. Click Apply then OK
Launch Windows Live Mail 2012
Once Windows Live Mail 2012 is installed, launch the program from Start > All Apps > Windows Live Mail
You will be prompted to add an email account, click Cancel.
Click the File menu then click Import messages
Select the appropriate email program you were previously running. In this case, we will use Windows Live Mail. Click Next.
Click Browse
Expand This PC > Local Disk (where Windows 10 is installed) > Windows.old > Users > Your Old Account Folder (represented by the username) > expand AppData
Expand Local > Microsoft then select Windows Live Mail then click OK
Click Next
Make sure All folders is selected then click Next
Wait while your emails are imported.
Expand Storage folders > Imported folders > then click Inbox
Should you did delete the Windows.old folder?
It depends, I would wait 30 days before deleting it unless you are pressed for disk space. In which case you can do so. If an issue occurs where you might need to rollback to your previous version of Windows, you will have to do so using reinstall media.
Applications will need to be reinstalled for certain programs.
You will notice that application files are blank; you will need to reinstall the appropriate applications in order to view and edit them, examples include Microsoft Office. If you copied over your iTunes folder from the Music folder under your old account in Windows.old, simply reinstall iTunes and it should automatically import your audio files and playlist.
What about Microsoft Outlook?
Your old mail data is stored in C:\Windows.old\Users\AccountName\AppData\Local\Microsoft\Outlook
Copy the Outlook folder to Documents, launch Outlook then perform the import.
copying all contents of folder to another folder using batch file?
I have a folder in C:\Folder1
I want to copy all the contents of Folder1 to another location, D:\Folder2
How do I do this using a batch file?

12 Answers 12
xcopy.exe is the solution here. It’s built into Windows.
If you have robocopy,
if you want remove the message that tells if the destination is a file or folder you just add a slash:
xcopy /s c:\Folder1 d:\Folder2\

I see a lot of answers suggesting the use of xcopy. But this is unnecessary. As the question clearly mentions that the author wants THE CONTENT IN THE FOLDER not the folder itself to be copied in this case we can -:
Thats all xcopy can be used for if any subdirectory exists in C:\Folder1

RoboCopy did not work for me, and there are some good solutions here, but none explained the XCopy switches and what they do. Also you need quotes in case your path has spaces in it.
xcopy /i /e «C:\temp\folder 1» «C:\temp\folder 2»
Here is the documentation from Microsoft:

On my PC, xcopy and robocopy need also the path to them, i.e. C:\Windows\System32\xcopy.exe
That’s why I use simply «copy»: copy /y . \Folder1\File.txt . \Folder2\
This is how it is done! Simple, right?
Here’s a solution with robocopy which copies the content of Folder1 into Folder2 going trough all subdirectories and automatically overwriting the files with the same name:
/COPYALL copies all file information
/E copies subdirectories including empty directories
/IS includes the same files
/IT includes modified files with the same name
Note: it can be necessary to run the command as administrator, because of the argument /COPYALL . If you can’t: just get rid of it.

FYI. if you use TortoiseSVN and you want to create a simple batch file to xcopy (or directory mirror) entire repositories into a «safe» location on a periodic basis, then this is the specific code that you might want to use. It copies over the hidden directories/files, maintains read-only attributes, and all subdirectories and best of all, doesn’t prompt for input. Just make sure that you assign folder1 (safe repo) and folder2 (usable repo) correctly.
And, that’s it folks!
Add to your scheduled tasks and never look back.
I have written a .bat file to copy and paste file to a temporary folder and make it zip and transfer into a smb mount point, Hope this would help,


