- Solved: Cannot Run CHKDSK Write Protected on Windows 10/8/7
- CHKDSK error: volume is write protected
- Possible causes for write protected
- Quick fixes to remove write protected for CHKDSK in Windows 10/8/7
- Fix CHKDSK write protected disk in CMD
- Remove write protection in Diskpart
- Modify WriteProtected key in Registry Editor
- Remove write protected by completely formatting
- Run disk checking with third party tools
- Fix: Windows cannot Run Disk Checking on this Volume Because it is Write Protected
- What causes the Windows cannot Run Disk Checking on this Volume Because it is Write Protected Error?
- Solution 1: Resolve CHKDSK in the Command Prompt
- Solution 2: Modify the Attribute via Registry
- Solution 3: Using DiskPart
- Solution 4: Scanning your drive for corruption
- [Fixed] Windows Cannot Run Disk Checking on This Volume Because It Is Write Protected
- Causes of «Windows Cannot Run Disk Checking on This Volume Because It Is Write Protected» Error
- Fix 1. Remove Write Protection via CMD
- Fix 2. Remove Write Protection via Diskpart
- Fix 3. Clear Read-Only in Registry Editor
- Fix 4. Recover Files from Hard Drive
- Fix 5. Format the Volume
- Conclusion
- FAQs About Windows Cannot Run Disk Checking On This Volume
- 1. How do you fix Windows Cannot run checking on this volume because it is write protected?
- 2. How do I remove write protection from a hard drive from command prompt?
- 3. How do I run chkdsk on a locked drive?
Solved: Cannot Run CHKDSK Write Protected on Windows 10/8/7
Windows says it cannot run CHKDSK because the volume is write protected? Come and learn how to remove write protected on hard drive for CHKDSK in Windows 10/8/7.
![]()
By Teresa  / Last Updated February 26, 2020
CHKDSK error: volume is write protected
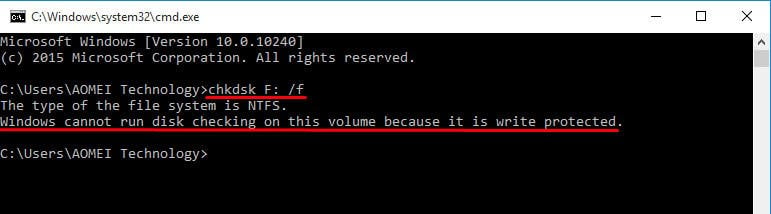
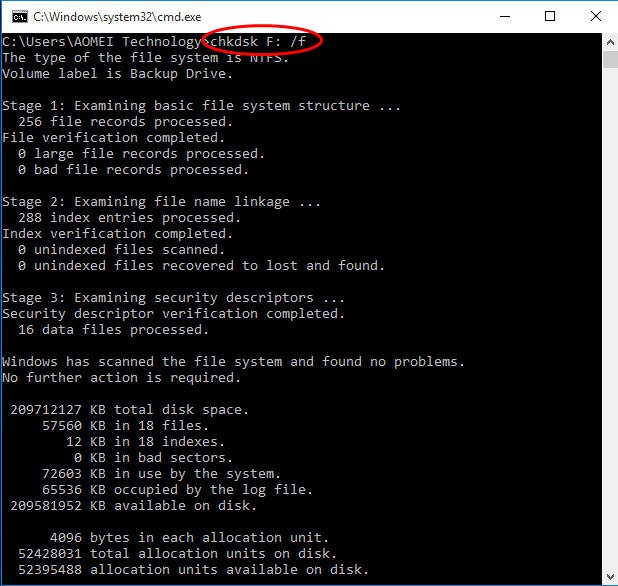
“I get a prompt says Windows detected a hard disk error after my Windows 10 startup this morning. I guess it would be the problem of my newly attached external backup drive, so I decided to check hard drive for errors after some Google. However, after I typed chkdsk F: /f in CMD, only to find that the drive was write-protected. It says: The type of the file system is NTFS. Windows cannot run disk checking on this volume because it is write protected. I don’t remember to set up write protection. What should I do to remove write protection on my external hard drive and run CHKDSK on write protected drive successfully?”
Did you come across similar issues? Write protection problem exists on not only external hard drive, but also USB flash drive, SD card, USB hard drive, and even internal hard disk in Windows 7/8/10. When you run CHKDSK and get write-protected message, you did not give rise to the issue but discover it. Other behaviors like creating new folder and modifying existing data will trigger the write protection error as well. Then, how do you get hard drive write-protected?
Possible causes for write protected
Generally speaking, write-protected status can be understood as read only. That is to say, you can read files on write protected drive but you cannot add new files or make changes for existing data. Following are possible reasons that account for why your drive get write protected.
There is a write protection tab on your hard drive. Usually, it is produced by manufacturer. Check your hard drive or disk enclosure. If yes, switch it to the Off side.
The partition file system is corrupted or damaged due to virus infection or other unknown reasons. A bad file system may cause the data cannot be accessed.
The attribute of selected drive is set as ReadOnly. The attribute may be modified unwittingly.
After knowing why you can’t run CHKDSK on write protected drive, let’s learn how to remove the write protection with different solutions.
Quick fixes to remove write protected for CHKDSK in Windows 10/8/7
To clear the write protection and perform CHKDSK, you may need different solutions under different situations. Some workable fixes are illustrated below.
Fix CHKDSK write protected disk in CMD
According the support of Microsoft, when you encounter the CHKDSK /f volume is write protected issue, you can try another command in CMD: chkdsk / f / r / x. For example, chkdsk F: /f /r /x and press Enter. You can replace F with another drive letter.
However, some users report that that command does not resolve their problem. The write protection error still prompts.

If you have faced such situation, it is suggested to try other methods showing in the next part.
Remove write protection in Diskpart
This method applies to the drive that has been set as readonly. It will clear readonly attributes.
1. Type diskpart in CMD and hit Enter. Click on Yes in the pop up confirming dialogue.
2. In Diskpart, type following commands in sequence and each of them comes with an Enter.
select volume n (where n is the write-protected drive, here is 6)
attributes disk clear readonly
![]()
3. Go back to CMD and type CHKDSK F: /f, you’ll find the disk checking runs smoothly.
Modify WriteProtected key in Registry Editor
Another way to clear readonly of a drive is to modify registry. Typeregedit in Run and navigate to this path:
Right click the WriteProtected key and select Modify. Change the value from 1 to 0.
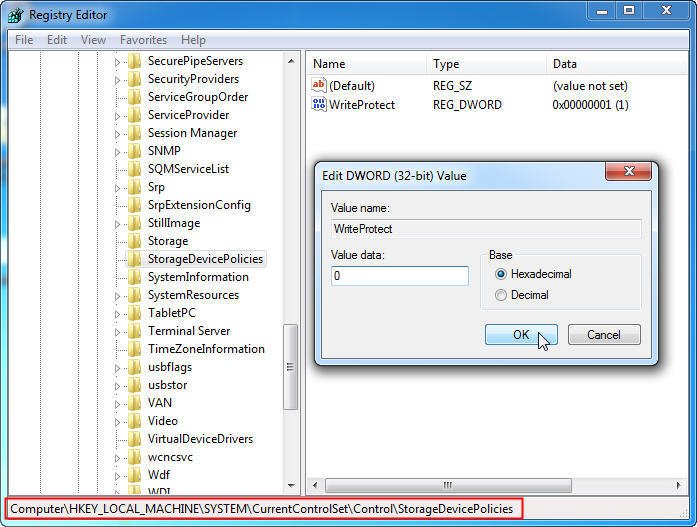
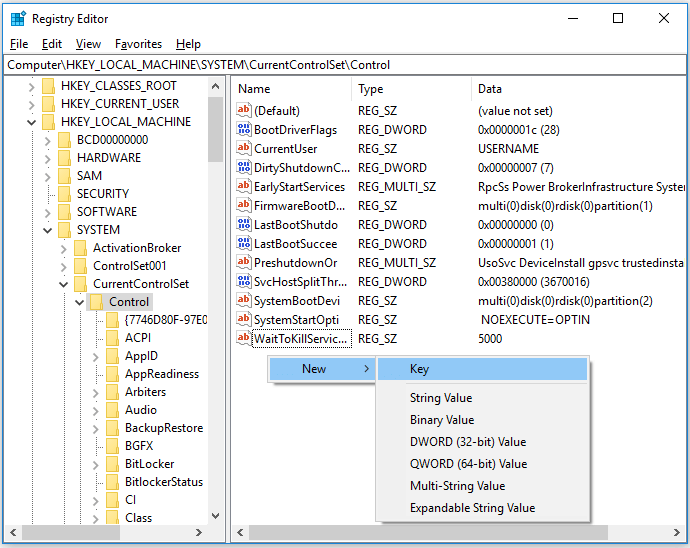
Tips: If you cannot find the StorageDevicePolicies, you can right click Control folder and then New > Key. Name it with WriteProtected and open it.
Remove write protected by completely formatting
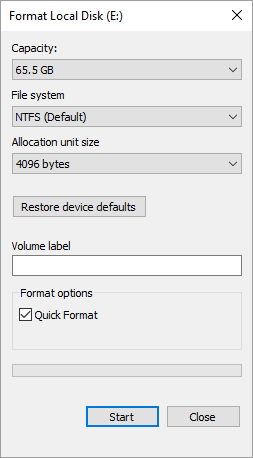
If the write protection in CHKDSK is caused by corrupted or damaged file system, you need to format it thoroughly. When format the drive with Device Manager or Diskpart, you may receive format write protected error.
Fortunately, you can format the write protected drive with AOMEI Partition Assistant Standard. It is free hard drive partition manager that will help you better manage internal/external/USB hard drive, USB flash drive, SD card, Pen drive, etc. To solve the CHKDSK write protected trouble in Windows 10, free download and have a try.
Important: formatting will cause data loss. Think twice before you leap.
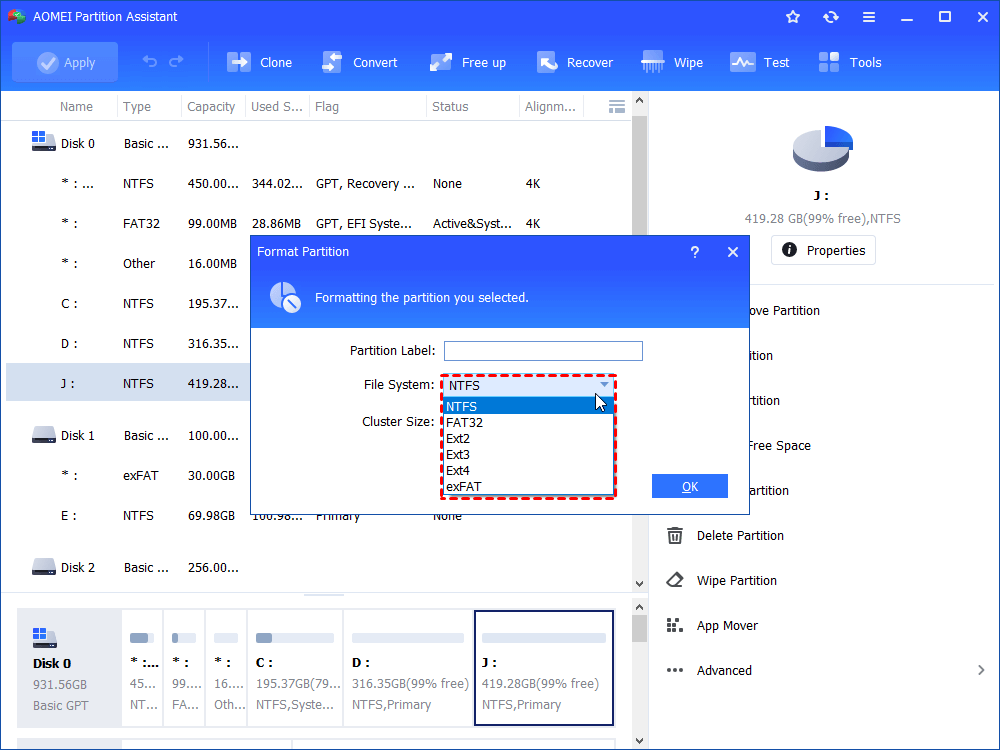
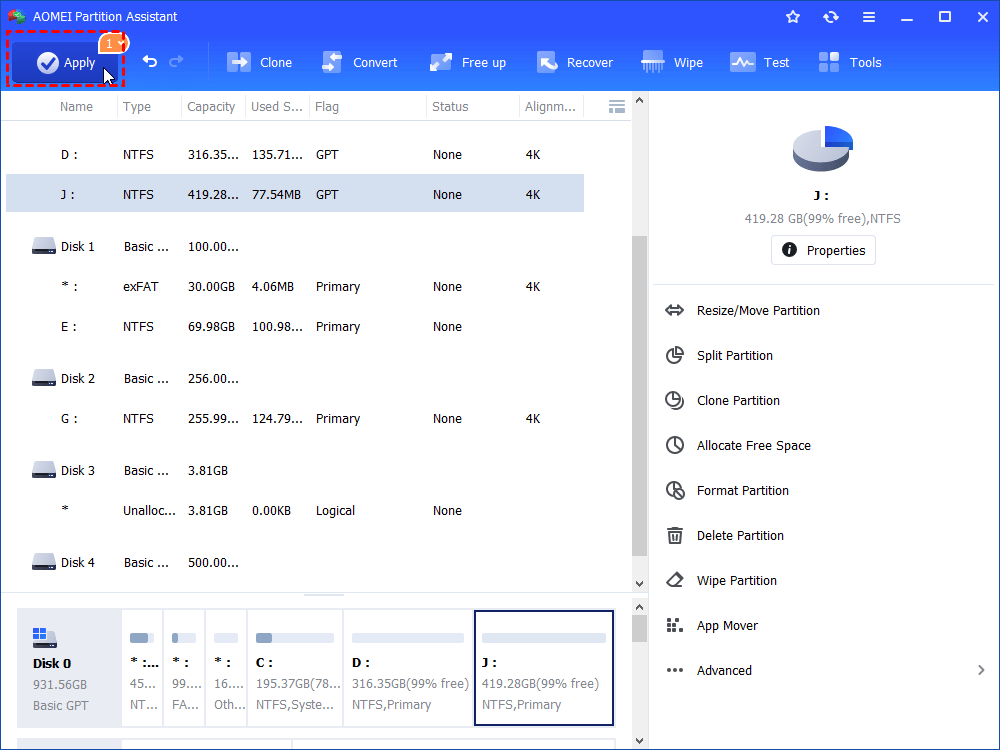
1. Install and run AOMEI Partition Assistant. Right click the write protected partition and select Format Partition.
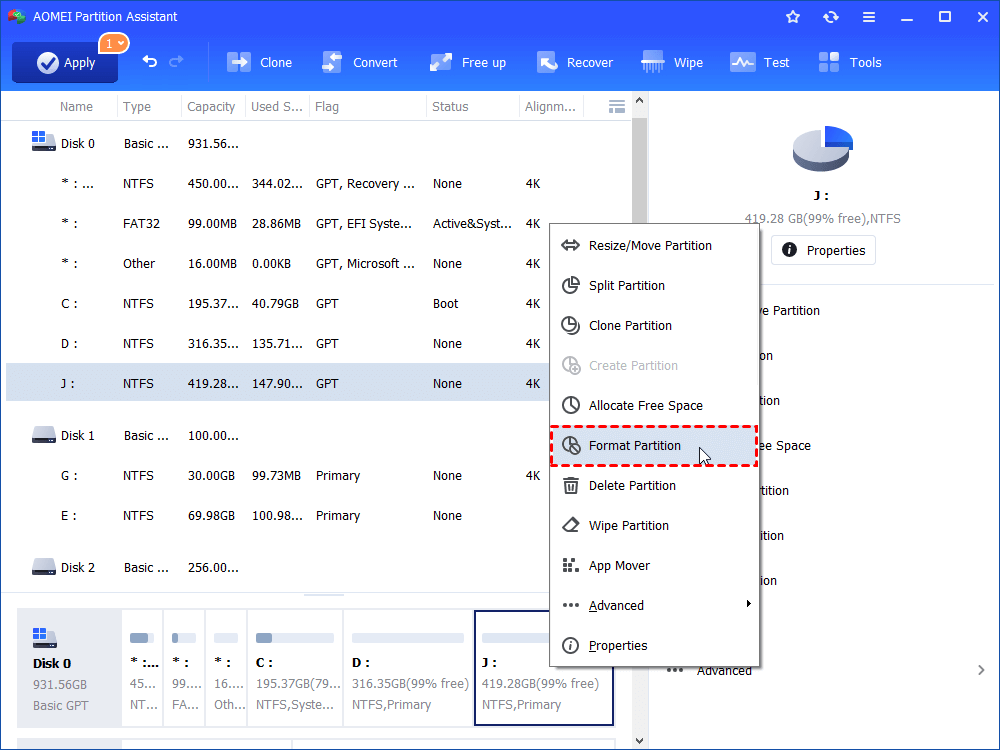
2. Edit partition label, select file system and change cluster size if you wish to in the pop up window.
3. Click Apply and then Proceed after your confirmation.
Tips: Except for formatting the partition, you can Wipe Partition if there is no important data stored on that drive.
Run disk checking with third party tools
To solve “unable to CHKDSK write protected” error, you can run disk checking with another tool. Aforementioned AOMEI Partition Assistant supports performing not only partition checking but disk checking. Let’s get to know these two features. In the first place, start AOMEI Partition Assistant.
1. For partition error checking, right click the drive and go Advanced >Check Partition.

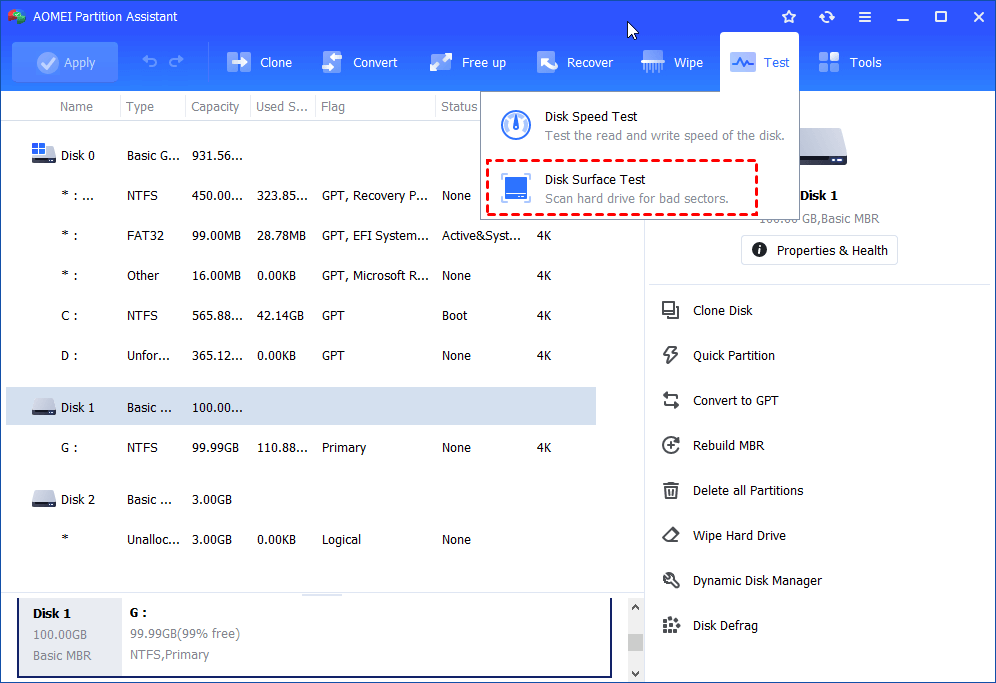
2. For disk bad sector checking, right click the disk and select Surface Test.
Tips: covered methods also apply to “CHKDSK write protected USB”, “CHKDSK NTFS write protected”, and “unable to install Windows because the partition is write protected” issues.
Fix: Windows cannot Run Disk Checking on this Volume Because it is Write Protected
The error ‘Windows cannot Run Disk Checking on this Volume Because it is Write Protected’ is caused when your volume/drive is damaged or attributed to Read Only. CHKDSK is a command-line utility in Windows that lets you search for bad sectors in your volume and verify the integrity of system files stored on your drive. Sporadically, running the utility might prompt you with an error which stipulates that the drive is either corrupted or write protected.
If one of your drives is write protected, this means you won’t be able to edit the contents of the drive which includes editing the files or removing them. To put it simply, write protected indicates that the volume is attributed to Read-only. A prime example would be the write protection of USB drives which, now and then, occurs to everyone in which case you are unable to copy the contents of the USB drive to the computer or vice versa.
What causes the Windows cannot Run Disk Checking on this Volume Because it is Write Protected Error?
It won’t be wrong to say that everyone encounters this error every now and then which is usually caused by —
- Write protection on your drive. If your drive is attributed to Read-only, the error will naturally appear due to restricted permissions.
- Damaged drive. Sometimes, if your drive is damaged or corrupted due to a bad system file stored on it, it can cause the error to pop up.
You can apply the solutions mentioned below to fix your issue.
Solution 1: Resolve CHKDSK in the Command Prompt
To start off with something easy, there have been reports that the error was resolved using a different chkdsk command. This was advised by the Microsoft Support itself, therefore, it is definitely worth the try. What you have to do is:
- Open an elevated command prompt by pressing Winkey + X and selecting Command Prompt (Admin) from the list.
- Once it opens, type in the following:
 Chkdisk – Windows
 Chkdisk – Windows
3. Where D: is the faulty drive, replace it accordingly.
The parameters mean the following:
/f parameter searches your drive for any errors and tries to fix them.
/r parameter will scan your drive for bad sectors and resolve them.
/x parameter dismounts your drive meaning if your drive is in use, it won’t be any longer until the search is completed.
It is important to note that some users reported that their problem persisted even after trying this in which case you’ll have to follow the other solutions mentioned below.
Solution 2: Modify the Attribute via Registry
If the solution provided by Microsoft doesn’t work for you, you can try to remove the write protection using Windows Registry. Windows Registry can cause certain critical issues so make sure you follow the steps very carefully. Here’s what to do:
- Press Winkey + R to open Run.
- Type in regedit.
- Once the Windows Registry opens, paste the following in the address/location bar:
4. There, double-click the ‘WriteProtect’ key and change the value from 1 to 0.
If you can’t find the StorageDevicePolicies folder in your Windows Registry, here’s an alternate way for you:
- Paste the following path in the address bar:
2. In the middle pane, right-click and select New > Key.
 Windows Registry – New Key
3. A new folder will be created, name it ‘StorageDevicePolicies’. Make sure you don’t type the name incorrectly.
4. Afterward, highlight the newly created folder, right-click on the middle pane and select DWORD (32-bit) Value.
 A New entry to clear Readonly Attribute
5. Name it WriteProtect and set the value to 0.
Solution 3: Using DiskPart
DiskPart is a command-line utility that you can use to create partitions on your drive. It can also be used to change the attributes of a drive which is what we’re going to do here. Here’s how to use it:
- Open Start Menu, type in ‘diskpart’ and open it up.
- Once the utility loads, type in:
3. The volumes on your hard disk will be listed, now type in the following:
4. You’ll have to replace # with your drive alphabet.
5. After that, type in the following:
![]() Using Disk Part to Clear Attribute
Using Disk Part to Clear Attribute
6. Wait for it to complete.
Solution 4: Scanning your drive for corruption
One last thing you can do to fix this error is to scan your drive for corrupted files which is one of the roots of the problem. Here’s how to do it:
- Open up ‘This PC’.
- Right-click the faulty drive and select Properties.
- Switch to the Tools tab.
- Once there, click the ‘Check’ option. Checking the Drive for Errors
- If you’re prompted with a UAC dialog box, select Yes.
- Wait for the scan to complete.
 Checking the Drive for Errors
[Fixed] Windows Cannot Run Disk Checking on This Volume Because It Is Write Protected
The error ‘Windows cannot Run Disk Checking on this Volume Because it is Write Protected’В is caused when your volume/drive is damaged or attributed to Read Only. CHKDSK is a command-line utility in Windows that lets you search for bad sectors in your volume and verify the integrity of system files stored on your drive.
Depending on the reason why you receive «Windows cannot run disk checking on this volume because it is write protected», the solutions to the problem vary.В Five Fixes for Chkdsk Write Protected:
| Workable Solutions | Step-by-step Troubleshooting |
|---|---|
| Case 1. Chkdsk Write Protected Because Hard Drive Is Write Protected | |
| Case 2. Chkdsk Write Protected Because File System Corrupted |