- Методы исправления ошибки «Не удается найти USB-накопитель» в Media Creation Tool Windows 10
- Варианты исправления ошибки «Не удается найти USB-накопитель»
- Способ 1: Форматирование USB-накопителя
- Способ 2: Использование другой версии ПО
- Fix: Windows 10 Media Creation Tool Can’t Find USB
- Initial Preparation
- Solution 1: Clean the USB Drive Using Diskpart
- Solution 2: Update Your USB Drivers
- Solution 3: Use Rufus to Create a Bootable Drive
- Fixed: USB Flash Drive not Showing Up in Windows
- USB Drive Not Showing Up in Windows
- Preliminary Checks on Your USB Drive
- Fixes for USB Drive Not Showing Up in Windows 10 File Explorer Only
- Method 1. Update USB Drive Driver
- Method 2. Reinstall Disk Driver for USB Drive
- Method 3. Create New Partitions
- Method 4. Assign a New Drive Letter to the USB
- Method 4. FixВ File System Errors
- Fixes for USB Not Showing Up in Windows File Explorer and Disk Management
- Method 1. Fix Driver Issues
- MethodВ 2. Change USB Connection
- MethodВ 3. Fix Physical Corruptions
- The Bottom Line
Методы исправления ошибки «Не удается найти USB-накопитель» в Media Creation Tool Windows 10
Как бы бережно вы не обращались со своей операционной системой, все равно рано или поздно настанет момент, когда придется ее переустановить. Зачастую в подобных ситуациях пользователи прибегают к помощи официальной утилиты Media Creation Tools. Но что делать, если указанный софт отказывается наотрез распознавать флеш-накопитель в ОС Windows 10? Именно об этом мы и расскажем в данной статье.
Варианты исправления ошибки «Не удается найти USB-накопитель»
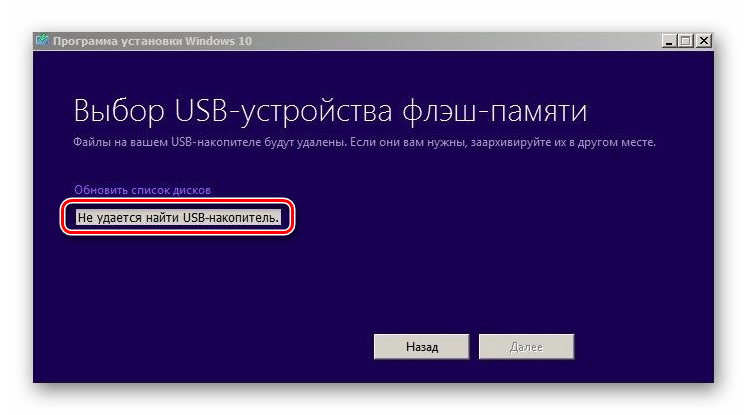
Перед тем как применять описываемые ниже методы, мы настоятельно рекомендуем попробовать поочередно подключить USB-накопитель ко всем разъемам вашего компьютера или ноутбука. Нельзя исключать вероятность того, что всему виной не софт, а само устройство. Если же результат тестов будет всегда такой, как указано на изображении ниже, тогда используйте одно из описанных ниже решений. Сразу обратим ваше внимание на тот факт, что мы озвучили лишь два общих варианта исправления ошибки. Обо всех нестандартных проблемах пишите в комментариях.
Способ 1: Форматирование USB-накопителя
В самую первую очередь, в случае когда Media Creation Tools не видит флешку, следует попробовать ее отформатировать. Сделать это очень легко:
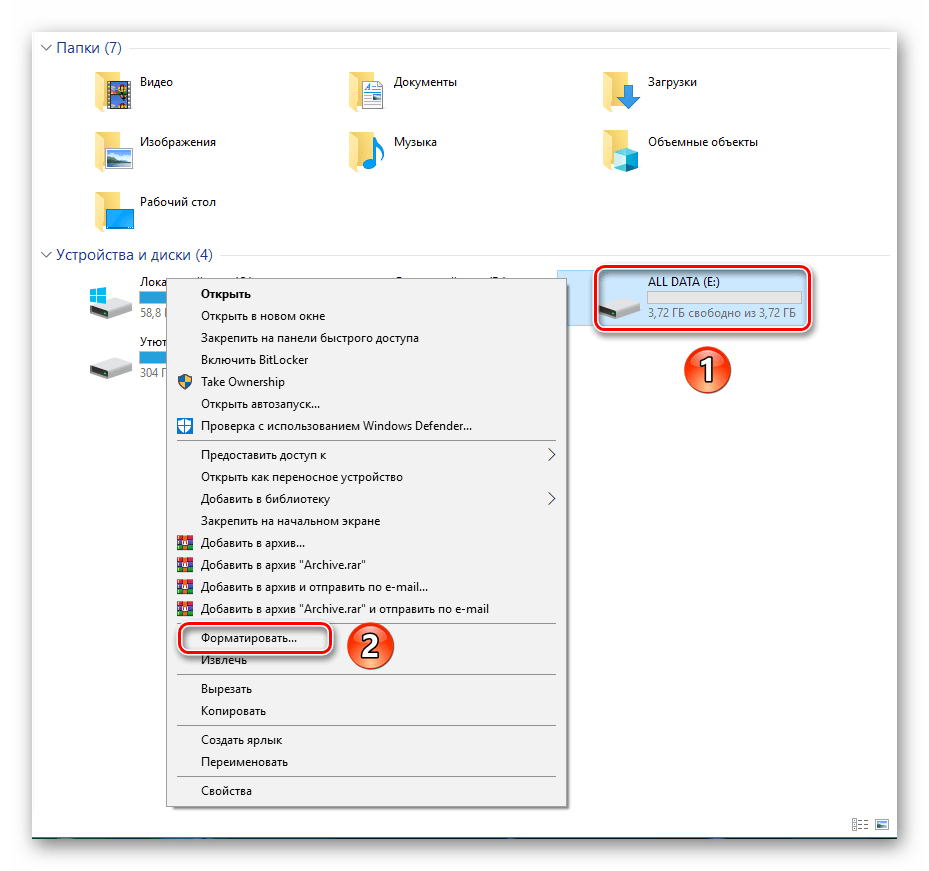
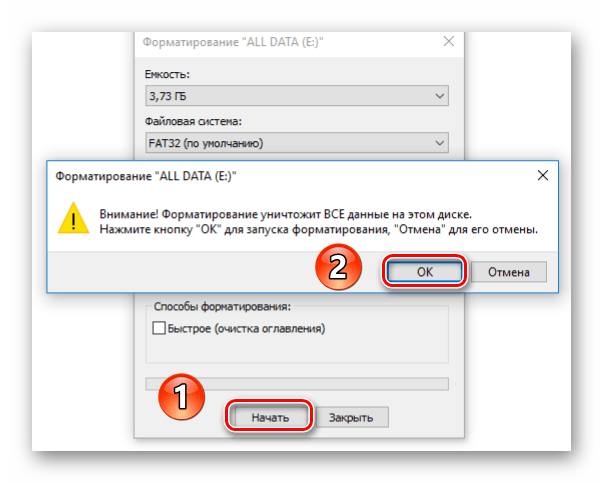
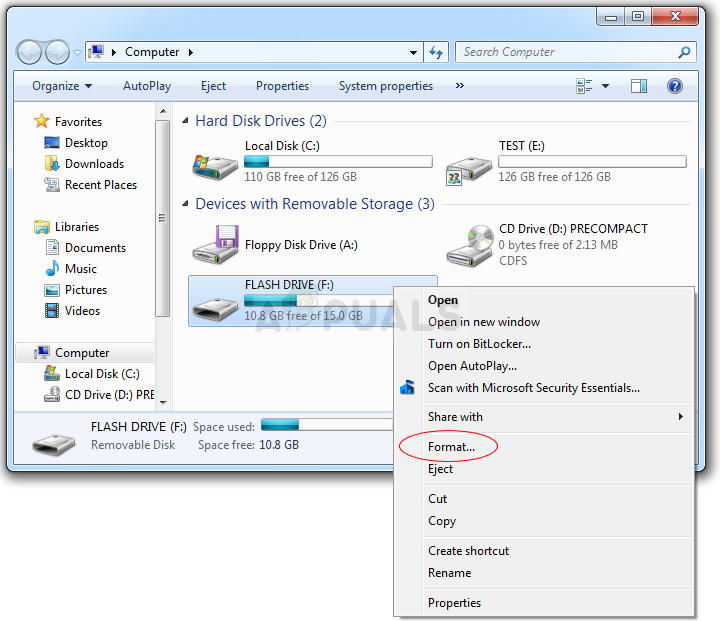
- Откройте окно «Мой компьютер». В списке накопителей найдите USB-флешку и нажмите на ее названии правой кнопкой мышки. В появившемся меню нажмите на строчку «Форматировать…».
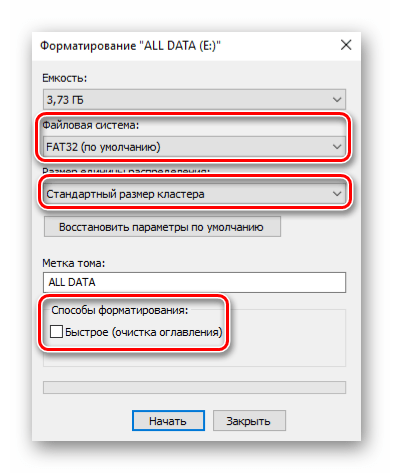
Далее появится маленькое окно с параметрами форматирования. Убедитесь в том, что в графе «Файловая система» выбран пункт «FAT32» и установлен «Стандартный размер кластера» в поле ниже. Кроме того, мы рекомендуем убрать галочку напротив опции «Быстрое форматирование (очистка оглавления)». В результате процесс форматирования будет длиться несколько дольше, но накопитель будет очищен более тщательно.
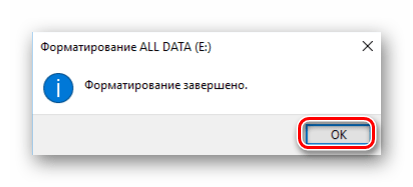
Спустя некоторое время на экране появится сообщение об успешном окончании операции. Закройте его и попробуйте снова запустить программу Media Creation Tools. В большинстве случаев после проделанных манипуляций флеш-накопитель корректно определится.
Если же вышеописанные действия вам не помогли, стоит попробовать еще один метод.
Способ 2: Использование другой версии ПО
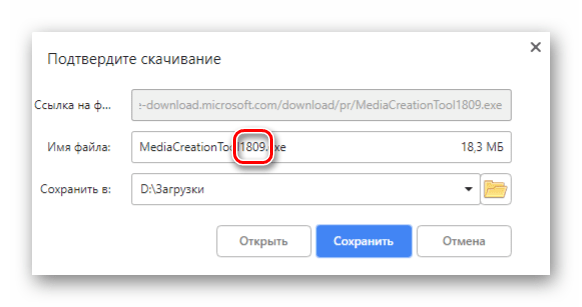
Как видно из названия, данный вариант решения проблемы крайней прост. Дело в том, что программа Media Creation Tools, как и любой другой софт, выпускается в различных версиях. Не исключено, что используемая вами версия попросту конфликтует с операционной системой или USB-накопителем. В таком случае достаточно просто скачать с интернета другой дистрибутив. Номер сборки обычно указывается в названии самого файла. На изображении ниже видно, что в данном случае это 1809.
Сложность этого способа заключается в том, что на официальном сайте Microsoft выкладывается лишь самая последняя версия программы, поэтому более ранние придется искать на сторонних сайтах. Это значит, что вам нужно быть предельно осторожными, чтобы вместе с ПО не скачать на компьютер вирусы. К счастью, есть специальные авторитетные онлайн-сервисы, на которых можно сразу же проверить загружаемые файлы на наличие вредоносных утилит. О пятерке лучших таких ресурсов мы уже писали ранее.
В 90% случаев использование другой версии Media Creation Tools помогает решить проблему с USB-накопителем.
На этом наша статья подошла к концу. В качестве заключения хотелось бы напомнить вам, что создавать загрузочные накопители можно не только с помощью указанной в статье утилиты — в случае необходимости вы всегда можете прибегнуть к помощи стороннего софта.
Fix: Windows 10 Media Creation Tool Can’t Find USB
Windows 10 Media Creation is a tool made by Microsoft which makes the process of burning Windows 10 to a USB or a DVD drive, as well as updating the said computer to Windows 10 easier for users.
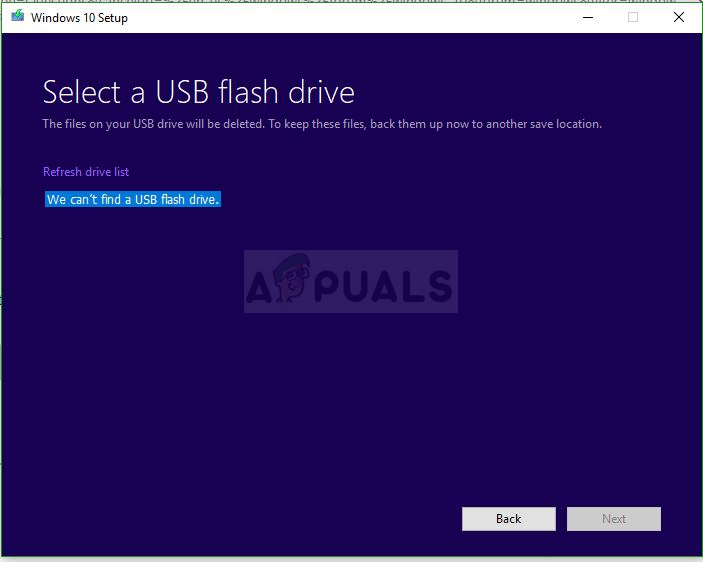
The “We can’t find USB” error appears after you have already chosen that you want to use a USB device to create a Windows 10 ISO USB and you are now supposed to choose the USB for the installation. It appears that something might be wrong with the USB or the tool so you might want to check out the working methods we have prepared below!
Initial Preparation
This section is related to easy methods for specific scenarios which may solve your problems in no time or display a solution which can be universal to a group of users.
Many users have reported that they experienced this issue exclusively with SanDisk USB drive. It seems that they were able to solve this problem simply by using a different USB device.
The reason this is placed as the first solution is that you might not be able to solve this problem in any other way without replacing your USB drive. If you are not using a SanDisk USB drive, please check out the rest of our solutions below.
Also, if you have a spare USB drive, when you see that your first USB drive (the one you want to use) is unrecognized in the Windows 10 ISO setup, plug in the second one. For some users, this actually helped and the second USB drive triggered the first one to appear as well!
Solution 1: Clean the USB Drive Using Diskpart
Diskpart is a tool built-into the Windows operating system which helps users manage disks and partitions installed on it. It can help you manage, rename, or format the drivers you have connected to your computer.
You can use this tool easily to prepare your USB drive for the installation. The cleaning process is somewhat different than the usual formatting so we recommend you try out this method. However, you will have to be extremely careful when locating the name and the number next to your USB drive!
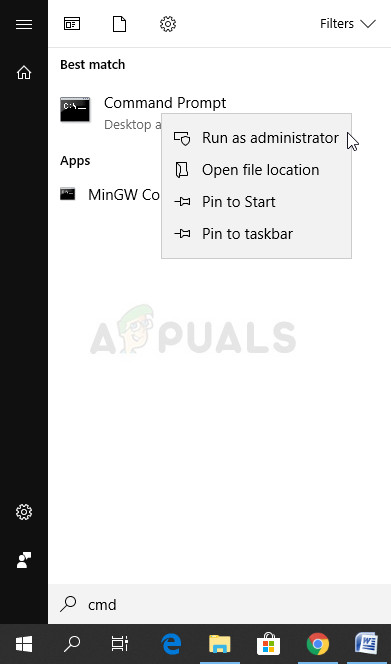
- You can easily open Command Prompt simply by clicking the Start menu or the Search bar next to it and type in “cmd” or “Command Prompt”. Right-click on the Command Prompt result at the top and choose the Run as administrator option.
- At this command prompt window, type in simply “diskpart” in a new line and click the Enter key in order to run this command.
- This will change the Command Prompt window to enable you to run various Diskpart commands. The first one you will run is the one which will enable you to see the complete list of all available volumes. Type this in and make sure you click Enter afterwards:
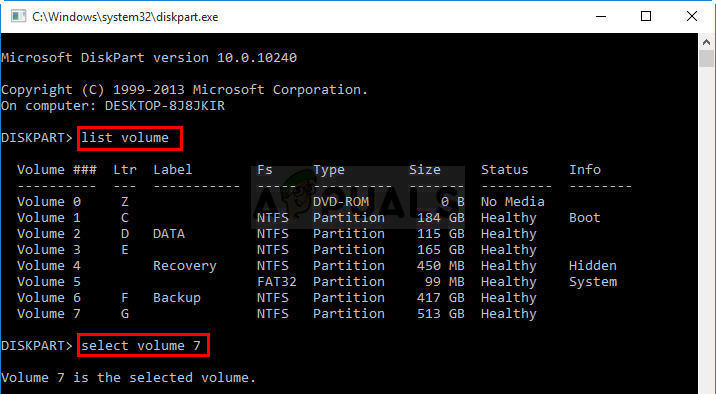
- Make sure you choose your USB drive carefully, depending on which number is assigned to it in the list of volumes. Let’s say that its number is 1. Now run the following command in order to select your USB drive:
- A message should appear saying something like “Volume 1 is the selected volume”.
Note: If you are unsure about which drive number belongs to your USB device, the easiest way to do so is to check its size at the right pane. If your USB is, for example, 8GB, you will be able to see that its size is at least 6.5GB.
- In order to clean this volume, all you need to do is to type in the command displayed below, click the Enter key afterwards, and stay patient for the process to complete. The process should now be successful for a change. This will also create an empty primary partition and add it to the top and the last command will exit Command Prompt.
This might do the trick for you, but it’s still recommended to format your drive using the usual method in Windows which is somewhat easier to accomplish using regular Windows tools. Follow the set of steps presented below in order to format your USB drive you want to use for Windows 10 ISO media.
- Open your Libraries option or open any folder on your computer and click on This PC option. If you are using an older version of Windows (Windows 7 and older), simply open My Computer from your Desktop.
- Right-click on the USB Removable Drive you want to format and choose the Format… option from the context menu which will appear.
- A small window should open up titles Format so make sure you click on the menu under File system and choose the FAT32 file system if it’s not already selected. Click on Format and be patient for the process to finish. Try to run the Windows ISO setup again and check to see if you USB device is now recognized.
Solution 2: Update Your USB Drivers
Sometimes there are issues with the ISO drive creation and the USB ports you have installed on your computer and you should definitely consider updating the drivers related to them as the concept of Windows 10 ISO is relatively new so your drivers should keep up.
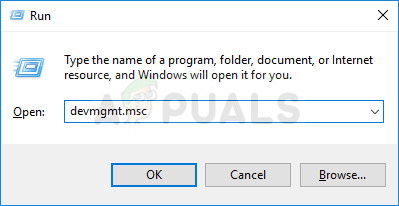
- Click on the Start button, type Device Manager, and select it from the top of the suggestions window. If you are using an older version of Windows (older than Windows 7), use the Windows Key + R key combination on your keyboard, type in “devmgmt.msc” in the Run dialog box, and click OK.
- Expand the Universal Serial Bus controllers section at the very bottom of the Device Manager window, right-click on entries beginning with Intel(R) or at least the ones with non-generic names, and choose the Update Driver option from the context menu.
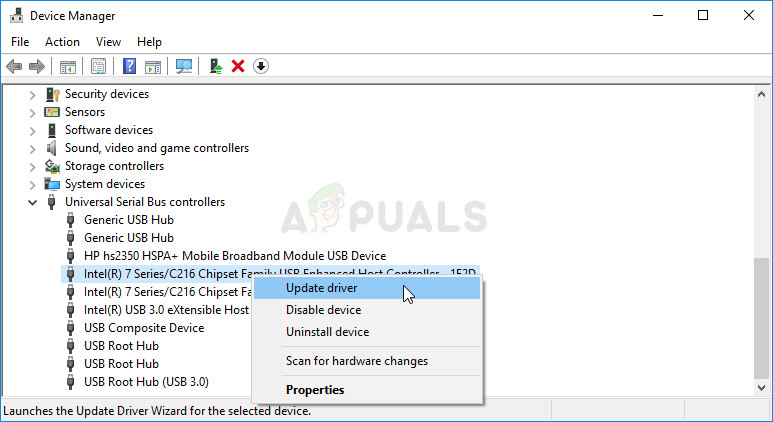
- Select Search automatically for updated driver software and wait for Windows to search for a new driver.
- If Windows doesn’t find a new driver, you can try looking for one on the device manufacturer’s website and follow their instructions.
Note: If you are using Windows 10 on your computer, latest drivers for built-in devices are often installed alongside cummulative Windows updates so make sure you keep your computer up to date at all costs. Windows Update is perfomed automatically on Windows 10 but you can check for new updates by following the instructions below for a new update.
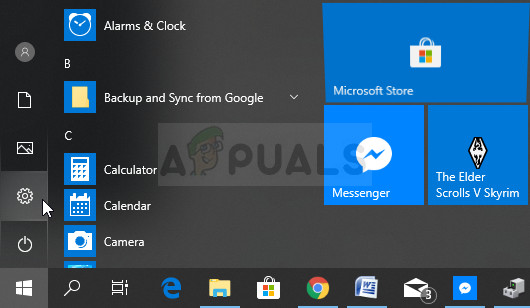
- Use the Windows Key + I key combination on your keyboard in order to open Settings on your Windows computer. Alternatively, you can search for “Settings” by using the search bar on the Taskbar or the Start menu or you can click the gear icon at the bottom left part.
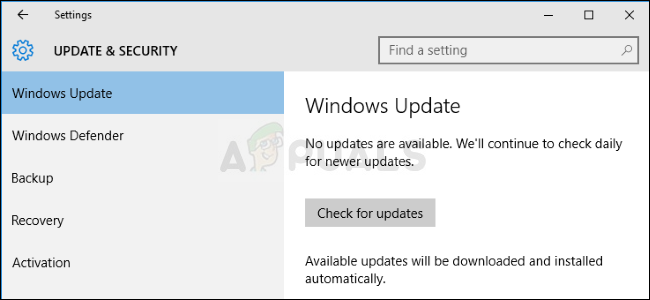
- Locate and open the “Update & security” section in the Settings app.
- Stay in the Windows Update tab and click on the Check for updates under the Update status in order to check whether there is a new build of Windows available.
- If there is one, Windows should proceed with the download process and you will be prompted to restart your computer in order to complete the update.
Solution 3: Use Rufus to Create a Bootable Drive
Users have reported that, after failing to create a USB bootable device using any other method or solution, they have tried using a simple tool called Rufus. It can perform the same process easily and you won’t have to prolong the process. The only thing it lacks is beautiful design but that is probably not the point anyway.
- You can download Rufus from this website. Scroll down towards the Download button and download the latest version. Open the file you downloaded and you can simply open it without installation.
- Under the Device section, click on the drop-down menu and choose your USB device from the list. This time, you shouldn’t have problems about the USB.
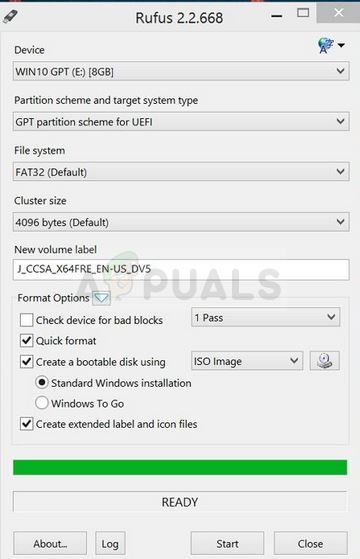
- Under the Partition scheme and target system type, make sure you choose the GPT partition scheme for UEFI and leave the File system option as FAT32. Leave the Cluster size to default.
- Check the Create a bootable disk option and leave the radio button next to Standard Windows installation. At the right part of this option, click on the disk icon and choose your .iso file containing Windows 10 installation.

- After that, click on Start, and wait for the process to finish. After it’s done, you will now have your USB device ready for use with Windows 10 on it!
Fixed: USB Flash Drive not Showing Up in Windows
A USB drive not showing up in Windows is one of the commonest issues related to external storage devices. USB drive not showing up in Windows may result from various causes. We will show you the symptoms, causes and corresponding fixes for the issue and provide you the useful way to recover data from your USB drive with EaseUS Data Recovery Wizard.
Table of Contents
About the Author
Reviews and Awards
USB Drive Not Showing Up in Windows
«I’ve tried all the methods I can think of to connect this USB flash drive to my PC, but my computer still does not show up any signals of the drive. All of my projects from this semester are stored on the drive, how can I get to my files?!”
Preliminary Checks on Your USB Drive
Many users have encountered such a problem, that is their USB flash drive not showing up on the computer. Generally, USB not showing up means it disappears from File Explorer. Is your USB drive disappearВ in Windows File Explorer but can be seen in Disk Management? Or is it missing from both places?
To make it clear, go to «This PC» > «Manage» > «Disk Management» and check whether your USB drive shows up. Specify your situation and choose the corresponding tips to follow.
Since there are two scenarios ofВ USB not detected by a PC, we offer a number of solutions. Follow these methods and get your missing USB drive back without losing any data. If you are a Mac user, having the same problem, follow this page to fix USB flash drive not showing up on Mac with ease.
Fixes for USB Drive Not Showing Up in Windows 10 File Explorer Only
If your USB drive shows up in Disk Management, it means Windows can still detect your drive. But due to some reasons, the USB cannot show up in File Explorer as expected. The reasons are:
- USB driver issues
- Drive letter conflicts
- File system errors
The solutions vary based on the causes but all detailed below. Follow to fix your problematic USB with ease.
| Workable Solutions | Step-by-step Troubleshooting |
|---|---|
| Fix 1. Update USB Driver | Connect USB flash drive or external USB to PC. Full steps |
| Fix 2. Reinstall Disk Driver | Right-click «This PC», click «Properties», «Devices Manager». Full steps |
| Fix 3. Recover USB Data | Connect USB flash drive to PC, run USB data recovery software. Full steps |
| Fix 4. Resolve Drive Letter Conflicts | Right-click «This PC», select «Manage» > «Disk Management». Full steps |
| Fix 5. Fix File System Errors | Right-click on the «Start» icon > Type computer management. Full steps |
Method 1. Update USB Drive Driver
This method works when yourВ USB drive not shows up in File Explorer and may show up as unallocated space under Disk Management. Follow the detailed steps below to make your USB driveВ usable again.
Step 1. Connect the USB flash driveВ to PC, right-click on «This PC» and choose «Properties».
Step 2. Click «Device Manager» then expand “Disk drives”. Find and right-click the problematic USB drive and select «Update driver»
Step 3. Click «automatically search for driver software online».
Step 4. Wait for the driver to be updated, then reboot your computer.В Afterward, you can try to reconnect your USB drive to the PC and check whether the USB drive shows up or not.
This method can also be helpful in solving disk-related issues like «The system cannot find the file specified»
Method 2. Reinstall Disk Driver for USB Drive
Step 1. Right-click «This PC» and choose «Properties» > «Devices Manager».
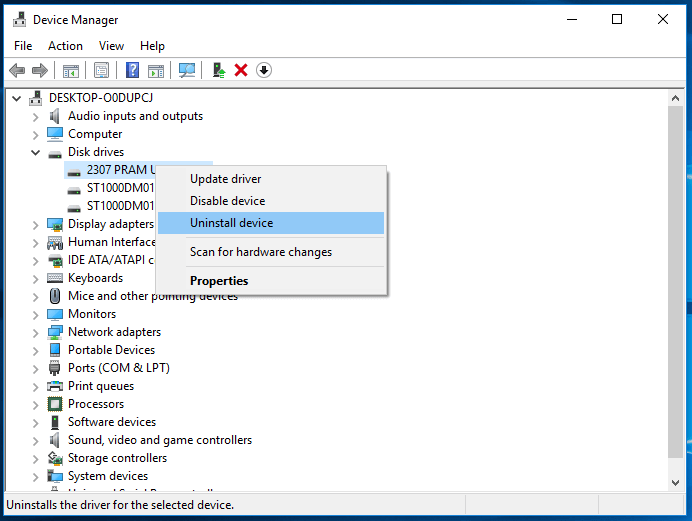
Step 2. Click on «Disk drives», right-click on your USB drive that is not showing up, and choose «Uninstall device».В
Step 3. In the prompt asking you to confirm the removal, click «OK». (Wait patiently and let the process finish. If it takes too long, you can remove the USB flash drive from the PC.)
Step 4. Restart your computer and reconnect the USB flash drive/external hard drive to the PC. After the computer restarts, the driver will be automatically installed.
Method 3. Create New Partitions
If your USB shows up as unallocated space in Disk Management after updating or reinstalling the driver, you are recommended to create a new partition to make it ready for data storage.
To create new partitions on the USB drive:
Step 1. Go to «This PC», right-click it, and choose «Manage» > «Disk Management».
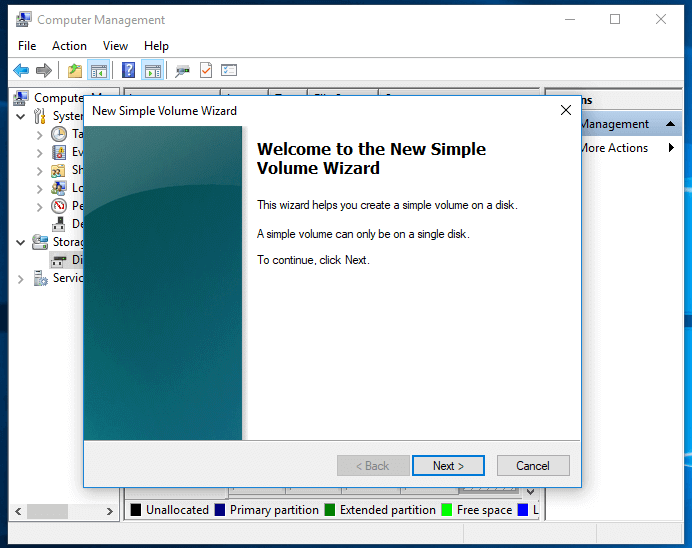
Step 2. Right-click the unallocated space and choose «New Simple Volume».
Step 3. Follow the wizard to finish the remaining process.
Now your USB drive should show up in Windows as usual. You can copy the files you recovered back to your USB according to your needs.
Method 4. Assign a New Drive Letter to the USB
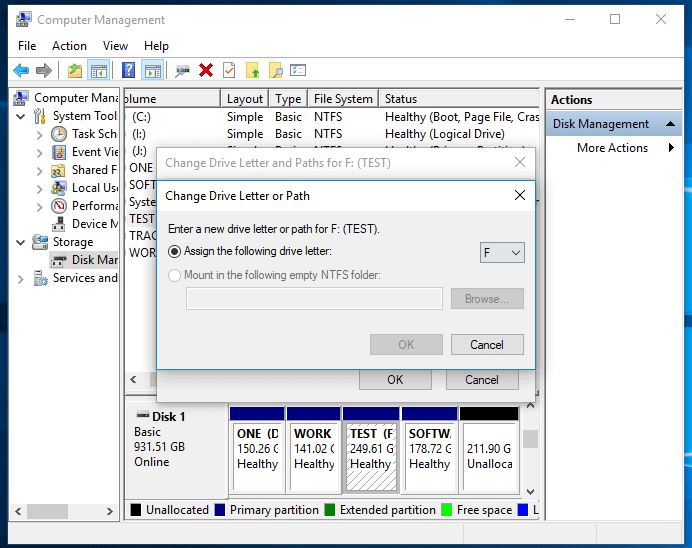
If the drive letter of your USB drive is the same as one of the drive letters of your computer’s hard disk partition, you won’t be able to see it in Windows File Explorer. Besides, you will see the drive has no drive letter in Disk Management. You need to assign a new drive letter to your USB drive.
Step 1. Go to «This PC», right-click it, and choose «Manage» > «Disk Management».
Step 2. Right-click the volume on your USB flash drive and select «Change Drive Letter and Paths».
Step 3. In the new window, click «Change».
Step 4. Assign a new drive letter to your USB and click «OK».
Method 4. FixВ File System Errors
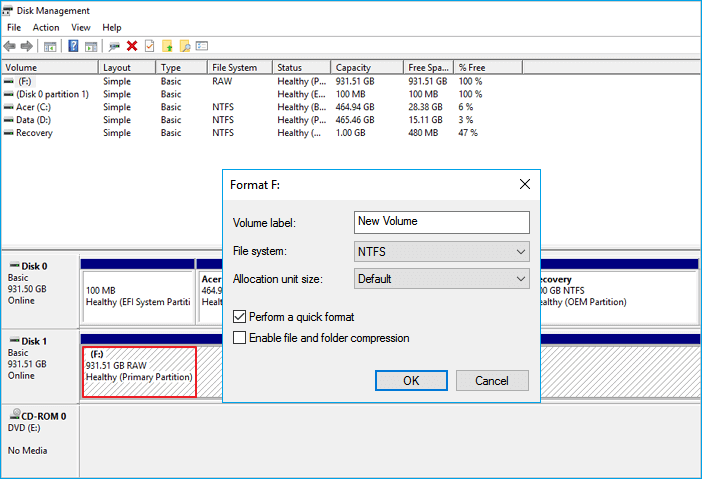
If your USB flash drive has file system errors, it will show up as RAW and become inaccessible. Here the file system error refers to an unsupported file systemВ or a damaged file system caused by misoperations or improper formatting. To fix the file system error you need to format the drive to convert RAW to NTFS or FAT32.В
When you format your USB drive, all data will be deleted. To protect your data, we highly recommend you to use EaseUS Data Recovery Wizard to recover all the data before format.В It allows you to restore data from an inaccessible, RAW, or formatted USB drive and other devices with simple clicks.
Download it now and follow the guide below to restore data from your USB flash drive easily.
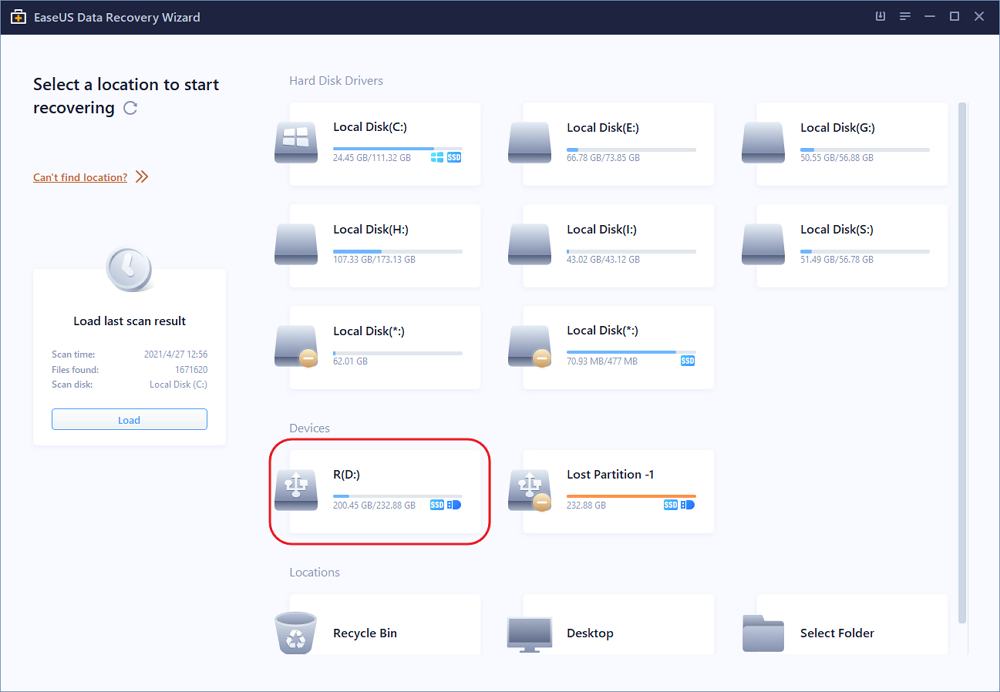
Step 1.В Run USB data recovery software.
Connect the USB flash drive to your computer and launchВ EaseUS USB data recovery software on your PC. Select your USB drive which marks as a removable disk, and click «Scan» to start finding your lost files.
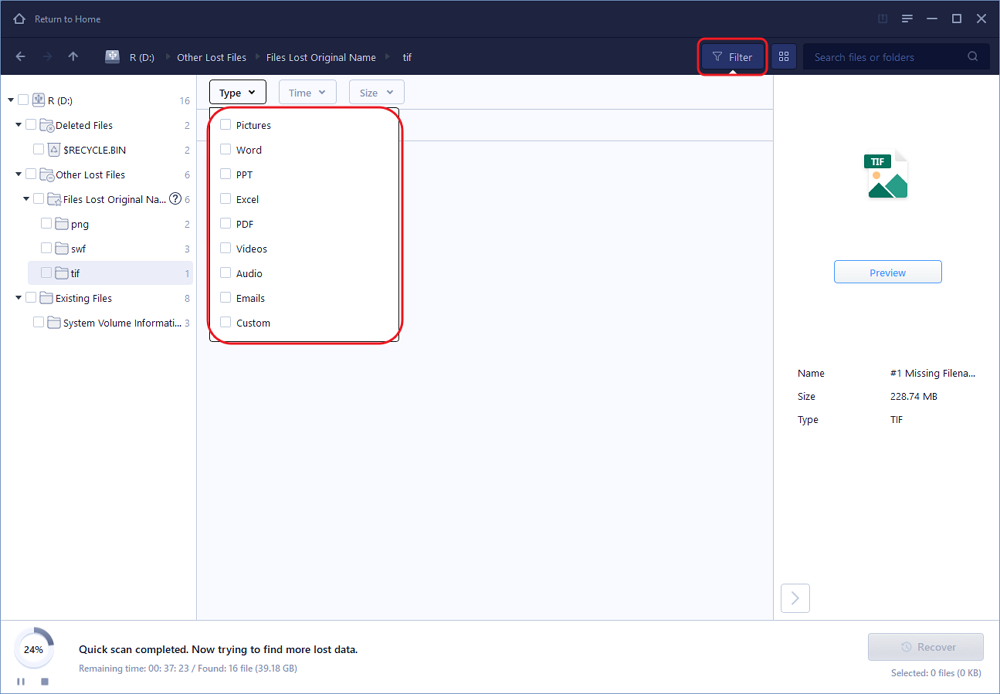
Step 2.В Scan all lost files from USB.
EaseUS Data Recovery Wizard will thoroughly scan your USB flash drive and find all your lost data on it. After the scanning process,В use the Filter feature to filter a specific file type. You can check and preview found USB files in this program.
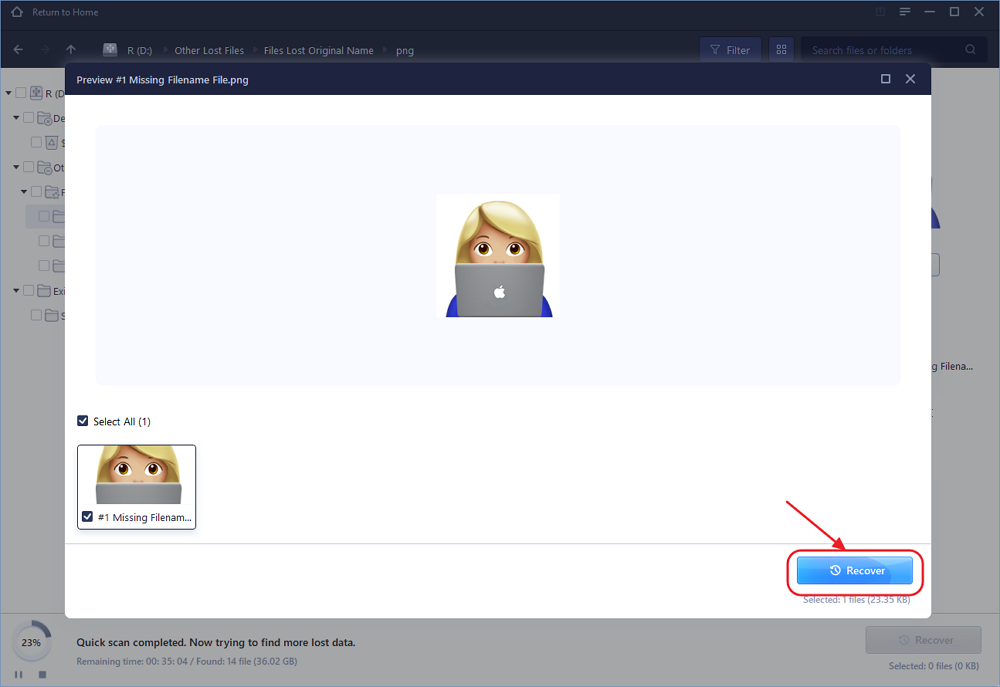
Step 3.В Restore all lost files from USB.
A double-click will allow you to preview the file results. Choose the target files and click «Recover» to save them to aВ secure location on your PC or other external storage devices.
After storing your data in a safe place, you need to format the USB drive to convert the file system back to NTFS or another Windows-compatible file system.
Step 1. Right-click on the «Start» icon > Type computer management > click on «Computer Management».
Step 2. Click «Disk Management» in the bar on the left-hand side, then find the device in the drive viewer.
Step 3. Right-click on the USB flash drive, select «Format» to directly format the USB drive to make it usable.
If you are having a similar issue on your hard drive, you may directly try the fixes below.В

Are your hard drives, be it new or old, internal or external, not showing up in File Explorer or Disk Management? Follow to learn how to make your hard drive showing up again in Windows 10/8/7 without losing data.
Fixes for USB Not Showing Up in Windows File Explorer and Disk Management
If your USB is not showing up in Windows File Explorer and Disk Management simultaneously, the reasons could be:
- USB driver issues
- USB port/cable error
- Physical corruptions of USB
Follow to fix your problematic USB with ease.
Method 1. Fix Driver Issues
Whether the USB drive shows up in Disk Management or not, the USB not showing up issue caused by problematic device drivers can be potentially solved by updating or reinstalling the USB driver. For the detailed steps, you can refer to the first two methods in the last part.
MethodВ 2. Change USB Connection
Connection failure may be the root cause. It’s a hardware problem that you can easily identify by checking the USB connection. Generally, there is more than one USB port on your computer. Try other ones on the same computer, switch from the front USB ports to the rear USB ports, or connect your USB drive to another computer and check whether the problem remains. Similarly, you can also change another USB cable if you are using an external hard drive.
MethodВ 3. Fix Physical Corruptions
If the tips above fail to fix your USB drive that is not showing up in Windows, it’s highly likely there is physical damage or corruption on your USB flash drive or external hard drive. This is the toughest situation and the only suggestion for you is to send the USB drive for manual repair.
The Bottom Line
When a USB flash drive does not show up on your Windows PC, it means that the computer has failed to read the USB drive. Therefore, in order to get a USB drive to show up, we must make the USB readable again. There are many methods for you to make an unrecognized USB drive to show up on PC: update USB flash driver, change drive letter, use Windows’s built-in disk management tool to detect the USB, and more. Hope one of them can be helpful to fix your USB drive.


