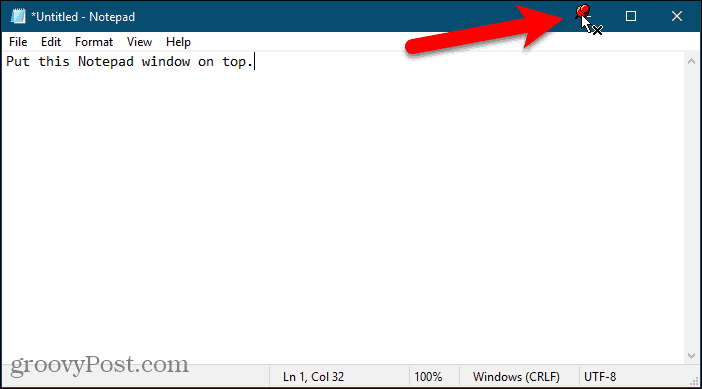
- Disable «Always On Top» Windows 7 taskbar
- Replies (18)
- 3 Ways to Keep a Window Always on Top on Windows 10
- 1. Use a Keyboard Shortcut with an Always on Top AutoHotkey Script
- 2. Use Your Mouse with DeskPins
- 3. Use a System Tray Menu with TurboTop
- Bring the Always-on-Top Feature to All Windows
- Windows 10/8/7 Taskbar Always on Top, How to Keep or Disable It?
- Part 1. How to Make Taskbar Always on Top in Windows 10, 8, 7
- Part 2. How to Disable Taskbar Always on Top in Windows 10, 8, 7
Disable «Always On Top» Windows 7 taskbar
I have read through all the posts, reported the bug during beta, found the hacks that don’t work properly, and still nothing that works.
Is there a status update on when this is going to be fixed? Loosing half an inch of desktop space is annoying when working on small screens. Or is that the point?
I need to be able to explain to over 250 people how to live with this bug and when a fix can be expected.
Replies (18)
* Please try a lower page number.
* Please enter only numbers.
* Please try a lower page number.
* Please enter only numbers.
I’d suggest you to give your Feedback about this feature from the link below to help you get more updates on this.
Yaaser — Microsoft Support Engineer
Visit our Microsoft Answers Feedback Forum and let us know what you think
Was this reply helpful?
Sorry this didn’t help.
Great! Thanks for your feedback.
How satisfied are you with this reply?
Thanks for your feedback, it helps us improve the site.
How satisfied are you with this reply?
Thanks for your feedback.
There is no particular status update on when it is going to have “Keep taskbar on top of other windows” option. I’d suggest you to give your Feedback about this feature from the link below to help you get more updates on this.
Yaaser — Microsoft Support Engineer
Visit our Microsoft Answers Feedback Forum and let us know what you think
One of the most annoying, glaring bugs, reported instantly upon release of the beta, is still not fixed? This makes win 7 extremely frustrating to attempt to use. Having the taskbar hide the title bar of running application windows is just plain stupid. Who ever let this get through the most rudimentary QA process without being reported and fixed needs to find a new job. It’s been reported hundreds of times. I reported it in beta, RC and in release. And am now told to report it again?
I will report the bug. again. again. since that seems to be the only solution you are suggesting. If any other microsoft rep knows the status of this usability bug, please let us know.
I visited link. The wonderful «submit suggestion» link. Where’s the report bug link? Where is the one that all the commercials talk about? You know, the one that Microsoft claims they actually read or listen to?
———————
Feedback left, but it won’t accept a real feedback submission. Submitting it here. Can you please submit this again for us?
———————
The task bar still stuck on top of all windows. Applications can no longer be maximized, taking up the entire screen. This makes using Windows 7 tedious because: it hides the title bar of application windows when you open them, requiring the use of hot keys, arrows, and key combinations to bring up «old» menus to right click to move windows to be able to grab the title bars of windows, you cannot maximize applications to use the full screen any longer, and it takes up precious desktop space on laptop screens. In short, it requires much more work to perform the same functions that we used to perform, and the work arounds are not intuitive on how to perform the functions that used to exist.
A typical user support conversation:
Customer: «How do you maximize the app to use the entire screen?»
Tech: «You can’t, they removed that ability.»
Customer: «How do I move a window with the title bar stuck under the task bar?»
Tech: «Hold down Shift key and right click on the icon in the task bar to bring up the old menu that used to appear when you right clicked and select ‘Move’. Then, use the arrow keys to move the window around until you can grab the title bar with the mouse cursor to move it where you want to normally.»
Customer: «But this happens every time I open an application?»
Tech: «Yes»
Customer: «WTF?»
Tech: «Correct, WTF. It’s a known bug that has been submitted thousands of times since public beta opened over a year ago.»
Customer: «Why are we considering upgrading to Win 7?»
Tech: «I have no clue.»
Having the task bar on top of the entire UI, ALL the time, is unacceptable. «AutoHide» is not a solution. You had a solution in Windows 3.0, 3.1, 3.11, NT4, 95, 98, ME, NT5, 2000, 2003, XP, Vista, and even 2008. You removed that solution with Win 7. And now thousands have complained, waiting for it to be fixed. How do we explain to our user base how the OS is plain broke, bringing into question why we are even considering upgrading to it? Why do we need to learn a new work around and try OS hacks to try to make it work?
3 Ways to Keep a Window Always on Top on Windows 10


When you are working in Windows with limited screen space, it’s useful to have certain windows stay on top of others. Some programs in Windows automatically incorporate this “always on top” feature, but most programs don’t, and Windows doesn’t include this feature either.
Today we’ll cover three ways to easily add the “always on top” feature to every single program in Windows.
1. Use a Keyboard Shortcut with an Always on Top AutoHotkey Script
AutoHotkey is a free program that allows you to create scripts to perform multiple actions with a single keyboard shortcut. It runs in the background and sits in the system tray.
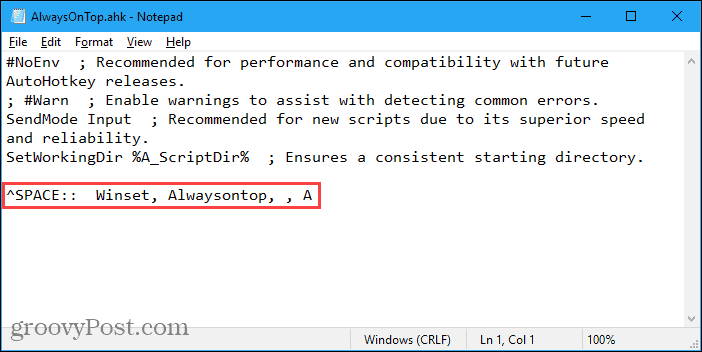
We’re going to use AutoHotkey to create a script that will keep a selected window on top of all others when you press Ctrl + Spacebar when that window is active. We’ll show you the script and explain how it works. But we’ll also provide a downloadable AutoHotkey script file you can use.
Download and install AutoHotkey and then run it.
Download the AlwaysOnTop.ahk script file, extract the .zip file, and put the script in a folder on your hard drive that won’t be moved or deleted.
The script contains some comments and then the following command:
This command sets the currently active window to always be on top when you press Ctrl + Spacebar. If you’d rather use a different key combination, you can change the first part of the command, “^SPACE“. The “^” character represents the Ctrl key. You’ll find the symbols to use for other hotkeys in the Hotkey Modifier Symbols section on this AutoHotkey help page.
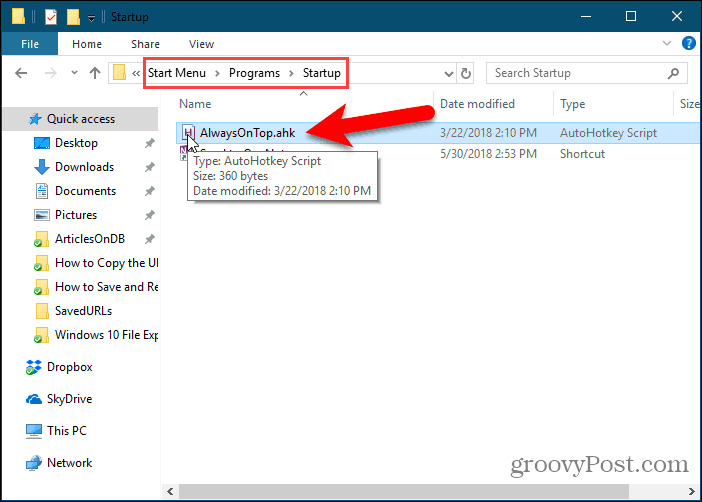
You can put the script in the Windows startup folder (%AppData%\Microsoft\Windows\Start Menu\Programs\Startup), so it starts automatically when Windows starts.
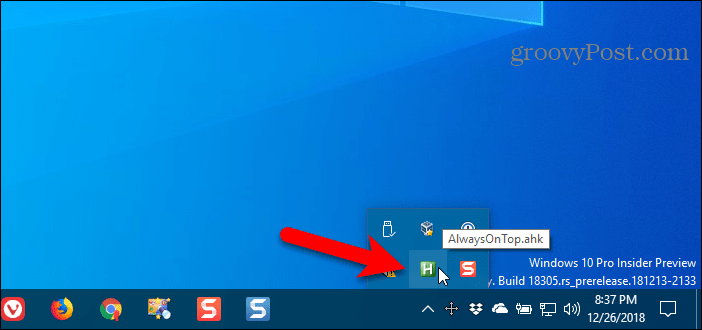
The AutoHotkey script stays in the system tray.
To make the active window always on top, press Ctrl + Spacebar (or the keyboard shortcut you assigned). Press the keyboard shortcut again to disable “always on top” for the active window.
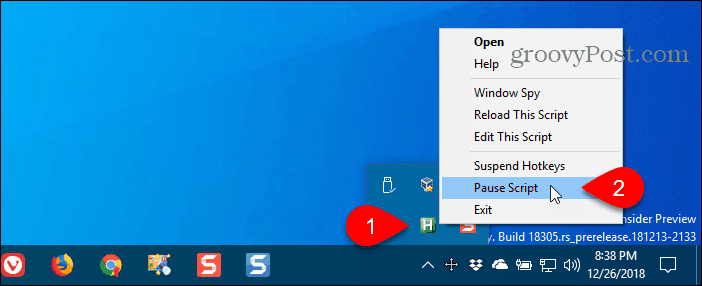
For script options, right-click on the AutoHotkey icon in the system tray.
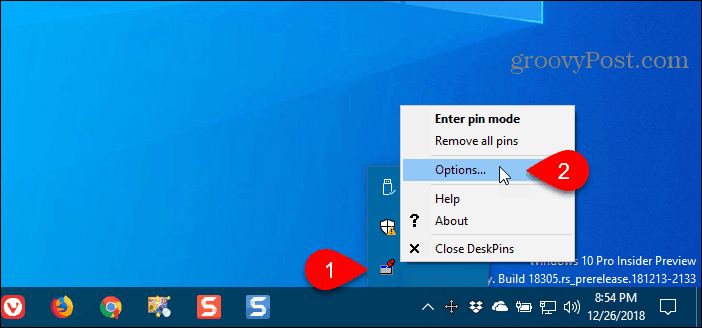
2. Use Your Mouse with DeskPins
DeskPins provides pins you can grab and use to keep any window on top of all other windows. The program sits in the system tray and uses minimal resources.
Download and install DeskPins. Run the program, right-click the icon in the system tray, and select Options to change the Pins, Autopin, and Hotkeys settings.
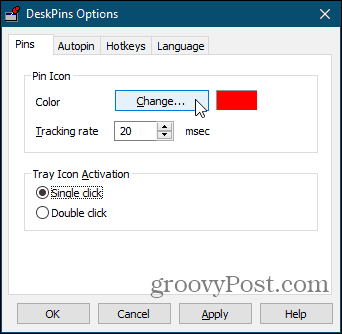
On the Pins tab, you can change the color of the pins. The Tracking rate controls how often each pin checks the pinned window’s position and state. Lower values make the pins more responsive. You can enter any number from 10 to 1000 msec (milliseonds).
If you have an older computer, you may want to increase the Tracking rate number to avoid slowing down your computer.
You can also choose Single click or Double click under Tray Icon Activation to indicate how you get pins from the DeskPins system tray icon. The default is Single click.
You can have DeskPins automatically pin certain types of windows using rules on the Autopin tab.
Check the Enable box and then click Add to add a new rule. Use the check boxes next to the rules to enable and disable individual rules.
Click Help to access the DeskPins help file for more information about automatically pinning windows.

DeskPins provides default shortcuts for entering pin mode and toggling the active window pin. You can change these shortcuts on the Hotkeys tab.

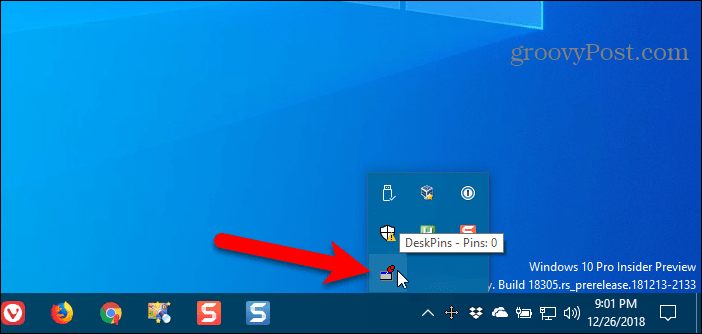
To pin a window on top, click (or double-click, depending on the setting) the DeskPins icon in the system tray.
Then, click the title bar on the window you want to keep always on top.
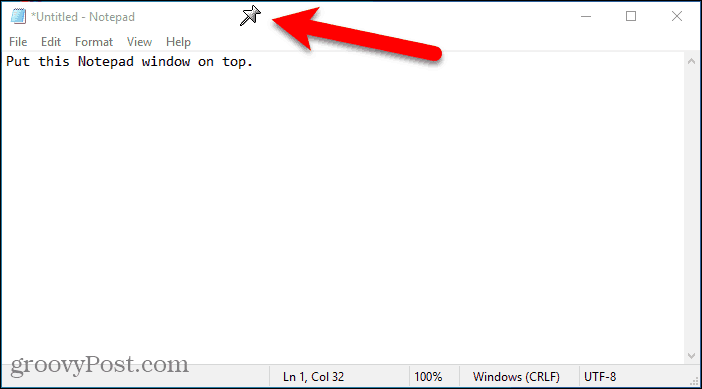
A pin displays on the title bar of the chosen window in the color you specified, or in the default color red.
Click the pin again to disable always on top for the window.
3. Use a System Tray Menu with TurboTop
TurboTop also sits in your system tray like DeskPins. But it operates differently.
Download and install TurboTop. Then, run the program.
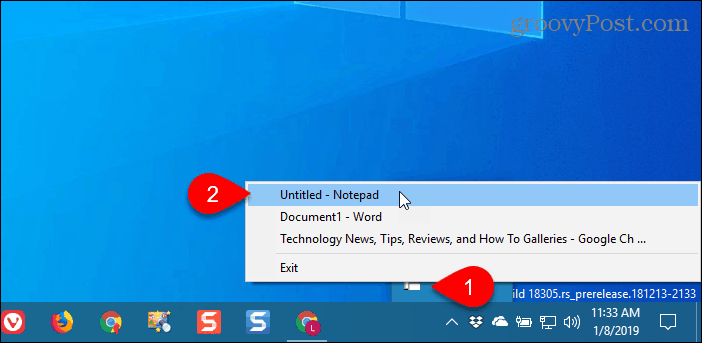
To keep a window always on top, click the TurboTop icon in the system tray. A list of all open windows displays. Select the title of the window you want.
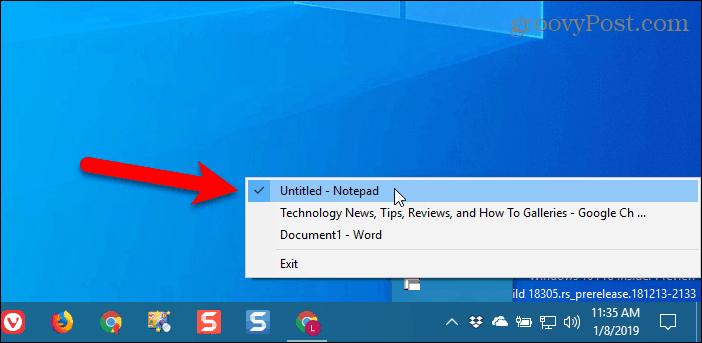
Any windows you choose to be always on top are indicated with a check mark on the TurboTop menu.
To stop keeping a window always on top, click the TurboTop icon in the system tray and select that window again, so there’s no check mark next to the window name on the menu.
Bring the Always-on-Top Feature to All Windows
Whether you like using keyboard shortcuts or prefer using the mouse, there’s an easy solution for keeping windows always on top. If you’ve found other options for keeping windows always on top, let us know in the comments.
Windows 10/8/7 Taskbar Always on Top, How to Keep or Disable It?
Taskbar can be quite convenient for us to launch applications whenever we need. But sometimes we may want to hide it for full-screen play or just for larger screen space. Whether to keep the taskbar always on the top or hide it depends on your needs.
There are a few users reporting that after Windows 10 update, the taskbar always shows up on top of all program windows and they are wondering how to disable that, while other users might be curious about how to keep the taskbar always on top in their Windows 7/8 and even Windows 10. Here you are. This how-to article will show you the ways of both keeping and hiding your taskbar in Windows.
Part 1. How to Make Taskbar Always on Top in Windows 10, 8, 7
The setting of making taskbar always on top in Windows 10 is a little bit different from that in Windows 8 and 7. Choose the one that suits your system version.
1. Uncheck Automatically Hide the Taskbar in Desktop Mode (For Windows 10)
Step 1. Right-click the taskbar on a blank space and select «Taskbar settings». Or you can also open the «Taskbar settings» through: Start menu > Settings > Personalization, and select «Taskbar» in the left menu.
Step 2. Toggle off «Automatically hide the taskbar in desktop mode». By turning off this feature, as long as your computer is in desktop mode, the taskbar will always on top.
Step 3. This is an extra step in which you can choose the location of the taskbar. In the option of «Taskbar location on screen», you are able to determine where the taskbar appears, at the bottom of the whole screen, or the top, or even along one of the sides.

2. Uncheck Auto-hide the Taskbar (For Windows 8/7)
Step 1. In Windows 7, right-click on the blank space of the taskbar and select «Properties». In Windows 8, open Start menu and select «Desktop».
Step 2. Locate «Taskbar» tab, and then uncheck «Auto-hide the taskbar».
Step 3. Click «Apply» at the bottom right of the window and click «OK» to save the settings.

Part 2. How to Disable Taskbar Always on Top in Windows 10, 8, 7
Obviously, the opposite side of turning on is turning off. You can simply try the two ways mentioned in Part 1 to hide your taskbar: In Windows 10, toggle on «Automatically hide the taskbar in desktop mode» in «Taskbar settings»; in Windows 7/8, check «Auto-hide the taskbar» under the «Taskbar» tab either in «Properties» or «Desktop».
If these solutions unfortunately haven’t helped you solve the problem, or if the taskbar still appears on top of all other windows after you’ve turned on the auto-hide, here are other three workarounds to help you disable the taskbar always on top in Windows 10, and Windows 7/8.
Solution 1. Unpin Applications on Taskbar
Unpin the applications or windows you’ve fixed them on the taskbar. If the problem is fixed after the unpinning, you may pin them back on the taskbar again. This solution is both available in either Windows 10 or Windows 7/8.

Solution 2. Cascade Windows
If you are working on Windows 10 and the Solution 1 doesn’t help you, you can try this one:
Right-click the taskbar on a blank space.
Click on «Cascade windows» to turn it on.

Solution 3. Reset Explorer.exe
In Windows 7/8, there is also another workaround worth trying: reset the explorer.
- Right click on the blank space of the taskbar and select «Task Manager».
- In the pop-up window, locate «explorer.exe». (If you don’t see that, click on «More information»)
- Right click on «explorer.exe» and select End Processor. Then click File to add a new task of «explorer.exe».

Do you get along well with your taskbar with the workarounds mentioned in this article? If you find this how-to guide is helpful, welcome to share it with your friends and family!
SHARE THIS ARTICLE!
Well that’s about a worthless article. OF course it is on top when you uncheck the option to hide it. I want it to auto-hide but when it pops up, I want it to be on top, duh. What an idiotic article and a waste of time.
agreed, I simple want it to go behind everything and be and stay on the desk top level. I dont need it always on top.
This article is talking about Windows Update perma-topping the taskbar no matter what you do.


