- Windows bootable dvd from iso
- How to make a bootable DVD?
- Windows USB/DVD Download Tool
- Overview
- Installation
- Using the Windows USB/DVD Download Tool
- Frequently Asked Questions
- Troubleshooting
- How do I create a bootable usb drive with an iso image of Windows 7?
- How to Create or Make Bootable DVD from ISO for Windows 10/8/7
- Part 1: How to Make Bootable DVD with Another CD or DVD
- Part 2: How to Create Bootable CD/DVD from ISO with ISO Burner
- Step 1 Download and Installation (on PC or Mac)
- Step 2 Insert a Blank CD or DVD Disc
- Step 3 Create Bootable CD/DVD from ISO Image
- Part 3: How to Make Bootable CD/DVD for Windows 10/8/7/XP
- Part 4: How to Make Bootable CD/DVD with Free ISO Creator
- Summary:
Windows bootable dvd from iso

How to make a bootable DVD?
Bootable DVD Maker: What is the Bootable DVD? A bootable DVD should be called Emergency Startup Disk which is mainly for re-booting your computer when your system has been compromised, or has experienced technical difficulties.
Making a bootable DVD is not difficult any longer. WinISO is an integrated tool to make bootable DVDs. It has the ability to extract & set boot information, and generate the bootable ISO file as well.
Note: Not all ISO files have boot information. Running WinISO, you will find out whether the ISO image files have bootable information or not on the left of WinISO.
Here we will show you how to make a bootable DVD with ease.
Let’s put the “Non-bootable” ISO file as an example.
Firstly, Free Download WinISO, and then install it.
Step 1: Install and run the software
After the installation, run the software. You can see the main interface as below.

Step 2: Make bootable ISO file
Open an ISO file which is non-bootable ISO. Then set the boot image file.
Tips: There are 2 ways to set the boot information with WinISO.
Usage 1:
Click «bootable» on the toolbar; choose the “Set Boot Image”, a “select a boot image file” dialogue will appear on your screen. Afterwards, choose the boot image file. Then click “open”, you will see the bootable image file on your screen.

Usage 2: You can also load boot information from CD/DVD/BD Driver or CD/DVD/BD image file
Click «bootable» on the toolbar; then click the «Import From..», There are two options. If you have the boot information in your CD/DVD/BD, just choose the “CD/DVD/BD Driver”, then you will get a message, including the importing succeeded message, the boot file size and ask you whether set into the current working image or save it to file? Click the «Set into current» button, the bootable ISO you will got right now. (We recommand you save the boot information first then set it into the non-bootable file.)

Step 3: Burn the bootable ISO file to DVD
Prepare a blank DVD, and make sure you have a DVD Driver to insert it. Then click the “Burn” on the toolbar. Choose the DVD driver you have and the bootable ISO you’ve just got. Everything is OK, Now click “Burn”. A few minutes, you will get a bootable DVD.

More things you can do
- Extract boot image: WinISO can also extract the boot information from the bootable DVD or bootable ISO files. Want to know how to extract the boot image, see here.
- Clear boot information: If you do not need boot information for your file, WinISO can help to solve the problem. Just click “Bootable” on the toolbar; the drop-down list will popup. Click the “Clear Boot Information” then you will get a Non-boot image file as the original ISO you have.

For more guides, please take closer look here:
Windows USB/DVD Download Tool
Overview
When you download Windows from Microsoft Store, you have two options: You can download a collection of compressed files, or you can download an ISO file. An ISO file combines all the Windows installation files into a single uncompressed file.
If you choose to download an ISO file so you can create a bootable file from a DVD or USB drive, copy the Windows ISO file onto your drive and then run the Windows USB/DVD Download Tool. Then simply install Windows onto your computer directly from your USB or DVD drive.
When you download the ISO file, you must copy it onto a USB or DVD. When you’re ready to install Windows, insert the USB drive or DVD with the ISO file on it and then run Setup.exe from the root folder on the drive.
This allows you to install Windows onto your machine without having to first run an existing operating system. If you change the boot order of drives in your computer’s BIOS, you can run the Windows installation directly from your USB drive or DVD when you first turn on your computer. Please see the documentation for your computer for information about how to change the BIOS boot order of drives.
Making copies
To install the software, you can make one copy of the ISO file on a disc, USB flash drive, or other media.
After you’ve installed the software and accepted the license terms that accompany the software, those license terms apply to your use of the software. The license terms for Windows permit you to make one copy of the software as a back-up copy for re-installation on the licensed computer. If you do not delete your copy of the ISO file after installing the Windows software, the copy of the ISO file counts as your one back-up copy.
If you need to download the software again, you can go to your Download Purchase History in your Microsoft Store account and access the download there.
Installation
To install the Windows USB/DVD Download Tool:
2. Click Download then Run.
3. Follow the steps in the setup dialogs. You’ll have the option to specify where to install the Windows USB/DVD Download Tool.
You must be an administrator on the computer on which you are installing the Windows USB/DVD Download tool. It requires the Microsoft .NET Framework version 2.0 or higher.
System requirements
Windows XP SP2, Windows Vista, or Windows 7 (32-bit or 64-bit)
Pentium 233-megahertz (MHz) processor or faster (300MHz is recommended)
50MB of free space on your hard drive
DVD-R drive or 4GB removable USB drive
For Windows XP users
The following applications must be installed prior to installing the tool:
Microsoft .NET Framework 2.0 must be installed. It can be downloaded here.
Microsoft Image Mastering API v2 must be installed. It can be downloaded here.
Using the Windows USB/DVD Download Tool
Before you run the Download Tool, make sure you have purchased the Windows ISO download from Microsoft Store and downloaded the Windows ISO file to your drive. If you have purchased Windows but have not yet downloaded the ISO file, you can download the ISO file from your Microsoft Store Account.
To make a copy of your Windows ISO file:
1. Click the Windows START button, and click WINDOWS USB/DVD DOWNLOAD TOOL in the ALL PROGRAMS list to open the Windows USB/DVD Download Tool.
2. In the SOURCE FILE box, type the name and path of your Windows ISO file, or click BROWSE and select the file from the OPEN dialog box. Click NEXT.
3. Select USB DEVICE to create a copy on a USB flash drive or select DVD disk to create a copy on a DVD disk.
4. If you are copying the file to a USB flash drive, select your USB device in the drop-down list and click BEGIN COPYING. If you are copying the file up to a DVD, click BEGIN BURNING.
When your Windows ISO file is copied to your drive, install Windows by moving to the root folder of your DVD or USB drive, and then double-click Setup.exe.
Frequently Asked Questions
Where can I download .NET framework 2.0?
The .NET framework can be downloaded here.
Where can I download Image Mastering API 2.0?
The Image Mastering API can be downloaded here.
What size USB drive is required?
You need a USB drive with a minimum of 4GB of free space.
Can I use my newly created USB drive to install Windows on someone else’s computer?
No. The Windows ISO file on the USB drive is only intended to be used to install Windows on the licensed user’s own computer.
Can I back up to a CD-ROM?
No. The Windows ISO file is too large to fit on a CD.
Can I back up to a Blu-ray Disc?
Yes, as long as your DVD drive can write to a Blu-ray Disc.
IfI have other files on the USB drive will the Windows USB/DVD download tool delete them?
This tool requires the USB drive to be completely blank before the Windows files are copied. This helps ensure that the device is bootable after the copying has completed.
Can I backup to an external hard drive or other device with enough free disk space?
Yes, but this is not recommended. The device must be formatted in order for the device to be bootable. A dedicated USB flash drive would be a better option.
Can I use the Windows USB/DVD Download Tool to back up other files?
No. This tool is only for use with the Windows ISO file purchased from Microsoft Store.
Does the tool support dual-layer DVD discs for burning?
No. Currently, the tool does not support dual-layer DVD discs.
Troubleshooting
The tool is asking me to install the .NET framework and Image Mastering API before I install the tool
If you’re running Windows XP, you must install the .NET Framework 2.0 and the Image Mastering API 2.0 before installing the tool. You can download .NET framework here and you can download the Image Mastering API here.
A restart may be required after installing the .NET framework and the Image Mastering API.
When creating a bootable USB device, I am getting an error about bootsect
To make the USB drive bootable, you need to run a tool named bootsect.exe. In some cases, this tool needs to be downloaded from your Microsoft Store account. This may happen if you’re trying to create a 64-bit bootable USB device from a 32-bit version of Windows. To download bootsect:
1. Login to your Microsoft Store account to view your purchase history.
2. Look for your Windows purchase.
3. Next to Windows, there is an Additional download options drop-down menu.
4. In the drop-down menu, select 32-bit ISO.
5. Right-click the link, and then save the bootsect.exe file to the location where you installed the Windows USB/DVD Download Tool (e.g. C:\Users\username\AppData\Local\Apps\Windows USB DVD Download Tool).
6. Once the file has been saved, go back to the Windows USB/DVD Download Tool to create your bootable USB device.
My USB drive is not in the list of available devices
If you don’t see your USB drive in the list of available devices, please make sure the drive is inserted in the USB port, and then click the Refresh button beside the list of available drives.
I inserted a blank DVD in my DVD-ROM drive, but the Windows USB/DVD Download Tool doesn’t recognize it
If there are multiple drives on the system, the tool will select the first one that is capable of burning DVDs. If you have multiple DVD-R drives, try inserting the blank DVD into another DVD-R drive. If that doesn’t help, please make sure that your disc isn’t damaged and that your DVD-R drive is operational. Contact Product Support if issues continue to arise.
I inserted a blank DVD in my DVD-ROM drive, but the tool won’t let me burn it
Make sure the disc isn’t a dual-layer DVD disc. Currently, dual-layer discs are not supported within the tool.
How do I create a bootable usb drive with an iso image of Windows 7?
Which web site is this?
You need to convert those three files into a bootable .ISO file, the following article will show you how:
After you have converted it to a .ISO file, you need to burn it to a blank DVD disc as a disc image, then proceed to install:
ImgBurn — In addtion to supporting the creation of CD’s from .ISO files,
it supports a wide range of other image file formats, and it’s free.
(BIN, CUE, DI, DVD, GI, IMG, MDS, NRG, PDI and ISO)
Download and install Gear ISO burn (Free):
Note: Always use the slowest burn speed (4x or 2x) if offered a choice.
You should have the option to download the .ISO file from the Microsoft Store and simply burn it to a blank DVD as a disc image. Much easier to work with than the box files.
If you downloaded your copy of Windows 7 from the Microsoft Store, try redownloading it again:
1. Login to your Microsoft Store account ( http://store.microsoft.com ) to view your purchase history
2. Look for your Windows 7 purchase.
3. Next to Windows 7, there is an «Additional download options» drop-down menu.
4. In the drop-down menu, select «32 or 64-bit ISO.»
Download the ISO Image of Windows 7
Windows 7 Professional x64 (64-bit)
Windows 7 Professional x86 (32-bit)
Windows 7 Home Premium x64 (64-bit)
ImgBurn — In addtion to supporting the creation of CD’s from .ISO files,
it supports a wide range of other image file formats, and it’s free.
(BIN, CUE, DI, DVD, GI, IMG, MDS, NRG, PDI and ISO)
http://www.imgburn.com/
Note: Always use the slowest burn speed (4x or 2x) if offered a choice.
How to make a bootable USB thumb drive:
you will have to use a tool such as the Windows 7 USB/DVD Download Tool (http://store.microsoft.com/Help/ISO-Tool)
This simple tool will help you convert the same image file into to a USB thumb drive. For installation purposes, you should get a thumb drive that’s at least 4 GBs in size to store the installation files. Browse to where the Windows 7 Image is stored, open it.
Select the USB device where you want to have the backup stored to for installation.
Once the USB device has been identified, click the Begin copying button.
And that’s it, the next step now is to boot your computer, from the thumb drive, make sure the thumb drive you will be installing Windows 7 from is plugged into the USB port. This might vary by manufacturer, but the usual one to try is F12, start your computer and press F12 repeatedly until a screen is displayed giving you the option to boot from a USB Memory device, select that and press Enter on your keyboard.
How to Create or Make Bootable DVD from ISO for Windows 10/8/7
There are several ways to make a bootable CD or DVD from ISO image. Covering the entire range of free and premium applications, there are quite a few choices for you to pick from. The question is, how do you know which will work for you and which won’t? It is impossible to go through all of them to decide on the best one for you, so we have picked four of them by hand to help you zero in perfect solution to create bootable DVD disc. In addition, we will aslo show you how to burn ISO file to CD/DVD effortlessly and quickly.
Part 1: How to Make Bootable DVD with Another CD or DVD
This particular utility has only one function, and that is to create bootable image files from the contents of a DVD. It is fairly simple to use, but it comes with its own set of disadvantages, as you will soon see. Below are the instructions you need to follow to use free DVD ISO maker:
Step 1: Download the utility to your PC and double-click the executable to initiate the installation process.
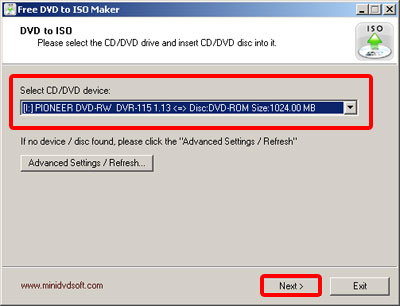
Step 2: Now insert a DVD into your optical drive and launch the program. You should be able to see a couple of options on your screen. The first step is to select the DVD from the dropdown provided. You may need to go into «Advanced Settings / Refresh» in case there is an error at this point. Now click on «Next».
Step 3: In this next window, you will see an option to select the output directory. Click on the button with the three dots and select the output folder location.
Step 4: Right below it you will see a table containing the various tracks on the DVD. Select the one that you want to rip to create the bootable image. Now click on the button that says «Convert».
Your bootable image will be created in a little while, and you can access it from the location that you chose in step 3 above. A lot of users have said that this software doesn’t read certain types of disks, so it is quite possible that your DVD will not be detected, which means you will not be able to create the bootable image. If you remember, we spoke about an Advanced Settings / Refresh button in step 2. Within this, you will be shown some parameters and settings that you can modify to help the software detect your DVD. Unfortunately, if you have zero technical expertise, then this will not be possible.
Cons:
- Can’t burn ISO to DVD .
- One bootable DVD should be prepared in advanced .
- Less support for newest DVD disc.
- Ugly user interface.
Part 2: How to Create Bootable CD/DVD from ISO with ISO Burner
ISO Burner from the renowned software maker Androidphonesoft is the perfect tool to put your ISO file or bootable image onto a CD or DVD disc with very little effort from your side. This highly reliable software application is used by millions of Windows users around the world. It has been extensively tested with more than 50+ brands of storage devices including USB flash drives, DVDs and CDs.. This flexibility makes it one of the most frequently used ISO burning utilities for Windows.
ISO Burner also supports both BIOS/CMS boot, which is available on older computers, as well as UEFI boot, which is found on 64-bit Windows 8 and Windows 10 PCs. This choice of two different partitions schemes as well as support for multiple file systems makes this a truly flexible and powerful piece of software. What is more, a couple of addition ISO features make it the best tool for managing ISO images.
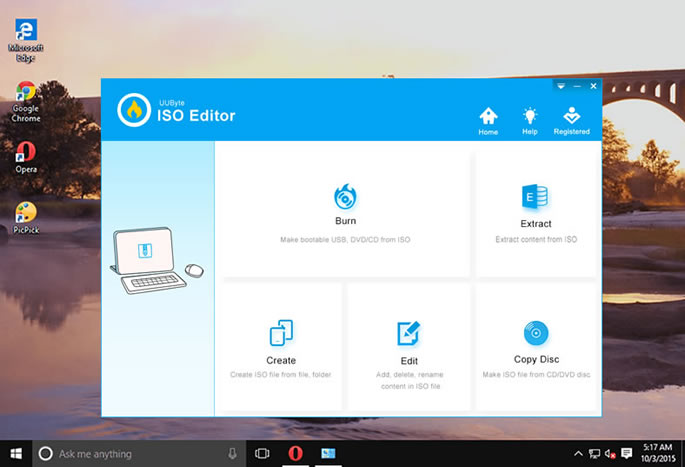
Step 1 Download and Installation (on PC or Mac)
Download ISO Burner from the official website and install it on a Windows PC or Mac. Now insert your preferred storage medium and launch the application. As you can see, there are 5 useful options listed on the main screen. Please click «Burn» to proceed to next step.
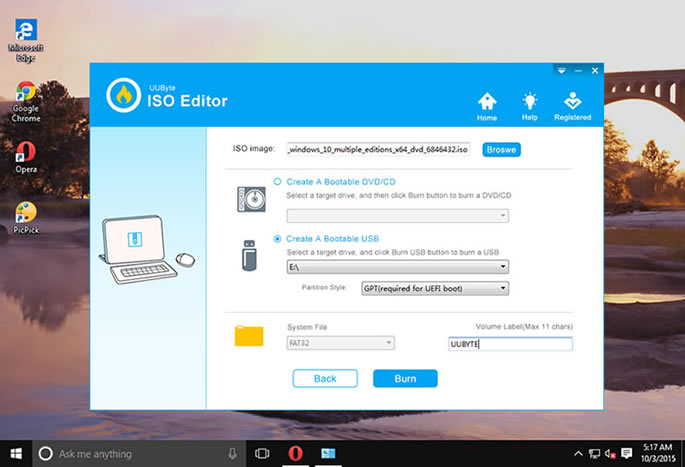
Step 2 Insert a Blank CD or DVD Disc
In this step, first select the ISO image that you want to burn onto your storage medium, then choose the medium itself. Other than the option for selecting the ISO image, the other choices will already been made for you using the software’s automatic detection feature.
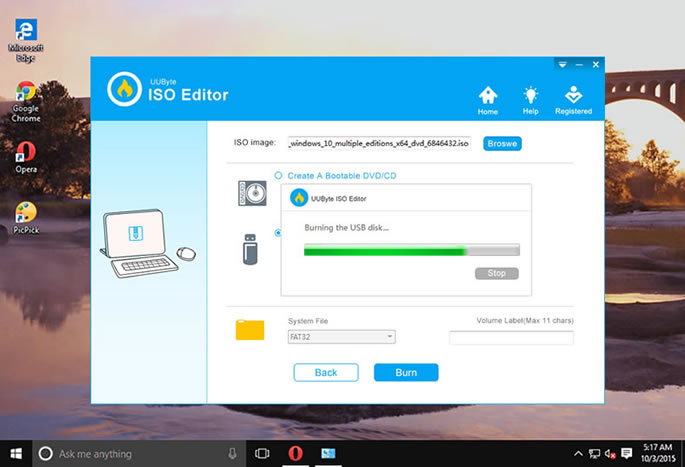
Step 3 Create Bootable CD/DVD from ISO Image
Now click on the «Burn» button and your ISO image will be faithfully burned to the appropriate storage media. You now have a bootable disk that you can eject from the drive and use for whatever purpose required.
It is a pleasant experience to use ISO burner to create bootable media from ISO. Less error and has a very clean user interface so almost no one would have problem in using this amazing app.
Part 3: How to Make Bootable CD/DVD for Windows 10/8/7/XP
BurnAware Free is a free utility that comes with a couple of paid upgrade options, but the free version should be sufficient for your basic needs. Just make sure that when you download the application, you choose the option called BurnAware Free. This basic version will have whatever you need to create a bootable image from a DVD, so you will not need either the premium or the professional version of this software.
Step 1: Download the .exe file for the appropriate version of BurnAware.
Step 2: Install the software application by double-clicking on the .exe file that you downloaded and follow the instructions on the installer to complete the installation. You can run the application at the end of the installation, in the final step. You can also close the installer and launch the software from the shortcut that will have been created on your desktop.
Step 3: On the software interface, look for an option that says «Copy to ISO». You will find this in the column called «Disc Images». Please note that there is also an option called «Make ISO», for which you will see an icon, but this option is not meant to create bootable images from a disk; it is used to create ISO files from a collection of files on your hard drive or external drive.
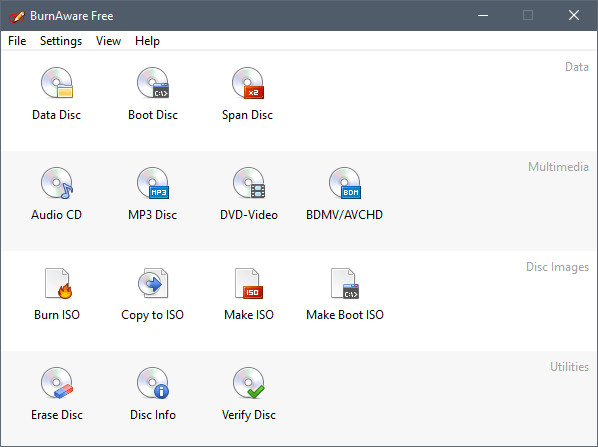
Step 4: Once you click on Copy to ISO, you will see a little tool appear called Copy to Image on top of the current window. At the top of this window you will see a drop-down option, where you can choose the DVD drive with the source DVD. You will first need to insert the DVD prior to this, or you can do it during this step.
Step 5: Now, in the middle of the screen, you should be able to see a button that says «Browse…’. Use this to navigate to where your ISO image file should be created to, and enter the filename in the text box provided for that purpose. Now click on «Save»‘.
Step 6: You can now click on «Copy» and give it a few minutes before the bootable image is created from the DVD. You will be able to see the image progress on the indicator provided. Once it is successful, you will be able to see the message «Copy process completed successfully»‘. You may now exit the software, and you will be able to find the ISO file by the name and location that you specified earlier.
Cons:
- Limited functions for free version.
- No free upgrades.
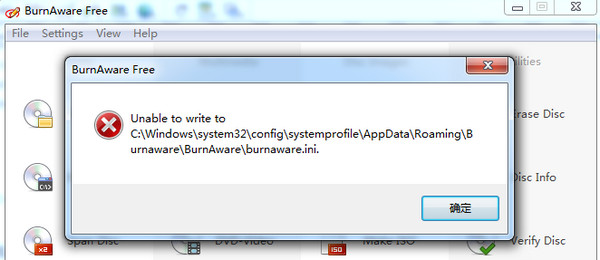
- Open error after installation, such as «can’t write to burnware.ini».
Part 4: How to Make Bootable CD/DVD with Free ISO Creator
This software is a little easier to use than the one previously described, but you will need to read through the various sections carefully before you proceed. Let’s see how to go about using Free ISO Creator to create a bootable image from a DVD:
Step 1: Download and install Free ISO Creator on your PC, and launch the application.
Step 2: The first thing you need to do is choose the file system, which you can do by clicking on the options button at the bottom. A window will pop up with a couple of options. First check the box next to where it says «Create bootable image». Now insert the DVD into the optical drive, then go back to that window and click on the button with the three dots, which will allow you to specify the location of the boot image that will finally be created.
Step 3: In the same window, right below the «Boot Options» section, you will see a section that says «File System». You can leave this on the default choice if you do not know what these file systems are. Now click on «Ok» in the smaller window and go back to the main window.
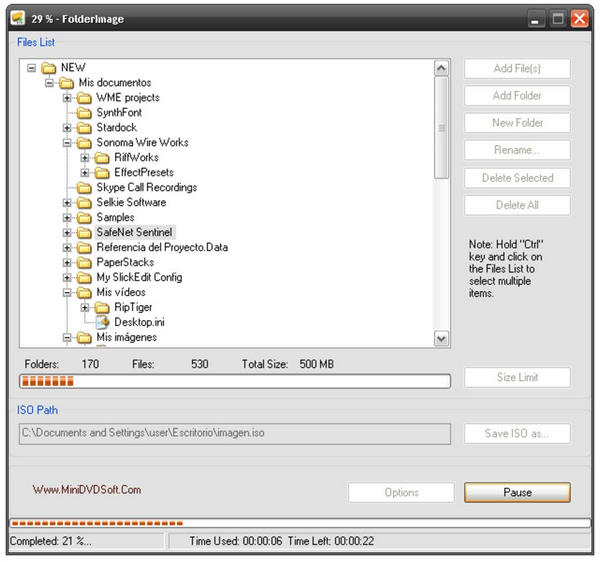
Step 4: In this step, you will be adding the source file from your DVD. Navigate to the correct location and select the DVD and then click on «Add file».
Step 5: If you did not specify the location for the boot image in step two above, you may do so here in the section called ISO Path. Click on the button that says «Save ISO as…» and specify the file path.
Step 6 : Now click on the «Convert» button to create your bootable image from the DVD.
Once you have created your boot image or ISO file, how do you burn this onto a DVD without corrupting the file in the process? One of the problems of creating bootable disks is that the source ISO file is not always properly created. But even if you are successfully able to create a working bootable image with the tools above, the next challenge is to be able to burn this image exactly as it is to a DVD, CD or USB flash drive so you can use it.
Cons:
- Very complex settings.
- Not user friendly for people who are not familiar with computer staff .
- No update for years and lack support for latest Windows 10 build.
Summary:
As you can see, you will need two different types of software for this entire process. The first one will be to create the bootable image itself, which is covered by the first three options above. The next stage requires a software to burn that ISO image file to USB drive or CD/DVD so that it can be used for various purposes. Both steps require you to use reliable software applications so that the data on the original DVD is rendered carefully on the final output disc or drive. The second stage is taken care of by Androidphonesoft ISO Burner, and for the first one, you can try out one of the four applications that we have showcased here to see which one works best for you.


