- How to turn your Windows 10 PC into a wireless hotspot
- How to check if your wireless adapter supports Hosted Networks in Windows 10
- How to create a wireless Hosted Network in Windows 10
- How to share your internet connection with a Hosted Network in Windows 10
- How to stop sharing an internet connection with other devices in Windows 10
- How to change a Hosted Network settings in Windows 10
- How to view the current Hosted Network settings
- How to disable a wireless Hosted Network in Windows 10
- Things you need to know
- Wrapping things up
- More resources
- Halo: MCC’s live service elements make it better, not worse
- Microsoft’s Surface Duo is not ‘failing up’
- Here’s what you can do if Windows 10 update KB5001330 is causing issues
- These external monitors go perfectly with the Lenovo ThinkPad X1 Carbon
- How to Create a Wi-Fi Hotspot on your Windows 10 PC
- Verify that your Wi-Fi Adapter Driver Supports Ad-Hoc Mode
- How to Enable Mobile Hotspot in Windows 10
- Common Windows 10 errors when Creating a Mobile Hotspot
- How to Create a Virtual Wi-Fi Network Using Command Prompt
- How to Share Your Internet Connection using Wi-Fi Hotspot
- Viewing Mobile Hotspot Settings
- Possible Errors and Troubleshooting Wireless Access Point on Windows 10
- Related Reading
- How to Run Windows File Explorer Elevated (as.
- Using Malicious Software Removal Tool (MRT.exe) on Windows
- How to Clean Up Large System Volume Information.
- How to Disable NetBIOS and LLMNR Protocols in.
- Enable Windows Lock Screen after Inactivity via GPO
- 36 comments
How to turn your Windows 10 PC into a wireless hotspot

Whether you’re connecting to the internet using a wireless or wired adapter, similar to previous versions, Windows 10 allows you to share an internet connection with other devices with a feature called «Hosted Network».
Hosted Network is a feature that comes included with the Netsh (Network Shell) command-line utility. It’s was previously introduced in Windows 7, and it allows you to use the operating system to create a virtual wireless adapter – something that Microsoft refers to «Virtual Wi-Fi» — and create a SoftAP, which is a software-based wireless access point.
Through the combination of these two elements, your PC can take its internet connection (be it an ethernet connection or hookup through a cellular adapter) and share it with other wireless devices — essentially acting as a wireless hotspot.
In this Windows 10 guide, we’ll walk you through the steps to verify if your network adapter supports the feature, how to configure and enable a wireless Hosted Network, and how to stop and remove the settings from your computer when you no longer need the feature.
To follow this guide, you’ll need to open the Command Prompt with administrator rights. To do this, use the Windows key + X keyboard shortcut, and select Command Prompt (Admin).
How to check if your wireless adapter supports Hosted Networks in Windows 10
While some adapters include support for Hosted Network, you will first need to verify your computer’s physical wireless adapter supports this feature using the following command:
NETSH WLAN show drivers

If the generated output shows Hosted network supported: Yes, then you can continue with the guide. If your wireless adapter isn’t supported, you could try using a USB wireless adapter that supports the feature.
How to create a wireless Hosted Network in Windows 10
Creating a wireless hotspot in Windows 10 is relatively straightforward — don’t let the command line scare you. Simply follow the steps below to configure a wireless Hosted Network:
While in Command Prompt (Admin) enter the following command:
NETSH WLAN set hostednetwork mode=allow ssid=Your_SSID key=Your_Passphrase
Where the SSID would be the name you want to identify your wireless network when trying to connect a new device, and the passphrase is the network security key you want users to use to connect to your network. (Remember that the passphrase has to be at least 8 characters in length.)

Once you created a Hosted Network, enter the following command to activate it:
NETSH WLAN start hostednetwork
How to share your internet connection with a Hosted Network in Windows 10
Up to here, you created and started a Hosted Network in your Windows 10 PC. However, any wireless capable device won’t be able to access the internet just yet. The last thing you need to do is to share an internet connection using the «Internet Connection Sharing» feature from a physical network adapter.
- Use the Windows key + X keyboard shortcut to open the Power User menu, and select Network Connections.
Next, right-click the network adapter with an internet connection – this could be a traditional Ethernet or wireless network adapter — select Properties.

Note: In Network Connections, you should now see a new our new Microsoft Hosted Virtual Adapter which is labeled Local Area Connection* X, and with the SSID name.
Next, from the Home networking connection drop-down menu select the Microsoft Hosted Virtual Adapter.

At this point, you should be able to see and connect any wireless capable device to the newly created software access point, and with access to the internet.
How to stop sharing an internet connection with other devices in Windows 10
If you want to temporary stop allowing other devices to connect wirelessly through your computer, you can type the following command in the Command Prompt and hit Enter:
NETSH WLAN stop hostednetwork
At any time, you can just use the start variant of the command to allow other devices to connect to the internet using your computer as an access point without extra configuration:
NETSH WLAN start hostednetwork
Similarly, you can also use the following command to enable or disable a wireless Hosted Network:
NETSH WLAN set hostednetwork mode=allow
NETSH WLAN set hostednetwork mode= disallow
How to change a Hosted Network settings in Windows 10
In the case you want to change some of the current settings, such as SSID or network security you can use the following commands:
NETSH WLAN set hostednetwork ssid=Your_New_SSID
NETSH WLAN set hostednetwork key=Your_New_Passphrase
How to view the current Hosted Network settings
There are two commands to view the Hosted Network settings on your computer:
The following command shows the mode and SSID name in use, max number of clients that can connect, type of authentication, and cipher:
NETSH WLAN show hostednetwork
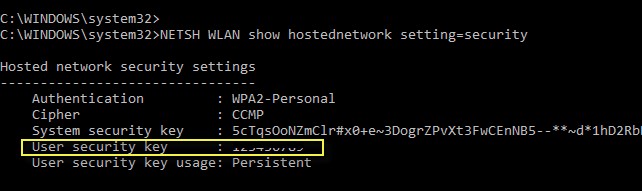
And the following command will also reveal the current network security key among other settings, similar to the previous command:
NETSH WLAN show hostednetwork setting=security

How to disable a wireless Hosted Network in Windows 10
While the setup of a wireless Hosted Network in Windows 10 is not very complicated, Microsoft doesn’t make very straightforward to remove the configurations when you no longer need the feature.
Although you can use the stop or disallow commands, these actions won’t eliminate the settings from your computer. If you want completely delete the Hosted Network settings in Windows 10, you’ll need to modify the Registry.
Important: Before you change anything settings on your computer, it’s worth noting that editing the Windows Registry can be a dangerous game that can cause irreversible damages to your system if you don’t know what you are doing. As such, it’s recommended for you to make a full backup of your system or at least System Restore Point before proceeding with this guide. You have been warned!
- Open the Start menu, do a search for regedit, hit Enter, and click OK to open the Registry with admin rights.
Scroll down the following path in the Registry:
HKEY_LOCAL_MACHINE\system\currentcontrolset\services\wlansvc\parameters\hostednetworksettings
Right-click the HostedNetworkSettings DWORD key, select Delete, and click Yes to confirm deletion.
Restart your computer
Open to the Command Prompt and use the following command:
NETSH WLAN show hostednetwork
You will know that you have successfully deleted the settings when the Settings field reads Not configured.
Make sure you turn off «Internet Connection Sharing» in the physical network adapter that was sharing the internet with other devices. Use the Windows key + X keyboard shortcut to open the Power User menu, and select Network Connections.
Uncheck the Allow other network users to connect through this computer’s Internet connection option.
Things you need to know
Although the wireless Hosted Network feature in Windows 10 allows you to implement an access point solution to share an internet connection with other devices, it’s not meant to be a solution to replace a physical wireless access point.
Also, there are a few things you want to consider. For example, wireless speeds will dramatically be reduced compared to the rates provided from a physical access point. Perhaps it would not be a big deal for internet browsing, but downloading or transferring big files could be an issue for some users.
You also need to consider that your computer needs to be always turned on to act as a wireless access point. If the computer enters into sleep, hibernate, or restarts, your wireless hotspot will stop working, and you will need to start manually the feature using the NETSH WLAN start hostednetwork command.
You cannot run a SorftAP and ad hoc at the same time on Windows. If you need to create a temporary network connection between two computers, setting up ad hoc will turn off SoftAP — you can run one or the other, not both at the same time.
Wrapping things up
Wireless Hosted Network is a nifty feature in Windows can be a great tool to have for when you need to create a wireless access point on the go. It won’t match the performance of a physical wireless access point, but it can be useful for many unexpected scenarios — like having one wired ethernet connection and several devices you want to get online. It’s not a replacement for the real thing, but in a sticky situation, it can be just the fix you need.
More resources
For more tips and tricks on Windows 10, and get the latest news, you can visit the following resources:
![]()
Halo: MCC’s live service elements make it better, not worse
Halo: The Master Chief Collection is more popular than ever, but some fans don’t agree with the live service approach 343 Industries has taken with it. Here’s why those elements are, at the end of the day, great for the game and for Halo overall.
![]()
Microsoft’s Surface Duo is not ‘failing up’
Microsoft announced this week that it was expanding Surface Duo availability to nine new commercial markets. While Surface Duo is undoubtedly a work in progress, this is not a sign of a disaster. It’s also doesn’t mean that Surface Duo is selling a ton either. Instead, the reason for the expansion is a lot more straightforward.
![]()
Here’s what you can do if Windows 10 update KB5001330 is causing issues
In this guide, we’ll show you the steps to get rid of the update KB5001330 to fix profile, gaming, and BSoD problems with the Windows 10 October 2020 Update and May 2020 Update.
![]()
These external monitors go perfectly with the Lenovo ThinkPad X1 Carbon
The Lenovo ThinkPad X1 Carbon is an excellent laptop, but what if you want to project the display onto a larger screen? You’ll need an external monitor for that. Here are our favorite options.
How to Create a Wi-Fi Hotspot on your Windows 10 PC
Like in previous OS versions, in Windows 10 user can create a software Wi-Fi hotspot (access point). This hotspot can be used for creating a local wireless network or sharing Internet connection (wired or cellular 3G / 4G connection) by several devices (smartphones, tablets and other devices). In the first releases of Windows 10, you could create and manage such a hotspot only from the command prompt. In Windows 10 1607 a simple graphical interface for creating an access point – “Mobile hotspot” appeared.
So, today we’ll consider how to create a Wi-Fi hotspot (virtual access point) based on Windows 10 without additional third party tools. We assume that your system has two network adapters — a wired Ethernet network card (connected to a provider’s network) and a wireless Wi-Fi adapter. We want our computer with a Wi-Fi adapter to be usedas a Wi-Fi access point by other devices and share its Internet connection.
Verify that your Wi-Fi Adapter Driver Supports Ad-Hoc Mode
Before you start to create a Wi-Fi hotspot make sure your Wi-Fi adapter driver supports a virtual access point (Ad-Hoc) mode. To do it, run this command:
netsh wlan show drivers
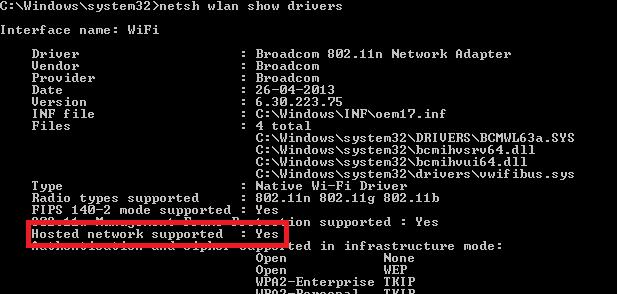
The command prompt window will display information about the Wi-Fi adapter driver used and the supported technologies (for details about the supported Wi-Fi driver standards, see How to Troubleshoot 5GHz Wi-Fi Not Showing Up in Windows 10). “Hosted network supported: Yes” message means that this driver supports access point mode. Otherwise, try to update the driver version or install another Wi-Fi adapter.
How to Enable Mobile Hotspot in Windows 10
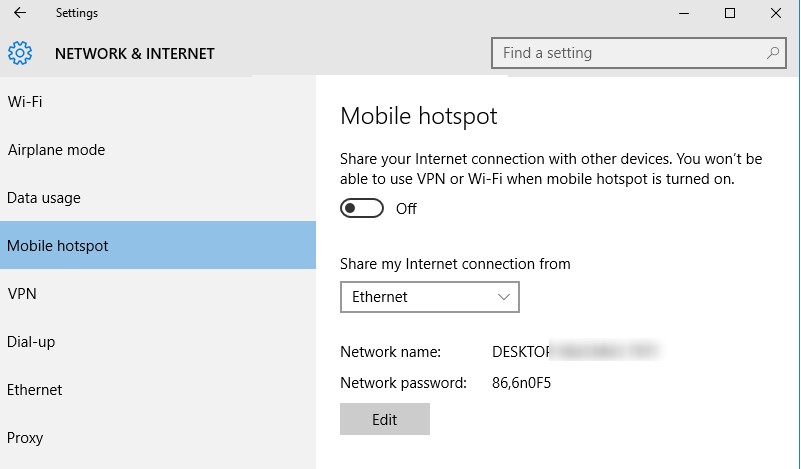
In Window 10 1607 (Creators Update) a simple GUI for sharing the Internet over Wi-Fi appeared. This function is called “Mobile Hotspot”. Go to the Settings -> Network & Internet -> Mobile hotspot. To turn on the access point, it is enough to click the toggle “Share your Internet connection with other devices“. The name of the new Wi-Fi network and the password will be generated automatically (you can change them). Select the Internet connection that you want to share with other devices (Share my Internet connection from). If your computer has only one internet connection, it will be automatically selected.
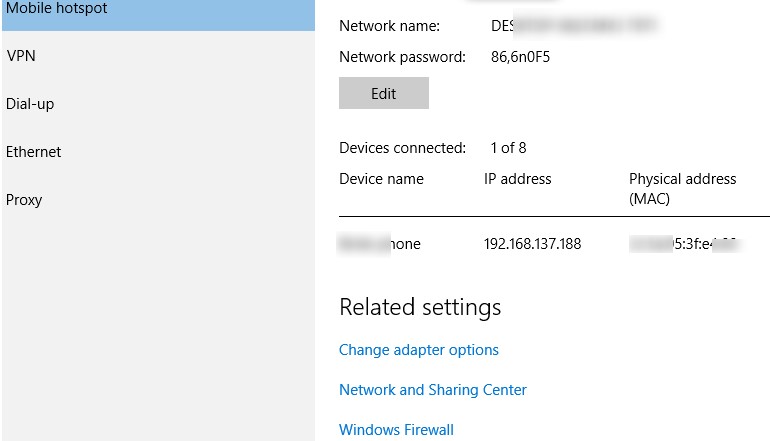
In the same window, the list of devices that are connected to your WiFi hotspot is displayed. The name and MAC address of the device, as well as the IP address assigned to it, are displayed. As you can see, up to 8 devices can be connected to the access point on Windows 10 at the same time.
Common Windows 10 errors when Creating a Mobile Hotspot
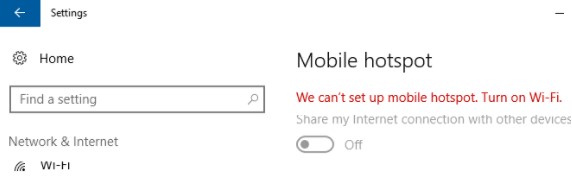
If the error “We can’t set up mobile hotspot. Turn on Wi-Fi” appears when you trying to create an access point, try to update the driver for your Wi-Fi adapter and / or remove the virtual Microsoft Wi-Fi Direct Virtual Adapter according to the instruction. After that, restart your computer and try to turn on the mobile hotspot again.
Another common error: “We can’t share this Internet connection because we can’t connect to the cellular network“. Just try to restart your Internet connection.

Another error: “We can’t set up mobile hotspot because your PC doesn’t have an Ethernet, Wi-Fi or cellular data connection“. Most likely there are problems with your internet connection (no network), so you need to check the connection. Also this error appears in case you are connected to the provider through PPPoE, this type of connection is not supported by the Windows 10 mobile hotspot.

How to Create a Virtual Wi-Fi Network Using Command Prompt
You can create a virtual Wi-Fi hotspot in Windows using command prompt. Suppose that you want to create a wireless network named Hotspot (this is the network SSID) with the password ZiZiPass. Run the command prompt (with the Administrator privileges) and execute the command:
netsh wlan set hostednetwork mode=allow ssid=Hotspot key=ZiZiPass
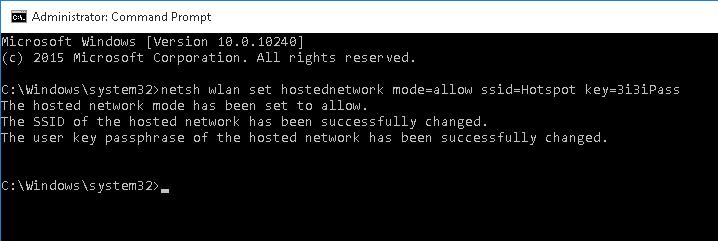
If everything is correct, the command will return the following message:
The SSID of the hosted network has been successfully changed.
The user passphrase of the hosted network has been successfully changed.
This command will create a new virtual Wi-Fi adapter in the system (Microsoft Wi-Fi Direct Virtual Adapter), which will be used by other wireless devices as a hotspot. Now, enable the created virtual adapter:
netsh wlan start hostednetwork
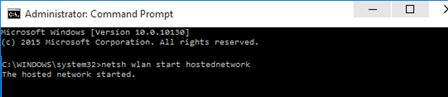
“The hosted network started” message tells that a Wi-Fi access point has been successfully started.
A new wireless connection named Hotspot will appear in Network and Sharing Center.
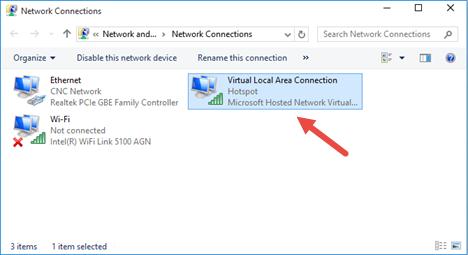
Now, other Wi-Fi devices can see and connect to this access point. Devices connected to such a network can share documents and hardware peripherals, but the Internet access through such WiFi hotspot is still impossible.
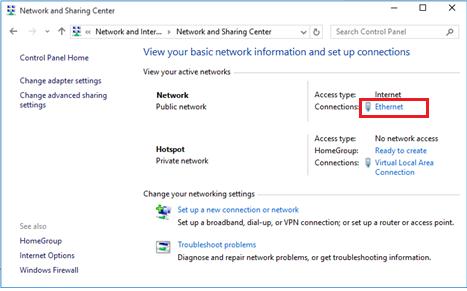
How to Share Your Internet Connection using Wi-Fi Hotspot
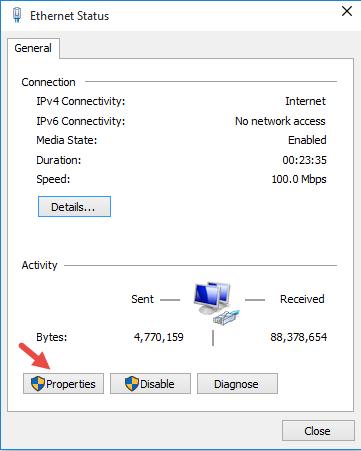
Now you need to allow to use a wired network connection to access the Internet for all devices connected to the Wi-Fi virtual access point. To do it, in Network and Sharing Center click the name of the network adapter, which provides the Internet connection. In our example, it is connection Ethernet.
In a network adapter statistics window click Properties.
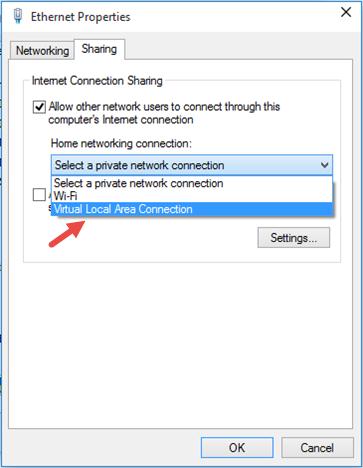
In the network adapter properties window you must share your Internet connection. Go to Sharing tab in the Ethernet Properties window. Check the box “Allow other network users to connect through this computer’s Internet connection” and select the name of the virtual adapter created previously in the dropdown list.
Save the changes. In the Network and Sharing Center, the type of Hotspot network will be changed to Internet and that’s mean that this network (and all devices connected to it) now have an access to the Internet .
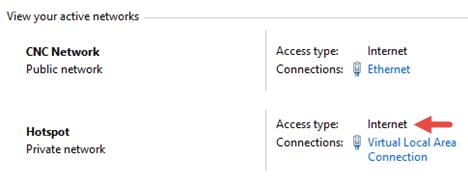
Now all the devices that are connected to the created hotspot on Windows 10 can access the Internet through the external network interface of the computer. Try to connect to your hotspot from your phone, tablet or other laptop.
Viewing Mobile Hotspot Settings
The current settings for the Wi-Fi access point you have created can be viewed using the command:
Netsh wlan show hostednetwork
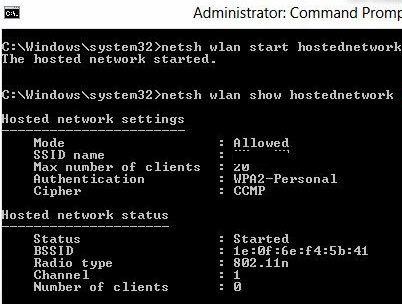
The command displays the network name (SSID), supported authentication and encryption types, the maximum number of devices that can simultaneously use this hotspot (Max number of clients) and the current number of connected clients (Number of clients).
The following command displays the various security settings for your Wi-Fi hotspot and connection keys:
Netsh wlan show hostednetwork setting=security
Possible Errors and Troubleshooting Wireless Access Point on Windows 10
Answer. To restore the wireless network, run the hosted network with the command:
netsh wlan start hostednetwork
You don’t need to re-enter the network name and password.
Answer. Run WLAN AutoConfig service from services.msc console or the command prompt:
net start WlanSvc
and start a virtual access point once again.
During the network start, the error “The hosted network couldn’t be started. The group or resource is not in the correct state to perform the request operation” appears.
Answer. Make sure that your Wi-Fi adapter is turned on. After that run Device Manager, select Show hidden devices in the View menu. Find Microsoft Hosted Network Virtual Adapter in network adapters section and enable it. If it didn’t help, run these commands one by one:
netsh wlan set hostednetwork mode=disallow
netsh wlan set hostednetwork mode=allow
After that re-create the hotspot:
netsh wlan set hostednetwork mode=allow ssid=Hotspot key=ZiZiPass
netsh wlan start hostednetwork
Answer
netsh wlan show hostednetwork
Answer. To stop an access point, run the command:
netsh wlan stop hostednetwork
To delete a hotspot in Windows 10 (SSID and network password are deleted), do the following:
netsh wlan set hostednetwork mode=disallow
Answer: Check DNS server settings on your device (try to specify the address of the public Google DNS server (8.8.8.8) manually in your client’s settings). Also, try to restart Internet Connection Sharing (ICS) service, or disable and re-enable the adapter through which your Windows 10 computer is connected to the Internet.
Another few typical problems:
- Some of antivirus software has a built-in firewall that can block the Internet sharing. Try to temporarily disable the firewall and check if the problem occurs when it is disabled;
- Make sure that you have enabled sharing exactly in the properties of your Internet connection;
- Verify that the Internet Connection Sharing service is enabled on Windows 10. The easiest way to do this is by opening the services management console – services.msc;
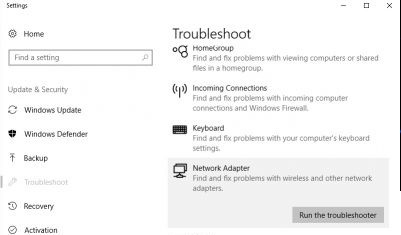
- Run the Network Adapter Troubleshooter utility (Network Adapter Troubleshooter: Troubleshoot -> Network Adapter -> Run Troubleshooter). This utility will check the current adapter settings and try to fix the problems automatically.

How to Check Who Reset the Password of a User in Active Directory
Memory Compression Process: High Memory and CPU Usage in Windows 10
Related Reading
How to Run Windows File Explorer Elevated (as.
Using Malicious Software Removal Tool (MRT.exe) on Windows
How to Clean Up Large System Volume Information.
How to Disable NetBIOS and LLMNR Protocols in.
Enable Windows Lock Screen after Inactivity via GPO
36 comments
This is the best instruction on the issue I have found, and it worked splendidly. However, after using this for three weeks for so, for some reason it has stopped working. The device (a smartphone) I’m trying to use to access my shared connection does show that it has established a connection, but no data is transferred. This issue has been confirmed on two other devices. Every time I make an access point using these instructions, a connection can be established but no data is being moved – even though these instructions did work well for a couple of weeks. Any idea how so solve this issue?
Try to re-create your acess point as follow:
netsh wlan set hostednetwork mode=disallow
netsh wlan set hostednetwork mode=allow
netsh wlan set hostednetwork mode=allow ssid=Hotspot key=ZiZiPass
netsh wlan start hostednetwork
How do I edit the max clients that can join my hotspot?
after creating hotspot connections but still does not work?
after creating hotspot connections but the internet still does not work?
That’s OK, its running successfully. But I want to create a Hidden ssid so its not visible to all. Is this case possible
It is impossible to hide the SSID of Windows software hotspot. You can disable WI-FI Broadcast only on hardware access point .
In hotspot network supported it says no…what should i do….
Update your WiFi adapter driver
i want to to keep running this hotspot even when my pc is in sleep mode
It’s impossible. Windows disables the Wi-Fi adapter in sleep mode
how to set hotspot without password?
samsung phone display ap not currently in use
Thanks a lot for this subject .. My greetings.
It seems we should add DNS setting on the client otherwise we could not connect to the Internet.
Thank you man! This worked! Tried everything before, but this worked! Had to change the ip to static on the client device and set the google DNS.
I have been facing following trouble.what i have to do?
The hosted network couldn’t be started.The group or resource is not in the correct state to perform the requested operation.
oi,estou usando o programa my wifi router 1.0.consegui criar rede wifi,mas nao tem conexao com internet,ja liberei no compartilhameneto do w10,mas nada vc pode ajudar.
got an error ip configuration failed
having issues obtaining ip address on my android
I use this technology to create a private wifi network. In order to manage domain names, I have created my own dns server in order to answer a specific ip to all devices connected to the network. When I start this DNS server on the port 53 on a windows 7 (the one emitting the wifi), the DNS server is automatically detected by the peers on the network and everything works well. However it is not the case on windows 10. Do you any idea why ?
Thanks
Thanks for the excellent guidelines!
I did everything, but there was no internet access on any device, I tried few things and at last I disabled the virtual LAN and it disappeared.
After that when I try to start the hosted network, there is a message:
“The hosted network couldn’t be started.
The group or resource is not in the correct state to perform the requested operation.”
And I cannot start the hosted network. Any suggestions?
good description with some notes, had to set a static IP and after that the mobile did connect to the created hot spot but it does not download anything so something else is still missing
Thanks for sharing this brief knowledge about how to create the Hotspot in windows 10.
Is there a way to automatically turn on the Hotspot upon booting up the PC?
If you have already created your hotspot with the command:
netsh wlan set hostednetwork mode=allow ssid=Hotspot key=ZiZiPass
To run adhoc, just execute the command:
netsh wlan start hostednetwork
You can create a runadcoh.bat with the command above file and add it to your Windows 10 Startup folder(Win+R->shell:startup)
Or run this command from the Windows task scheduler at the computer boot (At startup trigger).
I did what you suggested but seems running the .bat file does not trigger to turn on the hotspot upon boot up or just by clicking it. it may have something to do as i’m running Windows 10.
HI,
Can enable WPS Feature for windows hostednetwork (Soft AP)?
If Yes,
Please explain how to do it/
I didn’t find etailed technical information about the support or examples of usage Wi-Fi Protected Setup mode (WPS) on the Windows hostednetwork, but on the MSFT website there is such an info:
The wireless Hosted Network interacts with Wi-Fi Protected Setup (WPS) , another important new feature in Windows 7 and Windows Server 2008 R2 with the Wireless LAN Service installed. The wireless Hosted Network and WPS support a scenario that provisions a WPS-capable device for a non-WPS capable hardware AP. In this case, the SoftAP hosted on Windows is invoked in the background to push the hardware AP profile onto the WPS-capable device.
Thanks for your response,
Please update if you got any information about it.
Something is wrong in this article.
Win10 mobile hotspot is not implemented with hostednetwork. so you can’t enable mobile hotspot with command “netsh wlan start hostednetwork”.
How make to hide SSID?
Hope all of you are healthy & safe with your family.
I have a unique issue with Windows 10 – Microsoft Virtual Wifi Miniport Adapter. I am unable to view Microsoft Virtual Wifi Miniport Adapter on Network & Sharing window.
Let me explain my issue in detail. I had Windows-7 OS and TP link wifi adapter and uses Baidu Software to create internet hotspot.
I connect internet using Dailup connection then insert TP link wifi adapter in USB slot and it automatically display Microsoft Virtual Wifi Miniport Adapter on Network & Sharing window which I use to share my internet and create a Hotspot.
Now I have upgraded my OS from Windows-7 to Windows-10 and I used same method to connect internet but it doesn’t display Microsoft Virtual Wifi Miniport Adapter on Network & Sharing window to share internet and create Hotspot. However, it display Microsoft Virtual Wifi Miniport Adapter on Device Manager and it is working correctly.
Now to display missing Microsoft Virtual Wifi Miniport Adapter on Network & Sharing window I have troubleshooted below steps but there is no luck.
1. Uninstalling and reinstalling driver from device manager.
2. Enabling and disabling driver from device manager.
3. Network Reset
4. Windows Troubleshoot to fix network issue.
5. Netsh command to enable hosted network.
6. Reverting Windows-10 to Windows-7 (Works great on win-7 again)
7. Commands such as IP release and renew, ip flushdns, etc
8. Downloading updates for Windows-10 & troubleshooting again.
None of the above steps have helped me to display missing Microsoft Virtual Wifi Miniport Adapter on Network & Sharing window.
Please help me to display this missing Microsoft Virtual Wifi Miniport Adapter on Network & Sharing window.
Any Registry Key or Services changes required let me know I will do it.
Note:1. When I open Windows-10 Settings > Networking > Status I can see Microsoft Virtual Wifi Miniport Adapter there with an asterisk sign but not visible on Network & Sharing window.
Note:2. I have connected LAN wire to PC directly to create Dailup connection. I don’t have any router at present.
First, use the “netsh wlan show drivers” command to verify that your your tplink wireless adapter supports hostednetwork


