- Windows 10 desktop apps and privacy
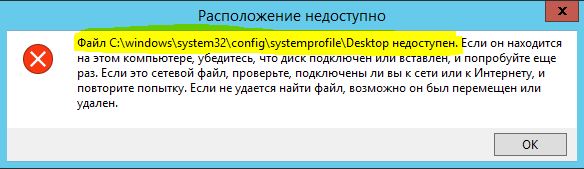
- Файл C:\windows\system32\config \systemprofile\desktop недоступен в Windows 10
- Исправить Desktop недоступен в Windows 10
- 1. Создать новую учетную запись пользователя
- 2. Обновить Windows через установочную флешку
- 3. Перезапуск процесса explorer (Проводник)
- 4. Вставить папку Dekstop
- 5. Выполнить чистую установку windows 10
- 6. Переустановить загрузочные файлы
- How to sync your Windows 10 Desktop, Documents, and more to Dropbox
- How to move default users to Dropbox
- Wrapping things up
- More Windows 10 resources
- The Dell XPS 15 is our choice for best 15-inch laptop
- Halo: MCC’s live service elements make it better, not worse
- Microsoft’s Surface Duo is not ‘failing up’
- These are the best PC sticks when you’re on the move
Windows 10 desktop apps and privacy
Desktop apps are a specific type of app that won’t ask for permission to access data associated with privacy settings in Windows 10 in the same way that a Microsoft Store app does. Some desktop apps may not even ask for permission to get access to personal data stored on your device. Desktop apps also won’t appear in the list of apps in the privacy settings pages that allows you to choose which apps can use data associated with that privacy setting.
What are desktop apps? They’re usually downloaded from the internet or installed with some type of media (such as a CD, DVD, or USB storage device). They’re launched using an .EXE or .DLL file, and they typically run on your device, unlike web-based apps (which run in the cloud).
Please read the privacy policies of any desktop app you install to learn more about how they might use personal data stored on your device. You should also check if the desktop apps you have installed have provided their own options to control access to personal data. To further reduce the risk that an app or service can access personal data when a privacy setting is off, you should only install apps and services from trusted sources.
There are varying degrees of exceptions to how a desktop app may access and use personal data on the device beyond the privacy controls available in Windows 10.
Location. Even when you’ve turned off the device location setting, some third-party apps and services could use other technologies (such as Bluetooth, Wi-Fi, cellular modem, etc.) to determine your device’s location with varying degrees of accuracy. Microsoft requires third-party software developers that develop apps for our Microsoft Store or develop apps using Microsoft tools to respect the Windows location settings unless you’ve provided any legally required consent to have the third-party developer determine your location. For more comprehensive protection of your location, you could consider disabling radio-based components of your device such as Wi-Fi, Bluetooth, cellular modem, and GPS components, which might be used by an app to determine your precise location. However, doing so will also impair other experiences such as calling (including emergency calling), messaging, internet connectivity, and connecting to peripheral devices like your headphones.
Camera, Microphone, and other privacy settings tied directly to a peripheral device. Some desktop apps may not be affected by turning off these privacy settings. For example, an app that also installs a driver could interact directly with your camera or microphone hardware, bypassing the ability of Windows to control the access. For more comprehensive protection of your personal data associated with these settings, you could consider disabling these devices, such as disconnecting or disabling your camera or microphone.
Other privacy settings. For other privacy settings not mentioned above, there are no steps you can take to ensure desktop apps do not access personal data without your awareness unless you choose not to install or use the app.
Файл C:\windows\system32\config \systemprofile\desktop недоступен в Windows 10
Обновление для Windows 10 2018 April появилось с множеством превосходных функций, включая некоторые проблемы, такие как «C:\windows\system32\config\systemprofile\desktop недоступен«. Один пользователь рассказал, что сбросил систему и после входа в нее, вместо загрузки на рабочий стол он получил эту ошибку. Другой пояснил, что Windows 10 загружает рабочий стол и становится черный экран с такой же ошибкой. И проблема возникает, когда пользователи обновляют свою версию Windows или выполняют чистую установку.
Исправить Desktop недоступен в Windows 10
Проблема с недоступным рабочим местом обычно возникает из-за поврежденных системных файлов. Однако перезагрузка компьютера должна устранить проблему, но если вы не можете исправить ошибку, следуйте дальнейшим решениям.
1. Создать новую учетную запись пользователя
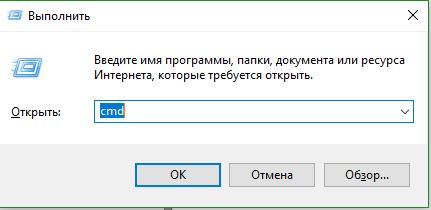
Шаг 1. Запустите командную командную строку от имени администратора. Нажмите Win + R и введите в поле cmd, после чего нажмите Ctrl + Shift + Enter. Если нажать сразу кнопку OK, то cmd запуститься в обычном режиме, но если вы нажмете сочетание кнопок Ctrl + Shift + Enet, Вы запустите её от имени администратора.
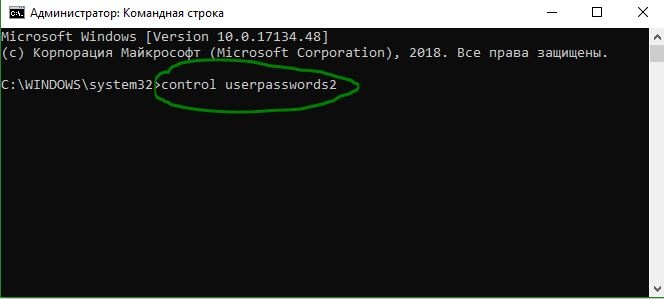
Шаг 2. Введите control userpasswords2 команду и нажмите Enter.
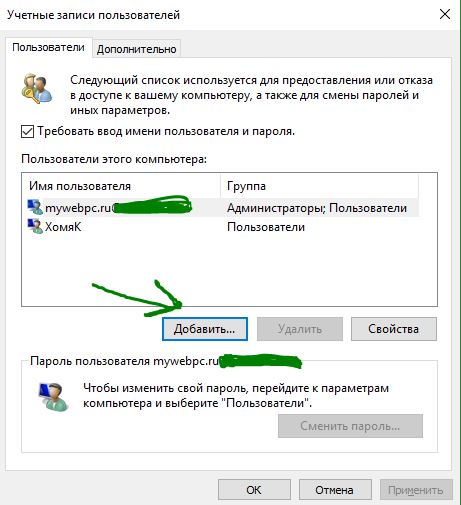
Шаг 3. Нажмите в новом окне «Добавить», чтобы создать учетную запись пользователя. Далее вставьте новый идентификатор электронной почты и код доступа в соответствии с инструкциями на экране. Вы можете добавить локального пользователя или учетную запись Microsoft и назначить ей права администратора, если хотите. Когда вы закончите создание нового пользователя, перезагрузите компьютер и на этот раз войдите в новую учетную запись пользователя. Это наиболее вероятное и простое решение, чтобы сохранить файлы и не переустанавливать windows.
2. Обновить Windows через установочную флешку
Этот способ помог исправить проблему с черным экраном на рабочем столе одному пользователю, с которым я вел переписку в комментариях, и решил его добавить на обозрение. Метод требует вашего внимания, Вы не должны пропустить предложенный вам пункт, чтобы сохранить файлы и приложения, если хотите их сохранить.
Шаг 1. Перейдите на официальный сайт microsoft и скачайте Media Creation. Используйте Media Creation для создания установочной флешки, на которой будет установлена последняя версия Windows 10. Вы можете начать процесс восстановления или обновления Windows 10 с установочной флешки с сохранением файлов и приложений. Если вам не удается запустить процесс установки при загрузке Windows 10, то следуем ниже.
Шаг 2. Подключите установочную флешку к компьютеру и включите свой компьютер до черного проблемного экрана. Далее нажмите Win + R, введите taskmgr и нажмите Ctrl + Shift + Enter, чтобы открыть диспетчер задач с правами администратора. В диспетчере задач нажмите на вкладку «Файл» > «Запустить новую задачу«. В открывшемся диалоговом окне нажмите «Обзор» и перейдите на ранее созданный диск USB. Внутри будет файл setup.exe. Выберите его для запуска. Далее следуйте инструкциям на экране и будьте осторожны и внимательны, не пропустите пункт с сохранением файлов.

3. Перезапуск процесса explorer (Проводник)
Шаг 1. Откройте диспетчер задач, нажав Ctrl + Alt + Del и нажмите снизу подробнее, если у Вас есть такое. Во вкладке «Процессы» найдите процесс под именем Проводник (в Windows 7 он называется explorer.exe). Нажмите на нем правой кнопкой мыши и выберите «Снять задачу«. 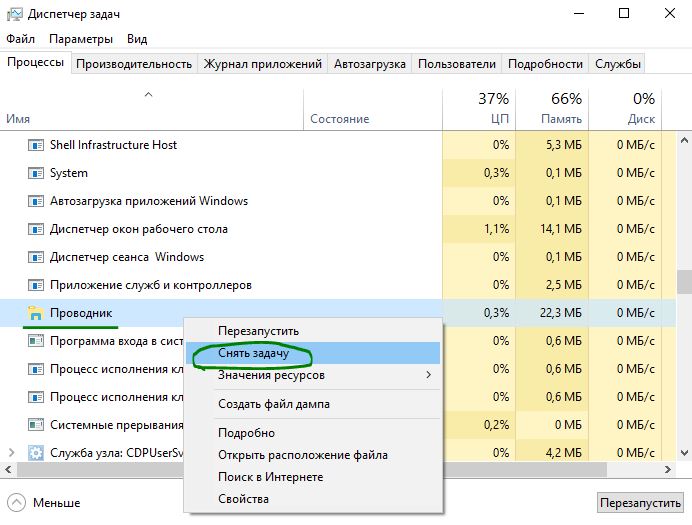
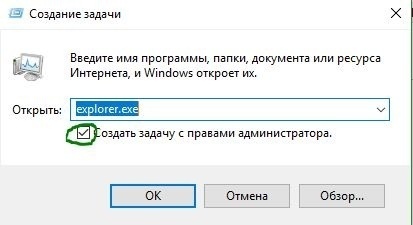
Шаг 2. Далее нажмите сверху на опцию Файл и выберите Запустить новую задачу. В появившимся окошке напишите explorer.exe, поставьте галочку Создать задачу с правами администратора и нажмите OK. В некоторых случаях, пользователи описывает, что проделовали запуск процесса несколько раз, чтобы исправить ошибку.
4. Вставить папку Dekstop
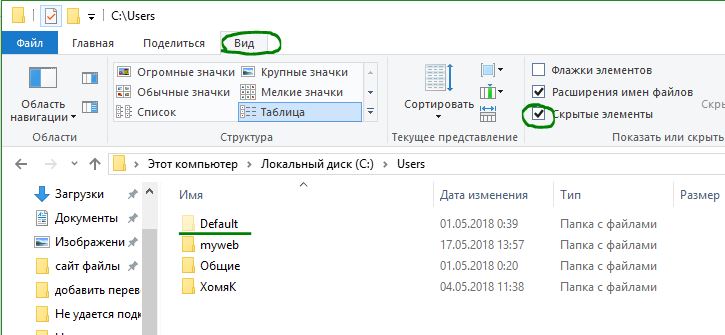
Шаг 1. Откройте «этот компьютер», если не можете с помощью курсора мышки, то нажмите на клавиатуре Win + E. Перейдите C:\User и включите Скрытые элементы нажав на вкладку Вид. Далее Вы увидите папку Default, зайдите в нее и скопируйте папку Dekstop, нажав правой кнопкой мыши по ней, если мышка не работает, то нажмите на клавиатуре кнопку контекстного меню, с правой стороны между AltCtrl и Ctrl.
Шаг 2. После того как Вы скопировали папку Dekstop, перейдите по следующему пути C:\Windows\System32\config\systemprofile и вставьте папку Dekstop в каталог systemprofile. Перезагрузите компьютер или ноутбук, именно перезагрузите, а не выключить и включить.

5. Выполнить чистую установку windows 10
Если ошибка «C:\windows\system32\config\systemprofile\desktop недоступен» появляется после первого проделанного пункта, то имеет смысл установить windows 10 с нуля. Windows 10 вы можете скачать с официального сайта Майкрософт и записать сразу, как ISO образ на флешку для установки или воспользоваться программами для создания загрузочной флешки .
6. Переустановить загрузочные файлы
Возможная причина недоступности рабочего стола — это поврежденные загрузочные файлы. Таким образом, Вы можете восстановить их с помощью командной строки из среды восстановления. Здесь вы найдете идеальный способ — как восстановить главную загрузочную запись (MBR) . Если обнаружу еще способы решения новой ошибки в windows 10, то обязательно сообщу вам. Успехов!
How to sync your Windows 10 Desktop, Documents, and more to Dropbox

Windows 10 by default always creates a group of default folders (Desktop, Documents, Downloads, Music, Pictures, and Videos) on every new account to help you keep your files neatly organize by category. The only issue is that unless you don’t manually make a backup, your files won’t be protected, and you can lose them at any time.
However, if you’re a Dropbox user and you want to keep saving your files in the same default locations, you can redirect the default folders to your cloud storage account and keep your files constantly backed up and accessible across devices.
In this Windows 10 guide, we’ll walk you through the steps to move your default account folders to Dropbox to keep your files protected and always backed up in the cloud.
How to move default users to Dropbox
- Open File Explorer.
Navigate the following path:
Quick Tip: You can always use the Windows key + R to open the Run command, type %HOMEPATH%, and click OK to open the current home folder location.
Inside the newly created folder, create a folder for each location you want to sync to Dropbox. For example, if you’re planning to move the Documents folder, then create a new Documents folder inside Dropbox.

Right-click Documents and select Properties.
Click the Move button.
Click the Select Folder button, and you’ll notice that the default location path has now changed.
You’ll be asked to move any file from the old to the new location. Click Yes to continue.
The last thing left to do is to repeat the steps to move the remaining folders, including Desktop, Downloads, Pictures, Music, and Videos to the new Dropbox location.
We always tend to download a lot of files from the internet that we use once and then never again. If you don’t keep anything interesting in the Downloads folder, you may want to skip moving it to Dropbox, as it’ll be a waste of space, and most of the time you can download those files again as needed.
If you change your mind or you’ll no longer be using Dropbox, you can use the following steps to revert the changes.
- Open Dropbox using File Explorer.
- Inside Dropbox, open the folder that has all the folders you want to restore to their old location.
- Right-click a folder and select Properties.
- Click the Location tab.
- Click the Restore Default button.
- Click Apply.
You’ll be asked to recreate the original folder in the old location. Click Yes to continue.
Click Yes to confirm that you’ll be moving the folder and its files from the old to the original location.
Wrapping things up
While there are a number of other ways you can use to backup your files, you’ll find a few good advantages using Dropbox. You’ll be able to keep your files constantly backed up in the cloud automatically, and if you have the same set up on your other devices, files will always be synchronized and organized across those devices. And you’ll even be able to access your Desktop files using any web browser through Dropbox.com.
In addition, you’ll be eliminating file duplication problems, and apps designed to save files to the default locations will now save directly to Dropbox without additional configuration.
Although anyone with a Dropbox account can do this — even those with a free account — keep in mind that storage can fill up quickly, which means that those with a Dropbox Pro account will get the most benefits. Of course, if you happen to have a Dropbox Business or Enterprise account, you will take advantage of the unlimited storage.
If you don’t use Dropbox, remember that you can do the same thing using OneDrive.
More Windows 10 resources
For more help articles, coverage, and answers on Windows 10, you can visit the following resources:
![]()
The Dell XPS 15 is our choice for best 15-inch laptop
For a lot of people, a 15-inch laptop is a perfect size that offers enough screen for multitasking, and in a lot of cases, some extra performance from powerful hardware. We’ve rounded up the best of the best at this size.
![]()
Halo: MCC’s live service elements make it better, not worse
Halo: The Master Chief Collection is more popular than ever, but some fans don’t agree with the live service approach 343 Industries has taken with it. Here’s why those elements are, at the end of the day, great for the game and for Halo overall.
![]()
Microsoft’s Surface Duo is not ‘failing up’
Microsoft announced this week that it was expanding Surface Duo availability to nine new commercial markets. While Surface Duo is undoubtedly a work in progress, this is not a sign of a disaster. It’s also doesn’t mean that Surface Duo is selling a ton either. Instead, the reason for the expansion is a lot more straightforward.
![]()
These are the best PC sticks when you’re on the move
Instant computer — just add a screen. That’s the general idea behind the ultra-portable PC, but it can be hard to know which one you want. Relax, we have you covered!


