- How to Disable Live Taskbar Thumbnail Previews in Windows 10
- Method 1: Turn off peeking visual effects from the system advanced settings
- Method 2: Increase the user interface hover time in the registry
- Windows 10 disable taskbar preview
- Asked by:
- Question
- All replies
- How to enable or disable Taskbar Thumbnail Preview in Windows 10
- Enable or Disable Taskbar Thumbnail Preview in Windows 10
- 1] Using Group Policy editor
- 2] Enable/Disable taskbar thumbnail preview in Windows 10 using Windows Registry
- 3] Using system advanced settings
- Related Posts
- Apps keep pinning themselves on startup to the taskbar
- How to show Taskbar in Full-Screen mode on Windows 10
- How to Restart or Reset Windows 10 Taskbar
- [email protected]
How to Disable Live Taskbar Thumbnail Previews in Windows 10
As first seen in Windows 7, thumbnail previews let you have a peek on the tasks on your taskbar. By hovering the mouse on a task on the taskbar, a thumbnail preview pops up and shows what is running on the selected application. The hover time is predefined, and the default is set to half a second. By hovering on the thumbnail that pops up, you can be able to sneak a peek of what is running on task window without actually going to the task. This has been a handy feature that lets you view tasks easily and still get to your current task easily.
This is not to be confused with Aero Peek that helps your get a peek of your desktop by hovering your mouse on the far right corner of the taskbar. The two are somewhat related and in Windows 7, turning off Aero Peek could turn off the taskbar thumbnail previews too. In Windows 10 however, the live thumbnail preview is activated by the ‘Peek’ feature.
However, this feature seems to be a nuisance to some users who would rather quickly switch to the task. When the mouse hovers over a task accidentally, the peek feature can also be annoying. This article will show you how you can disable live taskbar thumbnail previews with the methods below.
Method 1: Turn off peeking visual effects from the system advanced settings
The peeking feature is a visual effect that can be turned off from the systems settings. To do this:
- Press Windows Key + X to open the shortcuts menu
- Go to system
- On the right hand side choose “system info” from the bottom. Then choose Advanced System Settings
- In the Advanced Tab, find the Performance section and click on ‘Settings’
- In the visual effects tab Uncheck “Enable Peek“
- Click ‘Apply’ then ‘OK’.

Method 2: Increase the user interface hover time in the registry
Hover times are specific to users unless set in the group policy. By setting an extremely high user interface hover time in the current user registry, the peeking feature will never have enough time to ever appear.
- Open notepad
- Copy and paste the registry entry below
Windows Registry Editor Version 5.00
- The dword value 000186a0 is a hexadecimal value that translates to 100,000 seconds in decimal values, so your mouse hover gesture will wait for 100,000 seconds before displaying the taskbar live thumbnail.
- In your notepad window, go to file > ‘save as’
- Save the file to your desktop as ExtendedTime.reg
- Go to the file you created on the desktop and right click it and run as administrator
- You will get a warning about altering the registry, click ‘yes’ to continue
- If you are asked if you wish to merge your registry file, click yes to successfully add the registry entry
- Restart your PC
NOTE: Please take backup of your registry settings before modifying it. see steps (here)
Windows 10 disable taskbar preview
This forum has migrated to Microsoft Q&A. Visit Microsoft Q&A to post new questions.
Asked by:
![]()
Question
![]()
![]()
Those previews drive me crazy when I am working on multiple items. Long ago I found a registry fix which worked:
In
HKEY_CURRENT_USER\Software\Microsoft\Windows\CurrentVersion\Explorer\Advanced
Add
ExtendedUIHoverTime
I used a value of 5000 milliseconds which was a useful 5 second delay for me. That no longer has any effect so I tried the maximum suggested value of 30000 milliseconds, again with no effect.
A new search reveals another registry fix:
In:
HKEY_CURRENT_USER\SOFTWARE\Microsoft\Windows\CurrentVersion\Explorer\Taskband
Add
NumThumbnails.
By default, it has a value of 0, which should be what I want to get rid of them completely.
This also has absolutely no effect.
Does anyone know what is going on and a current working method to slow these things down or get rid of them (I am still using 1803).
All replies
![]()
![]()
I tested to modify the registry key on my side and successfully to delay the time.
So please check the following point.
Make sure you login system with administrator account.
Make sure the base is «Decimal» for ExtendedUIHoverTime key.
Make sure you sign-out and sign-in again to take the modification into effect.
Please remember to mark the replies as answers if they help.
If you have feedback for TechNet Subscriber Support, contact tnmff@microsoft.com.
![]()
![]()
You can do the same via Group Policy:
In Start Search and type in gpedit.msc and hit the Enter Key.
User Configuration – Administrative Templates – Start Menu and Taskbar
In the right-hand pane, double-click on Turn off taskbar thumbnails and choose the Enabled radio button.
S.Sengupta,Microsoft MVP Windows and Devices for IT, Windows Insider MVP
![]()
![]()
I just tried 29999 instead of 30000 (both decimal) and still no effect at all. I am using an admin account and as in my previous attempts I always did sign out/in or restart. As I said before the hover time did work in the past leaving me wondering what has changed.
This machine is on Windows 10 Home so no Group Policy Editor by default (although I know it can be unofficially installed).
![]()
![]()
To make sure there is no corruption system file on your system, please run the following command line as administrator, then check the sympton again.
DISM.exe /Online /Cleanup-image /Restorehealth
Please remember to mark the replies as answers if they help.
If you have feedback for TechNet Subscriber Support, contact tnmff@microsoft.com.
![]()
![]()
Please remember to mark the replies as answers if they help.
If you have feedback for TechNet Subscriber Support, contact tnmff@microsoft.com.
![]()
![]()
No change — the problem is still there.
I forgot to mention before that this is on one laptop only with which the thumbnail (only) appears instantly.
On my other PCs with the settings already suggested it has always been OK. I get the caption only appearing in a few seconds to be replaced about 5 seconds later (if I keep hovering) by the thumbnail.
They are all running 1803 (64 bit).
![]()
![]()
If all other Windows 10 1803 devices run well without thumbnail problem, I recommend to check if the corrupt one have same system version with others. Please run «winver» to check the system build. If they have not a same system build, try to update this computer. If they have same system build, make sure there is no corruption system files on this device by running the command line I posted upper. Or try to restore or reset this computer to check the issue. (Reset will not affect your personal data).
If you have any concerns, please contact with me directly.
Please remember to mark the replies as answers if they help.
If you have feedback for TechNet Subscriber Support, contact tnmff@microsoft.com.
![]()
![]()
I have exactly the same issue in 2020 on a new laptop with Windows 10 Home. I’ve tried all the usual advice, it just doesn’t work. I often see the same useless advice which assumes the error is corrupted files or whatever. People seem to have trouble believing that it might simply be that Windows itself is flawed and has this stupid issue.
It baffles me that anyone could find these thumbnail previews useful in any way. But okay, maybe some people do. But to not provide a way to TURN THEM OFF is utterly asinine and infuriating. And do the developers take it personally that people want to turn them off? Does this make them mad? Is that why, APPARENTLY, they prevented previously functional solutions from working any more? I also have Windows 10 Pro on my desktop and I can’t disable them on there either. This issue regularly drives me mad. I occasionally make another effort to search for a solution so here I am.
There are even 3rd party tools which promise to disable thumbnail previews. They don’t work either. Maybe they once did and Microsoft have since changed something to break them. It seems that it is very very important that we are not allowed to disable these stupid little boxes which pop up and obscure part of our screen.
How to enable or disable Taskbar Thumbnail Preview in Windows 10
Taskbar Thumbnail Preview is one of the most useful and interesting features offered by Windows 10. This feature displays a tiny preview in the form of a small thumbnail image of the open windows programs when you hover over the application icon on the taskbar.
By default, the taskbar thumbnail preview on Windows 10 is enabled and it has a predefined hover time – basically set to half a second. When the user hovers on the thumbnail that pops up, he/she can sneak-peek of what is running on the task window without going to the running program.
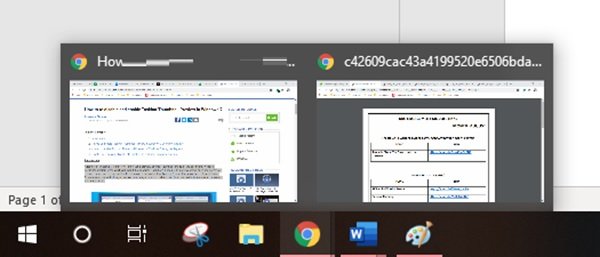
For example, if two Google Chrome windows are open and you hover your mouse cursor over the application icon on the taskbar, it will pop-up 2 tiny previews of each of your Google Chrome windows. This gives you a small snapshot of the open windows and lets you select the one you wish to activate. We have shown an example of this feature in the image below:
Unquestionably, this feature has been very handy, but for some users, it proved out to be a nuisance. This is because of the increased number of accidents that occur when the mouse hovers over a task and opens an unwanted program fortuitously. This is one reason many users prefer to even disable this feature.
In this blog, we shall discuss both, how to enable and disable this feature on Windows 10.
Enable or Disable Taskbar Thumbnail Preview in Windows 10
There are three different ways to disable or enable taskbar thumbnail preview on Windows 10:
- Using Group Policy editor
- Using Windows Registry
- Using system advanced settings
Let’s look at these three methods in more detail.
1] Using Group Policy editor
Follow these steps to Disable Taskbar Thumbnail Preview in Windows 10 using Group Policy Editor:
1] Go to the ‘Start Menu’ and type ‘gpedit.msc’ and hit ‘Enter’
2] On the local group policy editor navigate to ‘User Configuration > Administrative Templates > Start Menu and Taskbar’
3] On the ‘Standard’ tab appearing on the bottom of the interface, locate ‘Turn off Taskbar Thumbnails’ and double click on it.
4] Select ‘Disable’ and apply the changes. This will disable thumbnail images on the taskbar.
You can now check your Taskbar; it would not show the Taskbar Thumbnails Preview.
To enable the Taskbar Thumbnail Previews, feature again, select the ‘Enable’ option in step 4.
2] Enable/Disable taskbar thumbnail preview in Windows 10 using Windows Registry
We mentioned that Taskbar Thumbnail Previews work on a predefined hover time. Increasing the hover time will ensure that this feature’s peeking function is delayed, which means it will not have enough time to ever appear. You can do this by making a quick edit to the Windows Registry, follow these steps:
1] Click ‘Start’ and enter ‘Regedit’ in the search field.
2] Click on the ‘Yes’ button when the User Account Control prompts you to agree to allow this program to make changes.
3] Now, navigate to the following Registry key:
4] On the right-pane, create a new DWORD (32-bit) and name it ‘ExtendedUIHoverTime’
5] Once the value is created, double-click on it, and further click on the ‘Decimal’ option.
6] In the Value data field enter the delay time.
Please note – For every second you wish to delay you need to add 1000. So, if you want a 30-second delay you should enter 30000 into this field as shown in the below example.
7] Press ‘Ok’ to save changes and close the Registry Editor.
Now, reboot your system to put these changes into effect. Taskbar Thumbnail Previews would not appear until the specified time (30000ms) has elapsed.
Please note – Improperly modifying the Windows Registry can cause Windows malfunction and Windows may not operate correctly. Also, please take a backup of your registry settings before modifying it. This guide shows the different ways to Backup and Restore the Registry.
3] Using system advanced settings
Taskbar Thumbnail Previews is a peeking feature which is a kind of visual effect on Windows. This visual effect can be turned on or off from the system’s settings. Follow these steps:
1] Press ‘Win + X’ to open the Windows shortcuts menu.
2] Click on ‘System’
3] On the ‘System’ settings page, click on the ‘system info’ option appearing on the right-hand side.
4] Now select ‘Advanced System Settings’.
5] In the ‘Advanced’ tab, locate the ‘Performance’ and click on ‘Settings’.
6] In the ‘Visual effects’ tab, locate the ‘Enable Peek’ option.
7] To enable the Taskbar thumbnail previews, check the box, while to disable it, uncheck the box.
8] Click ‘Apply’ and then hit ‘OK’ to save the changes.
The Peek feature is amazing when you need to keep a track of what is happening on your system, mainly when you have a million things open during a busy day. We hope this guide lets you disable/enable at your own convenience and need.
If you need any help using this tutorial or following the steps, please feel free to get in touch with us by dropping a comment in the comments section below.
Date: September 1, 2020 Tags: Taskbar, Thumbnails
Related Posts
Apps keep pinning themselves on startup to the taskbar
How to show Taskbar in Full-Screen mode on Windows 10
How to Restart or Reset Windows 10 Taskbar
[email protected]
Ankit Gupta is a writer by profession and has more than 7 years of global writing experience on technology and other areas. He follows technological developments and likes to write about Windows & IT security. He has a deep liking for wild life and has written a book on Top Tiger Parks of India.


